Table of Contents
Advertisement
Quick Links
LGEUA_KD250(DKS-7500Q)_ENG_MFL37200117
DVD KARAOKE SYSTEM
OWNER'S MANUAL
MODEL : DKS-7500Q
USB
Please read this manual carefully before operating your set.
Retain it for future reference.
Designs and specifications are subject to change without
notice for improvement.
Internet address ; http://ua.lge.com
Customer Information Center LG ; (380-44) 490-7777, 8-800-303-0000
(DKS-7500)
R
CD - R/RW
Advertisement
Table of Contents

Subscribe to Our Youtube Channel
Related Manuals for LG DKS-7500Q


Summary of Contents for LG DKS-7500Q
- Page 1 CD - R/RW Please read this manual carefully before operating your set. Retain it for future reference. Designs and specifications are subject to change without notice for improvement. Internet address ; http://ua.lge.com Customer Information Center LG ; (380-44) 490-7777, 8-800-303-0000...
-
Page 2: Safety Precautions
Safety Precautions CAUTION concerning the Power Cord CAUTION Most appliances recommend they be placed upon a dedi- RISK OF ELECTRIC SHOCK DO NOT OPEN cated circuit; That is, a single outlet circuit which powers only that appliance WARNING: TO REDUCE THE RISK and has no additional outlets or branch circuits. -
Page 3: Table Of Contents
Table of Contents Introduction Operation with Audio CD and MP3/WMA File ..18 Playing an Audio CD and MP3/WMA File ... 18 Safety Precautions....... 2 Pause . -
Page 4: Before Use
Before Use Playable Discs Disc-related terms Title (DVD only) The main film content or accompanying feature content or additional feature content, or music album. (8 cm / 12 cm disc) Each title is assigned a title reference number enabling Audio CD you to locate it easily. -
Page 5: Precautions
Before Use Cleaning discs About Symbols Fingerprints and dust on the disc can cause poor pic- ture quality and sound distortion. Before playing, clean About the symbol display the disc with a clean cloth. Wipe the disc from the cen- ter out. -
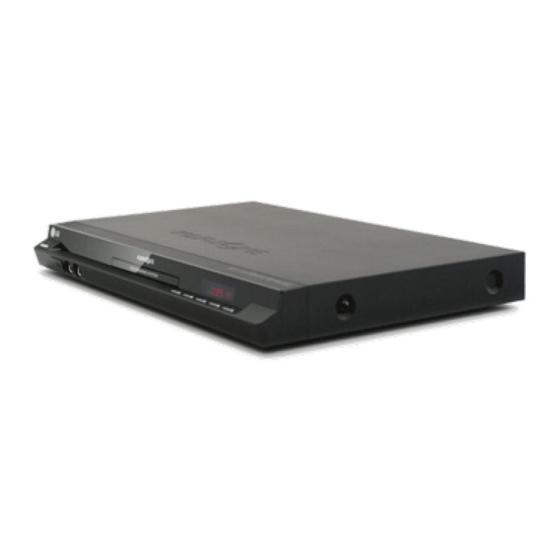
Page 6: Front Panel And Rear Panel
Front Panel and Rear Panel POWER ( / Switches the player ON and OFF. OPEN/CLOSE(Z) Opens or closes the disc tray. Display window Shows the current status of the player. Disc Tray STOP ( x ) Insert a disc here. Stops playback. -
Page 7: Remote Control
Remote Control POWER button • DVD button POWER • USB button NUMERIC buttons (0-9) • PROGRAM button • CLEAR button • AUDIO button • MALE button • SOUND button • FEMALE button ARROW buttons ( (For use in highlighting a selection on a TITLE and PROGRAM CLEAR MENU... -
Page 8: Connections
Connections SCART connection Tips Connect the EURO AV OUTPUT (TO TV) socket on the Depending on your TV and other equipment you wish DVD Player to the corresponding in jacks on the TV to connect, there are various ways you could connect using the scart cable (T). -
Page 9: Connecting To Optional Equipment
Connections Connecting to Optional Equipment Analog connection to a multi-channel A/V receiver with 6 Channel connector (Dolby Digital, DTS) Connecting to an amplifier equipped with two This DVD Player contains a multi-channel decoder. This channel analog stereo or Dolby Pro Logic ll/ enables playback of DVDs recorded in Multi-channel Pro Logic Surround without the need for an optional decoder. -
Page 10: Before Operation
Before Operation Mini Glossary for Audio Stream & Sound Mode Surround mode You can enjoy surround sound simply by selecting one of the pre-programmed sound fields according to the program you want to listen to. When DVD is inserted Allows you to enjoy 5.1(or 6) discrete channels of high You can change the Digital Audio Output mode by quality digital audio from DTS program sources such as discs, DVD and compact discs, etc.bearing the trademark. -
Page 11: General Explanation
Before Operation General Explanation Example: On-Screen Display during playing DVD This manual gives basic instructions for operating the DVD Karaoke. Some DVDs require specific operation Items Selection Method or allow only limited operation during playback. Title Number When this occurs, the symbol appears on the TV , Numbers or 1 / 3... -
Page 12: Initial Settings
Before Operation Initial Settings DISPLAY DISPLAY By using the Setup menu, you can make various adjust- TV Aspect 16 : 9 ments to items such as picture and sound. You can also Display Mode Widescreen set a language for the subtitles and the Setup menu, Progressive Scan among other things. -
Page 13: Audio
Before Operation AUDIO 5. Use to select the desired speaker. 6. Adjust options using buttons. Each DVD disc has a variety of audio output options. 7. Press SELECT/ENTER to confirm your selection. Set the player’s AUDIO options according to the type of Returns to the previous menu. -
Page 14: Lock (Parental Control)
Before Operation LOCK (Parental Control) Password (Security Code) You can enter or change password. LOCK 1 Select Password on the LOCK menu then press Rating Unlock 2 Follow step 2 as shown left (Rating). “Change” or Password **** Area Code “New”... -
Page 15: Others
Before Operation Operation with DVD OTHERS Playing a DVD OTHERS Playback Setup DivX(R) Registration Select Turn on the TV and select the video input source connected to the unit. Audio system: Turn on the audio system and select the input source connected to the unit. Press Z OPEN/CLOSE button to open the disc tray. -
Page 16: General Features
Operation with DVD General Features Slow Motion 1 Press PAUSE/STEP on the remote control during playback. The player will enter PAUSE mode. Unless stated otherwise, all operations described use 2 Use the to select the required speed: t 1/2, the remote control. Some features may also be t 1/4, t 1/8 or t 1/16 [(backward) - DVD only] or available on the Setup menu. -
Page 17: Zoom
Operation with DVD General Features (continued) Special DVD Features Zoom Checking the contents of DVD Video discs: Menus The Zoom function allows you to enlarge the video image and to move through the enlarged image. DVDs may offer menus that allow you to access special 1 Press ZOOM during playback or still playback to acti- features. -
Page 18: Operation With Audio Cd And Mp3/Wma File
Operation with Audio CD and MP3/WMA File Playing an Audio CD and MP3/WMA Repeat Track/All/Off You can play a title/chapter/all/track on a disc. file 1 Press REPEAT when playing a disc. The repeat icon The unit can play audio CD and MP3/WMA. appears. -
Page 19: Operation With Jpeg Disc
Operation with JPEG Disc Viewing a JPEG disc Slide Show JPEG to highlight the (Slide Show) This unit can play discs with JPEG files. Before playing then press SELECT/ENTER. JPEG recordings, read the notes on JPEG Recordings on right. Moving to another File Insert a disc and close the tray. -
Page 20: Programmed Playback
Programmed Playback The Program function enables you to store your favorite tracks from any disc in the player memory. A program can contain 99 tracks (Audio CD) or 300 tracks (MP3/WMA). Insert a disc. Repeat Programmed Tracks You can play a title/chapter/all/track on a disc. Audio CD and MP3/WMA Discs: 1 Press REPEAT when playing a disc. -
Page 21: Operation With Divx Disc
Operation with DivX Disc The unit can play the DivX files. DivX disc compatibility with this player is limited as follows: Insert a disc and close the tray. The DivX menu appears on the TV screen. • Available resolution size of the DivX file is under 720x576 (W x H) pixel. -
Page 22: Operation With Karaoke
Operation with KARAOKE You can play KARAOKE(singing along) with CD by connecting a microphone to the unit. You can enjoy KARAOKE with a stereo-recorded disc, even if it is a non-karaoke disc, by reducing the singer’s voice. Karaoke Basic Playback Karaoke Advanced Playback Check if the system is connected. -
Page 23: Karaoke Menu Playback
Operation with KARAOKE Karaoke MENU Playback Reserving the Songs When you want to make a reservation of next melody, Preparation you can enjoy the most 8 melodies reservation Press MENU on the karaoke mode. without waiting. The main MENU appears on the screen. Main MENU (On the TV screen) Press the NUMERIC buttons to reserve melody number you want in the karaoke disc... -
Page 24: Music List
Operation with KARAOKE MUSIC LIST ( SINGER LIST ( 1 Select and select the initial LOCAL SONG ( ) and POP of the singer you want by pressing the the SONG LIST and SINGER LIST menu, and SONG ( press SELECT/ ENTER. Select by pressing the on the main menu. - Page 25 Operation with KARAOKE COMPOSER LIST ( CLASSIC ( 1 Select and select the initial Select by pressing the of the composer you want by pressing the , and press SELECT/ ENTER in the LOCAL in the CLASSIC LIST and COMPOSER LIST menu, SONG, POP SONG and CLASSIC menu.
-
Page 26: Random
Operation with KARAOKE RANDOM ( Select number you want by pressing press SELECT/ ENTER. Sing along with the accompaniment. Select by pressing the main menu. Repeat step 4~5. Change the team of red team or blue team alternately. When reaching the targeted winning number, the will be shown on the TV screen. -
Page 27: Language Code List
Language Code List Use this list to input your desired language for the following initial settings: Disc Audio, Disc Subtitle, Disc Menu. Language Code Language Code Language Code Language Code Abkhazian 6566 Finnish 7073 Macedonian 7775 Slovenian 8376 Afar 6565 French 7082 Malagasy... - Page 28 Troubleshooting / Specifications Check the following guide for the possible cause of a problem before contacting service. Possible Cause Correction Symptom • The power cord is disconnected. • Plug the power cord into the wall outlet No power. securely. The power is on, but •...
Need help?
Do you have a question about the DKS-7500Q and is the answer not in the manual?
Questions and answers