Advertisement
Limited Warranty Statements
1. Warranty
Lockey Digital Systems Inc. . (hereafter "LDS") warrants the Product to be free
from defects in material and workmanship for a period of 12 months
from the original date of purchase.
If you discover a defect in the Product covered by this warranty, we will repair or
replace the item at our option, using new or refurbished components.
2. Exclusions
This warranty covers defects in manufacturing discovered while using the
Products as recommended by LDS rather than occurred by the act of God,
and damages caused by misuse, abuse, and unauthorized modi cation.
3. Limited of Liability
LDS will not be held liable for incidental or consequential losses or damages
to any act of God.
4. Reminder
Service requirement shall be subject to the presentation of this warrant card
and defective parts to the manufacture LDS.
The warranty card will not be reissued if lost.
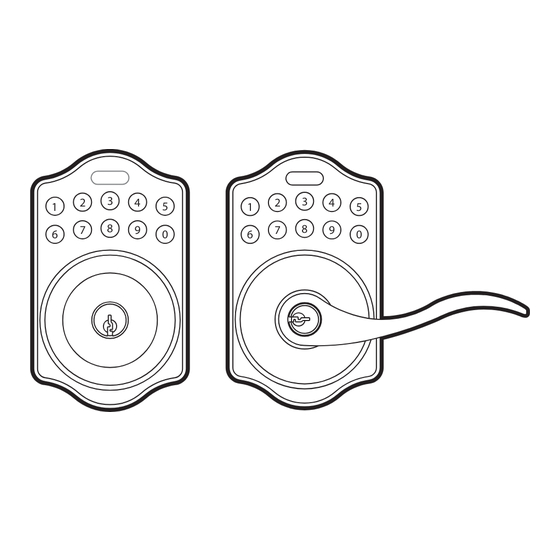
Product : KEYPAD ELECTRONIC KNOB & LEVER LOCK
Purchase Date :
Name & Address of Distributor :
LOCKEY DIGITAL SYSTEMS INC.
Mt. Pleasant Michigan
(989) 773-2363
www.lockeyusa.com
3
3
2
4
2
4
1
5
1
5
8
8
7
9
7
9
6
0
6
0
USER MANUAL
Attention : Do not use power tools
Advertisement
Table of Contents

Related Manuals for LOCKEY E-DIGITAL


Summary of Contents for LOCKEY E-DIGITAL
- Page 1 Limited Warranty Statements 1. Warranty Lockey Digital Systems Inc. . (hereafter “LDS”) warrants the Product to be free from defects in material and workmanship for a period of 12 months from the original date of purchase. If you discover a defect in the Product covered by this warranty, we will repair or replace the item at our option, using new or refurbished components.
-
Page 2: Install Latch
KEYPAD ELECTRONIC LEVER & KNOB 3. Identify Door Handing INSTALLATION INSTRUCTION Face the door from outside, the door is left handed if the hinge is on the left-hand side of the door, whereas the door is right handed if the hinge is on the right-hand side of the door. -
Page 3: Install Strike
7. Install Inside Mounting Plate 5. Install Strike Mounting Pass the IC wire through the wire hole on the Plate mounting plate and fix the mounting plate with screws. If outside lock assembly is lopsided, IC wire please loosen the screws to adjust it's position and tighten the screws again. - Page 4 Follow the same steps to remove interior lever and exchange the position of inside and outside levers. E-DIGITAL b. Remove the cylinder from lever and insert it into opposite lever. Then install the levers and make sure the small hole on the neck of lever aligns over the catch perfectly.
- Page 5 Speci cation / Function 6.User Code 6-1 The preset User Code is 1234. Please delete it and create a new one during rst 1.Power operation. 6-2 Up to 6 sets of User Codes can be saved. 6V, four AA 1.5 v Alkaline batteries.
- Page 6 lockset Pass Code & Function Set up 12.Unlock the The lockset will be unlocked by key or pressing the User Code on keypad from the outside or by the interior turn-button. 1. The Lockset must be in the unlocked position while programming. 2.
-
Page 7: Function Programming
Function Programming Programming Code (PC) Programming Code (PC) USER Code (UC) USER Code (UC) Add New User Code Toggle Mute On/O E-DIGITAL E-DIGITAL E-DIGITAL E-DIGITAL Enter PC Enter New UC Enter PC E-DIGITAL Remark : Remark : Repeat same steps to turn sound On/O .
Need help?
Do you have a question about the E-DIGITAL and is the answer not in the manual?
Questions and answers