Table of Contents
Advertisement
Advertisement
Table of Contents

Related Manuals for Honda HRC215


Summary of Contents for Honda HRC215
- Page 1 HONDA Power 1 Equipment Owner’s Manual Rotary Mower HRC215...
-
Page 3: Important Notice
Honda HRC215 mowers meet CPSC blade safety requirements for walk-behind rotary mowers. Honda HRC215 mowers are not factory-equipped with spark arresters. In some areas, it is illegal to operate an engine without a USDA qualified spark arrester. Check local laws and regulations before operation. An optional spark arrester is available from authorized Honda lawn mower dealers. -
Page 4: Table Of Contents
CONTENTS 1. SAFETY ... Safety Label Locations..Safety Information. Important Message to Parents ... 2. COMPONENT IDENTIFICATION ......3. - Page 5 7. MOWING RECOMMENDATIONS 8.TRANSPORTING ........32 9.
-
Page 6: Safety
1. SAFETY SAFETY LABEL LOCATIONS Read all safety instructions before operating the mower. UNDER NORMAL USAGE, THIS BAG MATERIAL IS SUBJECT TO DETERIORATION AND WEAR, AND SHOULD BE CHECKED FREDUENTLY FOR BAG REPUGEMENT. THIS BAG CONFORMS TO A.N.S.I. STANDARD 871.1, ANY REPLACEMENT MUST MEET THIS STANDARD. -
Page 7: Safety Information
Operator Responsibility Know how to stop the engine quickly in case of emergency. Understand the use of all controls. Be sure that anyone who operates the lawn mower receives proper instruction. Allowing without proper instruction Wear long pants and protective footwear. Operating the mower while barefoot or wearing sandals will increase the risk of injury. - Page 8 Always empty the grass bag when you’ve finished mowing, even if it’s not full. Stored lawn clippings are a fire hazard. Honda HRC215 mowers are not factory-equipped is illegal in some areas to operate an engine without a USDA qualified spark arrester.
-
Page 9: Important Message To Parents
Be honest1 Anyone who takes unnecessary risks and doesn’t obey rules should not operate this lawn mower. If you decide that your son or daughter can handle the mower safely, CAREFULLY READ THE OWNER’S MANUAL with your youngster. -
Page 10: Component Identification
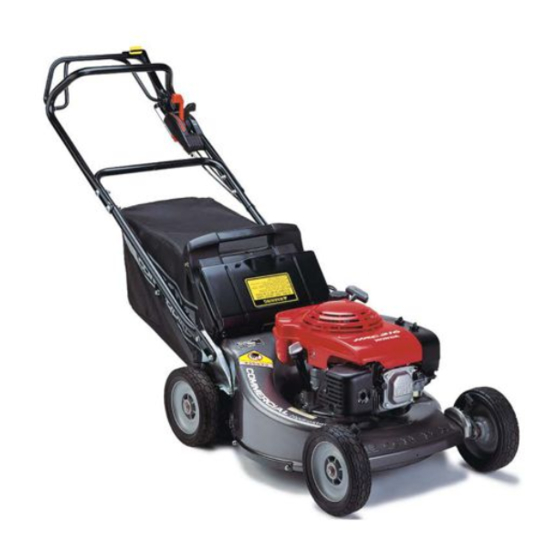
2. COMPONENT IDENTIFICATION ROTO-STOP LEVER ROTO-STOP BUTTON THROTTLE LEVER GRASS RAG CUTTING HEIGHT ADJUSTMENT LEVER CUTTING HEIGHT ADJUSTMENT LEVER CUTTER DECK... -
Page 11: Recoil Starter
CARBURETOR Record the frame and engine serial numbers for your reference. Refer to the serial numbers when ordering parts, and when making technical or warranty inquiries (see page 55). Frame serial number: MZAN- Engine serial number: GJAB- 2. COMPONENT IDENTIFICATION RECOIL STARTER AIR CLEANER FUEL VALVE... -
Page 12: Controls
3. CONTROLS FUEL VALVE The fuel valve opens and closes the connection between the fuel tank and the carburetor. The fuel valve must be in the ON position for the engine to run. When the mower is not in use, turn the fuel valve to the OFF position to prevent the possibility of carburetor flooding, and to reduce the possibility of fuel leakage Gasoline... -
Page 13: Roto-Stoplever
RDTO-STOP LEVER The ROTO-STOP lever operates the blade brake/clutch mechanism. It is used to start and stop the blade. To put the blade into operation, press the button on top of the ROTO-STOP lever, then push the lever forward and hold it against the handlebar. Releasing the ROTO-STOP lever will stop the blade Operate the ROTO-STOP lever with a quick and complete motion, so the blade drive is always either fully engaged or stopped. -
Page 14: Cutting Height Adjustment Levers
3. CONTROLS CUTTING HEIGHT ADJUSTMENT The blade can cause serious injury. Stop the engine before adjusting cutting height. There are five cutting height settings: 1 in (2.8 cm), l-1/2 in (4.1 cm), 2 in (5.3 cm), 2-l/2 in (6.5 cm), and 3 in (7.7 cm). -
Page 15: Attachments
Honda HRC215 mowers are provided with a grass bag as standard equipment. You can operate the mower with the grass bag (or optional hard-shell grass catcher) installed to collect the grass clippings, or with the grass bag removed (or optional side-discharge chute installed) if you wish to leave the grass clippings on the lawn. -
Page 16: Hard-Shell Grass Catcher (Optional)
4. ATTACHMENTS A hard-shell grass catcher, and a side-discharge chute, are available from authorized Honda lawn mower dealers. They attach to the cutter deck in place of the standard grass bag. HARD-SHELL GRASS CATCHER (optional) SIDE-DISCHARGE CHUTE (optional) SIDE DISCHARGE... -
Page 17: Pre-Operation Check
When the blade needs sharpening or replacement, take the lawn mower to an authorized Honda lawn mower dealer. Or, if you have a torque wrench, you can remove and install the blade yourself (see page 44). -
Page 18: Grassbag
5. PRE-OPERATION CHECK GRASS BAG Check that the grass bag is in good condition and not clogged. A clogged grass bag will not collect grass efficiently. When the bag needs cleaning, wash it with a garden hose, and allow it to dry thoroughly before use;... -
Page 19: Engineoil
ENGINE OIL Check the engine oil level with the engine stopped and the mower on surface. 1. Remove the oil filler cap, and wipe the dipstick clean. 2. Insert the dipstick into the oil filler neck, but do not screw it in. 3. -
Page 20: Fuel
FUEL Fuel tank capacity: 0.26 US gal (1.0 PI Remove the filler cap and check the fuel level. Refill the tank if the fuel level is low. Refuel carefully to avoid overfilling or spilling fuel. There should be no fuel in the filler neck. Gasoline explode, causing... -
Page 21: Gasolines Containing Alcohol
This is no cause for concern. If spark knock or pinging occurs at a steady engine speed, under normal load, change brands of gasoline If spark knock or pinging persists, see an authorized Honda lawn mower dealer. tMPcWrANT NOTtCE pinging can cause engine damage. -
Page 22: Air Cleaner
5. PRE-OPERATION CHECK AIR CLEANER Check that the air filter is clean and in good condition. A dirty air filter will restrict air flow to the carburetor, reducing engine performance A damaged air filter will allow dirt to enter the engine, causing rapid engine wear. 1. -
Page 23: Cutting Height
5. PRE-OPERATION CHECK CUTTING HEIGHT Check the cutting height settings, and make any necessary adjustments (see page 12). Set all four adjusting levers to the same cutting height position, The blade can cause serious injury. Stop the engine before adjusting cutting height. ADJUSTING LEVERS... -
Page 24: Operation
STARTING THE ENGINE If you run the engine in an area that is confined, or even partially enclosed, the air can become contaminated with a dangerous amount of exhaust gas. Exhaust contains pois- onous carbon monoxide, and odorless gas. Breathing consciousness and can cause loss of may lead to death. - Page 25 3. Operate the starter. NOTE: Always release the ROTO-STOP lever before starting the engine If the blade drive is engaged, extra effort will be required to operate the starter. Place your foot on the step of the cutter deck. Pull the starter grip lightly until you feel resistance, then pull briskly.
-
Page 26: Throttle Lever
4. When the engine warms up, move the throttle lever away from the CHOKE position. Set the lever in FAST ( b ) position for mowing, or in SLOW ( -1 idling. NOTE: If restarting a warm engine in the CHOKE position, move the throttle lever away from CHOKE as soon as the engine starts. -
Page 27: Mower Operation
MOWER OPERATION To mow, set the throttle lever in the FAST ( @ 1 position, button on top of the ROTO-STOP lever, then move the ROTO-STOP lever forward and hold it against handlebar. The blade will turn while the ROTO-STOP lever is held forward. NOTE: For best grass cutting bagging performance, and to avoid stalling the engine, always mow with... - Page 28 6a OPERATiON If the mower tilts or overturns, will increase the risk of injury from blade contact and debris. For your safety, keep all four wheels on the ground, and be careful not to lose your footing Keep a firm grip on the handlebar, and walk, never run, with the mower. Be very careful when mowing uneven or rough ground.
-
Page 29: Stopping The Engine
STOPPING THE ENGINE 1. Release the ROTO-STOP lever. 2. Move the throttle lever to the STOP position. When the mower is not in use, turn the fuel valve to the OFF position to prevent the possibility of carburetor flooding, and to reduce the possibility of fuel leakage Gasoline is extremely flammable, and gasoline vapor can... -
Page 30: High Altitude Operation
If you always operate the mower at altitudes higher than 6,000 feet above sea level, have an authorized Honda lawn mower dealer perform this carburetor modification. Even with carburetor modification, engine horsepower will decrease about 3.5%... -
Page 31: Mowing Recommendations
If tall grass is reduced in height a little at a time, and is allowed to recover between mowings, the grass will be healthier, and the lawn mower will work better and will leave a better lawn finish. For good mowing conditions, the grass should be relatively dry, but the ground should not be so dry that the mower stirs up a lot of dust. - Page 32 7. MOWING RECOMMENDATIONS For best results, start at the outer edges of the lawn, and work toward the center in a clockwise direction. If you use the standard grass bag, or the optional hard-shell grass catcher, a clockwise mowing pattern, starting at the outer edges of the lawn, will give the best bagging performance, leaving the least amount of clippings...
- Page 33 If the grass is not very thick or tall, you can mow a wide swath. Keep the wheels close to the swath line for maximum cutting width. If the grass is very thick or tall, cutting a wide swath may slow or stall the engine, clog the cutter deck, and cause poor bagging performanca For thick or tall grass, cut a narrower swath, and/or push the mower more slowly.
-
Page 34: Transporting
8. TRANSPORTING The engine and exhaust system become hot during operation and remain hot for a while after stopping. can cause bums and can ignite some materials. touching the engine or exhaust system for at least 15 minutes after the Avoid engine has stopped. -
Page 35: Maintenance
Fuel line NOTE: Ill Service‘more (2) These items should be serviced by an authorized Honda lawn mower dealer, unless you have the proper tools and are mechanically (3) For professional commercial usa log hours of operation to determine pmper maintenance intervals. -
Page 36: Engine Oil Change
9. MAINTENANCE ENGINE OIL CHANGE Engine oil capacity: 0.63 US qt (0.6 PI Drain the oil while the engine is warm to assure rapid and complete draining. 1. Place suitable container under the cutter deck to catch the used oil. NOTE: Check to be sure the drain hole in the cutter deck is not clogged. -
Page 37: Filler Cap
3. Install the oil drain bolt and tighten it securely. 4. Fill with the recommended oil (see page 17) to the upper level on the dipstick. Do not overfill. 5. Install the filler cap/dipstick. 6. Wipe the cutter deck drain channel clean to reduce dirt build-up when the mower is used. -
Page 38: Air Cleaner Service
9. MAINTENANCE AIR CLEANER SERVICE A dirty air filter will restrict air flow to the carburetor, reducing engine performance. If you operate the mower in very dusty areas, clean the air filter more often than specified in the MAINTENANCE SCHEDULE (see page 34). 1 IMPORTANT NOTlCE air filter, will cause rapid engine Remove the two cover screws, then remove the air cleaner cover. - Page 39 9. MAINTENANCE ELEMENT AIR FILTER FOAM ELEMENT...
-
Page 40: Spark Plug Service
9. MAINTENANCE SPARK PLUG SERVICE Recommended spark plugs: NGK BPRBES 1 IMPORTANT NOTICE engine damage. For good performance, the spark plug must be properly gapped and free of deposits. Disconnect the spark plug cap, and remove any dirt from around the spark plug area. -
Page 41: Spark Arrester Maintenance (Optional Equipment)
SPARK ARRESTER MAINTENANCE The spark arrester must be serviced every 100 hours to keep it functioning as designed. Touching burns. Let the engine cool before servicing. 1. Remove the two nuts from the muffler shield, using a 10 mm wrench. 2. -
Page 42: Roto-Stop Cable Adjustment
NOTE: When mowing, check that the ROTO-STOP lever operates properly. If the blade does not start or stop as it should, and lever free play is correctly adjusted, take the mower to an authorized Honda lawn mower dealer for repair. 314-l (20-25 in. -
Page 43: Throttle Cable Adjustment
THROTTLE CABLE ADJUSTMENT When the throttle lever is moved to the position, choke arm should move all the way counterclockwise, as far as it will go. Push the choke arm with your finger to check that it moved as far as it will go. If adjustment is necessary, loosen the throttle control cable lock nuts with a 10... -
Page 44: Carburetor Adjustment
9. MAINTENANCE CARBURETOR ADJUSTMENT 1. Start the engine outdoors, and allow it to warm up to normal operating temperature Exhaust contains and odorless gas. Breathing may lead to death. To keep exhaust gas from building up, provide adequate ventilation. 2. Set the throttle lever in the SLOW (e 3. -
Page 45: Grass Bag Cleaning And Replacement
GRASS SAG CLEANING When the bag needs cleaning, wash it with a garden hose, and allow it to dry completely before use; a wet grass bag will clog quickly. Replace a frayed, torn, or deteriorated bag with a Honda replacement bag or its equivalent. -
Page 46: Blade Removal And Installation
BLADE REMOVAL AND INSTALLATION When the blade needs sharpening or replacement, take the lawn mower to an authorized Honda lawn mower dealer. Or, if you have a torque wrench, you can remove and install the blade yourself. Wear heavy gloves to protect your hands. -
Page 47: Torque Wrench
3. Tighten the blade bolts with a torque wrench. Use the blade from turning when tightening the bolts. If you do not have a torque wrench, have an authorized Honda lawn mower dealer tighten the blade bolts. Blade bolt torque: ROTO-STOP 36.2-43.4... -
Page 48: Storage
10. STORAGE Preparation for Storage When the mower will not be used for one month or longer, proper storage preparation will help to prevent rust and corrosion, and will make it easier to start the engine when the mower is removed from storage. 1. - Page 49 4. For prolonged storage, perform these additional steps: For storage of 1 or 2 months: For storage of 1 or 2 months, be sure the fuel tank is full. If partially filled, air in the tank will promote fuel oxidation and deterioration, resulting in bad fuel that may cause hard starting.
-
Page 50: Storage
10. STORAGE For storage of more than 2 months d. Disconnect the fuel line from the fuel valve, and drain the fuel tank into an approved gasoline container. Gasoline explode, causing serious injury or death. Use extreme gasoline. KEEP OUT OF REACH OF CHILDREN. a Remove the carburetor drain bolt, using a 10 mm wrench. -
Page 51: Removal From Storage
Cover the mower to keep out dust. NOTE: Plastic sheets should not be used as dust covers; they trap moisture under the covers, promoting rust and corrosion. -2’ Removal from Storage Check all items described in the PRE-OPERATION CHECK section of this manual (pages 15-211. -
Page 52: Troubleshooting
11. TROUBLESHOOTING ENGINE ENGINE WlLL NOT SWIT 1. Check control Fuel valve OFF. positiona Throttle lever in wrong oosition. 2. Check fuel. out of fuel. Sad fuel; mower stored without treating or draining gasoline or refueled with bad gas. 3. Remove and inspect Spark plug faultv. - Page 53 GRASS CUlTlNG POOR CUT QuALlTY ORPOORCUlllNG PERFORMANCE 1. Check that throttle FAST lever is in ) position. 2. Reduce forward speed. 3. Check cutting height adjustment laws. 4. Check grass bag. 5. Check cutter deck and blade GRASS BAGGING POOR GRASS VIBRATION EXCESSIVE 11.
-
Page 54: Specifications
12. SPECIFICATIONS MOWER MODEL HRC215PXA Overall Lenath Width at cutter deck Maximum Height (cutting height adjusted to 3 in; 7.7 cm1 Minimum Height (cutting height adiusted to 1 in: 2.6 cm) Dry Weight Grass Bag Capacitv Cutting Width Cutting Height (adjustable) ENGINE Engine Model... -
Page 55: Wiring Diagram
IGNITION COIL PLUG ’ ’ 13. WIRING DIAGRAM... - Page 56 MEMO...
-
Page 57: Warranty Service
Owner Satisfaction Your satisfaction and goodwill are important to your dealer and to us. All Honda warranty details are explained in the Distributor’s Limited Warranty. Normally, .’ any problems concerning,the product will be handled by your dealer’s service department. If you have a warranty problem that has not been handled to your satisfaction, we suggest you take the following action: Discuss your problem with a member of the dealership management. - Page 58 When you write or call, please provide the following information: • Model and serial numbers • Name of the dealer who sold the Honda power equipment to you • Name and address of the dealer who services your equipment •...
- Page 60 31VB5BOO lPMlll6006912 00X31-VB5BOOO PRINTED IN U.S.A.
Need help?
Do you have a question about the HRC215 and is the answer not in the manual?
Questions and answers