Advertisement
Advertisement
Table of Contents

Related Manuals for Radio Shack In/Out Thermometer with Indoor Humidity Gauge


Summary of Contents for Radio Shack In/Out Thermometer with Indoor Humidity Gauge
- Page 1 In/Out Thermometer with Indoor Humidity Gauge...
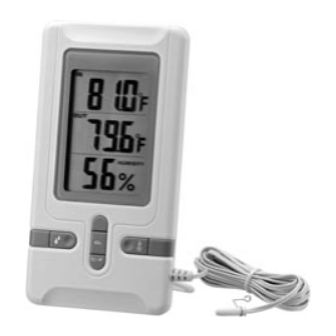
- Page 2 ˆ Features Your RadioShack In/Out Thermometer with Indoor Humidity Gauge is designed to accurately read and display the indoor and outdoor temperature and indoor rela- tive humidity. You can mount the ther- mometer on a wall for easy viewing. 3-Line LCD Display — displays the in- door relative humidity and the indoor and outdoor temperatures in Celsius or Fahr- enheit.
- Page 3 it, or replaced its batteries. Minimum and Maximum Indoor Rela- tive Humidity Readings — let you recall the highest and lowest indoor humidity the thermometer recorded since the last time you reset it, or replaced its batteries. Temperature Compensation — assures accurate indoor relative humidity mea- surement, unaffected by temperature changes.
-
Page 4: Installing/Replacing Batteries
ˆ A Quick Look at Your Thermometer 3-Line LCD Display Memory Reset Battery Compartment Removable Stand ˆ Preparation INSTALLING/REPLACING BATTERIES Your thermometer/hygrometer requires two AA batteries (not supplied) for power. For the longest life and best perfor- A Quick Look at Your Thermometer... - Page 5 mance, we recommend RadioShack al- kaline batteries. Cautions: • Use only fresh batteries of the required size and recommended type. • Do not mix old and new batteries, different types of batteries (standard, alkaline, rechargeable), rechargeable batteries of different capacities. 1.
- Page 6 All the segments of the display screen appear briefly, then the out- door/indoor temperatures and indoor relative humidity appear. 3. Replace the cover. If the display appears weak or the ther- mometer does not work properly, replace the batteries. Cautions: •...
-
Page 7: Choosing A Mounting Location
CHOOSING A MOUNTING LOCATION Choose locations for the thermometer and the attached outdoor sensor within 10 feet of each other, where you can eas- ily route the outdoor sensor’s cord out- side (near a window, for example). You can place the thermometer on a lev- el surface (such as a desktop or counter) using the supplied stand, or you can mount it on a wall. -
Page 8: Attaching The Stand
You can also use a pass-through tube to route the cord through a wall. Cautions: • The outdoor sensor is permanently attached to the thermometer. Do not try to remove it. • Avoid routing the outdoor sensor’s cord where it could be pinched or cut. - Page 9 2. Insert the tabs in the matching slots on the thermometer’s base until they snap into place. Note: Make sure the flat side of the base faces the front of the thermometer. To remove the stand, gently pull it away from the unit.
- Page 10 the back of the thermometer to mount the thermometer on a wall. Keyhole Screw Slot Outdoor Sensor Wire Bracket 1. Mark the position of the screw hole. 2. In the marked location, drill a hole slightly smaller than the wood screw. Caution: Be careful not to drill into any objects behind the wall.
-
Page 11: Mounting The Outdoor Sensor
3. Using a screwdriver, drive the screw into the wall, letting the head extend inch from the wall. 4. Align the keyhole slot on the back of the thermometer with the screw head, then carefully push the ther- mometer onto the screw head and slide it down into place. - Page 12 1. Mark the position of the screw hole. 2. In the marked location, drill a hole slightly smaller than the nail or screw. Caution: Be careful not to drill into any objects behind the wall. 3. Slide the wire bracket off the outdoor sensor.
-
Page 13: Changing The Degree Format
ˆ Operation OUTDOOR/INDOOR TEMPERATURE The thermometer automatically displays the outdoor temperature ( ) in the first line and the indoor temperature ( ) in the second line. Note: If the outdoor temperature rises above 158°F (70°C) or falls below –58°F (–50°C), the thermometer displays in the first line. -
Page 14: Indoor Humidity
To change the degree format, repeatedly press on the back of the thermome- °C °F ter to toggle to the desired degree format. INDOOR HUMIDITY The thermometer automatically displays indoor humidity in the third line. When the indoor relative humidity rises above 70 , appears, indicating ex- cess moisture in the air. - Page 15 temperatures and indoor humidity it re- corded since you last reset it, or replaced the batteries. To recall the stored maximum and mini- mum temperatures and humidity: 1. Press to recall the maxi- MEMORY mum ( ) indoor and outdoor tem- peratures indoor humidity...
- Page 16 Note: If you do not press MEMORY again, the information appears for about 5 seconds, Then the display returns to the current temperature and humidity. 4. To clear the minimum/maximum memory and reset it to the current temperature, hold down MEMORY about two seconds.
- Page 17 ˆ Care Keep the thermometer dry; if it gets wet, wipe it dry immediately. Use and store the thermometer only in normal tempera- ture environments. Handle the thermom- eter carefully; do not drop it. Keep the thermometer away from dust and dirt, and wipe it with a damp cloth occasional- ly to keep it looking new.
-
Page 18: Specifications
ˆ Specifications Power ....3V with Two AA Batteries Temperature Operating Range: Main Unit .... 23° to 122° F (–5° to 50° C) Outdoor External Probe ... –58° to 158° F (–50° to 70° C) Relative Humidity Operating Range ........25 to 95 Temperature Compensation Range ........ - Page 19 Dimensions (HWD) ....5 Inches (142 24 mm) Specifications are typical; individual units might vary. Specifications are subject to change and improvement without notice. Specifications...
- Page 20 Limited One-Year Warranty This product is warranted by RadioShack against manufacturing defects in material and workmanship under normal use for one (1) year from the date of purchase from Ra- dioShack company-owned stores and authorized RadioShack franchisees and dealers. EXCEPT AS PROVIDED HEREIN, RadioShack MAKES NO EXPRESS WARRANTIES AND ANY IMPLIED WARRANTIES, INCLUDING THOSE OF MERCHANTABILITY AND FITNESS FOR A PARTICULAR PURPOSE, ARE LIMITED IN DURATION TO THE DU- RATION OF THE WRITTEN LIMITED WARRANTIES CONTAINED HEREIN.
Need help?
Do you have a question about the In/Out Thermometer with Indoor Humidity Gauge and is the answer not in the manual?
Questions and answers