Table of Contents
Advertisement
Available languages
Available languages
Advertisement
Chapters
Table of Contents

Related Manuals for TOTALINE P340-2220


Summary of Contents for TOTALINE P340-2220
-
Page 1: Programmable Thermostat
P340-2220 Commercial Programmable Thermostat OWNER’S GUIDE 570-227 62-0289EFS-01... -
Page 2: Table Of Contents
CONTENTS Features ................Main Screen Selections and Display ........ Programming Heating and Cooling Schedule ....Operating the Thermostat ..........Replacing Batteries ............14 Reading Outdoor Temperature ......... 18 Reading Remote Indoor Temperature ......17 Advanced Settings ............24 Frequently Asked Questions and Answers ...... 28 Limited Two-Year Warranty .......... -
Page 3: Features
FEATURES • Large, Clear Display with Backlighting—current temperature, set temperature and time are easy-to-read and all are displayed on the main screen. • Menu Driven Programming—Provides guidance through the scheduling process, showing only necessary information and choices on each screen. •... -
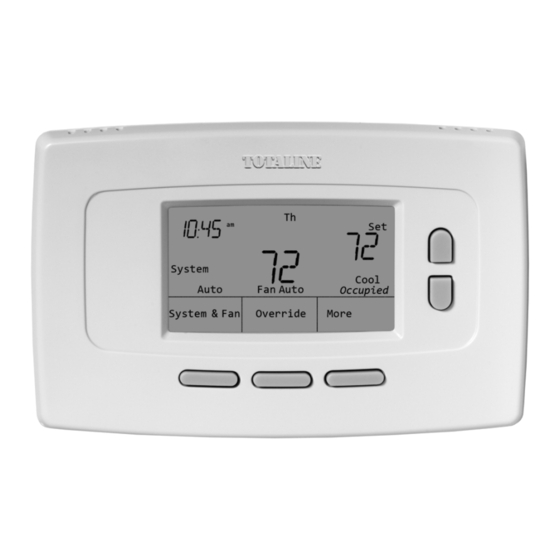
Page 4: Main Screen Selections And Display
Main Screen Selections and Display CURRENT DAY OF THE WEEK TEMPERATURE SETTING CURRENT TIME CURRENT SYSTEM SETTING INDICATES THERMOSTAT IS “CALLING FOR COOL OR HEAT” CURRENT FAN SETTING M13913 570-227 62-0289EFS—01... -
Page 5: Programming Heating And Cooling Schedule
Programming Heating and Cooling Schedule IMPORTANT Keep in mind that the up and down keys change the flashing number or word. When multiple items are flashing, changes affect only one of the items. The thermostat can control up to four different schedule periods per day: Occupied1—Work arrival time. - Page 6 Editing Schedule 1. Press MORE. 2. Press PROGRAM. 3. Press EDIT. 4. Use The Up and Down keys to change the flashing day. 5. Select any combination of days. NOTES: — Selected days schedule identical temperatures and times. — Be sure to select all days desired before pressing NEXT.
- Page 7 7. Use the Up and Down keys to change the flashing schedule period. DAYS SELECTED HEAT OR COOL TEMPERATURES SCHEDULE PERIOD UP AND DOWN KEYS CHANGES TIME AND TEMPERATURES DONE KEY ADVANCES TO TIME SETTING SCREEN AND GO BACK KEY HOME SCREEN GOES BACK TO NEXT KEY...
- Page 8 NOTES: — Pressing DONE will save all of the changes that have been made. — To exit scheduling without saving the current changes, press CANCEL. If that option is not available, press GO BACK until CANCEL is available. 10. When complete, press DONE.
-
Page 9: Operating The Thermostat
Setting Time 1. Press MORE. 2. Press TIME. 3. Use arrows to set current time. 4. Press DONE. IMPORTANT The current day of the week should already be set correctly. If not, see the Advanced Installation Instructions to set the day. M13917 Operating the Thermostat Setting “System &... - Page 10 SETTING FAN Fan selections vary based on the HVAC system type. ON—fan runs continuously. Use this setting for improved air circulation or for more efficient central air cleaning. AUTO—fan is controlled by the system. Typically, the fan runs only during cooling or heating operation.
- Page 11 NOTE: The ability to change settings remains for approximately seven seconds. Once neither the temperature nor the time continue to flash, you must restart at step 1 to make changes. 4. Use the Up and Down keys to set the desired time for the thermostat to resume the programmed schedule.
- Page 12 OVERRIDE Changes temperature setting until the next period takes effect. For use during Unoccupied periods. 1. Press OVERRIDE. The override settings default to those contained in the next Occupied period. NOTE: Changes are limited to those allowed by the lockout level. 2.
- Page 13 5. Use the Up and Down keys to change the number of days desired for the thermostat to override the schedule. 6. Press DONE. NOTE: During a holiday, the word “Holiday” flashes. 7. To cancel the Holiday Override early, press CANCEL. NOTE: When the number of Holiday Override days expires, the screen shows “Following Schedule”...
-
Page 14: Replacing Batteries
Replacing Batteries With proper power and connections, the thermostat does not require batteries. Thermostats with batteries provide a warning when the batteries run low. This warning flashes on the main screen for approximately 30 days. NOTES: — If batteries are not replaced when Low Battery warning is flashing, the LO batt screen displays continuously and... - Page 15 Replace the batteries as follows: 1. Remove the thermostat WALL from the base by pulling it straight out. 2. Install two new AA alkaline batteries with proper polarization. NOTES: — Always use AA alkaline batteries. — All programming (Schedule, Date and Time) information is retained during battery replacement.
- Page 16 3. Place the thermostat back on BATTERIES (2) BATTERY HOLDER its base: a. Align the terminal screw blocks with the pins on the back of the thermostat. b. Push the thermostat straight onto the base. NOTES: — After two minutes, the device automatically returns to the main screen.
-
Page 17: Reading Remote Indoor Temperature
Reading Remote Indoor Temperature If connected to an installed remote REMOTE INDOOR indoor temperature sensor, the TEMPERATURE READING thermostat displays the indoor temperature from the remote sensor(s). NOTE: When connected to an installed remote indoor temperature sensor, the thermostat internal sensor is not used. -
Page 18: Reading Outdoor Temperature
Reading Outdoor Temperature If connected to an outdoor sensor, the thermostat displays the Outside temperature. VIEW OUTSIDE TEMPERATURE The Outside temperature is located in the middle of the main screen. If it is not on the main screen, view the outdoor temperature by pressing MORE until the outside temperature shows. - Page 19 Keys Locked LOCK SYMBOL INDICATES KEYPAD LOCKOUT Some key control can be fully or partially locked. When the thermostat displays the lock symbol, key control is either fully or partially locked. NOTE: In order to change the key lock setting, the user must have details beyond the scope of this document.
- Page 20 PARTIAL LOCKOUT 1 This mode locks all keys except HOLIDAY, OVERRIDE, Up and Down. Standard procedures are used to incorporate the temporary changes made with these keys. See the Setting Temperature Overrides section for details. PARTIAL LOCKOUT 2 This mode locks all keys except HOLIDAY and OVERRIDE: —...
- Page 21 Temperature Recovery The thermostat is equipped with a feature to eliminate guesswork when setting a schedule. That is, the user need not know the amount of time for the HVAC system to bring the space to temperature (without overshoot) prior to the scheduled time.The thermostat manages that automatically.
- Page 22 Setting Calendar This thermostat is designed to, under normal use, automatically keep the current time and day in the memory for up to ten years once the calendar is set. There are two ways to set the calendar for this thermostat: SETTING CALENDAR WHEN THERMOSTAT IS FIRST POWERED When first powered, the thermostat proceeds through a sequence of screens to set the calendar.
- Page 23 SETTING CALENDAR AFTER THERMOSTAT IS ALREADY FACTORY FUNCTIONING SETTING SETUP See the Steps (1 through 4), in NUMBER CHANGE the Advanced Settings section, FACTORY to set year, month and day. SETTING GO BACK KEY DONE KEY GOES BACK TO ADVANCES TO TIME SETTING LAST SETTING SCREEN AND HOME SCREEN NEXT KEY...
-
Page 24: Advanced Settings
Advanced Settings The thermostat has many advanced settings to match the HVAC system. For more information on these advanced settings, refer to the Advanced Installation Instructions. These settings can be adjusted to match specific needs: 1. From the main screen, press SYSTEM &... - Page 25 Step 1. User Setup Number 0120: First Two Digits of Current Calendar Year. To change the current setting, use the Up and Down keys. Options: 20 — for years 20xx. 21 — for years 21xx. Step 2. User Setup Number 0130: Last Two Digits of Current Calendar Year.
- Page 26 Step 4. User Setup Number 0150: Current Calendar Date. To change the current setting, use the Up and Down keys. Options: 1 through 31 — for first of a month to 31 of a month. Step 5. User Setup Number 0160: Schedule Options. To change the current setting, use the Up and Down keys.
- Page 27 Step 8. User Setup Number 0540: Number of Programmable Periods per Day. To change the current setting, use the Up and Down buttons. Options: 2 — 2 periods per day. 4 — 4 periods per day. Step 9. User Setup Number 0640: Time Format. To change the current setting, use the Up and Down buttons.
-
Page 28: Frequently Asked Questions And Answers
Frequently Asked Questions and Answers Q: When making changes, the wrong setting is being changed; Why? A: Whatever is flashing on the screen is the item that the up and down buttons affect. Q: The keys (some or all) do not work; why not? A: Thermostat is locked. -
Page 29: Limited Two-Year Warranty
Limited Two-Year Warranty TWO-YEAR WARRANTY—This CARRIER CORPORATION product is warranted to be free from defects in material and workmanship under normal use and maintenance for a period of two years from the date of original installation. A new or remanufactured part to replace the defective part will be provided without charge for the part itself, through a qualified servicing CARRIER CORPORATION dealer or service, provided the defective part is returned to our distributor. - Page 30 Model No. Unit Serial No. Date of Installation Installed by Name of Owner Address of Installation 570-227 62-0289EFS—01...
-
Page 31: Customer Assistance
CUSTOMER ASSISTANCE If you have any questions about the operation of your thermostat, please go to www.Totaline.com 570-227 62-0289EFS—01... - Page 32 ® U.S. Registered Trademark 570-227 62-0289EFS—01 M.S. 11-08...
- Page 33 Thermostat programmable commercial P340-2220 MODE D'EMPLOI 570-227...
- Page 34 TABLE DES MATIÈRES Caractéristiques ................35 Affichage et sélections à l'écran principal .......... 36 Programmation de l'horaire de chauffage et de refroidissement ..37 Fonctionnement du thermostat ............42 Remplacement des piles ..............47 Lecture de la température ambiante à distance ........ 50 Lecture de la température extérieure ..........
-
Page 35: Caractéristiques
CARACTÉRISTIQUES • Grand écran clair et rétroéclairé - affiche la température ambiante, la température de consigne et l'heure en caractères faciles à lire; ces renseignements figurent tous à l'écran principal. • Programmation assistée par menu - guide l'utilisateur tout au long de la programmation de l'horaire, en indiquant seulement l'information et les choix utiles à... -
Page 36: Affichage Et Sélections À L'écran Principal
Affichage et sélections à l'écran principal JOUR EN COURS POINT DE CONSIGNE HEURE EN COURS DE LA TEMPÉRATURE RÉGLAGE ACTUEL DU SYSTÈME INDIQUE QUE LE THERMOSTAT DEMANDE DE LA CHALEUR RÉGLAGE ACTUEL OU DU FROID DU VENTILATEUR MF13913 570-227 62-0289EFS—01... -
Page 37: Programmation De L'horaire De Chauffage Et De Refroidissement
Programmation de l'horaire de chauffage et de refroidissement IMPORTANT Se rappeler que les flèches vers le haut ou vers le bas font changer le chiffre ou le mot qui clignote. Lorsque plusieurs éléments clignotent, les modifications n'affectent qu'un seul d'entre eux. Le thermostat offre jusqu'à... - Page 38 Modification de l'horaire 1. Appuyer sur le bouton MORE. 2. Appuyer sur le bouton PROGRAM. 3. Appuyer sur EDIT. 4. Utiliser les flèches vers le haut ou vers le bas pour modifier le jour qui clignote. 5. Sélectionner les jours dont il faut modifier l'horaire.
- Page 39 7. Utiliser les flèches vers le haut ou vers le bas pour modifier le programme qui clignote. TEMPÉRATURES JOURS SÉLECTIONNÉS DE CHAUFFAGE OU DE REFROIDISSEMENT PÉRIODE DU PROGRAMME FLÈCHES VERS LE HAUT ET VERS LE BAS MODIFICATIONS DE L’HEURE ET DE LA TEMPÉRATURE TOUCHE DONE PASSE AU RÉGLAGE...
- Page 40 REMARQUES : — Lorsqu'on appuie sur DONE, toutes les modifications apportées sont enregistrées. — Pour quitter le programme sans sauvegarder les modifications, appuyer sur CANCEL. Si cette option n'est pas offerte, appuyer sur GO BACK jusqu'à ce que le choix CANCEL apparaisse à l'écran. 10.
- Page 41 6. Pour apporter des modifications : a. Appuyer sur Edit. b. Passer à l'étape 7 de la section Modification de l'horaire. Réglage de l'heure 1. Appuyer sur le bouton MORE. 2. Appuyer sur le bouton TIME. 3. Se servir des flèches pour régler l'heure en cours.
-
Page 42: Fonctionnement Du Thermostat
Fonctionnement du thermostat Réglage du système et du ventilateur RÉGLAGE DU SYSTÈME Le réglage de la touche SYSTEM (Système) dépend du type de système de chauffage et (ou) de refroidissement. HEAT—Le thermostat commande le fonctionnement du système de chauffage. OFF—Les systèmes de chauffage et de refroidissement sont à l'arrêt. COOL—Le thermostat commande le fonctionnement du système de refroidissement. - Page 43 — Dérogation, et — Congé. MAINTIEN DE LA TEMPÉRATURE JUSQU'À UNE HEURE CHOISIE Maintient la même température jusqu'à l'heure réglée par l'utilisateur ou jusqu'au début de la période suivante : 1. Appuyer sur une flèche ou sur la touche Override. Les mots «TEMPORARY SET» (réglage temporaire) apparaissent à...
- Page 44 4. Appuyer sur les flèches vers le haut ou vers le bas pour régler l'heure à laquelle le thermostat doit reprendre l'horaire prévu. REMARQUE : Le mode de configu- ration par l'installa- teur peut limiter la durée de la déroga- tion à...
- Page 45 CONGÉ Modifie le point de consigne de la température pour un nombre de jours désigné. 1. Appuyer sur le bouton MORE. 2. Appuyer sur le bouton HOLIDAY. La température à l'écran clignote. 3. Utiliser les flèches vers le haut ou vers le bas pour modifier la température souhaitée et la durée du congé.
- Page 46 L'état du ventilateur est affiché à l'écran principal AUTO—le système commande le fonctionnement du ventilateur. ON—Le ventilateur reste en marche sans interruption. Quand le thermostat fait fonctionner le ventilateur, le symbole illustrant une pale de ventilateur apparaît devant le mot FAN pour indiquer que le thermostat fait fonctionner le ventilateur.
-
Page 47: Remplacement Des Piles
Remplacement des piles Lorsque le thermostat est correctement raccordé et alimenté, les piles ne sont pas nécessaires. Les thermostats munis de piles affichent un avertissement pour indiquer que les piles sont faibles. Cet avertissement clignote à l'écran pendant environ 30 jours. REMARQUES : —... - Page 48 Pour remplacer les piles, procéder comme suit : 1. Retirer le thermostat de sa base en tirant droit vers soi. 2. Insérer deux piles alcalines AA en respectant la polarité. REMARQUES : — Il faut toujours utiliser des piles alcalines AA. —...
- Page 49 3. Remettre le thermostat sur sa PILES (2) PORTE-PILES base : a. Faire correspondre le bornier avec les broches au dos du thermostat. b. Repousser le thermostat en ligne droite sur la base. REMARQUES : — Après deux minutes, le thermostat affiche automatiquement l'écran principal.
-
Page 50: Lecture De La Température Ambiante À Distance
Lecture de la température ambiante à distance S'il est raccordé à un capteur de LECTURE DE LA TEMPÉRATURE température ambiante à distance, le AMBIANTE À DISTANCE thermostat affiche la température ambiante relevée par ce capteur à distance. REMARQUE : S'il est raccordé à un capteur de température ambiante à... -
Page 51: Lecture De La Température Extérieure
Lecture de la température extérieure Si un capteur de température extérieure est installé, le thermostat affiche la température extérieure dans le coin inférieur droit de l'écran d'accueil (à l'écran : Out). VOIR LA TEMPÉRATURE EXTÉRIEURE La température extérieure est affichée dans le milieu de l'écran d'accueil (à... - Page 52 Touches verrouillées LE CADENAS INDIQUE QUE LE CLAVIER EST VERROUILLÉ Les commandes de certaines touches peuvent être partiellement ou complètement verrouillées. Lorsque l'écran affiche le symbole représentant un cadenas, cela signifie que les commandes sont partiellement ou entièrement verrouillées. REMARQUE : Pour modifier le réglage du verrouillage, l'utili- sateur doit consulter des renseignements qui ne...
- Page 53 VERROUILLAGE PARTIEL 1 À ce mode, toutes les touches sont verrouillées à l'exception des touches HOLIDAY (congé), OVERRIDE (dérogation) et des flèches vers le haut et vers le bas. Il suffit de suivre le mode normal pour apporter des modifications temporaires aux points de consigne en se servant de ces touches.
- Page 54 Reprise de la température Le thermostat comporte une caractéristique qui évite à l'utilisateur d'avoir à deviner au moment de la programmation. Ainsi, l'utilisateur n'a pas besoin de savoir combien de temps le système de CVCA mettra à atteindre la température ambiante souhaitée (sans la dépasser) avant l'heure prévue.
- Page 55 Réglage du calendrier Une fois le thermostat réglé, l'appareil est conçu pour automatiquement conserver l'heure et la date en mémoire pendant dix ans dans des conditions normales de service. Il existe deux façons de régler le calendrier du thermostat : RÉGLAGE DU CALENDRIER À...
- Page 56 RÉGLAGE DU CALENDRIER APRÈS RÉGLAGES LA MISE EN SERVICE DU DE L’USINE NUMÉRO DE THERMOSTAT CONFIGURATION MODIFIENT Consulter les 1 à 4 de la section LE RÉGLAGE sur les réglages avancées pour DE L’USINE régler l'année, le mois et le jour. TOUCHE GO BACK TOUCHE DONE REVIENT AURÉGLAGE...
-
Page 57: Réglages Avancés
Réglages avancés Le thermostat offre de nombreuses fonctions avancées qu'il faut choisir en fonction du système de chauffage et de refroidissement. Pour plus d'information sur ces réglages avancés, consulter les Directives d'installation complètes. Ces réglages peuvent être ajustés en fonction de besoins particuliers : 1. - Page 58 Étape 1. Numéro de configuration par l'installateur 0120 : Deux premiers chiffres de l'année en cours. Pour modifier le réglage actuel, utiliser les flèches vers le haut et vers le bas. Les choix sont les suivants : 20 — pour l'année 20xx. 21 —...
- Page 59 Étape 4. Numéro de configuration par l'installateur 0150 : Quantième. Pour modifier le réglage actuel, utiliser les flèches vers le haut et vers le bas. Les choix sont les suivants : 1 à 31—pour le premier au 31 jour du mois. Étape 5.
- Page 60 Étape 7. Numéro de configuration par l'installateur 0330 : Heure d'été en service ou non. Pour modifier le réglage actuel, utiliser les flèches vers le haut et vers le bas. Les choix sont les suivants : 0 — Hors service. Le thermostat ne fait pas automatiquement le passage à l'heure d'été. 1 —...
-
Page 61: Foire Aux Questions
Foire aux questions Q: Lorsque j'apporte des modifications, ce n'est pas le bon réglage qui change; pourquoi? R: C'est l'élément qui clignote à l'écran qui est modifié lorsqu'on appuie sur les flèches vers le bas ou vers le haut. Q: La ou les touches (quelques-unes ou toutes les touches) ne fonctionnent pas; pourquoi? R: Le thermostat est verrouillé. -
Page 62: Garantie Limitée De Deux Ans
Garantie limitée de deux ans GARANTIE DE 2 ANS—CARRIER CORPORATION garantit ce produit CARRIER contre tout vice de matière ou de fabrication dans la mesure où il en est fait une utilisation et un entretien convenables et ce, pour une période de deux (2) ans à... - Page 63 des produits CARRIER CORPORATION installés à l’extérieur des États-Unis continentaux, de l’Alaska, d’Hawaï, et du Canada; des coûts d’électricité ou de combustibles ou de la hausse de ces coûts, quelle qu’en soit la raison, y compris une utilisation inhabituelle du chauffage d’appoint; DE TOUT DOMMAGE INDIRECT PARTICULIER, QU’IL SOIT MATÉRIEL OU COMMERCIAL, DE QUELQUE NATURE QUE CE SOIT.
-
Page 64: Services À La Clientèle
SERVICES À LA CLIENTÈLE Pour toute question sur le fonctionnement du thermostat, prière de passer à l'adresse www.Totaline.com ® Marque de commerce déposée aux É.-U. 570-227 62-0289EFS—01 M.S. 11-08... - Page 65 P340-2220 Termostato programable Comercial GUÍA DEL PROPIETARIO 570-227...
- Page 66 CONTENIDO Características ................67 Pantalla y selecciones en la pantalla principal ........ 68 Cómo programar la planificación de calefacción y enfriamiento ..69 Uso del termostato ................73 Reemplazo de baterías ..............78 Lectura remota de temperatura interior ........... 81 Lectura de temperatura exterior ............
-
Page 67: Características
CARACTERÍSTICAS • Pantalla de gran tamaño y claridad, con luz de fondo: la temperatura actual, la temperatura establecida y la hora aparecen en la pantalla principal y son fáciles de leer. • Programación controlada por menús: proporciona orientación a través de un proceso de planificación, en que aparece sólo la información y alternativas necesarias en cada pantalla. -
Page 68: Pantalla Y Selecciones En La Pantalla Principal
Pantalla y selecciones en la pantalla principal DÍA ACTUAL DE LA SEMANA AJUSTE DE TEMPERATURA HORA ACTUAL AJUSTE ACTUAL DEL SISTEMA INDICA QUE EL TERMOSTATO ESTÁ “PIDIENDO FRÍO O CALOR” AJUSTE ACTUAL DEL VENTILADOR MS13913 570-227 62-0289EFS—01... -
Page 69: Cómo Programar La Planificación De Calefacción Y Enfriamiento
Cómo programar la planificación de calefacción y enfriamiento IMPORTANTE Tenga en cuenta que las teclas hacia arriba y hacia abajo cambian el número o palabra que parpadea. Si hay varios elementos parpadeando, los cambios sólo afectan a uno de los elementos. El termostato puede controlar hasta cuatro períodos diferentes de programación al día: Ocupado1: hora de llegada al trabajo. - Page 70 Edición de la planificación 1. Pulse MÁS. 2. Pulse PROGRAMAR. 3. Pulse EDITAR. 4. Use las teclas hacia arriba y hacia abajo para cambiar el día que parpadea. 5. Seleccione las combinaciones de días. NOTAS: — Los días seleccionados planifican temperaturas y horas idénticas.
- Page 71 7. Use las teclas hacia arriba y hacia abajo para cambiar el período de planificación que parpadea. TEMPERATURAS DÍAS SELECCIONADOS DE CALEFACCIÓN O ENFRIAMIENTO PERÍODO DE LA PLANIFICACIÓN TECLAS HACIA ARRIBA Y HACIA ABAJO CAMBIA LA HORA Y LA TEMPERATURA TECLA LISTO AVANZA A LA PANTALLA DE...
- Page 72 NOTAS: — Si pulsa LISTO, guardará todos los cambios realizados. — Para salir de la planificación sin guardar los cambios actuales, pulse CANCELAR. Si esta opción no está disponible, pulse VOLVER hasta que aparezca la opción CANCELAR. 10. Al finalizar, pulse LISTO. En la pantalla aparece “Guardado”...
-
Page 73: Uso Del Termostato
Ajuste de la hora 1. Pulse MÁS. 2. Pulse HORA. 3. Use las flechas para ajustar la hora actual. 4. Pulse LISTO. IMPORTANTE El día actual de la semana debiera estar ajustado correctamente. De no ser así, consulte las Instrucciones de instalación avanzada para ajustar el día. - Page 74 AJUSTE DEL VENTILADOR Las selecciones de ventilador varían de acuerdo con el tipo de sistema de HVAC. ENC: el ventilador funciona en forma continua. Use este ajuste para mejorar la circulación de aire o para una limpieza central más eficaz. AUTO: el sistema controla el ventilador.
- Page 75 3. Pulse SIGUIENTE. NOTA: La capacidad de cambiar ajustes dura aproximadamente siete segundos. Una vez que la temperatura y la hora dejen de parpadear, debe recomenzar con el paso 1 para hacer cambios. 4. Use las teclas hacia arriba y hacia abajo para ajustar la hora deseada a la cual el termostato debe reanudar la...
- Page 76 ANULAR Cambia el ajuste de temperatura hasta que entre en vigencia el siguiente período. Para uso durante períodos desocupados. 1. Pulse ANULAR. Los valores predeterminados de anulación corresponden a los del próximo período ocupado. NOTA: Los cambios se limitan a los que permite el nivel de bloqueo. 2.
- Page 77 5. Use las teclas hacia arriba y hacia abajo para cambiar el número de días que el termostato debe anular la planificación. 6. Pulse LISTO. NOTA: Durante vacaciones, parpadea la palabra “Vacaciones”. 7. Para cancelar antes la anulación de vacaciones, pulse CANCELAR. NOTA: Cuando el número de días de anulación de vacaciones vence, en la pantalla aparece “Siguiendo planificación”...
-
Page 78: Reemplazo De Baterías
Reemplazo de baterías Con la alimentación y las conexiones correctas, el termostato no requiere baterías. Los termostatos con baterías avisan si ellas se están agotando. Este aviso parpadea en la pantalla principal durante unos 30 días. NOTAS: — Si las baterías no se reemplazan cuando parpadea el aviso de batería baja, en la pantalla... - Page 79 Reemplace las baterías del siguiente modo: 1. Retire el termostato desde la base tirando de ella PARED hacia abajo. 2. Instale dos baterías alcalinas AA nuevas, con la polarización correcta. NOTAS: — Siempre use baterías alcalinas AA. — Toda la información de programación (Programa, Fecha y Hora) se retiene...
- Page 80 3. Vuelva a colocar el COMPARTIMENTO BATERÍAS (2) termostato en la base: PARA BATERÍAS a. Alinee los bloques de terminales de rosca con los pasadores de la parte posterior del termostato. b. Presione el termostato directo hacia la base. NOTAS: —...
-
Page 81: Lectura Remota De Temperatura Interior
Lectura remota de temperatura interior Si el termostato se conecta a un LECTURA REMOTA DE sensor remoto de temperatura interior, TEMPERATURA INTERIOR el primero muestra la temperatura interior de los sensores remotos. NOTA: Si el termostato se conecta a un sensor remoto de temperatura interior, no se usa el sensor interno del termostato. -
Page 82: Lectura De Temperatura Exterior
Lectura de temperatura exterior Si el termostato se conecta a un sensor exterior, el primero muestra la temperatura Exterior. VER TEMPERATURA EXTERIOR La temperatura Exterior se localiza en el centro de la pantalla principal. Si la temperatura exterior no aparece en la pantalla principal, puede verla pulsando MÁS hasta que aparezca. - Page 83 Teclas bloqueadas SÍMBOLO DE BLOQUEO INDICA BLOQUEO DEL TECLADO Se puede bloquear total o parcialmente el control de las teclas. Si en el termostato aparece el símbolo de bloqueo, el control de teclas está bloqueado total o parcialmente. NOTA: Para cambiar el ajuste de bloqueo de teclas, el usuario debe averiguar detalles que no se abordan...
- Page 84 BLOQUEO PARCIAL 1 Este modo bloquea todas las teclas, excepto las de VACACIONES, ANULAR y hacia arriba/hacia abajo. Se usan procedimientos estándar para incorporar los cambios temporales realizados con estas teclas. Para conocer más detalles, consulte la sección Setting Temperature Overrides. BLOQUEO PARCIAL 2 Este modo bloquea todas las teclas, excepto las de VACACIONES y ANULAR: —...
- Page 85 Recuperación de temperatura El termostato está equipado con una función que permite eliminar las conjeturas al fijar una planificación. Es decir, el usuario no tiene que saber la cantidad de tiempo que tarda el sistema de HVAC en llevar el área a la temperatura (sin excederse) antes de la hora programada.
- Page 86 Ajuste del calendario En condiciones normales, este termostato está diseñado para mantener automáticamente la hora y el día actuales en su memoria por hasta diez años una vez que se ajusta el calendario. Existen dos maneras de ajustar el calendario de este termostato: AJUSTE DEL CALENDARIO LA PRIMERA VEZ QUE SE ENCIENDE EL TERMOSTATO Cuando se encienda el termostato por primera vez, aparecerá...
- Page 87 AJUSTE DEL CALENDARIO UNA AJUSTE DE VEZ QUE EL TERMOSTATO YA SE FÁBRICA NÚMERO DE ENCUENTRA FUNCIONANDO CONFIGURACIÓN CAMBIO DEL Consulte los pasos del 1 al 4 AJUSTE DE de la sección Advanced FÁBRICA Settings para ajustar el año, el mes y el día.
-
Page 88: Ajustes Avanzados
Ajustes avanzados El termostato cuenta con muchos ajustes avanzados que corresponden al sistema de HVAC. Consulte las Instrucciones de instalación avanzada para obtener más información sobre estos ajustes avanzados, los cuales se pueden modificar para que satisfagan sus necesidades específicas: 1. - Page 89 Paso 1. Número de configuración de usuario 0120: Primeros dos dígitos del actual año calendario. Para cambiar el ajuste actual, use las teclas hacia arriba y hacia abajo. Opciones: 20: para los años 20xx. 21: para los años 21xx. Paso 2. Número de configuración de usuario 0130: Últimos dos dígitos del actual año...
- Page 90 Paso 4. Número de configuración de usuario 0150: Actual fecha calendario. Para cambiar el ajuste actual, use las teclas hacia arriba y hacia abajo. Opciones: 1 al 31: para el primer día de un mes al día 31 de un mes. Paso 5.
- Page 91 Paso 7. Número de configuración de usuario 0330: Horario de verano activado o desactivado. Para cambiar el ajuste actual, use los botones hacia arriba y hacia abajo. Opciones: 0: desactivado. La hora del termostato no se ajusta automáticamente al horario de verano. 1: activado.
-
Page 92: Preguntas Y Respuestas Frecuentes
Preguntas y respuestas frecuentes Q: Si se hacen cambios, se cambia el ajuste incorrecto, ¿por qué? A: Los botones hacia arriba y hacia abajo controlan el elemento que parpadea en la pantalla. Q: Las teclas (algunas o todas) no funcionan, ¿por qué? A: El termostato está... -
Page 93: Garantía Limitada De Dos Años
Garantía limitada de dos años GARANTÍA DE DOS AÑOS—CARRIER CORPORATION garantiza por un período de dos años a partir de la fecha de instalación original que este producto está exento de defectos de material y mano de obra cuando se lo somete a un uso y mantenimiento normal. - Page 94 CUALQUIER DAÑO ESPECIAL A LA PROPIEDAD O COMERCIAL DE CUALQUIER NATURALEZA INDI- RECTO O RESULTANTE DEL USO DEL PRODUCTO. Algunos Estados no permiten la exclusión de daños incidentales o resultantes, por lo que esta limitación podría no aplicarse en su caso. Nº...
-
Page 95: Asistencia A Clientes
ASISTENCIA A CLIENTES Si tiene preguntas acerca del funcionamiento del termostato, visite www.Totaline.com 570-227 62-0289EFS—01... - Page 96 ® Marca Registrada en los E.U.A 570-227 62-0289EFS—01 M.S. 11-08...
Need help?
Do you have a question about the P340-2220 and is the answer not in the manual?
Questions and answers
How to turn off (temporary set to) ?