Table of Contents
Advertisement
APPROVALS
DRAWN BY:
S. Livaskani
ORIGINATOR
J. Henley
SIZE
REV.
DOCUMENT NO.
A
C
LTR
ECN NO.
A
ECO 114767
B
ECO 115358
C
ECO 116299
D
E
F
G
H
J
K
L
M
N
P
R
T
U
V
W
Y
DATE
TITLE
01/26/09
01/26/09
REVISIONS
DATE
APPROVED
11/12/08
J. Henley
12/08/08
J. Henley
01/26/09
J. Henley
User Manual, 1288HD Video Camera
1000-401-140
LTR
Printing Instructions
1. Black and White
2. 5.5"W x 8.5"L
3. Select binding and paper weight based on cost
4. Source files are available from Engineering Services
Global Source
Archive this document as a user guide/manual.
This document contains the following languages:
1. English
5900 Optical Court, San Jose, CA 95138
REVISIONS
ECN NO.
DATE
Stryker Endoscopy
SHEET
OF
1
53
APPROVED
Advertisement
Table of Contents

Related Manuals for Stryker 1288 HD


Summary of Contents for Stryker 1288 HD
- Page 1 Stryker Endoscopy 5900 Optical Court, San Jose, CA 95138 APPROVALS DATE TITLE DRAWN BY: User Manual, 1288HD Video Camera S. Livaskani 01/26/09 ORIGINATOR J. Henley 01/26/09 SIZE REV. DOCUMENT NO. SHEET 1000-401-140 REVISIONS REVISIONS ECN NO. DATE APPROVED ECN NO.
-
Page 2: User Guide
1288 HD Video Camera User Guide 1288010000 1288010001 1288210105 1288710105... -
Page 4: Table Of Contents
Contents Warnings and Cautions ........1 Product Description and Intended Use ....4 Indications/Contraindications ............5 The Camera Console ..............6 The Camera Head ................8 The C-Mount Coupler ..............9 Setup and Interconnection ......10 Setting Up the Console ..............10 Setting Up the Camera Head .............15 Setting Up the Coupler ..............16 Operation ............ -
Page 6: Warnings And Cautions
Warnings and Cautions Please read this manual and follow its instructions carefully. The words warning, caution, and note carry special meaning and should be carefully reviewed: Warning Indicates risks to the safety of the patient or user. Failure to follow warnings may result in injury to the patient or user. Caution Indicates risks to the equipment. - Page 7 12. Avoid dropping the camera system. The camera system contains sensitive parts that are precisely aligned. 13. Ensure that readjustments, modifications, and/or repairs are carried out by persons authorized by Stryker Endoscopy. 14. Ensure that the electrical installation of the relevant operating room complies with the NEC and CEC guidelines.
- Page 8 In addition to the cautionary symbols already listed, other symbols found on the 1288 HD Camera and in this manual have specific meanings that clarify the proper use and storage of the 1288 HD Camera. The following list defines the...
-
Page 9: Product Description And Intended Use
1288210105, 1288710105 C-mount coupler 1288020122 The 1288 HD also comes with various connection cables which, like the other components, can be purchased together or separately. Federal law (United States of America) restricts this device to use by, or on the order of, a physician. -
Page 10: Indications/Contraindications
Indications/Contraindications The 1288 HD Camera is indicated for use in general laparoscopy, nasopharyngoscopy, ear endoscopy, sinuscopy, and plastic surgery wherever a laparoscope/endoscope/arthroscope is indicated for use. A few examples of the more common endoscopic surgeries are laparoscopic cholecystectomy, laparoscopic hernia repair, laparoscopic appendectomy, laparoscopic pelvic... -
Page 11: The Camera Console
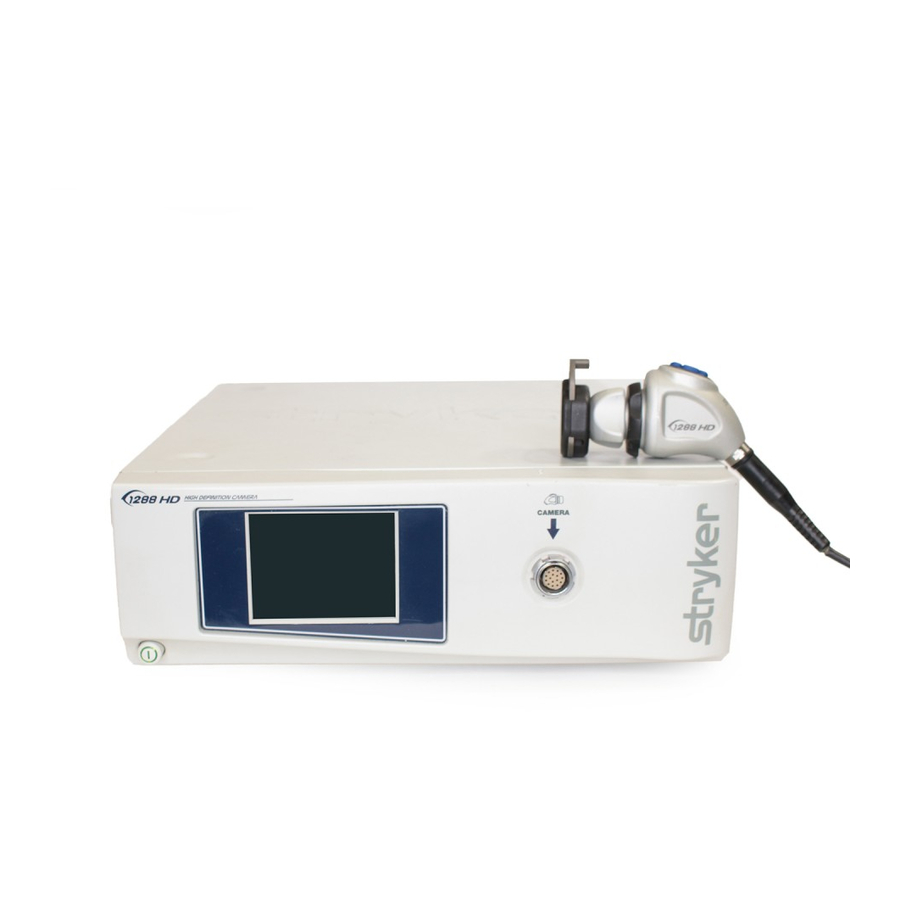
The Camera Console The camera console or Camera Control Unit (CCU) is the control center for the 1288 HD Medical Video Camera and processes the video and photographic images captured during the surgical procedure. The console front panel features a touch screen, where different menus can be accessed, including the controls... -
Page 12: Rear Panel
Rear Panel 7 8 9 10 11 1. SFB Connectors Enables FireWire connection with Stryker FireWire devices; provides connection for remote diagnoses and future software upgrades 2. SIDNE® Port Connects to the SIDNE® Console to enable voice operation and/or graphic tablet control 3. -
Page 13: The Camera Head
The Camera Head The camera head connects to the camera console and captures video and photographic images, which it relays to the camera console. It features several controls that are accessible through a button keypad located on the top of the camera head (see the “Operation Instructions”... -
Page 14: The C-Mount Coupler
The C-Mount Coupler The C-Mount coupler threads onto the face of the camera head, enabling a scope to be attached to the camera. It provides a focusing ring to adjust image sharpness. The features of the coupler are listed in Figure 3 below. Additional instructions are available in the “1288 C-Mount Coupler User Guide”... -
Page 15: Setup And Interconnection
Setup and Interconnection Note: Stryker Endoscopy considers instructional training, or inservice, an integral part of the 1288 HD Medical Video Camera. Your local Stryker Endoscopy sales representative will perform at least one inservice at your convenience to help set up your equipment and instruct you and your staff on its operation and maintenance. - Page 16 * On some monitors, S-VHS inputs may be labeled Y/C. ** The DVI connectors can also output analog SXGA signals through a DVI-I to VGA adapter. Use the cables and outputs described above to connect the 1288 HD to other operating-room equipment. Wiring Diagrams 1-3 describe typical set-ups. •...
- Page 17 Wiring Diagram 1: Camera and Flat-Panel Monitor WiSe 26" HDTV Surgical Display DVI-I/VGA Adapter 1288 HD Video Camera...
- Page 18 Wiring Diagram 2: Camera, SDC, SIDNE®, and Flat-Panel Monitor WiSe 26" HDTV Surgical Display SIDNE® Stryker European Rep. - RA/QA Manager ZAC Satolas Green Pusignan Av. De Satolas Green 69881 MEYZIEU Cedex, France 1288 HD Video Camera REMOTE...
- Page 19 Wiring Diagram 3: Camera, Flat-Panel Monitor, and CRT Monitor WiSe 26" HDTV Surgical Display DVI-I/VGA Adapter 1288 HD Video Camera S-VHS CRT Monitor...
-
Page 20: Setting Up The Camera Head
Note: If you are using any device with unterminated analog video inputs, you must connect a cable from the VIDEO OUT of that device to the VIDEO IN on the monitor. Note: An additional monitor may be connected using an open camera output. Note: The camera console is shipped from the factory in NTSC video format. -
Page 21: Setting Up The Coupler
Setting Up the Coupler 1. Attach the coupler to the camera head. • Grasping the rear adapter, screw the coupler onto the camera head (clockwise) until it forms a tight seal. Before each use, check the outer surface of the endoscope to ensure there are no rough surfaces, sharp edges, or protrusions. - Page 22 2. Attach an endoscope to the coupler. • Remove the red dust cap if it is present. • Push down on the endobody clamp (a) and insert the scope into the scope end of the coupler (b). • Release the endobody clamp. 3.
-
Page 23: Operation
Ensure that a video image appears on all video monitors before beginning any procedure. Note: Before operating the 1288 HD Camera, ensure all components have been set up according to the instructions in the “Setup and Interconnection” section of this manual. - Page 24 P (Picture) Button The P button controls up to two remote video accessories. • Press the P button for less than two seconds to select Remote 1. One beep will sound. • Press the P button for more than two seconds to select Remote 2. Two beeps will sound. W (White Balance) Button The W button activates the white-balance function or the light/zoom function. The white balance function is used to correct slight color differences that exist between different light sources or endoscopes.
-
Page 25: Using The Touchscreen Interface
Up and Down Buttons The up and down buttons work together to increase or decrease the light/zoom level. The camera console can be set to “light” mode or “zoom” mode using the Buttons submenu of the Configuration Menu. In “light” mode, pressing the arrow buttons will raise or lower the automatic-shutter light-level setting in 8 steps. -
Page 26: Home Screen
Home Screen The Home screen is the default screen. Use the buttons below to choose surgical specialties, operate the camera head, and navigate to other menus. Home Menu Language LANGUAGE ENGLISH Scroll through preset camera settings designed for surgical specialties. Choose from: • Arthroscopy • Laparoscopy • Cystoscopy... -
Page 27: Menu Screen
Menu Screen The Menu screen provides options for adjusting the camera picture. Home Menu Language LANGUAGE ENGLISH • Press once to return to the Home screen. • Hold for 5 seconds to proceed to the Language screen. Increase or decrease: • Enhance (picture sharpness) • Light (automatic-shutter light level) • Zoom (magnification) Enhance/Light/Zoom Meter Appears on the monitor, indicating the selection level. - Page 28 Language Screen The Language screen allows you to choose the default language for the user interface. Home Menu LANGUAGE Language ENGLISH LANGUAGE ENGLISH Scroll through available interface languages. Choose from: • Danish • Simplified Chinese • German • Finnish • Polish • Japanese • Dutch • Spanish...
- Page 29 Main Menu Screen (for On-Screen Display) The Main Menu screen works in conjunction with the on-screen display (OSD) to provide options for adjusting system settings. Home Menu Language LANGUAGE ENGLISH • Press once to return to the Home screen and exit OSD. • Hold for 5 seconds to reset global system settings to defaults and return to the Home screen. Power cycle the unit for global settings to take effect.
-
Page 30: Controlling Remote Video Accessories
3. Ensure the fiberoptic output is enabled (on) via the Options Submenu in the Configuration Menu. (See the section “Using the Configuration Menu”.) Note: The 1288 HD Camera model 1288010001 is a Class 1 laser product per IEC 60825-1 and 21CFR. -
Page 31: Operating The Camera With A Light Source
Operating the Camera with a Light Source IMPORTANT SAFETY NOTICE: Before operating this device, please read this operating manual thoroughly and carefully. When using this device with a light source, fire and/or severe injury may result to the patient, user or inanimate objects, if the instructions in this manual are not followed. -
Page 32: Troubleshooting
Troubleshooting Problem Possible Solution “Restart • Camera head temporarily shut down due to overcurrent. Camera Turn off the console, wait 3 seconds, and turn it back on. Console” • After sterilization, ensure the camera head has cooled message down before connecting it to the console (Color bar background) “System Error” • No video detected. message • After sterilization, ensure the camera head has cooled (Light blue down before connecting it to the console background) - Page 33 Noise or snow • Plug the electrocautery generator into a separate on picture electrical outlet and separate the 1288 HD power cord when using from the electrocautery power cord. electrocautery • Separate the camera cable from the electrocautery cable. probes • Reposition the electrocautery grounding pad on the patient. Noise or snow • Reduce Enhancement. on picture • Check for and replace faulty video cables. when not using...
- Page 34 • Ensure the specialty switch is not set to FLEXI-SCOPE unless you are using a flexible scope. Note: If this troubleshooting guide does not resolve the problem, call Stryker Technical Support at 1-877-478-7953 (inside the U.S.) or refer to the “Warranty and Return Policy” section of this manual.
-
Page 35: Cleaning, Reprocessing, And Maintenance
Cleaning, Reprocessing, and Maintenance The camera console is not intended to come into contact with the patient. It may be cleaned, but not sterilized. The camera head and coupler may contact the patient and should both be cleaned and sterilized prior to every use. Cleaning the Camera Console Disconnect the console from the AC power source before cleaning. - Page 36 • Always install the soaking cap prior to processing the camera. Failure to properly tighten the soaking cap will corrode the connector pins and void the warranty. • Inspect the camera cable for cuts and breaks before soaking in any fluid. Return any damaged camera to Stryker for service. • Never soak the camera in the same tray with sharp instruments. • Do not use brushes or pads with metal or abrasive tips during manual cleaning, as permanent scoring or damage could result. • To minimize galvanic corrosion, avoid soaking dissimilar metals in close proximity.
- Page 37 Preparation for Cleaning 1. Disassemble the coupler from the scope and camera head. 2. Prepare an enzymatic detergent according to the manufacturer’s recommendations (one ounce per gallon of tap water at 35 - 40°C). 3. Wipe the entire device with the detergent, using a clean cloth. 4.
- Page 38 4.Brush • Thoroughly brush the exterior of the device using a soft-bristled brush. • Inject the prepared detergent into any cannulae, lumens, or mated surfaces a minimum of 5 times. • Brush any lumens a minimum of 5 times from each end, using an appropriate bottle brush. • Actuate the device, brushing around any movable parts in all extreme positions. 5.Rinse • Thoroughly rinse the device with treated water until all detergent residue is removed. Flush any lumens or crevices 5 times. After the detergent residue is removed, continue rinsing for a minimum of 30 seconds.
- Page 39 • Inspect all components for cleanliness. If fluid or tissue buildup is present, repeat the above cleaning and disinfection procedures. • Inspect the camera cable for cuts and breaks. Return any damaged camera to Stryker for service. Packaging Sterilization After performing the cleaning instructions specified above, perform one of the following sterilization cycles.
-
Page 40: Using Sterile Drapes
Using sterile drapes will ensure maximum longevity of your 1288 HD Camera Head. For best results, follow the instructions provided by the drape manufacturer. Sterile camera drapes for use with the 1288 HD Camera Head can be ordered under Stryker product number 240-010-200. -
Page 41: Replacing The Fuses
It must not be disposed of as unsorted municipal waste and must be collected separately in accordance with applicable national or institutional related policies relating to obsolete electronic equipment. The 1288 HD must be disposed of according to local laws and hospital practices. -
Page 42: Technical Specifications
Technical Specifications 60Hz settings are displayed first. (50Hz settings follow in parentheses.) Imaging System 1/3” Progressive Scan CCDs High Definition Scanning System Horizontal: 64.00 kHz (60.00 kHz) Vertical: 60.02 Hz (50.00 Hz) Video Outputs Digital/ Two Digital Video Interface Analog: (DVI)/RGBHV 1280 ×... - Page 43 Contains four 850-nm laser diodes This product complies with IEC 60825- 1:1993+A1:1997+A2:2001. This product complies with 21CFR, Subchapter J, Parts 1040.10 and 1040.11, except for deviations pursuant to Laser Notice No. 50, dated July 26, 2001. Please contact your local Stryker Endoscopy sales representative for information on changes and new products.
-
Page 44: Electromagnetic Compatibility
Guidance and Manufacturer’s Declaration: Electromagnetic Emissions 1288 HD Camera is intended for use in the electromagnetic environment specified below. The customer or the user of 1288 HD Camera should ensure that it is used in such an environment. Emissions test... - Page 45 Guidance and Manufacturer’s Declaration: Electromagnetic Immunity 1288 HD Camera is intended for use in the electromagnetic environment specified below. The customer or the user of 1288HD Camera should ensure that it is used in such an environment. Immunity Test IEC 60601 Test Level...
- Page 46 Guidance and Manufacturer’s Declaration: Electromagnetic Immunity 1288 HD Camera is intended for use in the electromagnetic environment specified below. The customer or the user of 1288 HD Camera should ensure that it is used in such an environment. Immunity Test...
- Page 47 1288 HD Camera is intended for use in the electromagnetic environment specified below. The customer or the user of 1288 HD Camera should ensure that it is used in such an environment. (a) Field strengths from fixed transmitters, such as base stations for radio (cellular/cordless) telephones and land mobile radios, amateur radio, AM and FM radio broadcast, and TV broadcast, cannot be predicted theoretically with accuracy.
-
Page 48: Warranty And Return Policy
Stryker Endoscopy. If a valid warranty claim is received within the Warranty Period, Stryker will, in its sole discretion: (1) repair the product at no charge, (2) replace the product at no charge with a product that is at least functionally equivalent to the original product, or (3) refund the purchase price of the product. - Page 49 Restocking Fees: Unless the product is defective or the return is the direct result of a Stryker Endoscopy error, a restocking fee of 10% may be charged on all returned products.
- Page 50 If a return does not comply with these terms, Stryker Endoscopy reserves the right to destroy the product at the customer’s expense. Any replacement would be at the customer’s expense.
- Page 53 Stryker Endoscopy 5900 Optical Court San Jose, CA 95138 USA 1-408-754-2000, 1-800-624-4422 www.stryker.com European Representative: Regulatory Manager, Stryker France ZAC Satolas Green Pusignan Av. De Satolas Green 69881 MEYZIEU Cedex, France 1000401140 C 2008/12...
Need help?
Do you have a question about the 1288 HD and is the answer not in the manual?
Questions and answers
My Stryker 1288 camera keeps restarting by itself. What is the problem?
A Stryker 1288 HD camera may restart by itself due to several possible issues:
1. Faulty Fuse: A blown or incorrect fuse could cause power instability. Ensure the fuse matches the value specified on the fuse label and replace it if needed.
2. Power Supply Issues: Loose or faulty power cord connections can lead to intermittent power loss. Make sure the power cord is securely connected to both the wall outlet and the transmitter.
3. Overheating or Internal Faults: Lack of proper ventilation or internal hardware problems could cause automatic restarts.
4. Improper Maintenance: If periodic maintenance (e.g., checking earth leakage current and ground impedance) is not performed, electrical faults may occur, leading to restarts.
5. External Device Conflicts: Faulty connections with external devices (e.g., monitors, printers, or the SIDNE® console) could disrupt camera operation.
Check all power connections, replace the fuse with the correct type, and ensure proper maintenance is performed. If the issue continues, the device may require professional inspection.
This answer is automatically generated