Table of Contents
Advertisement
Advertisement
Table of Contents

Related Manuals for Stryker 1288010000


Summary of Contents for Stryker 1288010000
- Page 1 1288 HD Video Camera User Guide 1288010000 1288010001 1288210105 1288710105...
-
Page 3: Table Of Contents
Contents Warnings and Cautions ........3 Product Description and Intended Use ....6 Indications/Contraindications............7 The.Camera.Console..............8 The.Camera.Head...............10 The.C-Mount.Coupler..............11 Setup and Interconnection ......12 Setting.Up.the.Console...............12 Setting.Up.the.Camera.Head............17 Setting.Up.the.Coupler...............18 Operation ............20 Powering.the.Camera.On/Off.............20 Using.the.Camera.Head.Buttons..........20 Using.the.Touchscreen.Interface..........22 Controlling.Remote.Video.Accessories........26 Using.the.SFB.Serial.Interface. -
Page 5: Warnings And Cautions
Warnings and Cautions Please read this manual and follow its instructions carefully. The words warning, caution, and note carry special meaning and should be carefully reviewed: Warning Indicates risks to the safety of the patient or user. Failure to follow warnings may result in injury to the patient or user. Caution Indicates risks to the equipment. Failure to follow cautions may result in product damage. Note: Provides special information to clarify instructions or present additional useful information. - Page 6 12. Avoid dropping the camera system. The camera system contains sensitive parts that are precisely aligned. 13. Ensure that readjustments, modifications, and/or repairs are carried out by persons authorized by Stryker Endoscopy. 14. Ensure that the electrical installation of the relevant operating room complies with the NEC and CEC guidelines.
- Page 7 Symbol Definitions In addition to the cautionary symbols already listed, other symbols found on the 1288 HD Camera and in this manual have specific meanings that clarify the proper use and storage of the 1288 HD Camera. The following list defines the symbols associated with this product: Operating humidity ratings Operating pressure ratings...
-
Page 8: Product Description And Intended Use
Product Description and Intended Use The Stryker Endoscopy 1288 HD Medical Video Camera is a high-definition camera used to capture still and video images of endoscopic surgical applications. The 1288 HD Medical Video Camera consists of three main components: Component... -
Page 9: Indications/Contraindications
Indications/Contraindications The 1288 HD Camera is indicated for use in general laparoscopy, nasopharyngoscopy, ear endoscopy, sinuscopy, and plastic surgery wherever a laparoscope/endoscope/arthroscope is indicated for use. A few examples of the more common endoscopic surgeries are laparoscopic cholecystectomy, laparoscopic hernia repair, laparoscopic appendectomy, laparoscopic pelvic lymph node dissection, laparoscopically assisted hysterectomy, laparoscopic and thorascopic anterior spinal fusion, anterior cruciate ligament reconstruction, knee arthroscopy, shoulder arthroscopy, small joint arthroscopy, decompression... -
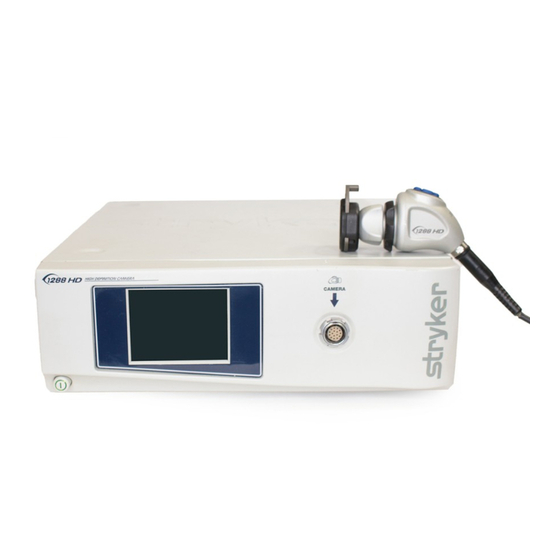
Page 10: The.camera.console
The Camera Console The camera console or Camera Control Unit (CCU) is the control center for the 1288 HD Medical Video Camera and processes the video and photographic images captured during the surgical procedure. The console front panel features a touch screen, where different menus can be accessed, including the controls for adjusting the enhancement level, light level, zoom, and white balance, as well as allows the selection of surgical specialty settings that optimize camera performance for various, specific surgical procedures. - Page 11 Rear Panel 7 8 9 10 11 1. SFB Connectors Enables FireWire connection with Stryker FireWire devices; provides connection for remote diagnoses and future software upgrades 2. SIDNE® Port Connects to the SIDNE® Console to enable voice operation and/or graphic tablet control 3. Remote Out 1 Connects to a video accessory remote switch 4. Remote Out 2...
-
Page 12: The.camera.head
The Camera Head The camera head connects to the camera console and captures video and photographic images, which it relays to the camera console. It features several controls that are accessible through a button keypad located on the top of the camera head (see the “Operation Instructions”... -
Page 13: The.c-Mount.coupler
The C-Mount Coupler The C-Mount coupler threads onto the face of the camera head, enabling a scope to be attached to the camera. It provides a focusing ring to adjust image sharpness. The features of the coupler are listed in Figure 3 below. Additional instructions are available in the “1288 C-Mount Coupler User Guide”... -
Page 14: Setup And Interconnection
Setup and Interconnection Note: Stryker Endoscopy considers instructional training, or inservice, an integral part of the 1288 HD Medical Video Camera. Your local Stryker Endoscopy sales representative will perform at least one inservice at your convenience to help set up your equipment and instruct you and your staff on its operation and maintenance. - Page 15 To set up the console, make the following connections: 1. Connect the AC power. • Connect the AC power cord to the AC inlet on the rear console panel. • Connect the other end to a hospital-grade outlet. 2. Connect the video output. •...
- Page 16 Wiring Diagram 1: Camera and Flat-Panel Monitor WiSe 26" HDTV Surgical Display DVI-I/VGA Adapter 1288 HD Video Camera...
- Page 17 Wiring Diagram 2: Camera, SDC, SIDNE®, and Flat-Panel Monitor WiSe 26" HDTV Surgical Display SIDNE® Stryker European Rep. - RA/QA Manager ZAC Satolas Green Pusignan Av. De Satolas Green 69881 MEYZIEU Cedex, France 1288 HD Video Camera REMOTE...
- Page 18 Wiring Diagram 3: Camera, Flat-Panel Monitor, and CRT Monitor WiSe 26" HDTV Surgical Display DVI-I/VGA Adapter 1288 HD Video Camera S-VHS CRT Monitor...
-
Page 19: Setting.up.the.camera.head
Note: If you are using any device with unterminated analog video inputs, you must connect a cable from the VIDEO OUT of that device to the VIDEO IN on the monitor. Note: An additional monitor may be connected using an open camera output. Note: The camera console is shipped from the factory in NTSC video format. -
Page 20: Setting.up.the.coupler
Setting Up the Coupler 1. Attach the coupler to the camera head. • Grasping the rear adapter, screw the coupler onto the camera head (clockwise) until it forms a tight seal. Before each use, check the outer surface of the endoscope to ensure there are no rough surfaces, sharp edges, or protrusions. Caution When attaching or removing the coupler, grip only the rear adapter, as twisting other parts of the coupler may result in mechanical damage. Do not overtighten the coupler, as this may damage the front window of the camera. Do not overtighten a direct-coupled C-mount scope, as this may damage the front window of the camera. - Page 21 2. Attach an endoscope to the coupler. • Remove the red dust cap if it is present. • Push down on the endobody clamp (a) and insert the scope into the scope end of the coupler (b). • Release the endobody clamp. 3.
-
Page 22: Operation
Operation Warning: Before using the 1288 HD Camera in a surgical procedure, test all components to ensure proper function. Ensure that a video image appears on all video monitors before beginning any procedure. Note: Before operating the 1288 HD Camera, ensure all components have been set up according to the instructions in the “Setup and Interconnection” section of this manual. Powering the Camera On/Off Press the power switch on the console to power the camera on or off. Using the Camera Head Buttons The camera head features a cross-shaped, four-button keypad for controlling the 1288 camera. - Page 23 P (Picture) Button The P button controls up to two remote video accessories. • Press the P button for less than two seconds to select Remote 1. One beep will sound. • Press the P button for more than two seconds to select Remote 2. Two beeps will sound.
-
Page 24: Using.the.touchscreen.interface
Up and Down Buttons The up and down buttons work together to increase or decrease the light/zoom level. The camera console can be set to “light” mode or “zoom” mode using the Buttons submenu of the Configuration Menu. In “light” mode, pressing the arrow buttons will raise or lower the automatic-shutter light-level setting in 8 steps. - Page 25 Home Screen The Home screen is the default screen. Use the buttons below to choose surgical specialties, operate the camera head, and navigate to other menus. Home Menu Language LANGUAGE ENGLISH Scroll through preset camera settings designed for surgical specialties. Choose from: •...
- Page 26 Menu Screen The Menu screen provides options for adjusting the camera picture. Home Menu Language LANGUAGE ENGLISH • Press once to return to the Home screen. • Hold for 5 seconds to proceed to the Language screen. Increase or decrease: • Enhance (picture sharpness) •...
- Page 27 Language Screen The Language screen allows you to choose the default language for the user interface. Home Menu LANGUAGE Language ENGLISH LANGUAGE ENGLISH Scroll through available interface languages. Choose from: • Danish • Simplified Chinese • German • Finnish • Polish •...
-
Page 28: Controlling.remote.video.accessories
Using the SFB Serial Interface The SFB serial connection on the console rear panel enables FireWire connection to the Stryker Endoscopy Software Management Site (SMS). Connect to the L9000 Light Source for “Run/Standby” controls from the Camera Head. Note: This system feature is not necessary for regular camera system operation. -
Page 29: Operating The Camera With A Light Source
Operating the Camera with a Light Source IMPORTANT SAFETY NOTICE: Before operating this device, please read this operating manual thoroughly and carefully. When using this device with a light source, fire and/or severe injury may result to the patient, user or inanimate objects, if the instructions in this manual are not followed. All light sources can generate significant amounts of heat at the scope tip, the scope light post, the light cable tip, and/or near the light cable adapter. Higher levels of brightness from the light source result in higher levels of heat. Always adjust the brightness level of the camera and the monitor before adjusting the brightness level of the light source. Adjust the brightness level of the light source to the minimum brightness necessary to adequately illuminate the surgical site. In addition, adjust the internal shutter of the camera higher in order to run the light source at a lower intensity. Avoid touching the scope tip or the light cable tip to the patient, and never place them on top of the patient, as doing so may result in burns to the patient or user. In addition, never place the scope tip, the scope light post, the light cable adapter, or the light cable tip on the surgical drapes or other flammable material, as doing so may result in fire. Always place the light source in standby mode whenever the scope is removed from the light cable or the device is unattended. The scope tip, scope light post, light cable adapter, and light cable tip will take several minutes to cool off after being placed in standby mode, and therefore may still result in fire or burns to the patient, user, or inanimate objects. -
Page 30: Troubleshooting
Troubleshooting Problem Possible Solution “Restart • Camera head temporarily shut down due to overcurrent. Camera Turn off the console, wait 3 seconds, and turn it back on. Console” • After sterilization, ensure the camera head has cooled message down before connecting it to the console (Color bar background) “System Error”... - Page 31 Noise or snow • Plug the electrocautery generator into a separate on picture electrical outlet and separate the 1288 HD power cord when using from the electrocautery power cord. electrocautery • Separate the camera cable from the electrocautery cable. probes •...
- Page 32 Ensure the specialty switch is not set to FLEXI-SCOPE unless you are using a flexible scope. Note: If this troubleshooting guide does not resolve the problem, call Stryker Technical Support at 1-877-478-7953 (inside the U.S.) or refer to the “Warranty and Return Policy” section of this manual.
-
Page 33: Cleaning, Reprocessing, And Maintenance
These reprocessing instructions are provided in accordance with ISO 17664, AAMI TIR12, AAMI ST79, and AAMI ST81. While they have been validated by Stryker as being capable of preparing the device for re-use, it remains the responsibility of the processor to ensure that the reprocessing as actually performed, using equipment, materials, and personnel in the reprocessing facility, achieves the desired result. - Page 34 • Inspect the camera cable for cuts and breaks before soaking in any fluid. Return any damaged camera to Stryker for service. • Never soak the camera in the same tray with sharp instruments. •...
- Page 35 Preparation for Cleaning 1. Disassemble the coupler from the scope and camera head. 2. Prepare an enzymatic detergent according to the manufacturer’s recommendations (one ounce per gallon of tap water at 35 - 40°C) 3. Wipe the entire device with the detergent, using a clean cloth. 4.
- Page 36 4. Brush • Thoroughly brush the exterior of the device using a soft-bristled brush. • Using a syringe, inject 50mL of the detergent into any cannulae, lumens, or mated surfaces a minimum of 5 times. • Brush any lumens a minimum of 5 times from each end, using an appropriate bottle brush.
- Page 37 3. Automated wash • Program the washer using the following parameters: Phase Recirculation Water Detergent Type and Time Temperature Concentration (if applicable) Pre Wash 2 minutes Cold tap water Enzyme 2 minutes Hot tap water Enzymatic Detergent Wash Wash 1 2 minutes Set point Non-enzymatic Detergent (66˚C) Rinse 1 2 minutes Hot tap water...
- Page 38 Inspect all components for cleanliness. If fluid or tissue buildup is present, repeat the above cleaning and disinfection procedures. • Inspect the camera cable for cuts and breaks. Return any damaged camera to Stryker for service. Packaging Sterilization After performing the cleaning instructions specified above, perform one of the...
- Page 39 Ethylene Oxide (EtO) Double wrap camera head and cable prior to sterilization. • Preconditioning parameters Temperature 55°C (131°F) Chamber Humidity 70% RH Vacuum Set Points 1.3 psia Time 30 minutes Exposure Concentration (100% EtO) 725 mg/L Temperature 55 ± 2°C (131 ± 5°F) Time 1 hour Chamber Humidity 70% RH (50–80%) ± 5% Aeration parameters Aeration Time 12 hours...
-
Page 40: Using.sterile.drapes
Sterrad® 1. Clean and prepare the camera head and cable as recommended in the “Cleaning and Disinfection” section. Ensure the soaking cap is installed. 2. Double wrap the camera head and cable prior to sterilization. 3. Sterilize the camera head and cable following the instructions of the manufacturer, using the STERRAD®... -
Page 41: Replacing.the.fuses
<0.1 ohms, and power consumption less than or equal to rated power. Use a true RMS digital multimeter and safety analyzer to perform this test. Note: Refer calibration and operating difficulties not detailed in this manual to your Stryker Endoscopy sales representative. Disposal This product contains electrical waste or electronic equipment. It must not be disposed of as unsorted municipal waste and... -
Page 42: Technical Specifications
Technical Specifications 60Hz settings are displayed first. (50Hz settings follow in parentheses.) Imaging System 1/3” Progressive Scan CCDs High Definition Scanning System Horizontal: 64.00 kHz (60.00 kHz) Vertical: 60.02 Hz (50.00 Hz) Video Outputs Digital/ Two Digital Video Interface Analog: (DVI)/RGBHV 1280 × 1024 (HD), 720p, 1080p (HDTV) format Connector: 29-pin DVI-I... - Page 43 1:1993+A1:1997+A2:2001. This product complies with 21CFR, Subchapter J, Parts 1040.10 and 1040.11, except for deviations pursuant to Laser Notice No. 50, dated July 26, 2001. Please contact your local Stryker Endoscopy sales representative for information on changes and new products.
-
Page 44: Electromagnetic Compatibility
Electromagnetic Compatibility Like other electrical medical equipment, the 1288 HD Camera requires special precautions to ensure electromagnetic compatibility with other electrical medical devices. To ensure electromagnetic compatibility (EMC), the 1288 HD Camera must be installed and operated according to the EMC information provided in this manual. - Page 45 Guidance and Manufacturer’s Declaration: Electromagnetic Immunity 1288 HD Camera is intended for use in the electromagnetic environment specified below. The customer or the user of 1288HD Camera should ensure that it is used in such an environment. Immunity Test IEC 60601 Test Level Compliance Level Electromagnetic Environment:...
- Page 46 Guidance and Manufacturer’s Declaration: Electromagnetic Immunity 1288 HD Camera is intended for use in the electromagnetic environment specified below. The customer or the user of 1288 HD Camera should ensure that it is used in such an environment. Immunity Test IEC 60601 Test Level Compliance Electromagnetic Environment:...
- Page 47 Guidance and Manufacturer’s Declaration: Electromagnetic Immunity 1288 HD Camera is intended for use in the electromagnetic environment specified below. The customer or the user of 1288 HD Camera should ensure that it is used in such an environment. (a) Field strengths from fixed transmitters, such as base stations for radio (cellular/cordless) telephones and land mobile radios, amateur radio, AM and FM radio broadcast, and TV broadcast, cannot be predicted theoretically with accuracy.
-
Page 48: Warranty And Return Policy
Stryker Endoscopy. If a valid warranty claim is received within the Warranty Period, Stryker will, in its sole discretion: (1) repair the product at no charge, (2) replace the product at no charge with a product that is at least functionally equivalent to the original product, or (3) refund the purchase price of the product. - Page 49 Restocking Fees: Unless the product is defective or the return is the direct result of a Stryker Endoscopy error, a restocking fee of 10% may be charged on all returned products.
- Page 50 Stryker Endoscopy reserves the right to destroy contaminated product at the customer’s expense and charge the customer for a replacement unit. If a return does not comply with these terms, Stryker Endoscopy reserves the right to destroy the product at the customer’s expense. Any replacement would...
- Page 52 2010/08 Products referenced with a ™ designation are trademarks of Stryker. Products referenced with a ® designation are registered trademarks of Stryker. STERRAD® is a registered trademark of Advanced Sterilization Products, Division of Ethicon Inc., a Johnson and Johnson company.
Need help?
Do you have a question about the 1288010000 and is the answer not in the manual?
Questions and answers