
Related Manuals for Clarion CZ300


Summary of Contents for Clarion CZ300
- Page 1 Owner’s manual & Installation manual Mode d’emploi et manuel d’installation Manual de instrucciones y de instalación CD/USB/MP3/WMA RECEIVER LECTEUR CD/USB/MP3/WMA RECEPTOR CD/USB/MP3/WMA...
- Page 2 Once you're registered, we can keep you informed of important product information. Register at www.clarion.com - it's easy to keep your Clarion product up to date. INFORMA nONS DE L'ENREGISTREMENT DE PRODUITS CLARION Pour les Etas Unis et Ie Canada seulement www.clarion.com...
-
Page 3: Table Of Contents
Contents Thank you for purchasing this Clarion product. • Please fully read this owner’s manual before operating this equipment. • Check the contents of the enclosed warranty card and store it in a safe place with this manual. 1. FEATURES ........................4 Expanding Systems ...................... -
Page 4: Features
HD Radio™ and XM Radio Ready ® Compatible with iPod /iPhone™ via USB 4ch/2V RCA Output with Subwoofer Control and BEAT-EQ with 3 Band Parametric Equalizer MP3/WMA compatible with ID3-TAG display Expanding Systems Expanding audio features 4-channel ampli er USB memory iPod/ iPhone Portable player... -
Page 5: Precautions
If moisture THIS DEVICE COMPLIES WITH DHHS RULES 21 CFR SUBCHAPTER J APPLICABLE AT DATE OF MANUFACTURE. forms on the optical parts of the player, CLARION CO.,LTD. 7-2,SHINTOSHIN,CHUO-KU,SAITAMA-SHI,SAITAMA-KEN,JAPAN do not use the player for about one hour. MANUFACTURED: The condensation will disappear naturally allowing normal operation. -
Page 6: Front Panel
For tough dirt, apply some neutral Clarion will not be held liable in the detergent diluted in water to a soft cloth, unlikely event of loss of or damage to wipe off the dirt gently, then wipe again memorized data. -
Page 7: Remove The Dcp
Remove the DCP The control panel can be detached to prevent theft. When detached, keep it in a safe place where it will not be subject to scratches. We recommend taking the DCP with you when leaving the car. 1. Press the [ ] button (2 sec.) to turn off the power. -
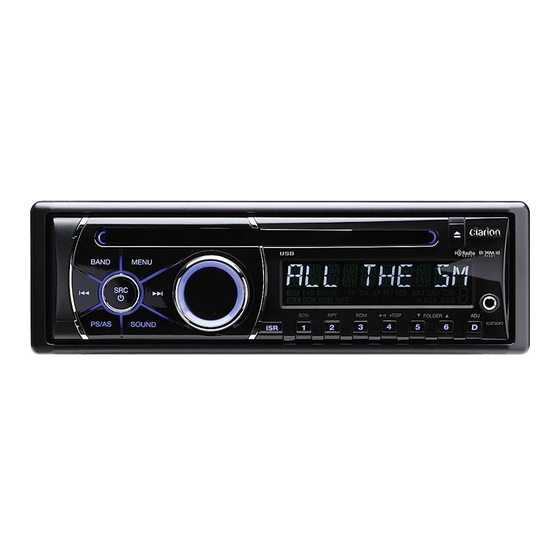
Page 8: Controls
Operational Panel Disc slot [MENU] [BAND] [1~6] [PS/AS] [SOUND] [ISR] AUX jack [ADJ] [OPEN] [POWER/SRC] [VOLUME] Names of Buttons [ISR] button / SRC] button • Recall ISR station stored in memory and • Power/Toggle the audio source store current station in ISR memory (long press) [BAND] button •... -
Page 9: Remote Control
Remote Control [POWER/SRC] button [RDM] button • Toggle the audio source/Power on/ • Random play Power off (long press) [RPT] button ] button • Repeat play • Preset station up/down/Previous/next track/Search (long press). [SCN/PS/AS] button • Scan play/Preset scan/Auto memory [POWER/ [BND/TOP] store... -
Page 10: Cautions On Handling
Handling Discs Handling Cleaning • New discs may have some roughness • To remove ngermarks and dust, use a around the edges. If such discs are used, soft cloth and wipe in a straight line from the player may not work or the sound may the center of the disc to the outer edge. -
Page 11: Operations
Basic Operations Note: Volume adjustment Be sure to read this chapter referring to the Turn the [VOLUME] knob on the front panel chapter “3. CONTROLS.” or press the [ ] button on the remote control. CAUTION The adjustable range of volume is 0 to 40. Before turning off the unit, return the volume to a lower level. -
Page 12: Radio Operations
2. The unit has four bands: FM1, FM2, FM3 and AM. FM3 and AM can store by AS function. Each bands can store six stations, CZ300 can store 24 stations in total. Manual store While tuned into a desired radio station, press and hold number button 1–6 to store it... -
Page 13: Satellite Radio Mode
Satellite Radio Mode ® Listeners can subscribe to XM Radio on 3. The preset number and station is the Web by visiting www.xmradio.com, or by displayed and highlighted. calling (800) 967-2346. Customers should Recalling a station have their Radio ID ready (see “Displaying 1. -
Page 14: Hd Radio Operations
HD Radio Operations ™ About HD Radio technology unavailable, the unit will revert to Analog reception. HD Radio technology allows CD-quality digital broadcasting of your local AM and FM radio stations. HD Radio broadcasts Preset stations can include multiple channels on the same Up to six stations on each band can be frequency, which is called multicasting. -
Page 15: Itunes Tagging
If an For detailed information on the playable iPod iPod is connected when a song is tagged, models, see our home page: www.clarion. the Tag will be immediately transferred to the iPod. Note: Note: •... -
Page 16: Cd/Mp3/Wma Operations
CD/MP3/WMA Operations (including an extension). This unit can play back MP3/ 3. Do not af x a name to a le inside a folder WMA les having the same name. Note: If you play a le with DRM (Digital Rights Folder structure Management) for WMA remaining ON, no A disc with a folder having more than eight... -
Page 17: Folder Select
CD/MP3/WMA Operations Fast-forward/Fast-reverse • Discs not bearing the mark TEXT Fast-forward and CD-ROMs cannot be played by this Press and hold the [ ] button. unit. Fast-reverse • Some CDs recorded in CD-R/CD-RW Press and hold the [ ] button. mode may not be usable. -
Page 18: Usb Operations
CD/MP3/WMA Operations MP3/WMA: Random play 1. Press the [RPT] button to perform repeat This function allows you to play all tracks play, “TRACK RPT” appears on the recorded on a disc in a random order. display, and “RPT” lights. Press the [RDM] button to perform random 2. -
Page 19: Aux Operations
AUX Operations Press the [SRC] button on the panel or remote control to select AUX. AUX is just for Audio content with 3.5 mm Jack connector plugged into audio-in socket on the front panel. AUX input sensitivity setting 1. Press the [ADJ] button. 2. -
Page 20: Audio Setup
Audio Setup Press the [SOUND] button to enter sound pass lter) -> SUBW VOL, rotate the effect setting mode. First press shows [VOLUME] knob to select a value. current EQ. Rotate the [VOLUME] knob to BALANCE: LEFT 1-7-> CENTER -> RIGHT change the options in the following order: OFF ->... -
Page 21: Trouble Shooting
General Problem Cause Measure Unit fuse blown. Install new fuse with correct rating. Unit does not turn Car battery fuse blown. Install new fuse with correct rating. Turn off the power and open the operation panel. Unit does not turn Press the Reset button with a thin rod. -
Page 22: Error Display
USB devices Problem Cause Measure The USB device has been Reversing the connection direction of the USB inserted with wrong direction. device, try it again. USB device cannot be inserted. The USB connector is broken. Replace with a new USB device. The USB device is damaged. -
Page 23: Specifications
FM tuner General Frequency range: 87.9-107.9 MHz Power supply voltage: Usable sensitivity: 8 dBz 14.4 VDC (10.8 to 15.6 V allowable), negative Frequency response: 30 Hz-15 kHz ground Stereo separation: 30 dB (1 kHz) Pre-Amp output voltage: Signal/noise ratio: >55 dB 2.0 V (CD play mode: 1 kHz, 0 dB, 10 k load) Fuse: 15 A Dimensions of the main unit (W ×... -
Page 24: Installation / Wire Connection Guide
Never use a rough cloth, thinner, benzine, anything into the unit during installation, or alcohol. For tough dirt, apply a little cold consult your dealer or an authorized or warm water to a soft cloth and wipe off Clarion service center. the dirt gently. - Page 25 Notes: 1. Some car models require special mounting kits for proper installation. Consult your Clarion dealer for details. 2. Fasten the front stopper securely to prevent the source unit from coming loose. • Console opening dimensions...
- Page 26 6. To prevent electric spark, connect the positive pole rst and then the negative 1. Before installation, please make sure that pole. all connections have been properly made 7. DO NOT block the cooling fan exit to and the unit operates normally. Improper ensure suf cient heating dissipation of this connection may result in damage to the unit, or it may result in damage to this unit.
- Page 27 Method B 6) Removing the Source Unit Disassemble trim ring 1. Push the trim ring to right and pull out the right part. M5×6 2. Push the trim ring to left and pull out the left part. Dashboard Mounting frame 1.
-
Page 28: Wiring And Connections
7) Wiring and Connections White Black Rear audio output (Left) Subwoofer output 1 Black Rear audio output (Right) Subwoofer output 2 White Left Front audio Right output terminal Gray Black USB connector 4-channel ampli er Refer to the next page. (Black) SAT BUS SAT L (White) -
Page 29: Connecting Accessories
16-pin connector extension lead (attached to the source unit) Gray Front right Brown wire (Phone mute lead) Gray/Black White Connect to cellular phone mute lead. Front left White/Black Yellow wire (Memory back-up lead) Purple Connect directly to battery Rear right Purple/Black Green Red wire (Power lead) - Page 30 Clarion Co., Ltd. All Rights Reserved. Copyright © 2010: Clarion Co., Ltd. Printed in China / Imprimé en Chine / Impreso en China PN:127075002438...
- Page 31 Pour Ie Canada et les Etats-Unis seulement Ce produit Clarion vendu par marchand autorise Clarion est garanti contre tous defauts de materiel et de mise en Ce produit Clarion vendu par marchand autorise Clarion est garanti contre tous defauts de materiel et de mise en...
- Page 32 11. Should you have any difficulties with the performance of this product during the warranty period, please call Clarion or visit our web site for a listing of Authorized Warranty Service Centers in your area. You may also contact Clarion or visit our web site for a listing of Authorized Warranty Service Centers in your area. You may also contact Clarion Customer Service at the address listed below for any service help you may need with Clarion products.