Bowflex TreadClimber TC5 Owner's Manual
Treadclimber
Hide thumbs
Also See for TreadClimber TC5:
- Owner's manual (36 pages) ,
- Assembly manual (28 pages) ,
- Service manual (33 pages)
Table of Contents
Advertisement
Advertisement
Table of Contents

Related Manuals for Bowflex TreadClimber TC5


Summary of Contents for Bowflex TreadClimber TC5
- Page 1 Owner’s Manual Manual en Español Latino Americano: http://support.nautilus.com...
-
Page 2: Table Of Contents
3369, tcinquiry@nautilus.com | outside U.S. +01-360-859-5180, technics-APLA@nautilus.com | Printed in China | © 2011 Nautilus, Inc., All rights reserved. ™ and ® indicate a trademark or registered trademark. Nautilus, Inc. (www. NautilusInc.com) trademarks include NAUTILUS®, BOWFLEX®, SCHWINN®, TreadClimber® and UNIVERSAL® and respective logos. Other trademarks are the property of their respective owners. -
Page 3: Important Safety Instructions
Important Safety Instructions This icon means a potentially hazardous situation which, if not avoided, could result in death or serious injury. Before using this equipment, obey the following warnings: Read and understand the complete Owner’s Manual. Read and understand all Warnings on this machine. If at any time the Warning stickers become loose, unread- able or dislodged, contact Nautilus Customer Service for replacement stickers. - Page 4 Important Safety Instructions • Be aware that in the normal operation of the machine, treadle movement is mechanically linked to the walking motion on the belts. When the walk belts are not in motion, the treadles will rest in a fixed position. In the event that an object becomes lodged between the treadles, the treadles can be manually moved in one of the following 2 ways: Push downward on the outside foot rail of the lowest treadle with your foot or hand, and the...
-
Page 5: Safety Warning Labels And Serial Number
Safety Warning Labels and Serial Number To validate warranty support, keep the original proof of purchase and record the following information: Serial Number __________________________ Date of Purchase ____________________ To register your product warranty, go to: www.bowfl ex.com/register Or call 1 (800) 605–3369. -
Page 6: Specifi Cations
Specifications Maximum User Weight: 300 lbs (136 kgs) Power Requirements: 2 AA Batteries (not included) Operational Voltage: 1.0 - 3.3VDC... -
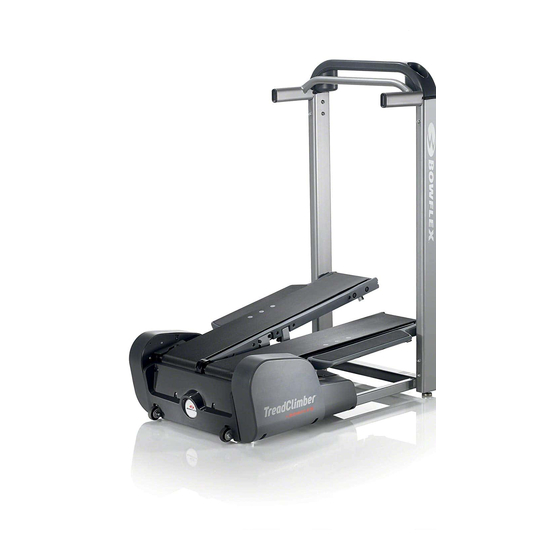
Page 7: Features
Features Console Bottle Holder Handlebars Battery Compartment Walking Belt Adjustment Bolt Treadle Foot Rail / Side Foot Support Platform Walking Belt Guide Transport Handle Bar Leveler Transport Wheel... - Page 8 Features Console Time display Calories (kcal) display Distance display Speed display START/STOP button SCAN button The G.O. Coach™ Console displays one workout value at a time, cycling through all four as you workout. During this cycling, an icon is shown to defi ne the displayed workout value. The icons are also defi ned below the console display (time, kcal, distance and speed).
- Page 9 Features Time display The Time display counts the total time of your workout in minutes and seconds (e.g. 5:42 minutes). Note: When you reach “99:59”, the Time display will rollover to a value of “00:00”. Calorie display The Calorie display shows the total Calorie value. The Calorie display counts your total calories.
-
Page 10: Operations
For example, 15 minutes in the morning and 15 minutes in the evening. For best results, combine your TreadClimber fitness machine workouts with a strength training program using a Bowflex home gym or ®... - Page 11 Operations Warm-Up * Before you use your TreadClimber fi tness machine, consider doing these dynamic warm-up stretches, which will help ® prepare your body for the workout: Dynamic Knee Hug Stand with the feet together. Bring one knee forward and up toward the chest.
- Page 12 Operations Dynamic Twist Stand with the feet shoulder-width apart. Bend the elbows; hold the arms out to the sides. Twist the upper body to one side and then the other side as far as comfortably possible. Each repeti- tion of the sequence should take 1 to 3 seconds. Repeat as a continuous, controlled, fl...
- Page 13 Operations Workouts Follow these guidelines to ease yourself into a weekly exercise regimen. Use your judgment and/or the advice of your physician or health care professional to fi nd the intensity and level of your workouts. Consult a physician before you start an exercise program. Stop exercising if you feel pain or tightness in your chest, become short of breath, or feel faint.
- Page 14 Operations Workout Schedule Here is a beginner, intermediate and advanced sample workout schedule. With each of these sample workout sched- ules, do not move on to the next week until the current week feels easier and comfortable. Week 1 Week 2 Week 3 Week 4 Week 5...
- Page 15 Operations Workout Log Use this log to track your workouts and progress. Tracking your workouts helps you stay motivated and achieve your goals. Date Cylinder Distance Time Calories Average Setting Speed...
- Page 16 Operations Cool-Down * When you are done using your TreadClimber fi tness machine, consider doing these relaxing stretches, which will help ® your body recover from the workout and make you more fl exible: Lying Leg Raise Lie on the fl oor face up with the legs slightly bent. Lift one leg up toward the ceiling, keeping the knee straight.
- Page 17 Operations Seated Twist Sit on the fl oor and extend the legs straight out in front of the body with the knees slightly bent. Place one hand on the fl oor behind the body and the other hand across the thigh. Twist the upper body as far as comfortably possible to one side.
-
Page 18: Before You Start
Operations Before You Start 1. Place the TreadClimber fi tness machine in your workout area. ® Place the machine on a clean, hard, level surface, free from unwanted material or other objects that may hamper your ability to move freely. A rubber mat can be used below the machine to prevent the release of static electricity and protect your fl... - Page 19 Operations freely in a natural walking motion. This workout will activate your core muscles. It should only be done by those com- fortable with not holding on to the Handlebars. 6. To end your workout, push the START/STOP button and step onto the Side Foot Support Platforms. Power Up / Idle Mode The Console will enter Power Up mode when batteries are installed and any button is pushed or the belts are moved.
- Page 20 Operations Pausing or Stopping a Workout To pause a workout, stop walking and bring the Speed value to 0. The workout will pause after 2.5 seconds. Push the SCAN button to cycle through the workout values. When a workout is paused, the workout icons do not fl ash. Note: If a paused workout is not restarted in 5.5 minutes, the machine will shut off.
-
Page 21: Moving Your Machine
Operations Moving Your Machine The TreadClimber fi tness machine weighs approximately ® 163 lbs (74 kg) when fully assembled and requires caution when being moved. Use the Transport Handle found under the front of the machine to move it. To get access to the Transport Handle, turn the Levelers until you have suffi... -
Page 22: Leveling Your Machine
Operations Machine Mat The Bowfl ex TreadClimber Machine Mat is an optional accessory that helps keep your workout area clear and adds ® ® a layer of protection to your fl oor. The rubber machine mat provides a non-slip, rubber surface which limits static discharge and reduces the possibility of display or running errors. -
Page 23: Maintenance
Maintenance Read all maintenance instructions fully before you start any repair work. In some conditions, an assistant is required to do the necessary tasks. Equipment must be regularly examined for damage and repairs. The owner is responsible to make sure that regular maintenance is done. -
Page 24: Walking Belt And Deck Lubrication
We recommend that you use one of the following: • Lube-N-Walk Treadmill Lubrication Kit (available from www.bowflex.com or your local specialty fitness dealer) ® • 100% pure silicone (available at most hardware and auto parts stores) For the best results lubricate the Treadles periodically with a silicone lubricant using the following instructions: 1. -
Page 25: Walking Belt Alignment
Maintenance To decrease the possibility of slipping, be sure the Treadle area is free from grease or oil. Clean off any excess oil from the machine surfaces. Walking Belt Alignment The walking belts need to be adjusted if they are out of center enough to cause a rubbing or scraping sound. Adjust- ments can be made at the Front Roller of each Treadle. -
Page 26: Heim Joint Inspection And Adjustment
Maintenance Belt Tension Check – From the belt’s midpoint, a correctly tensioned belt should only have two inches of give. Keep bystanders and children away from the product during this procedure. To check, pull the belt upward at its midpoint and measure the distance to the deck. If the distance is more than two inches, the belt is loose. -
Page 27: One Way Bearing Inspection And Adjustment
Maintenance One Way Bearing Inspection and Adjustment For proper operation of the Treadles, the One Way Bearings must be in the operational (green) zone. If a Treadle is lifted or moved incorrectly before the Dependency is connected, the One Way Bearings can roll out of the operational zone disabling the Treadles. -
Page 28: Replacing Console Batteries
Maintenance Replacing the Console Batteries The Console will fl ash “bAtt” three times when the batteries are around 10% of their rated power during power up. When replacing the batteries, make sure the batteries point in the +/– direction shown in the battery bay. Note: The console uses AA size batteries (LR6). -
Page 29: Walking Belt Electrostatic Reduction
Maintenance Walking Belt Electrostatic Reduction Your TreadClimber machine may develop a static charge caused by the movement of the walking belts. Follow this ® procedure to apply an anti-static spray to them to reduce the static electric charges. Wait a minimum of 60 minutes after the last workout before you apply the anti-static spray, to let hot electrical components cool to room temperature. - Page 30 Maintenance Maintenance Parts Console / Handlebar Assembly Flywheel and Speed Sensor Magnet Right Upright Left Junction Cover Right Junction Cover Front Cover Left Upright Left Side Cover Rear Cover Right Side Cover Treadle Assembly...
- Page 31 Maintenance Maintenance Parts (Treadle Assembly) Walking Belt Adjustment Screw Walking Belt Adjustment Walking Belt Guide Dependency Side Foot Bracket Bumper Support Platform Front Roller Heim Joint and One Way Dependency Lower Walking Belt Guide Bearing Speed Sensor Rear Roller Belt Tensioner Drive Chain Drive Belt...
-
Page 32: Troubleshooting
Troubleshooting Condition/Problem Things to Check Solution Console will not power up/turn Batteries Make sure batteries are on/start installed correctly. If batteries are correctly installed, replace with a set of new batteries. Speed displayed is not accurate Display set to wrong unit of Change display units. - Page 33 Troubleshooting Speed dependent grinding or Belt alignment Check walking belt alignment. scraping noise Belt contact with metal guides under Treadle can make a loud grinding sound. If belts are misaligned, adjust walking belt. Rollers Contact Customer Care for further assistance. Hesitation or belt slipping when Walking belt tension Adjust walking belt tension by...
-
Page 35: 100% Satisfaction Guarantee
100% Satisfaction Guarantee We want you to know that your TreadClimber machine is a superior product. Your satisfaction is guaranteed. If, for ® any reason, you are not 100% satisfi ed with your TreadClimber machine, please follow the instructions below to ®... - Page 36 Nautilus Bowflex Schwinn Universal ® ® ® ® 003-3859.011512.C...
Need help?
Do you have a question about the TreadClimber TC5 and is the answer not in the manual?
Questions and answers