
Related Manuals for Miele DA 422-6


Summary of Contents for Miele DA 422-6
- Page 1 Operating and installation instructions Cooker hood To prevent the risk of accidents or damage to the appliance, it is essential to read these instructions before it is installed and used for the first time. en-GB M.-Nr. 09 704 890...
-
Page 2: Table Of Contents
Contents Warning and Safety instructions................4 Caring for the environment................. 13 Modes of operation....................14 Con@ctivity 2.0 function..................15 Guide to the appliance..................16 Operation (Automatic mode)................18 Cooking with Con@ctivity 2.0 (Automatic mode)........... 18 Leaving automatic mode temporarily..............20 Returning to automatic mode................ - Page 3 Contents Drilling diagram for wall mounting................. 34 Connection for air extraction................35 Condensate trap....................36 Silencer........................36 Electrical connection................... 38 Activating Con@ctivity 2.0................... 39 Installing the Con@ctivity 2.0 Stick................ 39 Activating Con@ctivity 2.0..................39 Activating the cooker hood................39 Activating the hob..................... 39 Activation check....................
-
Page 4: Warning And Safety Instructions
They contain important notes on the safety, installation, use and maintenance of the appliance. Miele cannot be held liable for non-compliance with these instructions. Keep these instructions in a safe place and ensure that all users are familiar with the contents. - Page 5 Warning and Safety instructions Children must not be allowed to clean or maintain the cooker hood unsupervised. Please supervise children in the vicinity of the cooker hood and do not let them play with it. Danger of suffocation. Packaging, e.g. plastic wrappings, must be kept out of the reach of babies and children.
- Page 6 Unauthorised installation, maintenance and repairs can cause considerable danger for the user. Installation, maintenance and repairs must only be carried out by a Miele authorised technician. A damaged appliance can be dangerous. Check it for visible signs of damage. Do not use a damaged appliance.
- Page 7 Miele spare parts. If the electrical connection cable is faulty it must only be replaced by a Miele authorised service technician to protect the user from danger. During installation, maintenance and repair work, the appliance...
- Page 8 Warning and Safety instructions Using at the same time as other heating appliances that depend on the air from the room Warning - danger of toxic fumes Great care should be taken when using the cooker hood at the same time and in the same room or area of the house as another heating appliance which depends on the air in the room.
- Page 9 Warning and Safety instructions In order to ensure safe operation, and to prevent gases given off by the heating appliances from being drawn back into the room when the cooker hood and the heater are in operation simultaneously, an underpressure in the room of 0.04 mbar (4 pa) is the maximum permissible.
- Page 10 Warning and Safety instructions Correct use Never use an open flame beneath the cooker hood. To avoid the danger of fire, do not flambé or grill over an open flame. When switched on, the cooker hood could draw flames into the filter. Fat deposits could ignite, presenting a fire hazard.
-
Page 11: Correct Installation
The distances given in "Installation" must be observed when fitting the cooker hood. Exhaust ducting must be of non-inflammable material. Suitable material is available from Miele specialist dealers or the Miele Spares Dept. The appliance must not be connected to a chimney or vent flue which is in use. - Page 12 Warning and Safety instructions Accessories Only use genuine original Miele accessories with this appliance. Using accessories from other manufacturers will invalidate the guarantee, and Miele cannot accept liability.
-
Page 13: Caring For The Environment
Caring for the environment Disposal of the packing Disposal of your old appliance material Electrical and electronic appliances often contain valuable materials. They The packaging is designed to protect also contain materials which, if handled the appliance from damage during or disposed of incorrectly, could be transportation. -
Page 14: Modes Of Operation
(...EXT model cooker hoods) Air extraction A Miele extraction fan is installed in a location of your choice outside the The air is drawn in and cleaned by the room for cooker hoods which are grease filters and directed outside. -
Page 15: Con@Ctivity 2.0 Function
Modes of operation Con@ctivity 2.0 function The hob transmits information about its operational status via a radio signal to Automatic control the cooker hood. The cooker hood has a communication – When the hob is switched on, the facility which enables the automatic hob lighting comes on independently operation of the cooker hood and then after a short time the fan... -
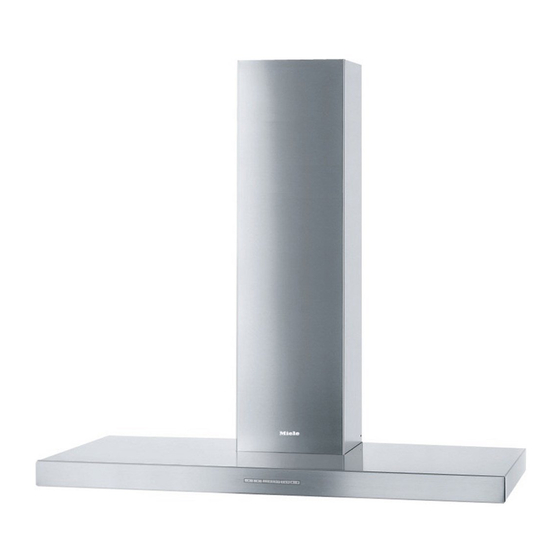
Page 16: Guide To The Appliance
Guide to the appliance... -
Page 17: Guide To The Appliance
Guide to the appliance a Telescopic extension piece b Tower c Canopy d Controls e Grease filters f Hob lighting g Control for the hob lighting h On/Off control for the fan i Controls to select the fan power level j Control for the run-on option k Operating hours control... -
Page 18: Operation (Automatic Mode)
Operation (Automatic mode) When Con@ctivity 2.0 is activated, the Reaction time cooker hood always works in automatic The cooker hood reacts with a slight mode (see "Activating Con@ctivity delay because altering the power level 2.0"). on the hob does not immediately result To operate the cooker hood manually, in a reduction or increase in cooking see "Cooking without Con@ctivity 2.0". -
Page 19: Switching Off
Operation (Automatic mode) Cooking process Switching off If for example you switch on a Switch off all cooking zones. cooking zone at the highest power The cooker hood fan will reduce its level to heat a pan for frying and power level over the next few minutes reduce the power level after approx. -
Page 20: Leaving Automatic Mode Temporarily
Operation (Automatic mode) Leaving automatic mode Returning to automatic mode temporarily The cooker hood returns to automatic mode: To leave automatic mode temporarily during cooking: if the cooker hood has not been used for approx. 5 minutes after selecting ... -
Page 21: Operation (Manual Mode)
Operation (Manual mode) Cooking without Con@ctivity After you have finished cooking, press the run-on option control 5 2.0 (Manual mode) 15 The cooker hood can be operated – Once: the fan will switch off after 5 manually if: minutes (5 will light up). –... -
Page 22: Power Management
Operation (Manual mode) Power management Switching Power management on /off The cooker hood features a power Switch off the fan and the lighting. management system for switching off the lighting and reducing the fan power Press the run-on option control 5 level automatically. -
Page 23: Operation (Automatic And Manual Modes)
Operation (Automatic and Manual modes) Operating hours counter Fan power level indicators 1 to IS show the time set: The number of hours the appliance has 1..........20 hours been in operation is stored in memory. 2..........30 hours When the Grease filter symbol , lights up, the operating hours counter is 3.......... -
Page 24: Reading The Filter Operating Hours Counter
Operation (Automatic and Manual modes) Reading the filter operating hours counter To check the percentage of time set already used Press the On/Off control to switch the fan on. Press and hold the operating hours control . The grease filter symbol ... -
Page 25: Cleaning And Care
Cleaning and care Housing To help prevent re-soiling, a proprietary conditioning agent for General information stainless steel (available from Miele) can also be used. Follow the The surfaces and controls are manufacturer’s instructions on the susceptible to scratches and packaging. - Page 26 Cleaning and care Cleaning interval Cleaning the grease filters by hand The grease filters should be cleaned Clean the filters with a soft nylon regularly (at least every 3 - 4 weeks) to brush in a mild solution of hot water avoid a build-up of grease.
-
Page 27: Resetting The Grease Filter Operating Hours Counter
Cleaning and care After cleaning Press the operating hours control for approx. 6 seconds, until only After cleaning, leave the filters to dry the 1 is flashing. on an absorbent surface before replacing them. When removing the filters for cleaning, also clean off any residues of oil or fat from the now accessible housing to prevent the risk of these... -
Page 28: After Sales / Guarantee
Miele dealer or the Miele Service Department. Contact details for Miele are given at the back of this manual. N.B. A call-out charge will be applied to service visits where the problem could have been resolved as described in these instructions. -
Page 29: Installation
Installation Before installation Dismantling Should the appliance ever need to be Before installation, it is important dismantled, follow the installation to read the information given on the instructions in reverse order as following pages as well as the described on the installation sheet. A "Warning and Safety instructions"... -
Page 30: Assembly Parts
Installation Assembly parts... - Page 31 Installation a 3 protective sheets for use when fitting the tower b 1 exhaust connection 6 screws 5 x 60 mm and for exhaust ducting 150 mm 6 plugs 8 x 50 mm c 1 reducing collar for securing the wall bracket for exhaust ducting ...
-
Page 32: Appliance Dimensions
Installation Appliance dimensions The diagram is not drawn to scale. -
Page 33: Safety Distance Between Hob And Cooker Hood
Installation ab The shaded area represents the wall or ceiling area for the vent cut-out, for fitting the connection socket and on EXT models for feeding the connection cable through to the external motor. Connection for air extraction 150 mm, or 125 mm with reducing collar. Safety distance between hob and cooker hood When planning the installation height of your cooker hood, the minimum safety distance between the top of a cooker or hob and the bottom of the cooker... -
Page 34: Installation Recommendations
Installation Installation recommendations Drilling diagram for wall mounting – When deciding on the safety distance between the hob and Please follow the directions given in cooker hood, please note that a the installation instructions supplied distance of 650 mm above electric for drilling. -
Page 35: Connection For Air Extraction
Connection for air extraction – The exhaust ducting should be as Before installation, it is important short and straight as possible. to read the information given on the following pages as well as the – Only use wide radius bends. "Appliance dimensions"... -
Page 36: Condensate Trap
Connection for air extraction will need to be addressed. The Silencer exhaust ducting will need to be suitably insulated. Condensate trap To achieve even further reductions in noise levels, a special silencer (optional accessory) can be fitted in the ducting system. - Page 37 Connection for air extraction Air extraction with external motor To minimise noise from the motor in the kitchen, the silencer should be positioned in front of the external motor if possible, or, if the ducting is long, above the exhaust connection inside the hood .
-
Page 38: Electrical Connection
Electrical connection If the switch is not accessible after All electrical work should be installation (depending on country), an undertaken by a suitably qualified additional means of disconnection must and competent person in strict be provided for all poles. accordance with current national and For extra safety it is advisable to protect local safety regulations (BS 7671 in the appliance with a suitable residual... -
Page 39: Activating Con@Ctivity 2.0
Activating Con@ctivity 2.0 Installing the Con@ctivity 2.0 – then the lighting control . Stick If Con@ctivity 2.0 is not activated, 2 and 3 will flash at the same time. In order to use the Con@ctivity 2.0 function, the hob must first be fitted ... - Page 40 Activating Con@ctivity 2.0 Then press in turn, – the "" control, – then the "" control, – then the lighting control . If Con@ctivity 2.0 is activated, 2 and 3 will light up constantly. If Con@ctivity 2.0 is not activated, 2 and 3 will flash at the same time.
-
Page 41: Technical Data
Length of connection cable to external motor: 1.9 m Conformity declaration Miele hereby declares that the cooker hoods listed at the end of this booklet comply with the basic requirements and other relevant regulations of Guideline 1999/5/EC. - Page 44 DA 422-6 DA 422-6 EXT en-GB M.-Nr. 09 704 890 / 00...
Need help?
Do you have a question about the DA 422-6 and is the answer not in the manual?
Questions and answers