Table of Contents
Advertisement
Advertisement
Table of Contents

Related Manuals for Holux M-241


Summary of Contents for Holux M-241
- Page 1 HOLUX Wireless GPS Logger M-241User’s Manual Holux Wireless GPS Logger M-241 User’s Guide OCT 2007 Rev.A Technology, Inc. 1F, No. 30, R&D Rd. II, HsinChu City 300, Science-based Industrial Park, Taiwan TEL: 886-3-6687000 FAX: 886-3-6687111 Website: www.holux.com All Rights Reserved...
- Page 2 HOLUX Wireless GPS Logger M-241 User’s Manual...
-
Page 3: Table Of Contents
HOLUX Wireless GPS Logger M-241 User’s Manual Table of Contents Table of Contents ...3 Overview ...4 Packing List ...6 Main features ...7 Specification ...8 Icons & Indicators ...10 Product Overview...11 Basic Operations...12 Connecting the device to the PC ...20 Download Log Data to PC ...21 10. -
Page 4: Overview
Earth. Position information, moving speed, free logging volume and the date & time can be shown on the LCD display directly at any time. The M-241 supports distance and time logging modes, kilometer and mile distance units, and 3 languages (English, Traditional Chinese, and Simplified Chinese). - Page 5 HOLUX Wireless GPS Logger M-241 User’s Manual Applications: * Vehicle tracing & Location base services * Navigation with PDA/Notebook/Smartphone devices * Car navigation * Marine navigation * Distance measurement * Sports and Recreation * Fleet Management Software application program: A user-friendly software utility is provided with the following functions: * Download recorded data to PC.
-
Page 6: Packing List
HOLUX Wireless GPS Logger M-241 User’s Manual 2. Packing List Thank you for purchasing the M-241 wireless GPS logger. Before you start, make sure that the following items are included in your package. If any of these items are missing, please contact your original local HOLUX dealer or distributor. -
Page 7: Main Features
HOLUX Wireless GPS Logger M-241 User’s Manual 3. Main features Built-in MTK Low power consumption GPS chipset. 32 parallel satellite-searching channels for fast acquisition and reacquisition. Superior sensitivity, up to -159 dBm. Built-in WAAS/EGNOS/MSAS Demodulator without any additional hardware. Completely compatible with Bluetooth Serial Port Profile (SPP). -
Page 8: Specification
HOLUX Wireless GPS Logger M-241 User’s Manual 4. Specification •32 parallel satellite searching channels •Receiver: L1, 1575.42 MHz •Frequency: 1.023 MHz •Update frequency: 1 Hz. •Antenna type: Built-in •Satellite signal reception sensitivity: -159dBm Specifications •Dimensions: 32.1mm X 30mm X 74.5mm •Weight (excluding battery): <... - Page 9 HOLUX Wireless GPS Logger M-241 User’s Manual ◆Output port: Mini-USB (CMOS Level) •NMEA protocol output: V 3.01 Baud rate: 38400 bps Data bits: 8 Sync bits: N End bit: 1 •Output interface: Standard: GPGGA (1 time per second), GPGSA (1 time per second), GPGSV (1 time per second), GPRMC (1 time per second), GPVTG (1 time per second).
-
Page 10: Icons & Indicators
HOLUX Wireless GPS Logger M-241 User’s Manual 5. Icons & Indicators Position Icon Descriptions Log by Time Log by Distance Log On Waypoint GPS Fix Bluetooth Connection Position Icon Descriptions Measure Distance On Lock On Device & PC Connected Battery is Full... -
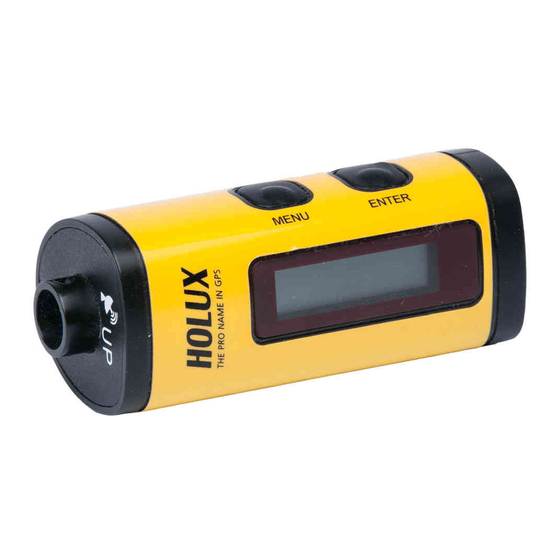
Page 11: Product Overview
HOLUX Wireless GPS Logger M-241 User’s Manual 6. Product Overview LCD Screen MENU Button ENTER Button Power Switch Battery Cover USB Port... -
Page 12: Basic Operations
7. Basic Operations Before you use 1. If the user wants to use M-241 to record the coordinate for matching the GPS coordinate of the picture in the camera, because the integration of the two parties is performed under the comparison of the time, it is recommended for the user to adjust the clock time in the camera to match the GPS time in the M-241. - Page 13 HOLUX Wireless GPS Logger M-241 User’s Manual Operational flow...
-
Page 14: Time Mode
Menu: Go to Time mode Enter: Start / Stop the recording GPS data. Note: When power on M-241, user will see “ acquisition. After GPS is fixed, you will see the screen When user starts the “Track Log” function, the “... - Page 15 HOLUX Wireless GPS Logger M-241 User’s Manual :Position Information Mode Menu: Go to Speed & Altitude Information mode Enter: Record a current track log data once Note: When Recording a current track log data once, the ” show for one second on the bottom-left corner of the screen.
-
Page 16: Setting Mode
HOLUX Wireless GPS Logger M-241 User’s Manual :Measure Distance Mode Menu: Go to Setting mode Enter: Start / Stop to measure distance Note: 1. When user enables the “Measure Distance” function, the “ will shows on the top-left corner of the screen 2. - Page 17 HOLUX Wireless GPS Logger M-241 User’s Manual Menu: Select “Point” or “Route” Enter: Setting and back to Setting mode NOTE: When the user select the “Point” logging method, the logged distance is the straight line distance between the starting point and the end point.
- Page 18 HOLUX Wireless GPS Logger M-241 User’s Manual Menu: Go to Log by Time menu of Setting mode Enter: Select “Full Stop” or “Overwrite” Menu: Select “Full Stop” or “Overwrite” Enter: Setting and back to Setting mode Note: 1. “ Full Stop” -> Recording log data -> flash full -> Stop recording.
- Page 19 HOLUX Wireless GPS Logger M-241 User’s Manual Menu: Go to Default menu of Setting mode Enter: Go to “YES / NO” status Menu: Not erased and back to Setting Mode Enter: Erase all of track log data and back to Setting Mode Menu: Go to Back menu of Setting mode Enter: Go to “YES / NO”...
-
Page 20: Connecting The Device To The Pc
HOLUX Wireless GPS Logger M-241 User’s Manual 8. Connecting the device to the PC M-241 support 2 kinds of connection to PC, through USB cable or Bluetooth. Install USB driver 1. Power On the device. 2. Connect the device to a computer with the USB cable provided in the package. -
Page 21: Using Bluetooth
3. The download time takes about 4 min if the full memory usage. Holux Logger Utility “Holux Logger Utility” allows the user to adjust Track Log Setting and Track Log Format Conversion and Track Log Photo Link. Utility main screen includes four sub pages:... -
Page 22: Device Setting
3. Baud rate:Select Baud rate.(Default: 38400) 4. Connect:Connect the Holux Logger Utility to device. 5. Device Information:If the device connected to Holux Logger Utility, the device information will show a descriptive message and the Connect button will change to Disconnect. The device LCD will show an “... - Page 23 HOLUX Wireless GPS Logger M-241 User’s Manual Connected 1. User Name:User can input user name here. a. Maximum input for user name:16 characters b. Input user name must be ASCII characters. c. Cannot input “*”or spaces. 2. Write Name:Send the user name setting to the device and save it.
- Page 24 HOLUX Wireless GPS Logger M-241 User’s Manual Track Log Setting 1. Page:Track Log Setting Page. 2. Record Style:Select Record Style. 3. Log Argument:Select Log Argument. 4. Upload:Go to upload Track Log Data from Device to PC. 5. Clear:Clear All Data of Device.
- Page 25 HOLUX Wireless GPS Logger M-241 User’s Manual Upload 1. Directory:Select the directory for saving. 2. Directory:If the user has Image files for Track Log Data, please go to select the image directory after the “Combine JPG file” item has been selected.
- Page 26 HOLUX Wireless GPS Logger M-241 User’s Manual Track Log File Status During the uploading of the track log, the track log files (*.trl) and (*.kml) will be generated. If the user has logged multiple tracks (Note: when the user press the “Log Start”...
- Page 27 HOLUX Wireless GPS Logger M-241 User’s Manual Track Log Format 1. Page:Track Log Format Page. 2. Directory:Select the track log source file (*.trl) that you are uploading. 3. Time Zone (UTC+-) :Select the time zone as device time zone (UTC).
- Page 28 HOLUX Wireless GPS Logger M-241 User’s Manual Track Log Photo...
- Page 29 HOLUX Wireless GPS Logger M-241 User’s Manual 1. Page:Track Log Photo Page. 2. Directory :Select the track log source file (*.trl) that you are uploading. 3. Directory :Select the image directory that you want to combine. 4. Photo Combine Setting:Calibrate Photo Time.
- Page 30 HOLUX Wireless GPS Logger M-241 User’s Manual “Track Log Setting” in the device, please click the “Apply All” button) Photo Combine Setting 1. Time Zone For Photo (UTC+-) :Select the time zone as device time zone (UTC). 2. Calibrate Time:Calibrate camera photo time to match the device showing time.
-
Page 31: Bluetooth Device Connection Installation
HOLUX Wireless GPS Logger M-241 User’s Manual 10. Bluetooth device connection installation The following software installation steps instruct the user how to setup Bluetooth Manager on PDA, DELL AXIM x51v . For other PDA or laptop devices, the steps might vary. - Page 32 HOLUX Wireless GPS Logger M-241 User’s Manual 5. Connect to “Serial port” or “SPP Slave”, then tap “Finish” 6. Go to the “COM ports” panel to tap “New Outgoing Port”, choose “HOLUX_M-241” device and tap “Next”. 7. Select the COM port, then tap finish, it will show as a figure on the right, and tap “OK”...
-
Page 33: Installation Of Mini Gps Viewer Program
HOLUX Wireless GPS Logger M-241 User’s Manual 11. Installation of Mini GPS Viewer program We provide the program “Mini GPS viewer.exe” for end users to watch the satellite signal receiving status on laptop or PDA devices. For Windows 2000/XP OS, you can execute “Mini GPS viewer_PC”... -
Page 34: Execute The Mini Gps Viewer Program
HOLUX Wireless GPS Logger M-241 User’s Manual 12. Execute the Mini GPS Viewer program The following window is shown after executing Mini GPS Viewer_PPC, (see Fig. 1). The Windows 2000/XP version is has a slightly different display. Setup the Baud rate: 38400, then tap the “Scan” button to scan your COM Port. - Page 35 HOLUX Wireless GPS Logger M-241 User’s Manual Select “GPS Status” panel to observe the GPS information status, see Fig. 3. In the “setup” panel you can see “Hot Start” “Warm Start” “Cold Start”, which allow you to re-acquisition the Ephemeris and Almanac.
-
Page 36: Power
Ordinary Battery Rechargeable Battery(1700mA) M-241 can be powered by the Car Charger or the USB Cable to continue the operation of the M-241 without any battery. However, it does not equip with the charging function. It can not perform the charging operation even if the rechargeable battery is used. -
Page 37: Troubleshooting
HOLUX Wireless GPS Logger M-241 User’s Manual 15. Troubleshooting Problems Possible Reasons Weak or no GPS signal at the place of M-241 No GPS output but The ephemeris and almanac data GPS timer is in the GPS memory are no longer... -
Page 38: Federal Communications Commission (Fcc) Statement
HOLUX Wireless GPS Logger M-241 User’s Manual Federal Communications Commission (FCC) Statement This equipment has been tested and found to comply with the limits for a Class B digital device, pursuant to Part 15 of the FCC Rules. These limits are designed to provide reasonable protection against harmful interference in a residential installation. - Page 39 HOLUX Wireless GPS Logger M-241 User’s Manual compliance. This equipment is in compliance with the essential requirements and other relevant provisions of Directive 1999/5/EC.
Need help?
Do you have a question about the M-241 and is the answer not in the manual?
Questions and answers