Table of Contents
Advertisement
Advertisement
Table of Contents

Related Manuals for Epson ELPMB30


Summary of Contents for Epson ELPMB30
- Page 1 ELPMB25 User’s Guide...
-
Page 2: Table Of Contents
Contents Included Items List ..............3 Safety Instructions . -
Page 3: Included Items List
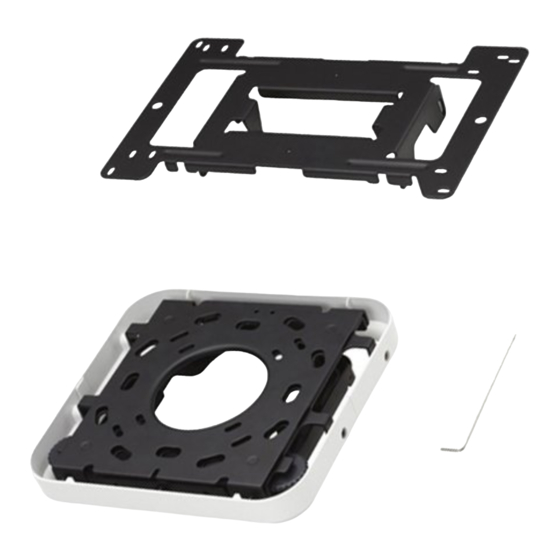
Low Profile Ceiling Mount Included Items List Check the following list and confirm that you have all of the supplied items. If there is anything missing or damaged, please contact your dealer. Y Ceiling plate Y Ceiling plate Y Ceiling plate Stacked on the c eiling plate Stacked under the ceiling Mounted on the ceiling plate... -
Page 4: Safety Instructions
Safety Instructions For your safety, read the attached documents carefully to assemble and install this product correctly. Be sure to follow the safety precautions. After you have read all instructions, keep this information for later reference. So that you can use the product safely and correctly, the following symbols are used to show dangerous operation or handling. -
Page 5: Precautions On Where To Mount The Projector
Doing so may cause fire or electric shock. If the power cable is damaged (exposed conductor, breaking or the like), contact your dealer or Epson customer service call center. v Disconnect the power cable from the projector before cleaning. When cleaning it, do not use a moistened cloth or solvents such as alcohol, thinner or benzine. -
Page 6: Installation
Installation Installing the Ceiling Plate and Ceiling Plate on the Ceiling Determine the distance to the screen and locate the mounting position before mounting the ceiling plates. Refer to "Ceiling template" below for the size of the ceiling plate and the location of screw holes and their size. The projection distance to the screen varies according to the projector. -
Page 7: Typical Installation Case
Tighten the screws firmly during installation or after adjusting the angles. After tightening the screws, retighten them firmly and make sure that they are not loose. v Epson accepts no responsibility for the projector and the ceiling mount falling due to inadequate installation. Female type anchors... -
Page 8: Mounting The Ceiling Plate
Mounting the Ceiling Plate on the Ceiling Plate Warning Be sure to tighten the screws securely. After tightening the screws, try re-tightening them once again and make sure that all of them are securely tightened. Necessary items for the following procedure Y Ceiling plate Y M8x10 screws (mm) Y M4x10 screws... - Page 9 Insert the M4x10 screws into the screw holes on the screen side of the ceiling plate and tighten them with the ball point hex wrench. To the screen Secure these.
-
Page 10: Mounting Projector Plate On The Projector
Mounting Projector Plate on the Projector Warning v Be sure to tighten the screws securely. After tightening the screws, try re-tightening them once again and make sure that all of them are securely tightened. v Applying threadlocker, lubricant, oil or other substance to the points at which the projector is fixed to this product may make the case crack and the projector may fall, and which may cause injury or an accident. -
Page 11: Mounting The Projector Plate To The Ceiling Plate
Mounting the Projector Plate to the Ceiling Plate Warning Keep holding the projector until the installation is complete. Necessary items for the following procedure Y M4x10 screws (mm; w/ washer) Y Ball point hex wrench Procedure Insert the projector plate through the cutouts on the ceiling plate White line Slide the projector plate and engage the dowels on the... - Page 12 Secure these. Insert the M4x10 screws into the screw holes on the projector plate and tighten them with the ball point hex wrench. Angle adjustment should be done later, so there's no need to firmly tighten the screws. Warning Do not pull the cables forcibly. Do the same for the other side.
-
Page 13: Adjusting The Position Of The Projected Image
Adjusting the Position of the Projected Image If the projected image is not fit to the screen, adjust the projection position as follows. v Adjustment by the Lens Shift (for projectors with the lens shift function only) Adjust the projection position by the lens shift function of the projector. For the details on the lens shift, refer to "User's Guide" supplied with the projector. -
Page 14: Shifting The Projected Image Up Or Down
Shifting the Projected Image Up or Down Warning v Keep holding the projector until the installation is complete. v Do not loosen or remove the screws carelessly during vertical tilt adjustment. The projector may fall and cause an accident. v Do not apply extra force to the plate or projector during adjusting the plates. The projector or plates may fall and cause an accident. - Page 15 While supporting the projector, tighten the four screws Tighten these temporarily. temporarily with the ball point hex wrench. Do not tighten the screws too much at this point. Do the same for the other side. Adjust the angle while lowering the projected image by turning the adjustment dial If the projected image is lowered too much, go back to Step 1 and try again.
-
Page 16: Shifting The Projected Image To The Right Or Left
Shifting the Projected Image to the Right or Left Warning v Keep holding the projector until the installation is complete. v Do not loosen or remove the screws carelessly during horizontal rotation adjustment. The projector may fall and cause an accident. v Do not apply extra force to the plate or projector during adjusting the plates. -
Page 17: Adjusting The Projected Image's Horizontal Roll
Adjusting the Projected Image's Horizontal Roll Warning v Keep holding the projector until the installation is complete. v Do not loosen or remove the screws carelessly during horizontal roll adjustment. The projector may fall and cause an accident. v Do not apply extra force to the plate or projector during adjusting the plates. The projector or plates may fall and cause an accident. -
Page 18: Installing The Ceiling Plate Cover
Installing the Ceiling Plate Cover Install the ceiling plate cover after adjusting the installation angles as necessary if you want to coordinate the colors of the projector and the ceiling. Necessary items for the following procedure Y Ceiling plate cover Y M4x10 screws Y Ball point hex wrench (mm;... -
Page 19: Inquiries
Insert the other piece for the screen side and fit it to the ceiling plate cover for the rear side. Secure this. Insert the M4x10 screws into the screw holes on the ceiling plate cover and tighten them with the ball point hex wrench. Do the same for the other side.
Need help?
Do you have a question about the ELPMB30 and is the answer not in the manual?
Questions and answers