Table of Contents
Advertisement
Advertisement
Table of Contents

Related Manuals for AT&T MiFi Liberate


Summary of Contents for AT&T MiFi Liberate
-
Page 1: User Guide
LTE Intelligent Mobile Hotspot User Guide AT&T Mobile Hotspot MiFi Liberate ®... - Page 2 ©2012 Novatel Wireless, Inc. All rights reserved. The information contained in this document is subject to change without notice and should not be construed as a commitment by Novatel Wireless, Inc. Patents and Licenses Visit www.novatelwireless.com/patents for a complete list of all Novatel Wireless patents. Software License Proprietary Rights Provisions: The software drivers provided with this product are copyrighted by Novatel Wireless and/or Novatel Wireless' suppliers.
-
Page 3: Table Of Contents
Accessing MiFi Liberate Features........ - Page 4 On the MiFi Liberate Manager........
- Page 5 Technical Support ............... . . 106 Customer Service .
-
Page 6: Getting Started
Getting Started Device Overview Components Battery Usage Wi-Fi Setup Configure Security Data Usage... -
Page 7: Device Overview
Wi-Fi network name and password, view and block connected devices, enable MiFi Media Center and more. See battery level, network and signal strength at a glance. Connect with confidence—global MiFi Liberate provides a secure, reliable connection when and where you need †... -
Page 8: Device Setup And Power On
Device Setup and Power On Your MiFi Liberate comes with the SIM card and battery already installed. Remove the battery pull- tab prior to use. ➊ Press and release the power button. When the touchscreen displays the interactive icons, your device is ready to use. -
Page 9: Components
➐ Battery Door — Remove to access battery and SIM card slot. ➑ SIM Card Slot — Active SIM card must be installed for network access. MiFi Liberate’s SIM Card comes preinstalled. ➒ Reset Button — Resets the device to factory default settings. -
Page 10: Power Sources For Your Mifi Liberate
Power Sources for Your MiFi Liberate Your MiFi Liberate will work from its battery or when plugged into a power source. Battery — The battery lasts up to 11 hours. Charge the battery by plugging in the A/C • charger. While the battery is charging the charging battery status icon displays on the MiFi Liberate touchscreen status bar. -
Page 11: Service Status Icons
Service Status Icons Status icons at the top of the MiFi Liberate Touchscreen, and on the Status bar of the MiFi Liberate Manager indicate the device status. The appearance of each icon varies according to the current device status. Status Icon... -
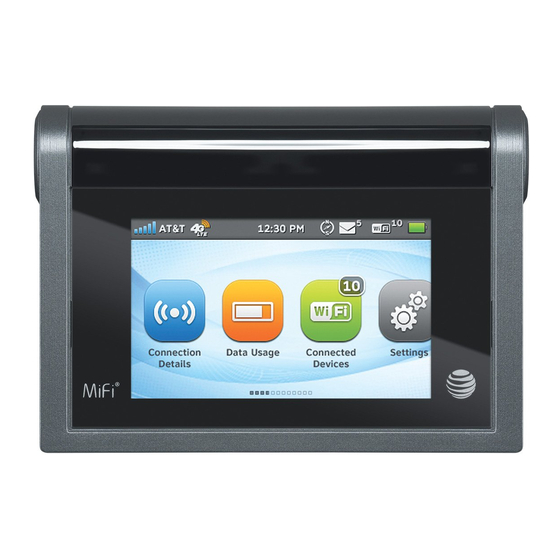
Page 12: Touchscreen Icons
Connected Devices Displays details of devices currently connected to or blocked from your MiFi Liberate. Settings Allows you to access and configure your MiFi Liberate device settings. Messages Connects you to text messages delivered to your MiFi Liberate, including AT&T service notifications. -
Page 13: Mifi Liberate Manager
MiFi Liberate Manager The MiFi Liberate Manager is part of your MiFi device. It's a web interface you can log into to customize settings, change your password, get information and access applications. MiFi Liberate Manager Navigation Each page contains a menu bar to help you navigate. The navigation panel is at the left of the browser interface on each page and contains the following: MiFi Home —... - Page 14 Media Center — takes you to the Media Center page, where you can view and share your • movies, music with connected devices. (See Media Center on page 73.) GPS — takes you to the GPS page, where the GPS receiver on the MiFi device can determine •...
-
Page 15: Battery Usage
The MiFi Liberate comes with the SIM card and battery installed. Remove the battery pull tab prior to use. To charge the battery, connect the A/C charger to the USB cable and plug into the MiFi Liberate’s micro USB port. The charging battery status icon displays on the MiFi Liberate touchscreen status bar while the battery is charging. -
Page 16: Remove The Battery
Using any of these types of objects could result in puncturing the MiFi Liberate battery. ➊ Place your MiFi Liberate device on a flat surface with the battery door facing up. Be sure to remove the battery pull tab before use. ➋... - Page 17 ➍ Use your forefinger to pull the battery up slightly so that it moves out of the battery well. ➎ Lift the battery out of the battery well.
-
Page 18: Remove The Sim Card
Remove the SIM Card Your MiFi Liberate comes with the SIM card already installed. To remove the SIM card: ➊ Open the battery compartment and remove the battery from the battery well to reveal the SIM card slot. ➋ To release the SIM card from the slot, push and release the top of the SIM card. -
Page 19: Battery Advisory
Do not place the device in a closed space where there is no air circulation (e.g., do not wrap • the device in a blanket or place it under a pillow). Whenever you remove or insert either the battery or the SIM card, ensure your MiFi Liberate • device is not connected to any device or power source. -
Page 20: Wi-Fi Setup
Wi-Fi Setup To properly set up your MiFi Liberate device, you need to do both of the following tasks: Set Up a Wi-Fi Connection • Log Into the MiFi Liberate Home Page • Set Up a Wi-Fi Connection To connect to your MiFi Liberate: ➊... - Page 21 ➌ Use your normal Wi-Fi manager on your computer to locate the MiFi Liberate Wi-Fi Network Name (SSID) and select it. ➍ Windows: Click Connect. Mac OS X: Click the MiFi device network name. Tip! Windows only: The steps to connect to a Wi-Fi network vary depending on your operating system version and whether you use the native application or third-party software.
-
Page 22: Log Into The Mifi Liberate Manager Web Interface
Log into the MiFi Liberate Manager Web Interface ➊ From your computer's Web browser, type http://att.mifiliberate (alternatively, http://192.168.1.1) without adding "www" in the address bar and press the Enter or Return key. The MiFi Liberate Manager Home page launches. ➋... - Page 23 ➌ Type the Admin Login: xxxxxxxx (case sensitive) into the login field (the default is attadmin). ➍ Click Login. The MiFi Liberate Home page opens.
-
Page 24: Configure Security
Configure Security Although your device is pre-configured to have security enabled, you should change the password to a password you can easily remember and that is hard for others to guess. Using security with your wireless network is very important. It is recommended that you configure security immediately by changing the following: Change the Admin Login •... - Page 25 NOTE There are two types of passwords: – The Admin Login password to access the MiFi Liberate Manager Web interface to configure settings. – The Wi-Fi password (also called the Wi-Fi key or network security key) that you need to connect your MiFi Liberate to your computing device(s).
-
Page 26: Change The Wi-Fi Password
Change the Wi-Fi Password You can use WEP (64- or 128-bit), WPA-PSK, WPA2-PSK, or WPA/WPA2 mixed mode security. IMPORTANT Record your Wi-Fi password (also referred to as the Wi-Fi key or network security key depending on your operating system). ➊ Open your browser, go to http://att.mifiliberate, then click Login. -
Page 27: Accessing Mifi Liberate Features
Accessing MiFi Liberate Features MiFi Liberate Manager Data Usage Connected Devices Settings Messages File Sharing Media Center About... -
Page 28: Mifi Liberate Manager
The MiFi Liberate Manager Home page is the first page you see when you connect to your MiFi Liberate. This is where you click Login to go to the MiFi Liberate Login page and enter your 8-digit password to login and customize your device and access advanced features and settings. -
Page 29: Data Usage
Data Usage You can quickly and easily check your data usage directly on the MiFi Liberate touchscreen, or on the MiFi Liberate Manager. On the MiFi Liberate Touchscreen ➊ To display your data plan summary, data used, and days remaining in your billing cycle, tap the Data Usage icon on the touchscreen. -
Page 30: On The Mifi Liberate Manager
On the MiFi Liberate Manager To access the Data Usage page, click Data Usage on the Navigation panel. The Data Usage page contains the following. Account Summary • International Roaming • ➊ To display your data plan summary, manage your AT&T account, and access information about global data packages, select the Data Usage tab on the Navigation panel on the MiFi Liberate Manager Home page. -
Page 31: Connected Devices
Connected Devices The Connected Devices page allows you to view devices currently connected or blocked from connection to your MiFi Liberate. You can also block and unblock devices from this page. The Connected Devices page contains the following. Connected Devices — a list of compatible devices currently connected to your MiFi Liberate. - Page 32 ➍ Go to http://att.mifiliberate/connecteddevices to manage your connected devices.
-
Page 33: On The Mifi Liberate Manager
To access the Connected Devices page, click Connected Devices on the Navigation panel. The Connected Devices page contains the following: Connected Devices — a list of compatible devices currently connected to your MiFi Liberate. • Blocked Devices — a list of compatible devices currently block from connecting to your MiFi •... - Page 34 ➊ Click the pencil icon to assign a name to a connected device. ➋ Enter the desired name into the name field, then select the type of device from the device type drop-down menu.
- Page 35 ➌ Click the check mark to finalize the changes. ➍ Click Block to add a connected device to the Blocked Device list.
- Page 36 ➏ Click Unblock to remove a device from the Blocked Devices list.
-
Page 37: Settings
The Settings page allows you to configure and customize your MiFi device. You can enable/disable Airplane Mode, Cellular Data access, and International Roaming; configure Screen Timeout and Brightness settings; set Sound Alerts and device Wi-Fi range; and configure USB Mode.. On the MiFi Liberate Touchscreen ➊ Tap the Settings icon to display the Settings page. - Page 38 Yes to accept data roaming charges that will apply to data usage outside the U.S., Puerto Rico and the U.S. Virgin Islands. ➎ To configure the amount of time the touchscreen displays after a period of inactivity, tap Screen Timeout. Scroll to select a timeout interval from 30 seconds to 5 minutes, or never to disable Screen Timeout.
- Page 39 To configure your USB Mode connection, tap USB Mode. Select Charge Only to recharge the battery via USB cable, or Tethering over USB to connect the device over a USB cable with a data connection. Windows XP users must install drivers from the MiFi Liberate Manager.
- Page 40 ➓ To access and configure additional features and settings, login to the MiFi Liberate Manager at http://att.mifiliberate, then select Settings > Device Settings > Preferences.
-
Page 41: On The Mifi Liberate Manager
On the MiFi Liberate Manager To access Advanced, Hotspot, and Mobile Setting options, select the Settings tab on the Navigation panel on the MiFi Liberate Manager Home page. The Settings page contains the following: Device Settings (See Device Settings on page 41.) •... -
Page 42: Device Settings
Device Settings The Device Settings menu includes the following additional menu options. Preferences (See Preferences on page 42.) • Admin Login (See Admin Login on page 46.) • Backup and Restore (See Backup and Restore on page 48.) •... -
Page 43: Preferences
Preferences The Preferences section allows you to customize your MiFi device settings and preferences. The Preferences section displays the following: Device Preferences – allows you to set auto shutdown preferences and to enable Ethernet • over USB. Select your shutdown preference from the Automatic Shutdown drop-down menu. Click Enable Ethernet over USB to enable. - Page 44 ➋ Select the automatic shutdown time interval you want to use from the Automatic Shutdown drop-down menu. If Screen Timeout is set to never, Automatic Shutdown is disabled. ➌ Click Save Changes.
- Page 45 Setting User Preferences To set the date and time format, temperature, and distance and number format preferences: ➊ Select the date/time format you want to use from the Date & Time drop-down menu. You can choose between 24- and 12-hour time display and European (dd/mm/yyyy) and U.S. (mm/dd/yyyy) date formats.
- Page 46 ➌ Select the number format units you want to use from the Number Format drop-down menu. ➍ Click Save Changes.
-
Page 47: Admin Login
Admin Login The Admin Login section displays the following: Display the Admin Login for the MiFi Liberate Manager on the touchscreen – allows you to • turn the MiFi Liberate Manager Admin Login display on the Connection Details page of the touchscreen ON or OFF. - Page 48 Changing the MiFi Liberate Manager Login To change your current Admin Login: ➊ Enter your current Admin Login in the Enter Current Login field. ➋ Enter your new Admin Login in the Enter New Login field. ➌ Enter your new Admin Login in the Confirm New Login field.
-
Page 49: Backup And Restore
Backup and Restore The Backup and Restore section displays the following: Backup — allows you to save your device settings to your computer. • Restore Backup — allows you restore settings from a previously saved backup file. • Restore to Factory Defaults — restores all settings and preferences to the factory default. •... - Page 50 Backing Up Your MiFi Liberate Settings To save your MiFi Liberate settings to your computer: Enter your device Admin Login in the Admin Login field and click Back Up Now. • Restoring Your MiFi Liberate Settings To restore settings from a previously saved backup file on your computer: ➊...
-
Page 51: Hotspot Settings
Hotspot Settings The Hotspot Settings menu includes the following additional menu options. General (See General on page 51.) • Advanced (See Advanced on page 54.) •... -
Page 52: General
General The General section displays the following: Network Name (SSID) — name of the network you are connected to. You can change the • name to something more descriptive if you want; for example, if there are several MiFi devices in your area you might put your name in the network name; for example, "Sarah's MiFi". - Page 53 Choose the most secure protocol that works with the computers and other computing devices you want to connect to your MiFi Liberate. ➍ Enter the new network key in the Wi-Fi Password (Key) field.
- Page 54 ➏ Select the maximum number of Wi-Fi connections (1 - 10) from the Number of Wi-Fi Connections drop-down menu. ➐ Click Save Changes. IMPORTANT You must write down the new network name and Wi-Fi password before you click Save Changes. You need these settings to reconnect to the MiFi device. Click Save Changes. IMPORTANT Your wireless connection will be disabled at this point.
-
Page 55: Advanced
WMM (Wi-Fi Multimedia) — allows you to give a higher priority to real time applications. • Channel — allows you to select a specific communication channel, or to let the MiFi Liberate • automatically select a channel. - Page 56 Automatic option. ➎ To configure the Wi-Fi coverage area for your MiFi Liberate, select from the drop-down menu options. Select Low Power - longer battery life to limit the size of your Wi-Fi network and conserve battery life, or High Power - shorter battery life to maximize the size of your Wi-Fi network.
-
Page 57: Mobile Settings
Mobile Settings The Mobile Settings menu includes the following menu options. Mobile (See Mobile on page 57.) • APN Profiles (See APN Profiles on page 58.) • Network Selection (See Network Selection on page 59.) • Manual DNS (See Manual DNS on page 60.) •... -
Page 58: Mobile
Mobile The Mobile section displays the following: Cellular Data — turn off cellular data to prevent all internet traffic from using the mobile • broadband connection. International Roaming — turn on to access the Internet when traveling internationally. • NOTE Additional data usage charges may apply. -
Page 59: Apn Profiles
APN Profiles This section is for enterprise use only. Changing default settings may adversely affect your Internet connection. The APN Profiles section displays the following: Active APN Profile — choose between AT&T Default or Custom. • APN — enter a name for your Custom APN Profile in the APN field. •... -
Page 60: Network Selection
Network Selection Your MiFi Liberate automatically connects to the optimal mobile network available. In many cases you can also connect to a network manually if multiple networks are available. Manual network selection will not be available if there are no additional available networks. -
Page 61: Manual Dns
Manual DNS The Manual DNS section displays the following: Enable Manual DNS — allows you to select a specific DNS address. • DNS Address 1 — allows you to enter your primary DNS address. • DNS Address 2 — allows you to enter a secondary DNS address if you have one. This field can •... -
Page 62: Sim Lock
SIM Lock The SIM Lock section displays the following: SIM Status — displays the current SIM status. • Desired Action — allows you to select Enable PIN Lock from the drop-down menu. • Enter current SIM PIN — allows you to enter your desired PIN. •... -
Page 63: Advanced Settings
Advanced Settings The Advanced Settings menu includes the following menu options: Firewall (See Firewall on page 63.) • LAN (See on page 64.) • Port Filtering (See Port Filtering on page 65.) •... -
Page 64: Firewall
Firewall The Firewall section displays the following: VPN Passthrough – allows connected devices to establish a VPN tunnel to a remote server or • device. To allow connected devices to establish a VPN tunnel to a remote server or device: Slide the ON/OFF button to ON. -
Page 65: Lan
The LAN section displays the following: IP Address — the address that identifies the MiFi Liberate on the network. • Subnet Mask — the standard address for the MiFi Liberate subnet. • MAC Address — the physical address or hardware address of your MiFi device. -
Page 66: Port Filtering
Port Filtering Port Filtering allows you to enhance the security of your system by only allowing certain applications to reach the Internet. The Port Filtering section displays the following: Port Filtering — restricts internet traffic to specific applications. Select the check box next to •... - Page 67 To enable Port Filtering for custom applications: ➊ Click Add Custom Applications. ➋ Enter the desired name in the App Name field. ➌ Enter the appropriate values in the Begin Port and End Port fields. ➍ Select either TCP or UDP from the Protocol drop-down menu. ➎...
-
Page 68: Messages
Messages The Messages page lists the SMS messages delivered to your MiFi Liberate by your service provider. All messages are listed in order by date, with unread messages indicated in bold on a colored background. All messages are marked as read once they are displayed on this page. -
Page 69: File Sharing
File Sharing Your MiFi Liberate includes a microSD card slot that allows you to store files and share them with connected devices. microSD cards are sold separately. The File Sharing page enables you to share files stored on the microSD card with other compatible devices, like your laptop and tablet, that are connected to the MiFi Liberate. -
Page 70: Accessing Shared Files
Accessing Shared Files Instructions for Windows: ➊ Click the Windows Start button and select Computer. The microSD card appears under Networks. ➋ If the microSD card does not appear under Networks, go to Start and type in \\MiFi-Liberate. ➌ If prompted for a user name, enter guest. Do not enter a password. Instructions for Mac: The microSD card will appear automatically under the ‘shared’... -
Page 71: On The Mifi Liberate Manager
From this page you can enable file sharing and see how much free space you have available on the microSDHC card. You can also decide to protect your files with a password or make them available to everyone connected to your MiFi Liberate. -
Page 72: Settings
Settings The Settings section allows you to enable/disable File Sharing, check your microSD card status, and provides instructions for accessing shared files. The Settings section displays the following: File Sharing — slide the ON/OFF button to enable/disable File Sharing. • microSD Card Status —... -
Page 73: View Files
View Files The View Files section allows you to view all files on the microSD card installed in the MiFi Liberate. To view or download and save files on the microSD: ➊ Click on the folder name to display all files in the folder. -
Page 74: Media Center
To access the Media Center page and enable the Media Center, tap the Media Center icon on the MiFi Liberate Touchscreen, or select Media Center on the Navigation panel on the MiFi Liberate Manager. On the MiFi Liberate Touchscreen ➊... -
Page 75: On The Mifi Liberate Manager
To view and share your media files with connected devices, play your media files in your web browser, and access Media Center applications, select the Media Center tab on the Navigation panel on the MiFi Liberate Manager Home page. The Media Center page contains the following. -
Page 76: Status
Status Turning on the MiFi Media Center makes the media content on the microSD card available to connected devices. To view and share your media files with other DLNA capable devices: ➊ Select the Status tab to display the Media Center Status page. - Page 77 ➋ Slide the ON/OFF button to ON to enable the Media Center and display Media Center status details and options. ➌ To rescan the contents on the microSD card, click Rescan Content. Click Confirm to begin the rescan.
- Page 78 ➍ To clear your cache and ensure that you have the latest versions of stored files, click Clear Cache. Click Confirm to delete the cached files. ➎ To restart the Media Center Server, click Restart Server. Click Confirm to begin the restart.
-
Page 79: Media
Media The Media menu displays these additional menu options. Photos (See Photos on page 79.) • Videos (See Videos on page 80.) • Music (See on page 80.) •... -
Page 80: Photos
Photos The My Library drop-down menu allows you to browse and sort the photo files on the MiFi Liberate microSD card using these options: All Photos — sorts all photo files. • By Date — sorts photo files by date. -
Page 81: Videos
Videos The My Library drop-down menu allows you to browse and sort the video files on the MiFi Liberate microSD card using these options: All Videos — sorts all video files. • By Date — sorts video files by date. -
Page 82: Music
Music The My Library drop-down menu allows you to browse and sort the music files on the MiFi Liberate microSD card using these options: Album — sorts music files by album. • All Tracks — sorts music files by track. - Page 83 The GPS page allows you to enable GPS and to enable GPS over Wi-Fi (NMEA). The GPS receiver on the MiFi Liberate can determine your current location, often even indoors. On the MiFi Liberate Touchscreen ➊ Tap the GPS icon to display the GPS page.
-
Page 84: On The Mifi Liberate Manager
On the MiFi Liberate Manager To access the GPS page, click GPS on the Navigation panel. The GPS page contains the following: Enable GPS (See Enable GPS on page 84.) • Current Position • GPS Over Wi-Fi • Port Number •... -
Page 85: Enable Gps
Enable GPS To enable GPS and GPS over Wi-Fi: ➊ Slide the Enable GPS ON/OFF button to ON. ➋ Click the Enable GPS over Wi-Fi check box. ➌ Click Save Changes to activate and save your selections. NOTE - You must download and install the GPS Over Wi-Fi Drivers to create a virtual NEMA (GPS) port on your computer before you can use the GPS Over Wi-Fi feature. - Page 86 To download GPS Over Wi-Fi Drivers: ➊ Click Download GPS Over Wi-Fi Drivers. A Help page displays a download overview and links to the available downloads. ➋ Click the appropriate link to download the driver to your computer.
-
Page 87: Wi-Fi Protected Setup
The Wi-Fi Protected Setup page allows you to setup WPS (Wi-Fi Protected Setup) on your MiFi Liberate to easily connect to other WPS-enabled devices. On the MiFi Liberate Touchscreen ➊ Tap the Wi-Fi Protected Setup icon to display the Wi-Fi Protected Setup page. - Page 88 ➍ To enable the WPS PIN method, tap WPS PIN method >. Find the WPS PIN on your connecting device, then click Enter WPS PIN.
-
Page 89: About
The About page allows you to view current Internet, Wi-Fi, microSD card and configuration status; device details; and software update history. You can also manage your AT&T account, and view detailed diagnostic information and logs used for troubleshooting. On the MiFi Liberate Touchscreen ➊ Tap the About icon to display the About page. - Page 90 ➍ Tap Help and Customer Care > to display a link to tutorials, customer care, your wireless number, the device model number, and the current software version. ➎ Tap Software Update > to display the current software version, last update, and to Check for Updates.
-
Page 91: On The Mifi Liberate Manager
On the MiFi Liberate Manager To access the About page, click About on the Navigation panel. The About page contains the following. Current Status (See Current Status on page 91.) • Device Info (See Device Info on page 93.) •... -
Page 92: Current Status
IP Address — the IP address assigned to the MiFi Liberate. • Subnet Mask — the network mask associated with the IP address of the MiFi Liberate. • Gateway — the gateway IP address associated with the IP address of the MiFI Liberate. -
Page 93: Device
Device microSD Card — indicates whether the microSD card is available. • Total Space — indicates the size of the microSD card. • Available Space — indicates how much free space is available on the microSD card. • File Sharing — indicates if File Sharing is enabled or disabled. •... -
Page 94: Device Info
The Device Info section displays the following: Manufacturer — the manufacturer of the MiFi Liberate device. • Model — the official model name and number for the MiFi Liberate device. • MiFi Liberate Software Version — the currently installed version of MiFi Liberate software. -
Page 95: Customer Care
Customer Care The Customer Care section displays the following: Quick Links — provides quick access to the AT&T website. • Self-Service Support — provides links to MiFi Liberate tutorials and support. • Contact AT&T — provides customer support contact information. •... -
Page 96: Diagnostics
Diagnostics The Diagnostics section displays the following: Modem Status (See Modem Status on page 96.) • HSPA Status (See HSPA Status on page 96.) • 4G LTE Status (See 4G LTE Status on page 96.) • NOTE - Diagnostics details are used only for troubleshooting and technical support. -
Page 97: Modem Status
GSM, UMTS and LTE mobile subscribers. It is stored in the SIM and changes if the SIM is changed. Wireless Number — the wireless telephone number for the MiFi Liberate. This number • changes if the SIM is changed. -
Page 98: Logs
Logs The Logs section displays the following: Mobile Network — records details regarding network connections. • System — records details for events other than network connections. • NOTE - Logs are used only for troubleshooting and technical support. Click Refresh List to update the Mobile Network or System Log. -
Page 99: Software Update
Current Software — displays the current version of software installed, last check for updates, • and any updates available. If an update is available it is automatically downloaded and you will be prompted on the MiFi Liberate touchscreen to install it. Last Update — displays the details of the last update installed. •... -
Page 100: Troubleshooting
Troubleshooting Overview Common Problems and Solutions Using the Master Reset Button... -
Page 101: Overview
Overview When properly set up, your MiFi Liberate is a highly reliable product. Ensure that you are in the coverage area. • Ensure you have an active subscription plan. • Ensure the SIM card is correctly installed. • Restarting your computer and your MiFi device can resolve many issues. -
Page 102: Common Problems And Solutions
If you are inside a building or near a structure that might block the signal, change the position ➤ or location of the device. For example, try moving your MiFi Liberate close to a window. The device has no power. - Page 103 I see the network name but I cannot connect to my MiFi Liberate. Check that you are connecting to your MiFi Liberate device. If another MiFi Liberate device is in ➤...
- Page 104 From the MiFi Liberate Manager: ➤ » Select About > Device Info to display the manufacturer, model number and MiFi Liberate software version details. How can I check the battery level of my MiFi Liberate? From the MiFi Liberate touchscreen: ➤...
- Page 105 ➤ » Select Connected Devices from the MiFi Liberate Manager Navigation panel to display all devices currently connected to or blocked from your MiFi Liberate, including IP and MAC address details. I am having trouble connecting to my office VPN.
-
Page 106: Using The Master Reset Button
Using the Master Reset Button Your MiFi Liberate comes with a master reset button that allows you to return it to its factory default state. The master reset button is recessed in a hole on the back of the device. You need a paperclip or similar object to push the button. -
Page 107: Technical Support
When calling, enter the wireless number of your MiFi Liberate found on the device by tapping About > Device Info, or on the MiFi Liberate Manager by going to About > Customer Care. Entering the wireless number of the device will route your call to specialty customer care teams trained to assist with the MiFi Liberate devices. -
Page 108: Product Specifications And Regulatory Information
Product Specifications and Regulatory Information Product Specifications Regulatory Safety Hazards Proper Battery Use and Disposal Limited Warranty and Liability... -
Page 109: Product Specifications
Product Specifications General Name: AT&T Mobile Hotspot MiFi Liberate Model: MiFi 5792 Approvals: FCC, PTCRB, DLNA, RoHS, WEEE Weight: 120 g (4.26 oz) Dimensions: 102.9 x 73.1 x 8.6 mm (4.05 x 2.88 x 0.34 in) Wireless Network: LTE, HSPA+, EDGE, GPRS Wireless Network - Wi-Fi Mode: 802.11b/g/n... -
Page 110: Regulatory
Regulatory Federal Communications Commission Notice (FCC – United States) Electronic devices, including computers and wireless modems, generate RF energy incidental to their intended function and are therefore subject to FCC rules and regulations. This equipment has been tested to, and found to be within the acceptable limits for a Class B digital device, pursuant to part 15 of the FCC Rules. -
Page 111: Safety Hazards
Safety Hazards Do not operate your MiFi Liberate device in an environment that may be susceptible to radio interference resulting in danger, specifically: Areas where prohibited by the law Follow any special rules and regulations and obey all signs and notices. Always turn off your MiFi Liberate device (or the host device and remove the modem from the USB port) when instructed to do so, or when you suspect that it may cause interference or danger. - Page 112 Electrostatic discharge (ESD) Electrical and electronic devices are sensitive to electrostatic discharge (ESD). Macintosh native connection software might attempt to reinitialize the device should a substantial electrostatic discharge reset the device. If the software is not operational after an ESD occurrence, then restart your computer.
-
Page 113: Proper Battery Use And Disposal
Proper Battery Use and Disposal CAUTION! Never dispose of batteries in a fire because they might explode: WARNING! In the event of a battery leak: • Do not allow the liquid to come in contact with the skin or the eyes. If contact has been made, wash the affected area with large amounts of water and seek medical advice. -
Page 114: Limited Warranty And Liability
Limited Warranty and Liability Novatel Wireless, Inc. warrants for the 12 month period immediately following receipt of the Product by Purchaser that the Product will be free from defects in material and workmanship under normal use. THESE WARRANTIES ARE EXPRESSLY IN LIEU OF ALL OTHER WARRANTIES, EXPRESS OR IMPLIED, INCLUDING, WITHOUT LIMITATION, ALL IMPLIED WARRANTIES OF MERCHANTABILITY AND FITNESS FOR A PARTICULAR PURPOSE. -
Page 115: Glossary
Glossary Glossary... -
Page 116: Glossary
Glossary ● 802.11 (b, g, n) — A set of WLAN communication standards in the 2.4, 3.6 and 5 GHz frequency bands. ● Access Point — A device that allows wireless communication devices to connect to a wireless network using a standard such as Wi-Fi. ●... - Page 117 ● ICCID — Integrated Circuit Card Identification. A serial number stored in and engraved or printed on a SIM card that internationally identifies the card. ● IMEI — International Mobile Equipment Identity. Used in GSM networks to identify the device. It is usually printed on the device and can often be retrieved using a USSD code.
- Page 118 ● NNTP — Network News Transfer Protocol. An Internet application protocol for reading and posting Usenet (newsgroup) articles. ● Port — A virtual data connection used by programs to exchange data. It is the endpoint in a logical connection. The port is specified by the port number. ●...
- Page 119 ● VPN — Virtual Private Network. A secure private network that runs over the public Internet. Commonly used to connect to an office network from elsewhere. ● VPN Passthrough — A feature that allows a client to connect to a VPN server. ●...
Need help?
Do you have a question about the MiFi Liberate and is the answer not in the manual?
Questions and answers