Advertisement
Available languages
Available languages
For product questions contact:
Jarden Consumer Service
USA : 1.800.334.0759
Canada : 1.800.667.8623
© 2010 Sunbeam Products, Inc. doing business as Jarden Consumer Solutions.
All rights reserved. Distributed by Sunbeam Products, Inc. doing business as
Jarden Consumer Solutions, Boca Raton, Florida 33431.
SPR-110310-668
Para preguntas sobre los productos llama:
Jarden Consumer Service
EE.UU. : 1.800.334.0759
Canadá : 1.800.667.8623
© 2010 Sunbeam Products, Inc. operando bajo el nombre de Jarden Consumer Solutions.
Todos los derechos reservados. Distribuido por Sunbeam Products, Inc. operando bajo el
nombre de Jarden Consumer Solutions, Boca Raton, Florida 33431.
Printed in China
Impreso en China
www.oster.com
www.oster.com
Model / Modelo
TSSTTVRB04, TSSTTVRB05
User Manual
Countertop Oven
Manual del usuario
Horno De Mostrador
Congratulations on your purchase of an OSTER
For entertaining tips and delicious recipes visit www.oster.com. Do not return
to place of purchase. Please contact us at www.oster.com or 1.800.334.0759.
P.N. 146330
Countertop Oven!
®
www.oster.com
Advertisement
Table of Contents

Related Manuals for Oster TSSTTVRB05


Summary of Contents for Oster TSSTTVRB05
- Page 1 Jarden Consumer Solutions, Boca Raton, Florida 33431. Congratulations on your purchase of an OSTER Countertop Oven! ® For entertaining tips and delicious recipes visit www.oster.com. Do not return to place of purchase. Please contact us at www.oster.com or 1.800.334.0759. Printed in China www.oster.com Impreso en China P.N.
-
Page 2: Important Safeguards
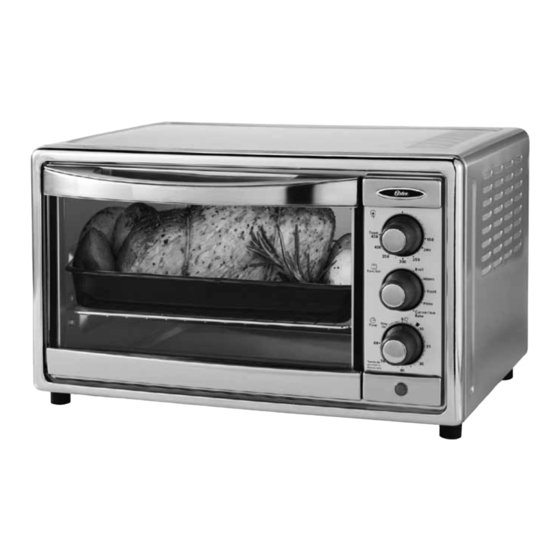
• Do not cover the oven with metal foil. This will cause overheating of the appliance. • Oversized foods or metal utensils must not be inserted in the appliance as they may create a fire or risk of electrical shock. • Do not clean with metal scouring pads. Pieces can break off the pad and touch electrical parts involving a risk of electrical shock. • Always use extreme caution when removing tray or disposing of hot grease. • To turn this appliance off, return all controls to the “OFF” position. • To disconnect, turn all controls to “OFF”, then remove plug from wall outlet. English-1 | oster.com English-2 | oster.com... - Page 3 Before removing the rack allow the unit to cool. PLEASE NOTE – For best toast and pizza results, Function position the rack in the upper rack position. Setting Removing Food Timer Always open door fully and remove food carefully with oven mitt. / Toast Setting Power Light English-3 | English-4 | oster.com oster.com...
-
Page 4: Cleaning Your Countertop Oven
Cleaning Your Countertop Oven • Turn the Temperature Control Knob to the desired temperature. • T urn the Timer Knob to the desired time.* 1. Before cleaning your OSTER countertop oven, unplug it and allow it to cool. ® NOTE – The top and bottom heating elements will cycle ON and OFF to maintain the 2. To clean, wipe with damp cloth. - Page 5 Rack placement Refer to “Positioning Rack” Section, Page English-4. Rack may need to be Set Oster ® Toaster Oven to broil and pre-heat. Arrange bread in one layer on a adjusted to accommodate food type. baking pan, then brush tops with 2 tablespoons oil and season with salt and pepper. Broil until golden brown and transfer to a rack. Spread thin layer of Brie on toasted...
-
Page 6: One Year Limited Warranty
1 1/2 cups chicken broth change the terms and conditions of this warranty. Preheat Oster ® Toaster Oven to 450°F. Sprinkle vegetables in bottom of an 11 inch This warranty does not cover normal wear of parts or damage resulting from any of the following: negligent use or misuse of the product, use on improper voltage or current, use contrary to the operating instructions, baking pan with 1 ½ – 2 inches sides and top with turkey breast. Tuck garlic and herbs... -
Page 7: Precauciones Importantes
PRECAUCIONES IMPORTANTES esTe PArATo ólo omésTiCo nsTrUCCiones ordón léCTriCo orTo LEA Y GUARDE ESTAS INSTRUCCIONES Se proporciona un cordón eléctrico corto para reducir el posible riesgo de engancharse o Cuando se usen aparatos eléctricos, siempre se deben seguir precauciones básicas de tropezar con un cordón más largo. Se puede usar un cordón de alargue si se tiene cuidado. Si se usa un cordón de alargue, la clasificación eléctrica del cordón debe ser al menos tan seguridad, entre las que se incluyen las siguientes: grande como la clasificación eléctrica del aparato. El cordón de alargue se debe colocar • LEA TODAS LAS INSTRUCCIONES, LAS ETIQUETAS DEL PRODUCTO Y LAS de manera que no cuelgue del mostrador o de la mesa en donde los niños puedan tirar del ADVERTENCIAS ANTES DE USAR EL HORNO DE MOSTRADOR. - Page 8 Aprendiendo acerca Preparándose para usar el horno para tablero de cocina por 2 Posición de temperatura primera vez de su Horno para tablero Ajusta la perilla del de cocina termostato a la temperatura Si va a usar el horno para tablero por primera vez, por favor asegúrese que: deseada. • Retire cualquier etiqueta de la superficie del horno • A bra la puerta del horno y retire todo documento o papel impreso del interior del horno 1 Posición de función • L impie la rejilla, la fuente y la bandeja con agua caliente, un poco de líquido lavaplatos y Selecciona la función una esponja que no sea abrasiva o una tela para limpiar.
- Page 9 • Fije la función a Horneado (Bake) Ambos elementos de calefacción operarán • Gire la perilla de control de temperatura a la posición deseada Limpiando su Horno para tablero de cocina • Fije la perilla del marcador de tiempo al tiempo deseado.* 1. Antes de limpiar su Horno para tablero de cocina Oster , desenchúfelo y deje enfriar NOTA – Los elementos de calefacción superior e inferior Irán en ciclos de APAGADO 2. P ara limpiar pásele una tela húmeda. NO SUMERJA EN AGUA! a ENCENDIDO para mantener la temperatura deseada. Asegúrese de usar solamente agua con jabón suave. Los limpiadores abrasivos, escobillas o Función de Horneado con Convección limpiadores químicos dañará la unidad. Vacíe la bandeja de migajas frecuentemente para evitar (Algunos modelos solamente) la acumulación de migajas. Las rejillas del horno se pueden lavar en el lavaplatos (sólo en la...
- Page 10 Cómo guardar el horno de mostrador Garantía limitada de 1 año Sunbeam Products, Inc. operando bajo el nombre de Jarden Consumer Solutions, o en Canadá, Sunbeam Deje que el aparato se enfríe por completo antes de guardarlo. Si el horno de mostrador se Corporation (Canada) Limited operando bajo el nombre de Jarden Consumer Solutions, (en forma guarda por un período de tiempo prolongado, es importante verificar que esté...
Need help?
Do you have a question about the TSSTTVRB05 and is the answer not in the manual?
Questions and answers