Table of Contents
Advertisement
Quick Links
Instructions – Parts List
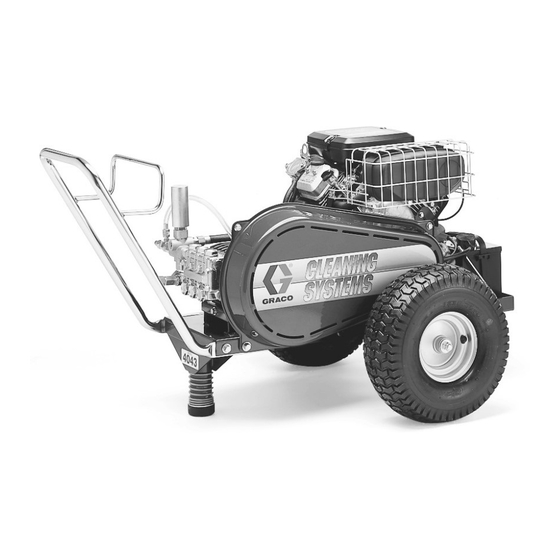
Hydra–Cleanr 4043, 16 HP Engine
Hydra–Cleanr 4043
Pressure Washer
P/N 800707, Series B
4000 psi (27.6 MPa, 276 bar) Operating Pressure
4300 psi (29.6 MPa, 296 bar) maximum Working Pressure
Important Safety Instructions
Read all warnings and instructions in this manual.
Save these instructions.
See page 2 for Table of Contents.
Parts
308532M
06811
Advertisement
Table of Contents

Related Manuals for Graco HYDRACLEANR 4043


Summary of Contents for Graco HYDRACLEANR 4043
- Page 1 Instructions – Parts List Hydra–Cleanr 4043, 16 HP Engine Hydra–Cleanr 4043 Pressure Washer P/N 800707, Series B 4000 psi (27.6 MPa, 276 bar) Operating Pressure 4300 psi (29.6 MPa, 296 bar) maximum Working Pressure Important Safety Instructions Read all warnings and instructions in this manual.
-
Page 2: Table Of Contents
Table of Contents Warnings ........Component Identification and Function Setup . - Page 3 D Do not operate this equipment in a closed building. EQUIPMENT MISUSE HAZARD Misuse of pressure washer or accessories may cause them to rupture and result in fluid injection, splashing in eyes or on skin, or other serious injury. D Do not alter or modify this equipment. Use only genuine Graco parts and accessories.
-
Page 4: Component Identification And Function
Component Identification and Function Typical Installation – Pressure Washer Fig. 1 Engine Pump Assembly Filter Water Supply Connection High Pressure Hose Connection Spray Gun Spray Tip Spray Gun Safety Latch Spray Hose Unloader Unloader Bypass Hose Hose Rack 308532 06811... -
Page 5: Setup
Check for Shipping Damage Check the unit for any damage that may have occurred in shipping. Notify the carrier immediately if there is any damage. Set Up Charge the battery. Be sure the battery connections are correct and secure. Connect the fuel line to the engine using the quick coupler provided. -
Page 6: Operation
308532 Operation NOTE: This pressure washer is equipped with a low–oil sensor that shuts the engine off if the oil level falls below a certain level. If the unit stops unexpectedly, check both the oil and the fuel levels. -
Page 7: Trigger Safety Latch
CAUTION Pressure washer is equipped with a thermal relief valve. If pressure washer is operated without spraying for an extended period (approximately 10 minutes) the valve will expel hot water. Do not operate pressure washer with inlet water screen removed. Keep screen clean. Screen keeps abrasive sediment out of pump, Abrasive sediment can clog pump or damage cylinders. -
Page 8: Installing And Changing Spray Tips
Installing and Changing Spray Tips WARNING To reduce risk of serious bodily injury, including fluid injection or splashing in eyes or onto skin, use extreme caution when changing spray tips. always follow procedure below. 1. Follow the Pressure Relief Procedure. CAUTION To avoid blowing o-ring out of quick coupler, due to high pressure in system, never operate pressure... -
Page 9: Shutdown, Flushing, And Storage
D Do not store unit outside where it will be exposed to rain, dirt or adverse weather conditions. D Before you store the pressure washer overnight or transport it, disconnect the water supply, and turn off the fuel supply valve. -
Page 10: Troubleshooting
To reduce risk of serious injury, including fluid injection and splashing in eyes, or on skin, always follow Pres- sure Relief Procedure on page 6 before proceeding. Problem Cause Engine will not start or No gasoline in fuel tank or carburetor. is hard to start Low oil level. -
Page 11: Pump Service
Servicing the Valves 1. Remove the hex valve plug. 2. Examine the o–ring under the plug for cuts or distortion and replace if worn. Lubricate new o–ring before installing. 3. Grasp valve retainer by tab at the top with pliers and remove from valve chamber. - Page 12 Servicing the Seals and V–Packings Disassembly: 1. Remove the manifold as described. 2. With crankcase side of manifold facing up, unscrew the seal case from the manifold using a special key wrench. 3. Remove o–ring from seal case. 4. Remove snap ring and low pressure seal from the seal case.
- Page 13 Notes 308532...
-
Page 14: Pressure Washer - Parts
Pressure Washer – Parts SHEET 2 Hydra–Clean 4043 Pressure Washer (Sheet 1 of 2) 308532 – – (REF) (REF) 44a, 44h 06810... - Page 15 Pressure Washer – Parts Model 800707, Series B Ref. Part No. Description 108868 CLAMP, wire 100214 WASHER, lock 5/16 803889 BELT, drive 803943 SHEAVE, engine 100023 WASHER, flat 5/16 118241 SCREW, flange, hex hd 803534 LABEL, belt guard 803926 BELT GUARD...
- Page 16 Pressure Washer – Parts 109* *Note: Chemical Injector Repair Kit – 244351 7544A Hydra–Clean 4043 Pressure Washer (Sheet 2 of 2) 308532...
- Page 17 Notes 308532...
-
Page 18: Pump Assembly - Parts
Pump Assembly – Parts 308532 04608... - Page 19 Pump Assembly – Parts Model 803508, Series A Ref. Part No. Description 803504 MANIFOLD 801468 SCREW, cap, hex hd 801469 WASHER, lock 801472 KIT, Valve (includes: 4a–4e) O-RING SEAT, valve PLATE, valve SPRING GUIDE, valve 803509 KIT, valve cap (includes 9a–9b) O–RING CAP, valve 803283...
-
Page 20: Accessories
Downstream Chemical Injector Kit 804387 For injecting harsh cleaning chemicals downstream from the pump. 800649 is stainless steel construction. Upstream Chemical Injector Kit 800257 For injecting mild cleaning chemicals upstream into the pump. 308532 Accessories Pressure Gauge Kit 248744 For viewing pump pressure. Water Sandblasting Kit 800120 For abrasive cleaning of stubborn dirt and paint. -
Page 21: Technical Data
High Pressure Hose Acrylonitrile and Buna–N cover and tube Bypass Hose Synthetic yarn and EPDM Pressure Washer Anodized aluminum, Aluminum or bronze alloys, Brass Copper, Nylon–PTFE composite, (including fittings) PTFE, Ceramic, Buna–N, Cotton phenolic, 303, 304, and 316 Stainless steel, Polymide–12... -
Page 22: Warranty
Graco Warranty Graco warrants all equipment listed in this manual which is manufactured by Graco and bearing its name to be free from defects in material and workmanship on the date of sale to the original purchaser for use. With the exception of any special extended or limited warranty published by Graco, Graco will, for a period of twelve months from the date of sale, repair or replace any part of the equipment determined by Graco to be defective.
Need help?
Do you have a question about the HYDRACLEANR 4043 and is the answer not in the manual?
Questions and answers