Grandstream Networks GXP2200EXT User Manual
Expansion module for gxp2200
Hide thumbs
Also See for GXP2200EXT:
- Quick installation manual (19 pages) ,
- Quick installation manual (4 pages)

Related Manuals for Grandstream Networks GXP2200EXT


Summary of Contents for Grandstream Networks GXP2200EXT
- Page 1 Grandstream Networks, Inc. GXP2200EXT Expansion Module For GXP2200 User Manual Grandstream Networks, Inc. www.grandstream.com...
-
Page 2: Table Of Contents
USING THE GXP2200EXT LED ......................15 CONFIGURING THE GXP2200EXT ............17 CONFIGURING VIA GXP2200 WEB GUI ..................17 ACCESSING GXP2200 WEB GUI....................17 CONFIGURING GXP2200EXT MPK IN WEB GUI ..............18 UPGRADING THE GXP2200EXT .............. 22 FACTORY FUNCTIONS AND RESET............23 FACTORY FUNCTIONS ........................23 RESTORE TO FACTORY DEFAULT VIA LCD MENU ............... - Page 3 Figure 5: GXP2200EXT Status and Version Info ..................12 Figure 6: GXP2200EXT Diagnostic Mode ....................13 Figure 7: GXP2200EXT Active MPK Info Page and Basic MPK Info Page ..........14 Figure 8: GXP2200 Main Screen - IP Address ..................17 Figure 9: GXP2200 Extension Board Configuration via GXP2200 Web GUI ..........
-
Page 4: Gnu Gpl Information
GXP2200EXT firmware contains third-party software licensed under the GNU General Public License (GPL). Grandstream uses software under the specific terms of the GPL. Please see the GNU General Public License (GPL) for the exact terms and conditions of the license. -
Page 5: Change Log
CHANGE LOG This section documents significant changes from previous versions of GXP2200EXT user manuals. Only major new features or major document updates are listed here. Minor updates for corrections or editing are not documented here. FIRMWARE VERSION 1.0.0.14 • This is the initial version. The corresponding GXP2200 firmware version is 1.0.3.6. -
Page 6: Welcome
Call Park/Pick-up, Speed Dial, Presence, Intercom, and conference/transfer/forward. The GXP2200EXT is the ideal solution for offices that manage high call volumes or an office receptionist. By using the GXP2200EXT the telephone attendant can ensure maximum office productivity by efficiently monitoring and dispatching multiple incoming calls. -
Page 7: Product Overview
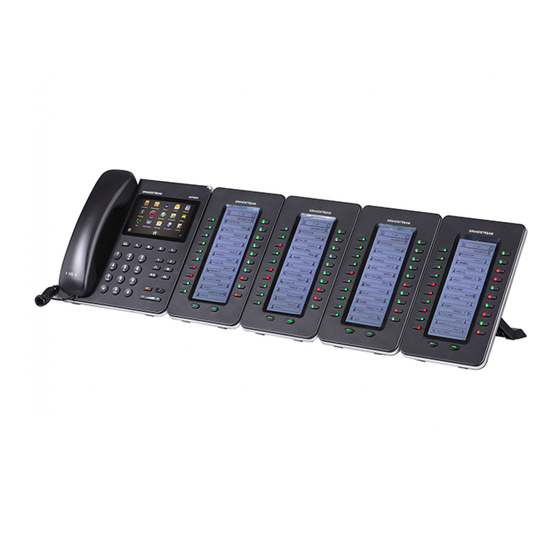
Daisy-chain 4 modules for up to 160 programmable buttons • Conference/call transfer/forward/pickup Figure 1: GXP2200EXT 4-Module Front View GXP2200EXT TECHNICAL SPECIFICATIONS Table 1: GXP2200EXT TECHNICAL SPECIFICATIONS 20 (Up to 40 with 2-page switch keys, or up to 160 with 4... - Page 8 Temperature and Humidity 32 - 104 F / 0 - 40 C, 10-90% (non-condensing) Compliance FCC/CE/C-Tick FIRMWARE VERSION 1.0.0.14 GXP2200EXT USER MANUAL Page 7 of 26...
-
Page 9: Installation
Figure 2: GXP2200EXT Connected to GXP2200 Back View To connect the GXP2200EXT to GXP2200, follow the steps below: 1. On the back of GXP2200 and the GXP2200EXT, there are slots for connector plate. Attach the connector plate between the slots for GXP2200 and the GXP2200EXT. -
Page 10: Safety Compliances
6. After successfully booting up, the GXP2200EXT will stay in idle. Press and hold the LEFT key for 3 to 5 seconds to check the version information and status. Note: The GXP2200EXT is an additional accessory for the GXP2200 and is not included in the GXP2200 box. -
Page 11: Getting To Know Gxp2200Ext
Press to use the assigned function as configured on GXP2200. Press to switch page if there is MPK configured in the second page; Left Press and hold the LEFT key for 3 to 5 seconds to check the GXP2200EXT version and status (press any key to exit). Right Press to switch page if there is MPK configured in the second page. -
Page 12: Using The Gxp2200Ext Lcd
Left + Right seconds to enter/exit GXP2200EXT Diagnostic Mode. USING THE GXP2200EXT LCD Note: The figures displayed in this section are for demo purpose only. The actual GXP2200EXT LCD display can be different. • GXP2200EXT Status Info The GXP2200EXT status info will be displayed in the following scenario. -
Page 13: Figure 5: Gxp2200Ext Status And Version Info
• GXP2200EXT Diagnostic Mode After the GXP2200EXT boots up, press and hold LEFT and RIGHT keys at the same time for 3 to 5 seconds. The Diagnostic mode screen will show on the GXP2200EXT LCD. Under Diagnostic mode, all the LED will light up in red. Pressing each key will change the corresponding LED to green. -
Page 14: Figure 6: Gxp2200Ext Diagnostic Mode
GXP2200EXT MPK Display Each GXP2200EXT board can have 2 pages. It allows user to display up to 40 MPKs. Users can use LEFT or RIGHT key to switch between pages. Page 1 displays MPKs from 1 to 20; page 2 displays MPKs from 21 to 40. -
Page 15: Figure 7: Gxp2200Ext Active Mpk Info Page And Basic Mpk Info Page
Active MPK Info Page -> Basic MPK Info Page (MPK 21-40) -> Basic MPK Info Page (MPK 1-20) Figure 7: GXP2200EXT Active MPK Info Page and Basic MPK Info Page The following table describes the icons used on the GXP2200EXT LCD. -
Page 16: Using The Gxp2200Ext Led
GXP2200 Account status: Off line GXP2200 Account status: Unknown USING THE GXP2200EXT LED Please refer to the following 2 tables for Multi-Purpose Key LED indication and LEFT/RIGHT key LED indication on the GXP2200EXT. Table 5: GXP2200EXT Multi-Purpose Key LED Color LED Status Description Solid... -
Page 17: Table 6: Gxp2200Ext Left/Right Button Led
Table 6: GXP2200EXT Left/Right Button LED Color LED Status Description Solid The next (or previous) page is Basic MPK Info page Flashing The next (or previous) page is Basic MPK Info page with at least one MPK in non-idle state... -
Page 18: Configuring The Gxp2200Ext
CONFIGURING THE GXP2200EXT After the GXP2200EXT is successfully connected to the GXP2200, the GXP2200EXT can be configured via the host GXP2200's web GUI. CONFIGURING VIA GXP2200 WEB GUI ACCESSING GXP2200 WEB GUI The GXP2200 Web GUI URL is http://Phone-IP-Address, where the Phone-IP Address is the IP address displayed on the GXP2200 desktop. -
Page 19: Configuring Gxp2200Ext Mpk In Web Gui
In absence of a hub/switch (or free ports on the hub/switch), please connect the computer directly to the PC port on the back of the phone. CONFIGURING GXP2200EXT MPK IN WEB GUI 1. In the GXP2200 web GUI, go to Advanced Settings->MPK EXT Settings (see figure below);... -
Page 20: Table 7: Gxp2200Ext Web Gui Settings
The definition for the settings in this page can be seen in the table below. Table 7: GXP2200EXT WEB GUI SETTINGS Key Mode Assigns a function to the Multi Purpose Key on the GXP2200EXT. The key mode options are: •... - Page 21 MPK ID This identifies the "MPK ID x" for "MPK x". The default number is from 1-160 for 160 MPKs in 4 GXP2200EXT boards. For example, if MPK 1 's MPK ID is changed from 1 to 5, users will see the configuration saved on MPK 5.
- Page 22 Name)". The "Phonebook Name" is the name saved in GXP2200 Contacts. Note: To configure "BLF Call Pickup Prefix" and "Eventlist URI", please go to GXP2200 web GUI->Advanced Settings->MPK General Settings. FIRMWARE VERSION 1.0.0.14 GXP2200EXT USER MANUAL Page 21 of 26...
-
Page 23: Upgrading The Gxp2200Ext
To upgrade the GXP2200EXT, install and connect the GXP2200EXT to the GXP2200 (make sure GXP2200 is booted up successfully). When the connected GXP2200EXT boots up, it will retrieve firmware image from the host GXP2200 and start upgrading process if new firmware image is presented. -
Page 24: Factory Functions And Reset
VoIP service provider. The GXP2200EXT can be reset via GXP2200 when the factory reset is performed on GXP2200. There are two methods to restore the GXP2200EXT to the factory default settings. -
Page 25: Figure 12: Gxp2200 Lcd - Factory Reset
2. Tap on Advanced Settings->Factory Reset, the following figure will show; Figure 12: GXP2200 LCD - Factory Reset 3. Tap on Factory Reset button, a confirmation message will show. Tap on OK to confirm. Figure 13: GXP2200EXT LCD - Confirm Factory Reset FIRMWARE VERSION 1.0.0.14 GXP2200EXT USER MANUAL... -
Page 26: Restore To Factory Default Via The Web Gui
2. At the bottom of the page, click on the Reset button for Factory reset. A dialog box will pop up; 3. Click OK to restore the phone to factory settings. Figure 14: GXP2200 Web GUI - Confirm Factory Reset FIRMWARE VERSION 1.0.0.14 GXP2200EXT USER MANUAL Page 25 of 26... -
Page 27: Experiencing The Gxp2200Ext
Thank you again for purchasing Grandstream GXP2200EXT, it will be sure to bring convenience and color to both your business and personal life. * Android is a trademark of Google Inc.
Need help?
Do you have a question about the GXP2200EXT and is the answer not in the manual?
Questions and answers