
Related Manuals for Bissell Cleanview Lift-off 10N4 SERIES


Summary of Contents for Bissell Cleanview Lift-off 10N4 SERIES
- Page 1 USER'S GUIDE 10N4, 22K7 SERIES 220-240V Thank You Safety Instructions Product View Assembly Operations 7-12 Maintenance and Care 13-15 Troubleshooting Accessories Replacement Parts Warranty Consumer Services...
- Page 2 My great-grandfather invented the floor sweeper in 1876. Today, BISSELL is a global leader in the design, manufacture, and service of high quality homecare products like your BISSELL CleanView Lift-Off ®...
-
Page 3: Important Safety Instructions
Use indoors only Use only cleaning products formulated ■ ■ by BISSELL for use in this appliance to Do not immerse; use only on surfaces ■ prevent internal component damage moistened by cleaning process Keep openings free of dust, lint, hair, etc. -
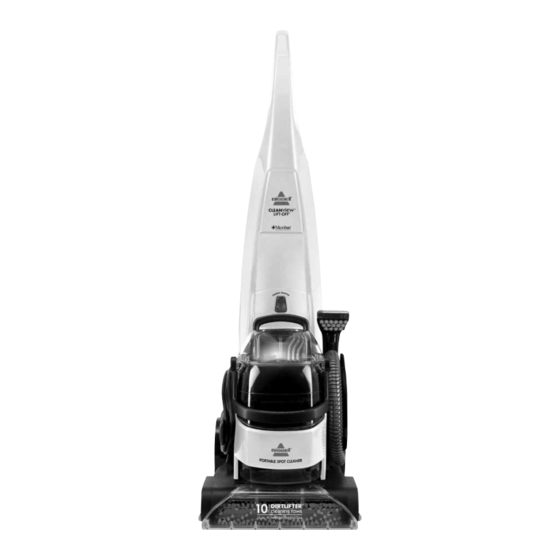
Page 4: Product View
roduct view Upper Handle Carry Handle Heat Indicator Light Formula & Water Tank Power Button Flex Hose Power Cord Quick Release™ Dirty Tank Cord Wrap Portable Spot Cleaning Release Pedal Removeable Edge Sweep ™ Nozzle Brushes w w w . b i s s e l l . c o m... -
Page 5: Cleaning Formula
Cleaning formula Keep plenty of genuine BISSELL 2X cleaning formula on hand so you can clean and protect whenever it fits your schedule. Always use genuine BISSELL deep cleaning formulas. Non-BISSELL cleaning formulas may harm the machine and will void the warranty. - Page 6 ssembly Your CleanView Lift-Off comes in two ® ® easy to assemble components: 1. Upper handle 2. Portable spot cleaner/Base The only tool you will need to assemble your cleaner is a Phillips screwdriver. 1. Slide upper handle onto base 2.
-
Page 7: Special Features
To help restore this important protection, only BISSELL offers deep cleaning formulas with Scotchgard protector. This offers extra protection against dirt and tough stains to keep your carpets looking good longer. -
Page 8: Before You Clean
2. Unscrew the black cap and remove bottle insert. 3. Fill tank with hand hot tap water to the water fill line. Add 60 mL of BISSELL 2X formula to the tank. 4. Replace the bottle insert in the tank and tighten the black cap. - Page 9 perations Upright cleaning mode continued Cleaning continued CAUTION: 3. Release the spray trigger and make one slow forward and backward pass over the Do not overwet. Take care not same area. Repeated passes will help aid to run over loose objects or in dry time.
- Page 10 perations Upright cleaning mode continued Cleaning your machine continued 2. Rinse front nozzle of any dirt and debris. WARNING: Remove portable spot cleaner from the base of the machine. To reduce the risk of fire, elec- Unscrew three screws with Phillips screw tric shock or injury unplug from driver and remove nozzle.
-
Page 11: Portable Spot Cleaning Mode
perations Portable spot cleaning mode Preparing the machine 1. Step on the portable spot cleaning pedal to release the portable spot cleaner. 2. Release flex hose by twisting the hose secure latch clockwise. Unwrap flex hose completely. 3. Attach the desired tool to the hose grip until it snaps together. - Page 12 perations Portable spot cleaning mode continued Cleaning with Deep Reach™ Tool (select models only) 1. Set tool on soiled surfaces and press the spray trigger to spray solution onto the soiled area to be cleaned. 2. Slowly move the tool back and forth over the soiled surface, keeping the tool in con- tact with the carpet.
-
Page 13: Machine Care
aintenance and care Machine care (check regularly) WARNING: Cleaning suction gate To reduce the risk of fire, elec- The suction gate automatically diverts tric shock, or injury, turn power air when the portable deep cleaner OFF and disconnect plug from is detached. -
Page 14: Small Belt Removal/Replacement
aintenance and care Small belt removal and replacement (as needed) Occasional replacement of one or WARNING: both belts may become necessary. If that is needed, please follow the instructions below. To reduce the risk of fire, electric shock or injury, 1. -
Page 15: Brush Removal/Large Belt Replacement
9. Follow step number 8 & 9 on page 14. If you have any questions or are having trouble installing or replacing your belt(s) or brushes, please call BISSELL Consumer Services. w w w . b i s s e l l . c o m... -
Page 16: Troubleshooting
Other maintenance or service not included in the manual should be performed by an authorized service representative. Thank you for selecting a BISSELL product. Please do not return this product to the store. w w w . b i s s e l l . c o m... - Page 17 651 mL Tough Stain Precleaner *Not all parts are included with every model. Note: Additional BISSELL formula options may be available at your local retailer. w w w . b i s s e l l . c o m...
-
Page 18: Replacement Parts
eplacement parts Below please find a list of common replacement parts. While not all of these parts may have come with your specific machine, all are available to you for purchase, if desired. Item Part No. Part Name 203-7893 Formula & Water Tank Assembly (includes cap and insert) 203-6675 Cap and Insert for Formula &... -
Page 19: Limited Five Year Warranty
Limited Five Year Warranty Subject to the *EXCEPTIONS AND EXCLUSIONS identified below, BISSELL Homecare, Inc., will replace (with new or remanufactured components), at BISSELL’s option, free of charge from the date of purchase by the original purchaser, for five years any defective or malfunctioning part do to manufacturers defect. - Page 20 ISSELL consumer services If your BISSELL product should require service: Call BISSELL Consumer Services at the numbers below and we will give you the location of a BISSELL Authorized Service Center in your area. If you have questions about your warranty or need replacement parts please contact the numbers below.
Need help?
Do you have a question about the Cleanview Lift-off 10N4 SERIES and is the answer not in the manual?
Questions and answers