Advertisement
Table of Contents
- 1 Important Safety Instructions
- 2 Product View
- 3 Power Cord
- 4 Special Tools
- 5 Maintenance and Care
- 6 Emptying the Dirt Container
- 7 Cleaning the Pre-Motor Filter
- 8 Thermal Protector
- 9 Troubleshooting
- 10 Please Do Not Return this Product to the Store
- 11 Replacement Parts
- 12 Limited One Year Warranty
- Download this manual
Advertisement
Table of Contents

Related Manuals for Bissell CLEANVIEW 80Q2


Summary of Contents for Bissell CLEANVIEW 80Q2
- Page 1 view Clean USER'S GUIDE 80Q2 SERIES Thank You Safety Instructions Product View Assembly Operations Maintenance and Care 9-12 Troubleshooting Consumer Services Replacement Parts Warranty...
- Page 2 Services department, so, should you ever have a problem, you’ll receive fast, considerate assistance. My great-grandfather invented the floor sweeper in 1876. Today, BISSELL is a global leader in the design, manufacture, and service of high quality homecare products like your BISSELL CleanView Multi Cyclonic canister vacuum.
-
Page 3: Important Safety Instructions
MPORTANT SAFETY INSTRUCTIONS When using an electrical appliance, basic precautions should be observed, including the following: REAd ALL INSTRUCTIONS BEFORE USINg YOUR CANISTER VACUUM. WARNINg: reduce the risk of fire, electric shock, or injury: Unplug from outlet when not in use ■... -
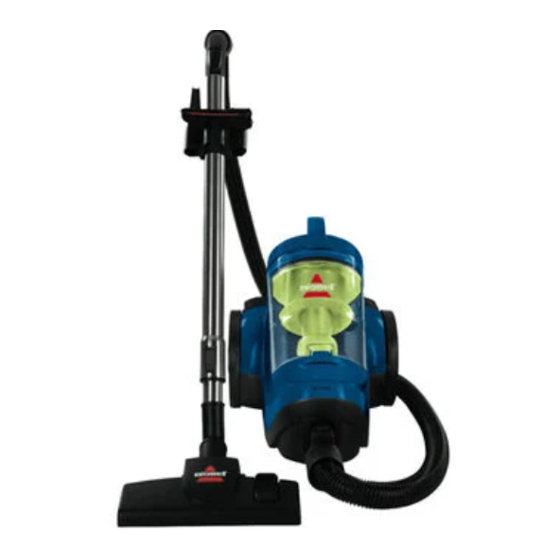
Page 4: Product View
roduct view Air Flow Regulator Telescoping Extension Wand Easy Empty™ Dirt Cotainer Multi-Surface Floor Nozzle Brush Switch Upholstery Tool Crevice Tool w w w . b i s s e l l . c a Handle Hose Connector CAUTION: Do not plug in your vacuum until you are familiar with all instructions and... - Page 5 ssembly Connect the hose to the vacuum by inserting the hose connector into the suction opening on the bottom front of the vacuum. Push in until it clicks into the locked position. Connect the telescoping extension wand to the handle end of the hose. Connect the floor nozzle foot onto the telescoping extension wand.
-
Page 6: Power Cord
perations Power cord The power cord is located at the rear of the vacuum. Gently pull out the power cord, watching for the yellow line. Stop pulling the power cord once the yellow line is visible. There is also a red line, which indicates the end of the usable cord. - Page 7 perations Power button Turn the power ON or OFF by pressing lightly downward on the power button Variable suction power control The variable suction power control is located on the back of the vacuum. Turn the control toward the larger dots for maximum suction.
-
Page 8: Special Tools
Special tools Your BISSELL CleanView Multi cyclon- ic is not only a powerful carpet and rug vacuum cleaner, it’s also a versatile bare floor and above floor vacuum cleaner when you select one of the special tools. Floor nozzle: Use to vacuum carpets, rugs and bare floors. -
Page 9: Maintenance And Care
aintenance and care Emptying the dirt container Empty the dirt container as soon as the dirt reached the “FULL” lines on the sides of the dirt container. 1. Unplug the vacuum from the electrical outlet. 2. Press the dirt container release button located on the back of the carry handle and lift up to remove. - Page 10 Cleaning the inner cyclone & screen Filters protect the motor from dirt and dust particles. Use only BISSELL replacement filters in your CleanView Multi Cyclonic 1. Unplug the vacuum from the electrical outlet. 2. Remove the dirt container from the vacuum.
-
Page 11: Cleaning The Pre-Motor Filter
Cleaning the pre-motor filter The pre-motor filter protects the motor from dirt and dust particles. Use only BISSELL replacement filters in your CleanView Multi Cyclonic. 1. Turn the power OFF. Unplug the vacuum from the electrical outlet. -
Page 12: Thermal Protector
3. The thermal protector automatically resets after approximately 2 hours. If the thermal protector does not reset, call BISSELL Consumer Services or visit the website. w w w . b i s s e l l . c a Post-Motor HEPA... -
Page 13: Troubleshooting
Other maintenance or service not included in the manual should be performed by an authorized service representative. Thank you for selecting a BISSELL product. Please do not return this product to the store. w w w . b i s s e l l . c a... - Page 14 For information about repairs or replacement parts, or questions about your warranty, call: BISSELL Consumer Services Or visit the BISSELL website - www.bissell.ca When contacting BISSELL, have model number of cleaner available. Please record your Model Number: ___________________ Please record your Purchase Date: ___________________ NOTE: Please keep your original sales receipt.
-
Page 15: Replacement Parts
eplacement parts - Item Part No. 203-1578 203-1579 203-1536 203-1583 203-1581 203-1580 203-1582 203-1575 203-1569 203-1557 w w w . b i s s e l l . c a Part Name Hose Telescoping Extension Wand Multi-Surface Floor Nozzle Tool Holder Upholstery Tool Crevice Tool Dusting Brush... -
Page 16: Limited One Year Warranty
Call BISSELL Consumer Services at the number listed below or visit the BISSELL website – www.bissell. ca to locate a BISSELL Authorized Service Centre in your area. If there are no authorized BISSELL Service Centres in your area, a BISSELL Representative at canada.custhelp@bissell.ca or at the phone number below will issue you a Return Authorization Number and a pre-paid mailing label to return the unit to BISSELL for warranty repair.
Need help?
Do you have a question about the CLEANVIEW 80Q2 and is the answer not in the manual?
Questions and answers