
Related Manuals for Jensen VM9414


Summary of Contents for Jensen VM9414
-
Page 1: Operating Instructions
VM9414 Operating Instructions PICTURE ANGLE / TILT WIDE Press Audio Enter VM9414 MUTE watts peak 40W x 4... -
Page 2: Table Of Contents
VM9414 CONTENTS Thank you for choosing a Jensen product. We hope you will find the instructions in this owner’s manual clear and easy to follow. If you take a few minutes to look through it, you’ll learn how to use all the features of your new Jensen VM9414 Mobile Multimedia Receiver for maximum enjoyment. - Page 3 VM9414 Accessing DVD Mode ..............27 DVD Playback On-Screen Controls ..........27 Accessing the DVD Menu ............... 29 Sectional Repeat Function (A-B) ............ 29 Direct Search .................. 29 VCD PBC - Play Back Control ............30 Playback Information ..............30 MPEG Playback On-Screen Controls ..........
- Page 4 VM9414 NavMate Table of Contents Horizon NavMate Introduction ............63 Key Features .................. 63 About GPS and GNSS..............63 Horizon NavMate Navigation / Tele Atlas Map Data....... 64 Safety Information................65 User Agreement................65 Driver Safety Rules ................. 65 Basic Operation................... 67 Acquiring a Satellite Signal .............
- Page 5 VM9414...
-
Page 6: Features
VM9414 FEATURES Congratulations on your purchase of the Jensen VM9414 Mobile Multimedia Receiver. It’s a good idea to read all of the instructions before beginning the installation. We recommend having your Jensen VM9414 installed by a qualified installation shop. •... - Page 7 VM9414 • Heat management system with forced air cooling to keep the chip sets operating at nominal temperatures General • MediaLink USB - 3.5mm AV input and USB input • Built-In navigation (See “Horizon NavMate Introduction” on page 63.) •...
-
Page 8: Optional Equipment
See “Bluetooth Operation” on page 46. • Rear Camera The VM9414 is "camera ready." Before accessing any camera features, you must purchase and install a rear video camera. Once the rear camera is connected and operating properly, the CAMERA source mode will... -
Page 9: Warnings
VM9414 WARNINGS WARNING! Never install this unit where operation and viewing could interfere with safe driving conditions. WARNING! To reduce the risk of a traffic accident (except when using for rear view video camera) never use the video display function while driving the vehicle. -
Page 10: Controls And Indicators
VM9414 CONTROLS AND INDICATORS 1. OPEN Press to activate the automatic mechanical system and move the TFT monitor into viewing position. Press again to close the TFT. 2. BAND Press to change between three FM and two AM bands. 3. Disc Slot 4. - Page 11 VM9414 14. SD Card Input Insert an SD/MMC card (up to 8 GB) for playback of music/video files. 15. Touch Display 16. AS Press and hold to select six strong stations and store them in the current band. 17. MUTE Press to activate the MUTE function and silence the receiver.
- Page 12 VM9414 LOUD CLOSE TILT PICTURE WIDE Press Audio Enter VM9414 AV IN MUTE...
-
Page 13: Remote Control
VM9414 REMOTE CONTROL See remote control tables in various sections for button functions. POWER VIDEO MUSIC... -
Page 14: Using The Tft Monitor
VM9414 USING THE TFT MONITOR Open/Close TFT Monitor Open TFT Monitor Press the OPEN/CLOSE button (1) on the front panel or remote control to activate the mechanism that moves the display panel into the viewing position. Close TFT Monitor Press the OPEN/CLOSE button (1) on the front panel or remote control to load the display panel back into the compartment. -
Page 15: Aspect Ratio
VM9414 Aspect Ratio Press the WIDE button (4) on the monitor to adjust the aspect ratio as follows: FULL The entire screen is extended horizontally to the aspect ratio of 16 to 9. The extension ratio is the same at any point. -
Page 16: Monitor Movement Mechanism
VM9414 Monitor Movement Mechanism If an obstruction occurs in the monitor path, the following protective measurements can be executed to prevent damage to the mechanism or monitor: Table 1: Monitor Protective Measures OPEN Button Power Obstruction Self Protection Pressed Reconnected... -
Page 17: Operating Instructions
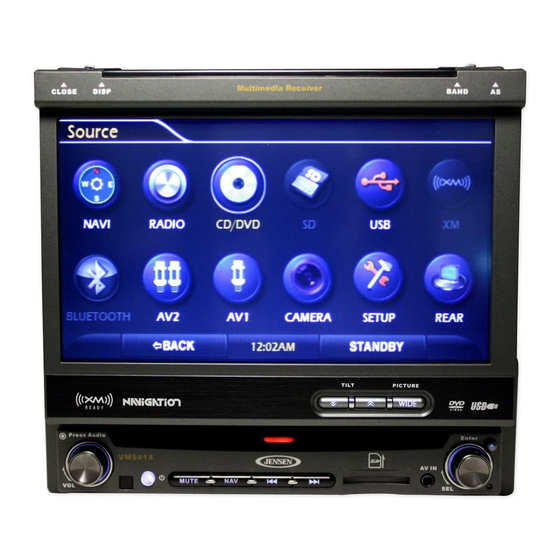
VM9414 OPERATING INSTRUCTIONS Power On / Off Press the SRC/ button (10) on the unit (or the button (4) on the remote control) to turn the unit on. The buttons on the front of the unit light up and the current mode status appears in the LCD (7). - Page 18 VM9414 Source Menu You can also use the touch screen to change the source through the Source menu. To access the Source menu, touch the top left corner of the screen or press the SRC button on the front panel (10) or remote control (8).
-
Page 19: Volume Adjustment
VM9414 connected to the AV IN connector. For information regarding the use of USB devices, see “Accessing a USB Device” on page 32. Volume Adjustment To increase or decrease the volume level, turn the VOL rotary encoder (11) on the front panel or press the VOL-/+ buttons (15, 16) on remote control. When the volume level reaches “0”... -
Page 20: System Reset
VM9414 NOTE: The EQ SETTING mode will automatically change to “USER” when individual audio functions are adjusted. The Audio menu will automatically exit after a few seconds of inactivity. To exit quickly, touch the top left corner of the screen or press the VOL rotary encoder (11). -
Page 21: Steering Wheel Control (Swc)
VM9414 Steering Wheel Control (SWC) The VM9414 is compatible with the PAC (Pacific Accessory Corporation) steering wheel control adapter SWI-PS. A 3.5mm female connector (labeled “SWC Interface”) on the back of the head unit allows connectivity to the PAC adapter. Please refer to the instructions included with the PAC adapter for detailed installation information. -
Page 22: Setup Menu
VM9414 SETUP MENU To access system settings, press the MENU button (1) on the remote control or touch the top left corner of the screen where the current source is indicated, and then touch the on-screen SETUP button. The “Setup” menu appears, with the current sub-menu highlighted in yellow. -
Page 23: Adjusting A Feature
VM9414 Adjusting a Feature 1. Use the touchscreen or press the buttons (26, 27) on the remote control to highlight the audio feature to be adjusted. 2. Use the touchscreen or press the OK button (30) on the remote control to view submenu choices. - Page 24 VM9414 Setting Options Function TFT Open You must press the OPEN button (1) to open the TFT panel. Auto The TFT panel automatically opens when the unit is turned on. Manual When the ignition is turned OFF, the TFT panel DOES NOT retract if it was previously out.
- Page 25 VM9414 Setting Options Function Treble 8kHz Adjust Treble boost/cut frequency. Range of adjustment is +/ Freq - 12 dB. 10kHz 12.5kHz 15khz Subfilter 80Hz Select a crossover frequency to set a cut-off frequency for the subwoofer's LPF (low-pass filter). 100Hz...
- Page 26 VM9414 Navigation Sub-menu Features Setting Options Function GPS Time Ignore Use GPS satellite time. Sync Use the radio set time. Time Zone NFT Select navigation time zone. Atlantic Eastern Central Mountain Pacific Alaska Turn daylight savings mode on/off. Misc Sub-menu Features The DVD system has a built-in parental lock feature to prevent unauthorized persons from viewing restricted disc content.
-
Page 27: Exiting The System Setup Menu
VM9414 To reset the password, access the “Set Password” option and enter the current password to unlock the field. Access the “Set Password” again once unlocked and enter a new password. You must enter the same password twice to confirm. -
Page 28: Tuner Operation
VM9414 TUNER OPERATION Accessing Radio Tuner Mode To access the “Radio” screen, press the SRC button (10) on the front panel or touch the top left corner of the screen to access the Source menu, and then touch the “RADIO” icon. You can also press the SRC button (8) on the remote control until “RADIO”... -
Page 29: Touch Buttons
VM9414 Touch Buttons • : Seek tuning lower • : Incremental tuning lower • Scan: Scan the AM or FM band for a preview of available stations in your area • : Incremental tuning higher • |: Seek tuning higher •... -
Page 30: Using Preset Stations
VM9414 Using Preset Stations Six numbered preset buttons store and recall stations for 1 87.50MHz each band. All six stored stations (P1-P6) for the current band appear on the screen. 2 90.10MHz Storing a Station 3 98.10MHz 1. Select a band (if needed), then select a station. -
Page 31: Dvd/Vcd Video Operation
VM9414 DVD/VCD VIDEO OPERATION NOTE: When properly installed, DVD video cannot be displayed on the main TFT screen unless the parking brake is applied. If you attempt to play a DVD while the vehicle is moving, the TFT screen displays “PARKING”... -
Page 32: Accessing Dvd Mode
VM9414 Accessing DVD Mode To switch to DVD mode when a disc is already inserted, press the SRC button (10) on the front panel or remote control (8). NOTE: See “Controls and Indicators” on page 5 for the location of control panel buttons. - Page 33 VM9414 Table 5: DVD/VCD Remote Control Functions Button Function Name ROOT Access DVD menu. Turns on/off PBC when playing TITLE Enter the title menu of the disc AUDIO Select alternate audio language Select Left Channel, Right Chan- nel, Mix or and Stereo output...
-
Page 34: Accessing The Dvd Menu
VM9414 Accessing the DVD Menu Press the MENU button (1) on the remote control to recall the main DVD menu. Use the directional (arrow) buttons on the remote control to select a title from the menu or touch the title on screen. -
Page 35: Vcd Pbc - Play Back Control
VM9414 VCD PBC - Play Back Control For VCDs with play back functionality, play back control (PBC) provides additional controls for VCD playback. Press the ROOT button (21) on the remote control to toggle the PBC function “On”/”Off”. Once PBC is on, playback starts from track one of the play list. -
Page 36: General Disc Information
VM9414 General Disc Information Table 6: Disc Properties Symbol 12cm Disc Properties Max Play Time Single side single layer (DVD-5) (MPEG 2 Method) Single side double layer (DVD-9) 133 minutes Double side single layer (DVD-10) 242 minutes Double side double layer (DVD-18) -
Page 37: Cd/Dvd/Mp3 Audio Operation
Instructions for TFT control and Insert/Eject are the same for DVD and CD operation. Please see the DVD/Disc Video Operation section for information about these topics. The VM9414 will play music or other audio files from the following disc media: • CD-DA •... -
Page 38: Accessing An Sd Card
VM9414 Accessing an SD Card 1. Locate the SD connector (14) on the front of the radio. 2. Insert the SD card into the SD connector. 3. Press the SRC button (10) on the front panel or touch the top left corner of the screen to access the Source menu, and then touch the “SD”... - Page 39 VM9414 indicators and touch key areas for CD/DVD/MP3 audio playback are outlined below: DISC 12:15PM ROOT Sweetest Perfection 1. World in My Eyes Depeche Mode 2. Sweetest Perfec... Violator 3. Personal Jesus 01:55 04:55 4. Halo Press for more options.
-
Page 40: Indicators/Controls
VM9414 Indicators/Controls 1. (a) Current source (b) Touch to view “Source” menu and select a new source 2. Current track and total number of tracks on disc 3. Song title 4. Artist name (if available for MP3) 5. Album name (if available for MP3) 6. -
Page 41: Direct Track Entry
VM9414 Table 8: CD/DVD/MP3 Audio Remote Control Functions Press once to repeat song, twice to repeat album Repeat playback from time frame A to time frame B Up/down track list Page up/page down Select highlighted option or resume playback when paused/... -
Page 42: Mp3/Wma File Requirements
VM9414 MP3/WMA File Requirements This player allows you to play back MP3 and WMA files recorded onto CD-R/ RWs, DVD+R/RWs, and DVD-R/RWs. For CD-RW discs, please make sure it is formatted using the full method and not the quick method to prevent illegal disc operation. - Page 43 For example, a medium with the following folder/file hierarchy is subject to Folder Search, File Search or Folder Select, as shown below. The VM9414 player will only recognize three folder levels and does not display folders containing only other folders. In the example above, the unit will display folders 3, 4, 6, and 8, but not 2 and 7 since they do not contain any tracks directly.
-
Page 44: Xm Radio Operation
VM9414 RADIO OPERATION ® ® Listeners can subscribe to XM Radio on the Web by visiting www.xmradio.com, or by calling (800) 967-2346. Customers should have their Radio ID ready (see “Displaying the Identification (ID) Code”). Customers can receive a limited number of free-to-air channels without activation. -
Page 45: Indicators/Controls
VM9414 Indicators/Controls 1. (a) Current source (b) Touch to view “Source” menu and select a new source 2. Current category 3. Channel name 4. Channel number 5. Artist name 6. Song name 7. Clock 8. Signal strength indicator 9. Current MENU level (CHANNELS, CATEGORY, PRESETS) 10. -
Page 46: Direct Channel Entry
VM9414 Direct Channel Entry To select a channel directly, touch the button on screen to display the direct entry menu. Enter the desired track using the on-screen number pad. Press OK to play the selected track number. To backspace, touch... -
Page 47: Operation
VM9414 iPod OPERATION ® NOTE: Be sure your iPod has the latest Apple firmware installed to avoid connectivity issues. This unit is Made for iPod. You can control your iPod via touch screen to access Playlist, Artist, Album, Songs, etc. Supported models include, but are not limited to, the following: •... -
Page 48: Indicators/Controls
VM9414 Indicators/Controls 1. (a) Current source (b) Touch to view “Source” menu and select a new source 2. File number and total number of files 3. Song title 4. Artist name 5. Album name 6. Playback progress indicator 7. Elapsed playing time/total playing time for current file 8. -
Page 49: Using The Ipod Menu
VM9414 Table 9: iPod Remote Control Functions Press once to repeat song, twice to repeat album SUB-T Select video menu ANGLE Select music menu , , , Navigate iPod menu Select highlighted option or resume playback when paused/ stopped Previous file... -
Page 50: Direct Track Entry
Enter the desired track using the on-screen number pad. Press OK to play the selected file number. To backspace, touch NOTE: To transmit the video from your iPod to the VM9414 screen, you must set the following options through the iPod video settings menu: TV Out = On, TV Signal = NTSC, and Widescreen = On. -
Page 51: Bluetooth Operation
Before attempting to use the Bluetooth functions on the VM9414, you must purchase and install the BTM10. When connected properly, the blue light appears illuminated. Bluetooth features are only available when the BTM10 is installed. -
Page 52: Accessing Bluetooth Mode
VM9414 • Some mobile phones (like Sony Ericsson) may have a "Power Saving Mode" option. PLEASE DO NOT use the power saving mode with the VM9414. • Before accepting or making a call, make sure your mobile phone's Bluetooth function is turned on. -
Page 53: Hands Free Profile (Hfp)
However, depending on your phone, the connection may be made using HSP (Head Set Profile), making some functions unavailable. This is a limitation of your phone, not the VM9414. Since there are a number of Bluetooth mobile phone implementations available on the market, operations with your Bluetooth mobile phone using this unit vary greatly. -
Page 54: Managing Incoming Calls
Pairing Code field under the Bluetooth SETUP menu. The default pairing code for many phones is “0000”. The default code for the VM9414 is “1234”. 7. If your mobile phone displays a prompt requesting a pass key or pairing code, enter “1234.”... -
Page 55: Making An Outgoing Call
VM9414 Making an Outgoing Call Outgoing calls can be made using the direct dial screen or by selecting a number from the “Call Logs” screen (see “Call Logs” on page 50). To make a call from the direct dial screen: 1. -
Page 56: Bluetooth Auto Connect
3. Touch a number to dial it automatically. NOTE: Some mobile phones do not support Phone Book upload through Bluetooth. This is a limitation of the phone, not the VM9414. Dialed Numbers The Dialed Numbers list retrieves the list of dialed numbers from your phone. -
Page 57: Bluetooth Streaming Music
Bluetooth provides an Advanced Audio Distribution Profile (A2DP) for streaming music from a wireless phone or portable multimedia player (PMP), often called an MP3 player. The VM9414 allows you to play audio files from your phone or PMP using a Bluetooth connection. -
Page 58: Viewing Jpeg Photos
VM9414 VIEWING JPEG PHOTOS JPEG images stored as individual images or stored in folders can be accessed using the DISC/SD/USB interface. When a disc/card is loaded and read by the unit, the root menu will display the contents of the disc. Press the folder image to view the contents of a folder. -
Page 59: Rear Camera Function
VM9414 REAR CAMERA FUNCTION This unit is “camera ready.” Before accessing any camera features, you must install a rear video camera. When the camera is not installed and the function is accessed by gear selector being placed in reverse or by the unit’s menu, the message “VIDEO NOT DETECTED”... -
Page 60: Rear Monitor Video Display
VM9414 REAR MONITOR VIDEO DISPLAY This unit allows you to install one or two additional monitors (sold separately) for DVD/CD playback. You can play DVD video and another source simultaneously. For example, the unit’s screen can be set to Radio function while the rear passengers can watch a DVD/CD using an optional rear monitor. -
Page 61: Troubleshooting
VM9414 TROUBLESHOOTING Table 10: Troubleshooting Problem Cause Corrective Action GENERAL Unit will not Radio Fuse blown Install new fuse with correct rating power on Car battery fuse blown Install new fuse with correct rating Illegal operation Press the RESET button located in the... - Page 62 VM9414 Table 10: Troubleshooting Problem Cause Corrective Action Prolonged Improper aspect ratio Use correct aspect ratio setting image or setup improper height/width ratio display Monitor stops Moving path is blocked Press OPEN key to restart monitor at incorrect movement position...
-
Page 63: Error Messages
VM9414 Table 10: Troubleshooting Problem Cause Corrective Action Incorrect play- Message is longer than back message LCD can display displayed Error Messages Table 11: Error Messages Message Cause Corrective Action Displayed Loading Disc is being read No Disc Disc is dirty... - Page 64 VM9414 6. The CD player may not operate properly in extreme hot or cold. If such conditions occur, allow the interior of the vehicle to reach a normal temperature before using player. 7. When the vehicle warms up during cold weather or under damp conditions, condensation may appear on the LCD panel.
-
Page 65: Specifications
VM9414 SPECIFICATIONS DVD/CD Player Compatible Disc Media: DVD + R / RW (Single and Dual Layer) and CD-R / Compatible Media Formats: CD-DA, MP3, WMA, VCD, SVCD, MPEG1 / 2 Signal to Noise Ratio: >95dBA Dynamic Range: >95dB Frequency Response: 20Hz to 20 kHz, -3dB Channel Separation: >... - Page 66 VM9414 Fuse: 15-amp, mini ATM type DIN chassis dimensions: 7" X 7" X 2" (178mm x 178mm x 50mm) CEA Power Ratings Power Output: 13 Watts RMS x 4 channels into 4-Ohms @ < 1% THD+N Signal to Noise Ratio: 70dBA below reference (Reference: 1 Watt, 4-Ohms) Frequency Response: 20 Hz - 20 kHz, -3dB.
- Page 67 VM9414...
-
Page 68: Horizon Navmate Introduction
Turn by Turn Voice Guidance About GPS and GNSS The VM9414 uses a vehicle GPS (Global Positioning System)-based navigation device which utilizes digital map data to guide you from your selected location A to location B, using location information obtained from a Global Navigation Satellite System (GNSS). -
Page 69: Horizon Navmate Navigation / Tele Atlas Map Data
VM9414 Horizon NavMate Navigation / Tele Atlas Map Data The navigation map data covers the continental US, Alaska and Hawaii. The initial GPS location lock is best established when your vehicle is parked. If the device is in motion, the signal can take longer to initially connect. Once the initial coordinates are established, the software will follow you as you move and navigate. -
Page 70: Safety Information
VM9414 SAFETY INFORMATION User Agreement When the unit is first turned on, you will see the following message, warning you to operate your navigation system appropriately: You must agree to the above notice before using the navigation software. Touch the bar labeled “Press to accept.” to proceed to the Main Menu. - Page 71 • Do not use the VM9414 to navigate to a police station, hospital, etc. in an emergency. Call 911 for assistance. • Laws in some states prohibit wearing stereo headphones or may prohibit use or placement of a navigation device while operating a motor vehicle.
-
Page 72: Basic Operation
VM9414 BASIC OPERATION Acquiring a Satellite Signal Drive your vehicle to an open area where the GPS signal can be clearly received and park the vehicle. If the device is in motion, the signal can take longer to initially connect. -
Page 73: Using The Keyboard
VM9414 Using the Keyboard Keyboard Command Buttons Table 1: Keyboard Command Buttons Press to clear your selection and start over. Press to switch to City entry. Press to switch to Postal Code entry. Press to add a space when entering a multi-word location. -
Page 74: Selecting From Lists
VM9414 After entering the second character, only letters that can be used to spell an existing destination will be available for selection of the third character, the fourth character, and so on. SPACE NOTE: On the keyboard screen, the “SPACE" button is located in the bottom center of the screen. - Page 75 VM9414 • Touch the marked item to select it. LINE ITEM UP SCROLL BAR LINE ITEM DOWN NOTE: Some lists keep track of the five most recently used selections, which are placed at the top of the screen. This feature allows you to...
-
Page 76: Function Buttons
VM9414 Function Buttons Table 2: Common Command Buttons Press the map icon to view your current location on the map or to return to map mode. Zoom in the map to show a smaller area. Zoom out the map to show a larger area. -
Page 77: Main Menu
VM9414 Main Menu The main menu is your central point of access to all functions of the navigation software. It allows you to set your destination, manage your favorites and control all settings of your device. The “Main Menu” consists of the following options: •... - Page 78 VM9414 Map Tracking Screen During navigation, the screen displays your route (in yellow) and your surroundings. A red/blue arrow identifies your current position. The upcoming maneuver is visualized in the upper left corner, along with the distance and approximate time before that turn. When you come up to a turn, you will hear a voice command at the appropriate time.
- Page 79 VM9414 • To add a POI destination to your route, press the button. • For one-way streets, the transit direction is indicated with a red arrow. • For more information about navigation, see “Navigating” on page 96. Map Browsing Screen Touch (and hold) the screen to access Map Browsing Mode.
-
Page 80: Trip Computer
VM9414 2D/3D/Split Screen During navigation or map browsing, you can click the button to switch between 2D (default), 3D and Split Screen map views. SPLIT Trip Computer The Trip Computer provides information about your vehicle speed, trip related timing, elevation, odometer and clock. - Page 81 VM9414 • Press the “i” icon to view detailed readings for each field. • Press the blue /\ / V arrow buttons or use the scroll bar on the right side of the screen to navigate the list. • Use the buttons to move through the list page by page.
-
Page 82: Selecting A Destination
VM9414 SELECTING A DESTINATION There are five different ways to find and choose a destination. Some methods allow you to select from a list using the arrow keys, while others allow you to search using an on-screen keyboard. NOTE: If a route is in progress when you exit the navigation system, the unit will prompt “Do you want to resume guidance?”... - Page 83 VM9414 The “Go To...” menu appears, allowing you to search for an Address or Intersection, select a POI (Point of Interest), enter map Coordinates, or select a favorite or recent destination. State or Province Address or Intersection After choosing the destination State or Province, press the Address or...
- Page 84 VM9414 address or intersection in the previously selected state beginning with the City or by entering the Postal Code. To toggle between City and Postal Code entry, press the button. 1. Begin entering the city by typing the City name or Postal Code. The navi- gation software will utilize it’s look-ahead feature and only offer characters...
-
Page 85: Choosing A Location On The Map
VM9414 Coordinates Press the Coordinates button to route to a destination by directly entering latitude and longitude values. Choosing a Location on the Map 1. From the “Main Menu”, press the button. The “Map - Tracking” win- dow will be displayed, indicating your last location:... - Page 86 VM9414 2. Touch any part of the map area to enter browsing (panning) mode and navigate the map. Use the +/– buttons to zoom in/out. 3. Press the button to view and select the address nearest the crosshair, or press Quick POI to locate a POI in the visible map area.
-
Page 87: Navigating To A Recent Location
VM9414 4. Touch the address to view the “Set” screen, where you can choose to set the address as your destination, your home address, or your vehicle position or choose to add this location to your address book. Navigating to a Recent Location Previous destinations are automatically saved to memory as “History”. - Page 88 VM9414 2. From the “Go To...” menu, select History. 3. A list of recent locations will appear on the screen. 4. Press to select a recent destination from the “History” list and view the “Start Route” screen. • Press the blue /\ / V arrow buttons or use the scroll bar on the right side of the screen to navigate the list.
-
Page 89: Navigating To Your Home Or Office Address
VM9414 Navigating to your Home or Office Address The Home Address and Office Address buttons allow you to quickly navigate to your home or office address. If the home or office address is not already saved, a screen like the following will appear: Press the check mark to enter and save your home or office address. -
Page 90: Choosing A Location From Your Address Book
VM9414 Choosing a Location from your Address Book 1. On the “Main Menu”, press Go To..2. On the “Go To...” menu, press Favorites. 3. Press Address Book to view a list of Address Book entries. 4. Select an Address Book entry. -
Page 91: Following A Trail
VM9414 Following a Trail The Trail Book feature allows you to create a path using map points when navigation data is not available. To navigate to a saved Trail, perform the following steps: 1. Press the button to view the “Main Menu” (if not already doing so). - Page 92 VM9414 7. Follow the red line to begin traveling along the trail. You can press the button and then press Stop Trail at any time to cancel the route.
-
Page 93: Selecting A Point Of Interest
VM9414 SELECTING A POINT OF INTEREST From the main menu, press the Go To... button and then press the Point of Interest button. The “Point of Interest” window will be displayed: The previously selected State or Province is automatically selected for the POI search. - Page 94 VM9414 • Use the buttons to move through the list page by page. 2. Click an item on the list to select that category OR press the button to access the keyboard and enter a category directly. City 1. Press the City button to enter the city in which you would like to find a point of interest.
-
Page 95: Browsing Poi Destinations
VM9414 1. Press the button 2. Press Sort by Distance or Sort by Name to retrieve a list of POI’s within the parameters you entered. • Press the blue /\ / V arrow buttons or use the scroll bar on the right side of the screen to navigate the list. -
Page 96: My Poi
VM9414 2. Press to select Hospital, Restaurant, Parking Lot, Hotel, Gasoline Station or Atm and display a list of POI’s in that category. Straight Line Distance to POI/Phone Number POI Address POI Name • Press the blue /\ / V arrow buttons or use the scroll bar on the right side of the screen to navigate the list. - Page 97 VM9414 Add Category Before My POI can work properly, you must create a category before adding a new POI destination. Use the keyboard to create a new POI category name and set the Icons, Sound and Distance of your choice for the new category.
- Page 98 VM9414 • Distance: Press to choose the distance from the destination at which you would like the chosen sound to be played. 4. Press the green check mark to complete the Category setup and confirm the Category entry. 5. Press the green check mark to confirm and add your new POI Category to the directory.
- Page 99 VM9414 1. To add a destination to a My POI Category, press the following sequences of menu buttons: Go To... > Favorites > Edit Favorites > My POI > Add from the “Main Menu”. 2. Refer to information in the section titled “Selecting a Destination” on page 77 to locate a destination.
- Page 100 VM9414 4. Press the green check mark to save your POI entry. A confirmation screen appears. 5. Press the green check mark to confirm and save the current entry under the selected Category in your My POI list. Edit My POI List To edit items on your My POI list, press the following sequences of menu buttons: Go To...
-
Page 101: Navigating
VM9414 NAVIGATING The powerful capabilities of your navigation software will guide you along the shortest or quickest route from A to B – with voice commands and in 3D (optional). To begin navigation, select a location using the Go To... feature (see “Selecting a Destination”... - Page 102 VM9414 Intersection Zoom As you approach an intersection, the map will automatically zoom in to show a close-up view of the roads near the intersection point on the right side of the screen. Route Interruptions If you intentionally or accidentally leave the current route, the NavMate software will automatically recalculate the route and prompt you to get back on track to your destination.
-
Page 103: Browsing The Map During Navigation
VM9414 Press the button to return to the map screen. Browsing the Map During Navigation You can browse the map while navigating without interrupting the current route – you will still be guided through voice commands. • To browse during navigation, touch (and hold) the screen to activate the Map Browsing feature. -
Page 104: Arriving At Your Destination
VM9414 2. Press Detour to view the “Detour” screen. 3. Choose a parameter for the Detour from the on-screen list. • Press the blue /\ / V arrow buttons or use the scroll bar on the right side of the screen to navigate the list. -
Page 105: Managing Favorites
VM9414 MANAGING FAVORITES The “Edit Favorites” menu allows you to save your home and work locations, as well as other frequent destinations for easy recall. After entering an address or searching for a POI, you can choose the Save option to bookmark your... -
Page 106: Edit Address Book
VM9414 Edit Address Book The “Address Book” feature allows you to store and edit address book entries. To edit your address book, perform the following steps: 1. Press the button to access the “Main Menu” screen. 2. Press the following on-screen buttons in the order listed: a. -
Page 107: Edit Trip Book
VM9414 Edit Home/Office Address 1. On the “Edit Favorites” menu, press the Home Address or Office Address icon to add or replace the home or office address. A window like the following will appear: 2. Refer to information in the section titled “Selecting a Destination” on page 77 to locate the home or work address. - Page 108 VM9414 2. Press the Add button to create a new Trip or the Edit button to edit an existing Trip. Add New Trip 1. After pressing the Add button, use the on-screen keyboard to enter a name for your trip.
- Page 109 VM9414 • Press the button to save the Trip name and go to the “Trip Book” screen. 2. Refer to information in the section titled “Selecting a Destination” on page 77 to locate the home or work address. Edit Trip 1.
-
Page 110: Edit Trail Book
VM9414 3. Press to highlighted a Trip and view the destination screen for your trip. 4. Use the buttons at the bottom of the screen to make changes to you trip destinations or to add a new destination. • Touch to highlight a destination. - Page 111 VM9414 1. To access the Trail Book function, press the Trail Book button on the “Edit Favorites” menu. 2. Press the Add button to create a new Trail or the Edit button to edit an existing Trail.
- Page 112 VM9414 Create a New Trail After pressing the Add button to create a new trail, you will see the “Name Trail Book Entry” screen, shown below: 1. Press the button to clear the default entry, if desired. 2. Use the keyboard to enter the name for your Trail. (See “Using the Keyboard”...
- Page 113 VM9414 6. Continue adding waypoints until your trail is complete. 7. When finished, press the button and then choose Stop Trail. Edit Trail 1. To edit an existing Trail press the following sequences of menu buttons: Go To... > Favorites > Edit Favorites > Trail Book > Edit from the “Main...
- Page 114 VM9414 2. Press to highlight the Trail you want to modify. The “Edit” screen appears. 3. Press Color to choose from ten colors for your dotted line guidance. Press the desired color to apply that color and return to the “Edit” menu.
- Page 115 VM9414 Delete Trail 1. To edit an existing trail press the following sequences of menu buttons: Go To... > Favorites > Edit Favorites > Trail Book > Edit from the “Main Menu”. 2. Press to highlight the trail you want to delete.
- Page 116 VM9414 2. Press to select the desired map scale. 3. Press the green check mark next to each trail to which you would like to apply the map scale setting.
-
Page 117: Setup Menu
VM9414 SETUP MENU When using the navigation software for the first time, it is recommended that you customize the system parameter settings. For example, regarding navigation, you can choose to avoid or allow toll roads or ferries or change your map orientation. You can also edit display settings, including the display of on-screen navigation icons. -
Page 118: Display Options
VM9414 • Simulation: Enable simulation mode (perform simulated navigation when not traveling). • Auto Recalculation: Automatically recalculate the route if a wrong turn is made. • Voice Guidance: When on, the system will give voice prompts. • Announcement Tone: When on, the system will give a double tone to alert you of the next turn. -
Page 119: User Preferences
VM9414 • Enlarged Intersection User Preferences Language Settings Press to choose from a list of available languages for on-screen text. Once a new language is selected, you will return the initial screen and be required to review safety information in the chosen language. - Page 120 VM9414 Day/Night Settings From the Day/Night Settings menu, press to select Day or Night mode, shown below. Press Auto. to allow the mode to be chosen automatically based on the time of day. DAY MODE NIGHT MODE Point of Interest Icon Setup This option allows you to choose a specific POI icon scale for selected POI categories.
-
Page 121: Location Reset
VM9414 Location Reset Press to reset the location of your vehicle. System Volume From the “System” menu, select Volume to modify the volume of voice commands. • Press the + button to increase the volume. • Press the – button to decrease the volume. - Page 122 VM9414 System Information View software version, map version and copyright information.
- Page 123 VM9414...
- Page 124 Audiovox Electronics Corporation Hauppauge, NY 11788 Technical Assistance: 1-800-323-4815 www.jensen.com © 2010 Audiovox Ver. 030510 Printed in China...
Need help?
Do you have a question about the VM9414 and is the answer not in the manual?
Questions and answers