Table of Contents
Advertisement
Quick Links
Advertisement
Table of Contents

Related Manuals for Niles RCA-HT2


Summary of Contents for Niles RCA-HT2
- Page 1 I N S T A L L A T I O N G U I D E REMOTE CONTROL ANYWHERE! ® RCA - HT2...
-
Page 2: Table Of Contents
Niles manufactures the industry’s most complete line of custom installation components and accessories for audio/video systems. To see the complete Niles product assortment, visit us on the internet at: www.nilesaudio.com. -
Page 3: Introduction
INTROdUCTION The Niles RCA-HT2 Remote Control Anywhere! Kit enables you to operate your remote controlled audio/video equipment from virtually any location. Now you can place your audio/video (A/V) components out of sight (behind cabinet doors, in the rear of a room, or in a different room) and still conveniently control your system. -
Page 4: Features And Benefits
FEATURES ANd BENEFITS – REMOTE CONTROL ANYWHERE! KIT COMPLETE SYSTEM Everything needed to assemble a complete IR extender system is included in one box: ONE INFRAREd MICROSENSOR ® Receives/initiates the IR commands and routes them to the Main System Unit ONE MAIN SYSTEM UNIT Amplifies and distributes the commands to the infrared flashers IR MICROFLASHER... - Page 5 Enjoy the convenience of 20’ to 35’ of remote control range (6.1 meters to 10.6 meters) PRINTEd CIRCUIT BOARd Our printed circuit board uses surface mount technology (SMT) to ensure reliability SMALL SIzE Discretely blends into environment EXTRA LONG CABLE 10’ of connecting cable included NILES AUDIO CORPORATION – 1-800-BUY-HIFI – 1-305-238-4373...
-
Page 6: Power Supply
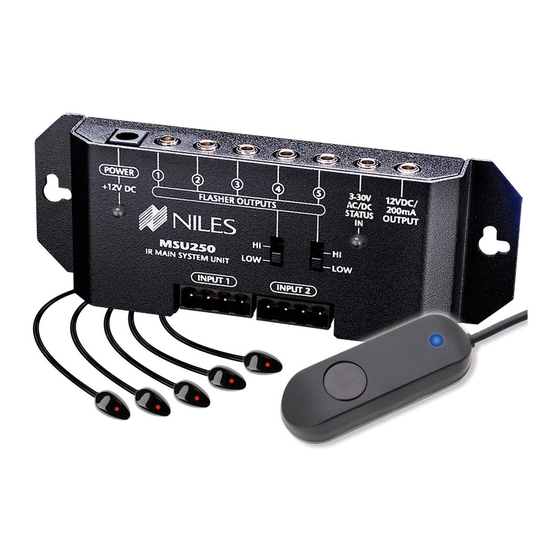
FEATURES ANd BENEFITS – MAIN SYSTEM UNIT UNIVERSAL SYSTEM Compatible with virtually all brands of audio/video equipment and remote controls VERSATILE CONNECTIONS Accommodates one IR MicroSensor with removable screwless connector plus four IR flashers via ® 3.5 mm jacks SYSTEM FEEdBACK LEd Confirms proper operation 3-30V AC/dC STATUS INPUT Provides system status to connected sensors and keypads... - Page 7 EASY INSTALLATION A strip of self-adhesive tape provides secure mounting CONNECTING WIRE A 10’ connecting wire (3 m) is fitted with a 3.5 mm mono mini-plug to provide a secure connection to the MSU NILES AUDIO CORPORATION – 1-800-BUY-HIFI – 1-305-238-4373...
-
Page 8: Installation Considerations
INSTALLATION CONSIdERATIONS WARNING – TO PREVENT POSSIbLE INjURy, THE FOLLOWING bASIC SAFETy PRECAUTIONS SHOULD bE ObSERVED IN THE INSTALLATION AND USE OF yOUR REMOTE CONTROL ANyWHERE KIT. 1. Read through the entire manual – Before attempting any installation, read this manual thoroughly and keep it for future reference. -
Page 9: Installation
Steps one through five describe how to perform a quick and easy check for compatibility. Once you have determined that all of your remote controlled A/V components are compatible, proceed with the rest of the installation. Figure 1 Connection Hub Placement NILES AUDIO CORPORATION – 1-800-BUY-HIFI – 1-305-238-4373... - Page 10 Place the Connection Hub so that the MicroFlasher wires will reach the components. Never place the connection hub closer than 1’ away from a television set ( Figure 1). To Niles IR Flasher To 12VDC Power Supply Plugged into a switched To unswitched AC Outlet.
- Page 11 Figure 4: Wiring Legend TECH TIP: Wire size is expressed by it’s AWG (American Wire Gauge) number. The lower the AWG number, the larger the wire, i.e., 20 AWG wire is physically larger than 22 AWG. NILES AUDIO CORPORATION – 1-800-BUY-HIFI – 1-305-238-4373...
- Page 12 INSTALLATION (continued) STEP 3 – MICROFLASHER ANd 12VdC IN-LINE POWER SUPPLY CONNECTION Plug the MicroFlasher into any of the sockets labeled FLASHER OUTPUTS on the connection hub (Figure 5). Plug the connector on the supplied 12VDC power supply into the socket labeled POWER on the connection hub and then plug the wall adapter into a live electrical outlet.
- Page 13 MicroSensor Repeat this procedure for each A/V component you wish to control. When the A/V component responds repeatedly, peel off the protective backing on the MicroFlasher and place the MicroFlasher in that location. NILES AUDIO CORPORATION – 1-800-BUY-HIFI – 1-305-238-4373...
- Page 14 INSTALLATION (continued) STEP 5 – MOUNTING THE CONNECTION HUB Make sure that your system tested OK before proceeding Once you have decided on the ideal location for the connection hub, unplug the 12VDC power supply from the electrical outlet and disconnect the MicroSensor and the MicroFlasher cables from the connection hub (Figure 8).
- Page 15 Exposing too much wire could create “shorts” within the system. IMPORTANT: IF yOU HAVE DOUbTS AbOUT WHETHER yOU ARE CAPAbLE OF INSTALLING A NILES REMOTE CONTROL ANyWHERE! KIT IN yOUR WALLS, CONSULT A NILES DEALER OR PROFESSIONAL INSTALLER. THEy HAVE SPECIAL TOOLS, TECHNIqUES, AND ExPERIENCE TO MAKE THE IMPOSSIbLE POSSIbLE.
- Page 16 INSTALLATION (continued) STEP 7 – RUNNING THE MICROSENSOR CABLE Reconnect the MicroSensor plug, flashers and power supply as outlined in steps 2, 3 and 4 (Figure 10). That’s it! Now you are ready to control your audio/video equipment from the room you chose. NOTE: MAKE SURE THAT THE STRIPPED ENDS OF THE WIRE DO NOT COME IN CONTACT WITH ONE ANOTHER OR ANy SURFACE OTHER THAN THE CONNECTOR.
-
Page 17: Normal Operation
If you are using a remote control with macro capabilities (a single press of a button issues a string of commands), allow sufficient time for all of the commands to execute. Figure 12: System Operation NILES AUDIO CORPORATION – 1-800-BUY-HIFI – 1-305-238-4373... -
Page 18: Optional Accessories
INSTALLATION (continued) OPTIONAL ACCESSORIES STATUS FEEdBACK WALL AdAPTER The MicroSensor features a status feedback LED that glows green whenever your system is on. This is a very useful feature when operating your equipment from a remote location. For this feature to work, your system receiver (or preamp) must have a switched AC outlet and you must purchase the optional Status Feedback 12VDC Wall Adapter (FG01035). -
Page 19: Scheduling And Preparation
AddITIONAL MICROSENSORS The Remote Control Anywhere! Kit includes one surface mount MicroSensor. The included MSU250 main system unit will accommodate a second IR MicroSensor. Niles makes a variety of MicroSensors for virtually any application. See your Niles dealer for more information. - Page 20 INSTALLATION (continued) SAFETY FIRST! Wear gloves, safety goggles and head protection when drilling. Avoid nails, they ruin bits and they can cause injury. Pay particular attention when using “hole-hogs” and other powerful electric drills; the torque of the drill when suddenly stopped by a nail can break a strong person’s wrist. dRILLING Use a bit that is large enough for the cables you plan to run.
- Page 21 This “fire blocking” makes it very difficult to retrofit long lengths of cable. In some areas of the country the exterior walls are constructed of solid masonry, and have no hollow space for cables. NILES AUDIO CORPORATION – 1-800-BUY-HIFI – 1-305-238-4373...
- Page 22 INSTALLATION (continued) Start by examining all the possible routes you might take to run the MicroSensor cable from the MicroSensor location to the A/V components to be controlled. Use a stud sensor or other device to locate the internal structure of the wall. you want to avoid all studs or joists. A typical route would be from the MicroSensor location up the inside of the wall to a new hole drilled into the top “plate”...
- Page 23 A careful study of the potential problems before you start the job will pay off later. Figure 14: Unobstructed space for MicroSensor cable Figure 15: Routing Wire Around a Door NILES AUDIO CORPORATION – 1-800-BUY-HIFI – 1-305-238-4373...
-
Page 24: Specifications
SPECIFICATIONS MSU250 Mounting Surface Mount IR System Compatible with virtually all brands Wiring Requirements of remotes using carrier frequencies between Individual home-runs of CAT-5 cable 25kHz and 90kHz Unit Dimensions Wiring Requirements Individual home-runs of 2” wide x 11/16” high x 1/2” deep CAT-5 cable from each MicroSensor/keypad 5.08 cm wide x 1.74 cm high x 1.27 cm deep Unit Dimensions... - Page 25 NOTES NILES AUDIO CORPORATION – 1-800-BUY-HIFI – 1-305-238-4373...
-
Page 26: Limited Warranty
To obtain warranty service, take the unit to the nearest authorized NILES dealer, who will test the product and if necessary, forward it to NILES for service. If there are no authorized NILES dealers in your area, you must write to NILES and include your name, model and serial number of your unit, along with a brief description of the problem. -
Page 27: Warranty Registration Card
Niles products? ❍ Yes ❍ No Who will install the product? Musical tastes: (Please check ❍ Custom Installer all that apply) ❍ Alternative ❍ Classical ❍ Electrician ❍ Country ❍ Jazz ❍ Friend NILES AUDIO CORPORATION – 1-800-BUY-HIFI – 1-305-238-4373... - Page 28 1 - 8 0 0 - B u y - H i f i – w w w . n i l e s a u d i o . c o m ©2 00 9 Niles Au dio Corporation. All r ights res er ved. Niles , the Nil es logos, Mi cr oSensor, Micr oF l ashe r, Rem ot e Co ntro l A nywhere! and Blending High Fidel ity and Arc hi tec ture are r egistered trad emar ks o f N il es Au di o C orpo rat i on.
Need help?
Do you have a question about the RCA-HT2 and is the answer not in the manual?
Questions and answers