Table of Contents
Advertisement
Advertisement
Table of Contents

Related Manuals for White SuperLock


Summary of Contents for White SuperLock
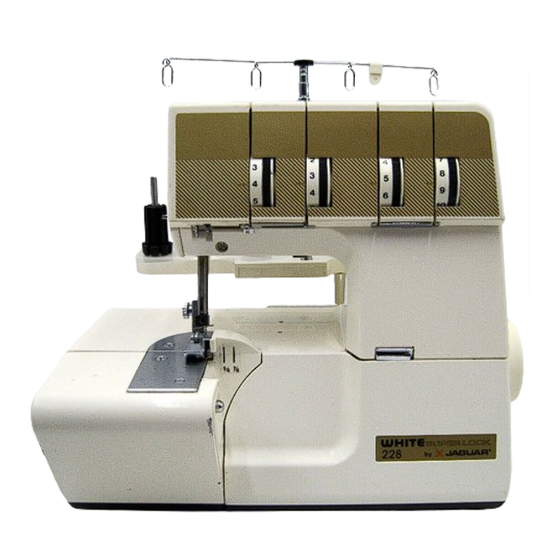
- Page 4 1. KNOWiNG YOUR MACHINE IDENTIFICATION CHART © 1. Lower looper thread tension control 10. Extension plate 2. Upper looper thread tension control 11. Spool pin base 3. Right needle thread tension control 12. Hand wheel 4. Left needle thread tension control 13.
- Page 6 PARTS LIST AN parts listed may be obtained from your 1. The model and serial number of your machine, which you will find on the nearest dealer. identification plate, at the back. When ordering, please give: 2. The part number and description. Screw driver Ilarge>...
- Page 7 SETflNG UP YOUR MACHINE 1. Set your machine on a sturdy, flat surface. 2. As your machine has been thoroughly oiled at the factory, be sure to wipe the needle plate area and bed plate carefully before sewing a garment. It is wise to practice on a scrap of fabric so any surplus oil is absorbed.
- Page 8 THREAD GUIDE POLE Extend thread guide pole to its highest point. Place threads on spool pins and draw them through the guides from rear to front. 8. ADJUSTING MACHINE BALANCE To compensate for any uneveness on your working surface, the machine is fitted with an adjustable rubber stud.
- Page 10 F[TTING THE NEEDLE(S) Raise needle bar to highest point b turning hand wheel towards you, but leave Needle clamp presser foot down. Loosen needle clamp screw with small screwdriver to remove old needles. Place new needles with FLAT SIDE AWAY FROM YOU, into the groove of the needle bar making certain it is up as far as it will go Tighten the needle clamp screw securely.
- Page 14 NEEDLES Feed the thread through the thread guide as illustrated. While pressing down and hold ing tension release lever at its down position, draw the needle threads through left-hand ten sion slot. Thread the needles from front to back through needle eye, pull...
- Page 16 TESTING STITCH OVERLOCK STITCHES Fig. 1 After threading is completed, use spare fabri that you plan to sew and test to sew in th following order. 1. Gently pulling all the threads to the lef lower the presser foot. Rotate the haft wheel towards you a few times to see if th lock stitches are properly formed.
- Page 22 FEED Differential feed Set by simply turning the differential feet control lever control lever in the direction desired referrin to the chart below. The adjustment can be made between 0, (Minimal effect) and 2 (Positive effect These settings give the best ratio of feeding For normal sewing, the lever should be st at 1.
- Page 24 MACHINE ADJUST MENT CHART FOR NARRO W AND ROLLED Narrow overlock hems Rolled hems Needle plate and Use needle plate and presser foot for narrow/r olled hems presser foot (see page 21). Stitch length “1.5to2 1 to2 Needle 75or90(l lorl4) 75(11) Thread for Polyeste r, Nylon, Silk No.
- Page 26 —...
- Page 30 CLEANING AND OILING To keep the machine running smoothly, keet clean and lubricated at all times. FIRST DISCONNECT MACHINE POWER SUPPLY BY REMOVING PLU( FROM SOCKET.OUTLET. 1. Open both front and side covers. Usin the brush provided, remove dust and Iir that have accumulated.
Need help?
Do you have a question about the SuperLock and is the answer not in the manual?
Questions and answers
Lower looper thread is too big
how to set the timing on my White Superlock 534
Tiene filtro de aceite