
Related Manuals for RODE Microphones PODCASTER


Summary of Contents for RODE Microphones PODCASTER
- Page 1 USB MICROPHONE USB MICROPHONE Instruction Manual USB MICROPHONE USB MICROPHONE ( EMC, LVD )
- Page 3 Podcaster, as well as step-by-step instructions for its setup, and full product specifications. As a Podcaster owner you now have full access to the site www.rodepodcaster.com. This site offers hosting as well as other interesting podcasting information. If you have any questions or comments, you can log onto our website: www.rodemic.com where there are answers to frequently asked queries...
-
Page 4: Specifications
USB MICROPHONE Specifications Acoustic Principle: Dynamic 28 mm USB MICROPHONE Active Electronics: Analogue signal conditioning + A/D and USB interface. Pickup Pattern: Cardioid. Frequency Response: USB MICROPHONE 40 Hz ~ 14 kHz. Sensitivity: -51 dB re 1 Volt/Pascal (2.8 mV @ 94dB SPL) +/- 3 dB Maximum SPL: 115 dB Signal/Noise:... -
Page 5: Frequency Range
USB MICROPHONE Specifications cont. Frequency range: 40 Hz - 14kHz USB MICROPHONE USB MICROPHONE 40 Hz 1000 10 000 20 000 0˚ +5.0 -2.0 -4.0 -6.0 -8.0 -10.0 -12.0 -14.0 -16.0 -18.0 -20.0 -22.0 -24.0 270˚ 90˚ -25.0 dB rel. 1V/Pa 180˚... -
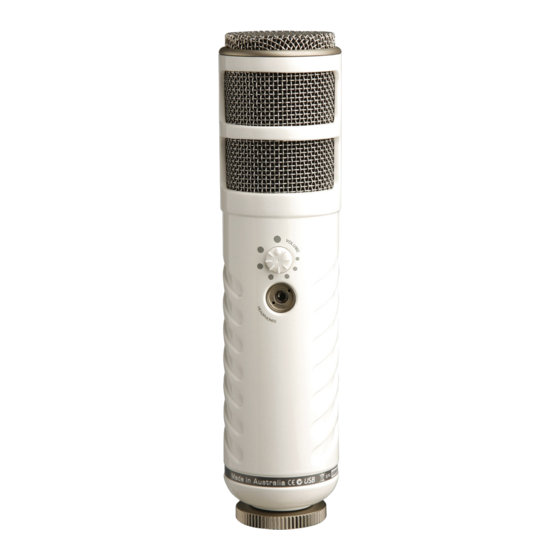
Page 6: Podcaster L A Yout
USB MICROPHONE Podcaster l a yout USB MICROPHONE USB MICROPHONE STATUS HEADPHONE VOLUME CONTROL HEADPHONE OUTPUT LOCKING COLLAR CONNECTION Fig. 2... - Page 7 USB MICROPHONE I n stal l i ng the Podcaster There are two ways that you can install your Podcaster depending on how much control you wish to have over your recording. USB MICROPHONE As your Podcaster is USB compliant, by simply connecting your...
- Page 8 Fig. 4 3. Next open the ‘Sound Preference’ and click the ‘Input’ tab and select ‘Røde Podcaster’ (figure 4). This will allow you to use your Podcaster through the existing sound recording software on your MAC. To enhance the features of your Podcaster we recommend you install the additional software which can be download from the podcaster web site.
- Page 9 ‘Sounds and Audio Devices’ icon. Click on the ‘Audio’ tab which will bring up 3 options. Under the ‘Sound Recording’ option, you should now be able to select ‘Røde Podcaster’ as your default device (figure 5). 3. This will allow you to use your Podcaster through the sound recording software on your PC (go to www.rodepodcaster.com for...
- Page 10 ‘Sound Recording’ option, you should now be able to select either ‘USB Audio Device’ or Røde Podcaster’. 3. This will allow you to use the Podcaster through your sound recording software on your PC (go to www.rodepodcaster.com for information on various recording software programs). To check that you have the Podcaster set as your recording device, go to Edit/Audio Properties, and check that ‘Røde Podcaster’...
- Page 11 USB MICROPHONE I n stal l i ng and using Podcaster software To use the Podcaster as a simple recording microphone it is merely a matter of connecting it to your computer. If you want to explore, enhance and control your recordings then we have created additional software which will allow you to do this.
- Page 12 By adjusting the Recording Volume Slider you should be able to set a reasonable level very quickly. The way to do this is to set the Podcaster up in front of you and raise the slider control while you are speaking at the same level you will use when recording.
-
Page 13: Operating And Powering The Podcaster
USB MICROPHONE When the Podcaster is first connected to the computers USB port, you will notice that the light on the Podcaster will turn Red for a fraction of a second and then it will turn to green and it should stay green until you disconnect your Podcaster. -
Page 14: Connecting Headphones To Your Podcaster
The proximity effect causes an increased base response when you are closer to the microphone. This can be used in a positive way to enhance the quality of your voice. If you would like to learn more on how to setup your podcaster visit the podcsater website (www.rodepodcaster.com) and view the online tutorials. -
Page 15: Mounting Your Podcaster
USB MICROPHONE Mounting your Podcaster The Podcaster comes with a stand mount that will allow you to connect it to a microphone stand. USB MICROPHONE The mount comes with a 3/8” brass insert that can be removed. Once removed the internal thread of the mount is a 5/8” thread. - Page 16 USB MICROPHONE 3/8” insert. 2. Remove the locking collar from the base of the Podcaster and store it away in a safe place where it will not get lost. 3. Install the Podcaster into the PSM1 by fitting the microphone into the center of the web and onto the bottom mounting plate (figure 10).
- Page 17 USB MICROPHONE Warranty Servi c e PODCASTER comes standard with a 1 year warranty from the date of purchase. You can extend that USB MICROPHONE to a FULL TEN YEARS if you register online at www. rodepodcaster.com. The warranty covers parts and labour that may be required to repair the microphone during the warranty period.
- Page 18 International: Microphones. Unit 2/107 Carnarvon Street Silverwater NSW 2128 Australia 61 2 9648 5855 Fax: 61 2 9648 2455 USA: P.O. 4189 Santa Barbara, CA 93140-4189 805 566 7777 Fax: 805 566 0071 Technical Support: For information and technical support questions contact: support@rodemic.com In the United States and Puerto Rico, contact:...
Need help?
Do you have a question about the PODCASTER and is the answer not in the manual?
Questions and answers