Table of Contents
Advertisement
Owner
'
s manual:
Owner
'
s manual:
Guide d'utilisation :
Guide d'utilisation :
Manual del propietario:
Manual del propietario:
Français - Table des matières
Consignes de sécurité . . . . . . . . . . . . . . . . . . . . . . . . . . . . . 12
Pièces et composants . . . . . . . . . . . . . . . . . . . . . . . . . . . . . 13
Assemblage . . . . . . . . . . . . . . . . . . . . . . . . . . . . . . . . . . . . . 14
1-800-760-3844
Peinture . . . . . . . . . . . . . . . . . . . . . . . . . . . . . . . . . . . . . . . . 15
Changement d'accessoires . . . . . . . . . . . . . . . . . . . . . . . . . 15
Nettoyage . . . . . . . . . . . . . . . . . . . . . . . . . . . . . . . . . . . . 16-17
Wagner Technical Service
Nettoyage facultatif. . . . . . . . . . . . . . . . . . . . . . . . . . . . . 18-19
Or visit us on the world wide web!
Conseils concernant le nettoyage et le rangement . . . . . . . 20
Ou visitez notre site Web!
Entretien . . . . . . . . . . . . . . . . . . . . . . . . . . . . . . . . . . . . . . . 20
¡O visitenos en Internet!
Dépannage / Carte d'enregistrement du produit . . . . . . . . . 21
http://www.wagnerspraytech.com
Liste des pièces . . . . . . . . . . . . . . . . . . . . . . . . . . . . . . . 32-33
Garantie . . . . . . . . . . . . . . . . . . . . . . . . . . . . . . . . . . . . . . . . 34
Heures d'ouverture du Service technique :
du lunde au vendredi, de 8 h à 4:30 h, heure normale du Centre
1-800-760-3844
Wagner Technical Service
Or visit us on the world wide web!
Ou visitez notre site Web!
¡O visitenos en Internet!
http://www.wagnerspraytech.com
Form No. 0514825D
0506 •
Read this manual for complete instructions
Read this manual for complete instructions
Ce manuel contient des instructions détaillées
Ce manuel contient des instructions détaillées
Le este manual para obtener instrucciones completas
Le este manual para obtener instrucciones completas
Safety Information . . . . . . . . . . . . . . . . . . . . . . . . . . . . . . . . . 2
Parts and Components . . . . . . . . . . . . . . . . . . . . . . . . . . . . . 3
Assembly . . . . . . . . . . . . . . . . . . . . . . . . . . . . . . . . . . . . . . . . 4
Painting . . . . . . . . . . . . . . . . . . . . . . . . . . . . . . . . . . . . . . . . . 5
Changing Accessories . . . . . . . . . . . . . . . . . . . . . . . . . . . . . . 5
Cleanup . . . . . . . . . . . . . . . . . . . . . . . . . . . . . . . . . . . . . . . 6-7
Optional Cleanup . . . . . . . . . . . . . . . . . . . . . . . . . . . . . . . . 8-9
Cleanup and storage tips . . . . . . . . . . . . . . . . . . . . . . . . . . 10
Maintenance . . . . . . . . . . . . . . . . . . . . . . . . . . . . . . . . . . . . 10
Troubleshooting . . . . . . . . . . . . . . . . . . . . . . . . . . . . . . . . . . 11
Registration card . . . . . . . . . . . . . . . . . . . . . . . . . . . . . . . . . 11
Parts List . . . . . . . . . . . . . . . . . . . . . . . . . . . . . . . . . . . . 32-33
Warranty . . . . . . . . . . . . . . . . . . . . . . . . . . . . . . . . . . . . . . . 34
Información de seguridad . . . . . . . . . . . . . . . . . . . . . . . . . .22
Piezas y componentes . . . . . . . . . . . . . . . . . . . . . . . . . . . .23
Ensamblaje . . . . . . . . . . . . . . . . . . . . . . . . . . . . . . . . . . . . .24
Pintura . . . . . . . . . . . . . . . . . . . . . . . . . . . . . . . . . . . . . . . . .25
Cómo cambiar los accesorios . . . . . . . . . . . . . . . . . . . . . . .25
Limpieza . . . . . . . . . . . . . . . . . . . . . . . . . . . . . . . . . . . . .26-27
Limpieza opciónal . . . . . . . . . . . . . . . . . . . . . . . . . . . . . .28-29
Sugerencias de limpieza y almacenamiento . . . . . . . . . . . .30
Mantenimiento . . . . . . . . . . . . . . . . . . . . . . . . . . . . . . . . . . .30
Solución de problemas / Targeta de registro del producto . . . .31
Liste de piezas . . . . . . . . . . . . . . . . . . . . . . . . . . . . . . . .32-33
Garantía limitada . . . . . . . . . . . . . . . . . . . . . . . . . . . . . . . . .35
Need Help?
Call us first for answers
fast. Call Wagner toll-free if
you have any comments or
problems with this Wagner
product.
English - Table of Contents
Technical service hours:
Monday through Friday, 8:00 am to 4:30 Central Time
Español - Tabla de Contenido
Horario del servicio técnico:
De lunes a viernes, de 8 a.m. a 4:30 p.m., Hora Central
Besoin d'aide?
Appelez-nous pour des
réponses rapidas.
obtener respuestas rápidas.
Téléphonez à Wagner sans
frais d'appel si vous avez
des commentaires ou des
comentario o tiene problemas
problèmes avec l'appareil.
con este producto de Wagner.
®
¿Necesita Ayuda?
Llámenos primero para
Llame a la línea gratuita de
Wagner si quiere hacer un
Advertisement
Table of Contents

Related Manuals for WAGNER Power Roller


Summary of Contents for WAGNER Power Roller
-
Page 1: Table Of Contents
Call us first for answers Wagner Technical Service réponses rapidas. obtener respuestas rápidas. fast. Call Wagner toll-free if Or visit us on the world wide web! Téléphonez à Wagner sans Llame a la línea gratuita de Ou visitez notre site Web! you have any comments or frais d’appel si vous avez... -
Page 2: Safety Information
Cord length (feet) Ampere rating 120V 25-50 100 range This high performance power roller is a precision power tool used for both interior and exterior painting and may be used with both water (latex) and oil based paints. 2 - 3 English... -
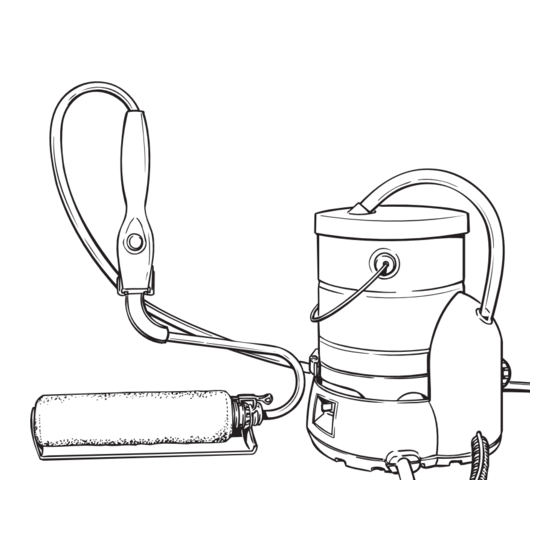
Page 3: Parts And Components
Parts and components Item Description Item Description a) ....... .Roller arm h) . -
Page 4: Assembly
Title Assembly 2. Tightly place the lid on the paint can. Align arrow (a) and 1. Before using the unit, make sure the inlet plug is screwed tightly into the Quick-clean™ adapter, or material will leak paint can handle (b) as shown. from the adapter opening. -
Page 5: Painting
Title Painting 2. PRESS and HOLD handle button until paint appears 1. Plug in the power cord. Flip selector switch on base to PAINT. No paint will flow until handle button is depressed. through the roller cover. When roller cover is saturated, RELEASE the handle button and begin rolling. -
Page 6: Cleanup
Title Cleanup - Purging the paint hose When you are finished with your project, follow these steps to return any remaining material left in the hose back into its container. These steps should be followed no matter what type of material you used. 2. - Page 7 Title Cleanup - Using the Quick-clean™ Feature • Follow these steps ONLY if you used latex-based material AND you have an available garden hose. • Make sure you have completed steps 1-4 in Cleanup - Purging the Paint Hose before using the Quick-clean™ feature. 1.
-
Page 8: Optional Cleanup
Optional Cleanup - latex materials Follow these steps ONLY if you used latex materials and do not have a garden hose available. 2. Flip selector switch to CLEAN (motor will run continuously 1. Elevate roller arm and hang from an empty bucket. The unit must be lower than the arm in order for air to be without the aid of the handle button). - Page 9 Optional Cleanup - oil-based materials These steps should be followed for use with ONLY oil-based materials. 2. Flip selector switch to CLEAN (motor will run continuously 1. Place roller arm and suction tube in a bucket of mineral spirits. without the aid of the handle button). Recirculate one quart of mineral spirits through the unit for approximately 10 minutes (cleaning time may vary depending upon type of paint).
-
Page 10: Cleanup And Storage Tips
Cleaning and Storage Tips • Thoroughly cleaning your unit and its components is the best way to ensure the prolonged life of your unit. • Keep water, paint, and other residues away from the handle button. A clogged handle button will affect the performance of your unit. -
Page 11: Troubleshooting
Troubleshooting Problem Cause Solution The pump will not run 1. The power cord is unplugged, or no power in 1. Plug the power cord into 120V outlet. outlet. 2. Turn switch to PAINT and depress 2. The handle button is not being depressed, and the switch is not set to PAINT. -
Page 12: Parts List
Parts List • Liste de pièces • Lista de piezas Inner handle Manche interne Mango interno *For reference only *À titre de référence seulement *Sólo para referencia English Français Español... - Page 13 Parts List • Liste de pièces • Lista de piezas Title Item Part No. Quantity English - Français - Español - Article Nº de piéce Quantite Articulo Pieza No. Description Description Descripción Cantidad 0514113 Handle assembly Ensamble de manche Ensamblaje del mango 2, 3, 9* 0514112 O-ring and seal...
-
Page 14: Warranty
This warranty does not cover damage resulting from improper use, accidents, user's negligence or normal wear. This warranty does not cover defects or damages caused by service or repair performed by anyone other than a Wagner Authorized Service Center. This warranty does not apply to accessories. -
Page 15: Mantenimiento
Servicio Técnico de Wagner en 1770 Fernbrook Lane, Minneapolis, MN 55447. El Centro de Servicio Autorizado de Wagner se encargará de la reparación o el reemplazo del producto (a criterio de Wagner) y lo enviará al comprador, con el flete de transporte prepagado. - Page 16 Wagner Spray Tech Corporation © 2004 Wagner Spray Tech. All rights reserved, 1770 Fernbrook Lane including right of production in whole or in part, in Plymouth, MN 55447 any form. Printed in China. Telephone: 1-800-760-3844 U.S. Patent Number D 470 914...
Need help?
Do you have a question about the Power Roller and is the answer not in the manual?
Questions and answers
i need the operating manual for a old - wagner - power roller painting system - model: 959