NETGEAR N150 Setup Manual
N150 wireless router
Hide thumbs
Also See for N150:
- User manual (107 pages) ,
- Quick start (2 pages) ,
- Setup manual (42 pages)
Table of Contents
Advertisement
Quick Links
Download this manual
See also:
User Manual
Advertisement
Table of Contents
Troubleshooting

Related Manuals for NETGEAR N150


Summary of Contents for NETGEAR N150
- Page 1 N150 Wireless Router Setup Manual NETGEAR, Inc. 350 E. Plumeria Drive San Jose, CA 95134 USA September 2010 208-10710-01 v1.0...
- Page 2 In the interest of improving internal design, operational function, and/or reliability, NETGEAR reserves the right to make changes to the products described in this document without notice. NETGEAR does not assume any liability that may occur due to the use or application of the product(s) or circuit layout(s) described herein.
-
Page 3: Table Of Contents
Contents N150 Wireless Router Setup Manual Getting to Know Your Wireless Router................1 Unpacking Your New Router ..................... 1 Hardware Features ......................2 Front Panel ........................2 Back Panel ........................4 Side Panel ........................4 Router Label ........................ 5 Positioning Your Wireless Router ..................5 Installing Your Wireless Router .................. - Page 4 Checking the Internet Service Connection ..............32 Obtaining an Internet IP Address ..................32 Troubleshooting PPPoE .................... 33 Troubleshooting Internet Browsing ................34 Using the Ping Utility to Troubleshoot ................34 Testing the Path from Your Computer to Your Router ..........34 Testing the Path from a Computer to the Internet .............
-
Page 5: Getting To Know Your Wireless Router
Click Documentation on the main menu. If any of the parts are incorrect, missing, or damaged, contact your NETGEAR dealer. Keep the carton, including the original packing materials, in case you need to return the product for repair. -
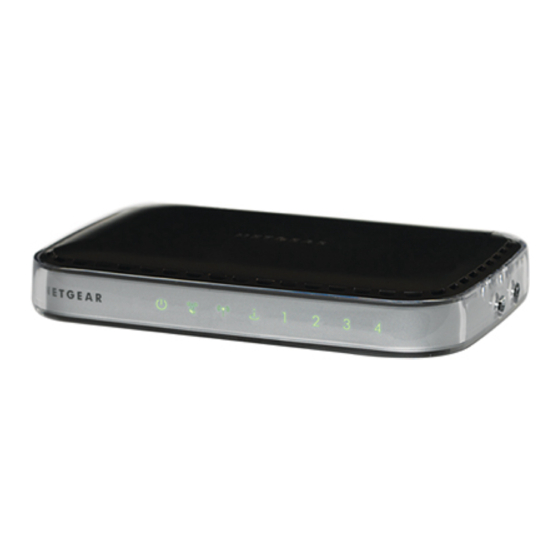
Page 6: Hardware Features
To prepare your router for installation: Carefully peel off any protective film covering the sides of your router. Place your router in a suitable area for installation (near an AC power outlet and accessible to the Ethernet cables for your wired computers). Hardware Features Before you install and connect your router, take a moment to become familiar with the front and back panels of the router—especially the status lights on the front panel. - Page 7 You can use the status lights to verify various conditions. Table 1. Status Light Descriptions Label Activity Description Solid Amber The router is performing the power-on self-test diagnostic. Solid Green The power is on and the router is ready. Fast blink–Green A software update is in progress.
-
Page 8: Back Panel
Back Panel The router back panel, shown in Figure 2, contains port connections. Figure 2 Viewed from left to right, the rear panel contains the following elements: 1. AC power adapter outlet for connecting the power adapter. 2. Power on/off push-button. 3. -
Page 9: Router Label
1. WPS button – Turns Push ‘N’ Connect (WPS) security on and off. When wireless security is enabled, the Push ‘N’ Connect LED on the front of the wireless router is solid green. See “Push 'N' Connect” on page 2. Wireless On/Off button – Turns the Wireless network on and off. When the Wireless network is enabled, the Wireless LED on the front of the router is solid green. -
Page 10: Installing Your Wireless Router
PC(s); configure your wireless settings; and enable wireless security for your network. When you have finished, you will be Internet ready! NETGEAR does not recommend or support adding a NETGEAR router behind another router, or replacing a gateway with a NETGEAR router. -
Page 11: Updating Your Router Firmware
Updating Your Router Firmware NETGEAR is always improving the operability and features included with your router. To make it easy for you to receive the best, most up-to-date features of your router, NETGEAR provides a variety of methods for updating your product. -
Page 12: Installing Your Router Using The Smart Wizard
You have the configuration information provided by your ISP. Using the Smart Wizard The NETGEAR Smart Wizard takes you through the procedure to connect your router, modem, and PC(s). It then helps you to configure your wireless settings and enable wireless security for your network. - Page 13 When the Smart Wizard prompts you about updates, click Yes to check for updates for your router, or No, to update later (for more information, see “Setting Up Your Router for Internet Access” on page 17, or the online User Manual). Follow the remaining instructions and prompts to complete the installation.
-
Page 14: Accessing Your Router After Installation
After connecting to the Internet, you can: • Log in to the router and check for new firmware. Refer to the bottom label for the default login information, or see the steps in “Configuring Your Wireless Network” on page • Set up additional wireless computers in your network for Internet access (see “Configuring Your Wireless Network”... -
Page 15: Manually Installing Your Router
Manually Installing Your Router Before installing and connecting your router manually, review the list below and make sure that you have all of the necessary information. Use the procedures in this topic if you are an advanced user, or a user of Linux systems. -
Page 16: Connecting Your Wireless Router
Then, skip to step 5 in the following procedure NETGEAR does not recommend or support adding a NETGEAR router behind another router, or replacing a gateway with a NETGEAR router. There are two steps to setting up your wireless router: 1. - Page 17 Figure 6 Locate the Ethernet cable that came with your NETGEAR product. Securely insert one end of the Ethernet cable into your modem (C) and the other end into the Internet port of the wireless router (D). (The cable and the Internet port label are color coded.)
- Page 18 2 3 4 Figure 8 Connect any additional wired PCs to your router by inserting an Ethernet cable from a PC into one of the three remaining LAN ports. Review that your network is now set up (as shown in Figure 9);...
-
Page 19: Verifying Your Connection
Failure to start or restart your network in the correct sequence could prevent you from accessing the Internet. To start your network: Plug in and turn on the cable or DSL modem. Wait 2 minutes. Plug the end of the power adapter’s cord into the wall or a power strip, and into the power adapter outlet of your wireless router (F), as shown in Figure 10. - Page 20 Figure 11 Table 2. Status Lights After Installation Label Description The power light should turn solid green. If it does not, see “Checking Basic Router 1. Power Functions” on page The WPS button/light will not be lit unless you push it to enable Push ‘N’ Connect (WPS) security.
-
Page 21: Setting Up Your Router For Internet Access
Setting Up Your Router for Internet Access When configuring your wireless router manually, you must log in to your wireless router to set it up initially and to make any changes to your wireless router’s settings later. The factory default state is reset when you use the Restore Factory Settings button. “Restoring the Default Password and Configuration Settings”... - Page 22 Click Yes to check for new firmware (recommended). The router will automatically check the NETGEAR database for a new firmware image file. If no new firmware version is available, the message “No New Firmware Version Available” will display. (If you select “No,” you can check for new firmware later;...
- Page 23 • Select No to set up the connection yourself. Click Next and the Basic Settings screen will display. Enter the required information for your ISP connection in the appropriate fields. If you need assistance, follow the Basic Settings Help screens on the router interface or see the online User Manual for this wireless router.
- Page 24 Review your settings and make sure that you have selected the correct options and typed everything correctly. • Contact your ISP to verify that you have the correct configuration information. • Read “Troubleshooting” on page If problems persist, register your NETGEAR product and contact NETGEAR Technical Support. Manually Installing Your Router...
-
Page 25: Configuring Your Wireless Network
N150 Wireless Router. For a wireless connection, the router and each wireless computer must use the same SSID, also called the wireless network name, and the same wireless security. NETGEAR strongly recommends that you use wireless security. -
Page 26: Setting Your Ssid And Wireless Security Manually
The wireless mode (802.11g/b or 802.11n) that each wireless adapter supports. • Wireless security option. NETGEAR strongly recommends that you use wireless security. To successfully implement wireless security, check each wireless adapter to determine which wireless security option it supports. -
Page 27: Using Push 'N' Connect (Wps) To Configure Your Wireless Network
WPA2-PSK. WEP security is not supported by WPS. If you install a NETGEAR adapter that supports WPS, its installation procedures guide you through a WPS connection without the need to log in to the router. However, if you wish to 1. - Page 28 perform any WPS connection using the router settings, use the procedures below. (For more information on setting up a mixed network, see the online User Manual. To add a WPS client to your network: Log in to the wireless router, type http://www.routerlogin.net or http:// www.routerlogin.com in the address field of your browser, and then click Enter.
- Page 29 • Entering a PIN. If you want to use the PIN method, select the PIN radio box. A screen similar to the one shown below displays. – Go to your wireless client and, from the client’s WPS utility, obtain the wireless client’s security PIN, or follow the client’s WPS utility instructions to generate a security PIN.
-
Page 30: Testing Basic Wireless Connectivity
Internet LED blink, indicating communication to the ISP. If you are planning a mixed network of WPS capable devices and non-WPS capable devices, NETGEAR suggests that you set up your wireless network and security settings manually first, and only use WPS for adding the WPS capable devices. - Page 31 Your wireless router is now configured to provide Internet access for your network. Your wireless router automatically connects to the Internet when one of your computers requires access. It is not necessary to run a dialer or login application such as Dial-Up Networking or Enternet to connect, log in, or disconnect.
-
Page 32: Troubleshooting
Troubleshooting If you have difficulties accessing the Internet, use the Basic Setup Checklist to make sure that you have connected and set up your router correctly. You can find help with the following problems: • “Basic Setup Checklist” on page 28 •... -
Page 33: Checking Basic Router Functions
• Make sure the network settings of the computer are correct. – LAN connected computers must be configured to obtain an IP address automatically using DHCP. For more information, see the links in “Related Documents” on page – Some cable modem services require you to use the MAC address of the computer registered on the account. - Page 34 – Check that you are using the power adapter supplied by NETGEAR for this product. If the error persists, you have a hardware problem and should contact technical support. • Power Light Blinks Green Slowly and Continuously. The router firmware is corrupted.
-
Page 35: Troubleshooting Login Problems
b. Clear the router’s configuration to factory defaults. This will set the router’s IP address to 192.168.1.1. This procedure is explained in “Restoring the Default Password and Configuration Settings” on page c. Turn the power off and back on to see if the router recovers. •... -
Page 36: Checking The Internet Service Connection
• If you are attempting to set up your NETGEAR router as a replacement for an ADSL gateway in your network, the router cannot perform many gateway services, for example, converting ADSL or Cable data into Ethernet networking information. NETGEAR does not support such a configuration. -
Page 37: Troubleshooting Pppoe
To check the Internet IP address from the browser interface: Log in to the wireless router. Select the Router Status link under the Maintenance heading to check that an IP address is shown for the Internet Port. If 0.0.0.0 is shown, your wireless router has not obtained an IP address from your service provider. -
Page 38: Troubleshooting Internet Browsing
If you cannot connect after several minutes, you might be using an incorrect service name, user name, or password. There also might be a provisioning problem with your ISP. Unless you connect manually, the wireless router will not authenticate using PPPoE until data is transmitted to the network. -
Page 39: Testing The Path From A Computer To The Internet
If the path is working, you see this message: Reply from www.routerlogin.net: bytes=32 time=NN ms TTL=xxx If the path is not working, you see this message: Request timed out If the path is not working correctly, you could have one of the following problems: •... - Page 40 • Check to see that the network address of your PC (the portion of the IP address specified by the netmask) is different from the network address of the remote device. • If your ISP assigned a host name to your PC, enter that host name as the Account Name in the Basic Settings menu.
-
Page 41: Technical Specifications
Technical Specifications Default Configuration Settings This section provides factory default settings and technical specifications for the N150 Wireless Router Model WGR614v11. Table 3. Home Router Default Configuration Settings Feature Default Setting Router Login Router Login URL http://www. routerlogin.net; http://www.routerlogin.com; or http://192.168.1.1... - Page 42 Table 3. Home Router Default Configuration Settings (continued) Feature Default Setting Wireless Wireless Communication Enabled SSID Name NETGEAR Security Disabled Broadcast SSID Enabled Transmission Speed Auto Country/Region United States (North America only; otherwise varies by country and region) RF Channel...
-
Page 43: Restoring The Default Password And Configuration Settings
Restoring the Default Password and Configuration Settings You can restore the factory default configuration settings that reset the router’s user name to admin, the password to password, and the IP address to 192.168.1.1. This procedure will erase all the current configuration settings and restore the factory defaults. -
Page 44: Related Documents
Related Documents This section provides links to reference documents that you can use to gain a more complete understanding of the technologies used in your NETGEAR product. Table 4. Related Documents Document Link Internet Networking and http://documentation.netgear.com/reference/enu/tcpip/index.htm TCP/IP Addressing Preparing a Computer http://documentation.netgear.com/reference/enu/wsdhcp/index.htm... -
Page 45: Registration And Certifications
Registration and Certifications Product Registration, Support, and Documentation Register your product at http://www.NETGEAR.com/register You must register before you can use our telephone support service. Product updates and Web support are always available by going to: http://www.NETGEAR.com/support Setup documentation is available on the CD, on the support website, and on the documentation website...
Need help?
Do you have a question about the N150 and is the answer not in the manual?
Questions and answers