Table of Contents
Advertisement
Quick Links
Advertisement
Table of Contents
Troubleshooting

Related Manuals for GoVideo DVD Recorder+VCR


Summary of Contents for GoVideo DVD Recorder+VCR
- Page 1 DVD Recorder+VCR User's Guide...
-
Page 2: Safety Precautions
SERIAL NUMBER: The serial number is found on the back of such as a bookcase or similar unit. the DVD Recorder+VCR. This number is for this unit only. You NOTE TO CABLE/TV INSTALLER: This reminder is provided to should record requested information here and retain this guide call the cable TV system installer’s attention to Article 820-40 of... -
Page 3: Important Safety Instructions
IMPORTANT SAFETY INSTRUCTIONS CAUTION: PLEASE READ AND OBSERVE ALL WARNINGS AND INSTRUCTIONS IN THIS OWNER’S MANUAL AND THOSE MARKED ON THE PRODUCT. RETAIN THIS MANUAL FOR FUTURE REFERENCE. This product has been designed and manufactured to assure personal safety. Improper use can result in electric shock or fire hazard. -
Page 4: Table Of Contents
Table of Contents INTRODUCTION AUDIO Settings ..... . . 21 • Dolby Digital..... . . 21 Overview . - Page 5 Table of Contents Audio CD and MP3/WMA Operation..34-35 EDITING Playing an Audio CD or MP3/WMA Disc ..34 Title List and Chapter List Menu ..46-57 Music Menu Options .
-
Page 6: Overview
DVD and Video CDs playback fea- otes tures may not be available or other functions may be – The DVD Recorder+VCR cannot record on CD-R or added. Refer also to the instructions supplied with your CD-RW discs. DVDs and Video CDs. Some DVDs made for business –... -
Page 7: About Recordable Discs
What are “Recording Modes”? otes Two recording modes are available on your DVD • The DVD Recorder+VCR cannot make recordings on Recorder+VCR: “Video mode” and “VR mode”: CD-R or CD-RW discs. • Our company takes no responsibility for recording fail- About “VR mode”... -
Page 8: Notes For Recording
Use of this copyright protection technology Recording TV Audio Channels must be authorized by Macrovision Corporation, and The DVD Recorder+VCR can record one or two chan- is intended for home and other limited viewing uses nel audio. For TV broadcasts, this usually means mono... -
Page 9: Precautions
To obtain a clear picture About the Symbol The DVD Recorder+VCR is a high-tech, precision device. If the optical pick-up lens and disc drive parts “ ” may appear on the TV screen during operation. are dirty or worn, the picture quality will be poor. -
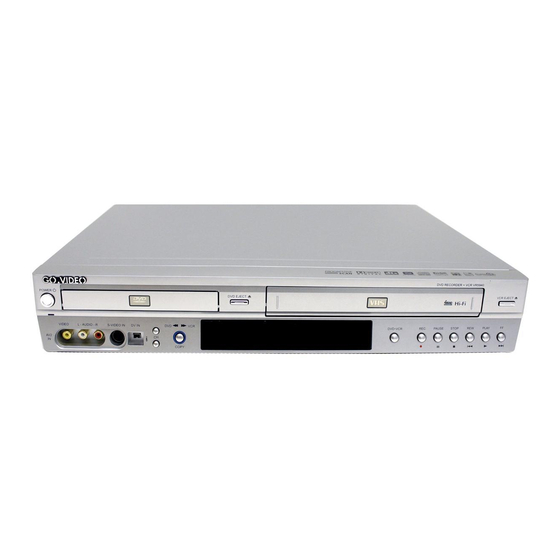
Page 10: Front Panel Overview
Front Panel Overview POWER button and indicator VCR EJECT Switches the DVD Recorder+VCR ON and OFF. Ejects the tape in the VCR deck. Lights green when the DVD Recorder+VCR is turned on. Cassette Compartment (VCR deck) Insert a video cassette here. -
Page 11: Front Panel Display Overview
DUB Indicates that a DVD to VCR (or VCR to DVD) copy is in progress. Indicates when the DVD Recorder+VCR is locked. Hi-Fi Indicates when the DVD Recorder+VCR is playing or recording a tape in Hi-Fi. ST Indicates that a stereo broadcast is being received. -
Page 12: Remote Control Overview
CHILD LOCK RANDOM The Lock feature disables the front panel buttons to prevent children Plays tracks in random order. from tampering with the DVD Recorder+VCR. Simply press CHILD LOCK on the remote control to toggle this feature on and off. -
Page 13: Rear Panel Overview
Connect to an amplifier with an optical digital audio input. RF OUT (TO TV) Connect to a TV with an RF coaxial input. Caution Do not touch the inner pins of the jacks on the rear panel. Electrostatic discharge may cause permanent damage to the DVD Recorder+VCR. -
Page 14: Connections
16. 1 Tune the TV to the correct video input channel. 2 Set the DVD Recorder+VCR to the output channel of the Caution cable box using the CH (v / V) or the 0-9 keys on your DVD –... -
Page 15: Connecting A Tv
How to set the DVD Recorder+VCR’s RF output (A). channel Turn off the DVD Recorder+VCR, then press and hold Progressive Scan Connection CH (v/V) on the front panel for about five If your television is a high-definition or “digital ready”... -
Page 16: Connecting An Amplifier/Receiver
Dolby Pro Logic ll/ Pro Logic Connect the Left and Right AUDIO OUT jacks on the DVD Recorder+VCR to the left and right audio in jacks on your amplifier, receiver, or stereo system, using the supplied audio cables (A). -
Page 17: Connecting Optional Equipment
VIDEO jack. jack of your DV camcorder/video deck to the front panel DV IN jack of the DVD Recorder+VCR. This jack is for connection to DV equipment only. It is not compatible with digital satellite tuners or D-VHS video decks. -
Page 18: Initial Setup
14-69 and CATV channels 1-125. Preparation: While the desired item is selected, press B to Connect the DVD Recorder+VCR to the desired type of move to the second level. antenna or cable TV system, as shown in “Connecting Use v / V to select the second desired option. -
Page 19: Channel Add/Delete
Press B to move to the third level. You can set your local Time Zone manually. When Time The Edit icon is highlighted. Zone is set to Auto, the DVD Recorder+VCR will use XDS information to determine the proper setting. Press ENTER. -
Page 20: Tv Aspect Ratio
TV Aspect Ratio Factory Setting 4:3 Letterbox: Select when a standard 4:3 TV is con- If you wish, you can reset the DVD Recorder+VCR to nected. Displays theatrical images with masking bars its original factory settings. Select “SET” then press above and below the picture. -
Page 21: Audio Settings
Dolby Digital • If your receiver or amplifier is capable of handling 96 kHz signals, select 96 kHz. The DVD Recorder+VCR PCM: Select when connected to a 2-channel digital stereo will pass each type of signal through without any fur- amplifier. -
Page 22: Lock Settings
Initial Setup (Continued) LOCK Settings Password Changing the 4-digit code Movie Rating Follow steps 1-3 as shown under Movie Rating. The Lock feature allows you to prevent DVDs from being played based on their ratings or to have certain Use v / V to select the Password option. discs played with alternative scenes. -
Page 23: Country Code
Initial Setup (Continued) Country Code RECORD Settings Enter the 2-letter code for the country/area whose stan- Disc Record Mode dards were used to rate your DVDs, referring to the “Country Code List” on page 60. You can set the default DVD recording quality to: XP (1 hr/disc), SP (2 hrs/disc), LP (4 hrs/disc), or EP (6 hrs/disc) Movie Rating... -
Page 24: Dv Record Audio
Initial Setup (Continued) DV Record Audio Disc Initialize Start You only need to set DV Record Audio if you have a Disc Finalize digital camcorder with 32kHz/12-bit sound connected to Disc Label Disc Protect the front panel DV IN jack. Some digital camcorders have two stereo tracks for audio. -
Page 25: Disc Finalize
AutoPlay When you load a DVD with AutoPlay turned on, the Select OK then press ENTER. DVD Recorder+VCR will bypass the Disc menu and The DVD Recorder+VCR starts finalizing the disc. trailers and start playing the movie automatically. Set AutoPlay to ON or OFF. -
Page 26: Yourdvd
ENTER to confirm your When you load a DVD with the YourDVD feature turned selection. on, the DVD Recorder+VCR will automatically search • English/Latin Capital: Selects a keyboard with the disc for your Audio, Subtitle and Surround prefer- uppercase characters. -
Page 27: On-Screen Display Overview
The On-Screen Display provides feedback on the status the 0-9 or CH (+/-) buttons on the remote control or CH of the DVD Recorder+VCR and/or the currently loaded (v / V) buttons on the front panel. disc or tape. To access the On-Screen Display (or OSD), press the DISPLAY button. -
Page 28: Osd Menu Options By Media Type
Initial Setup (Continued) OSD Menu Options by Media Type Shows the elapsed playing time and total time. Shows the current title/chapter number and Shows the current Title: 1/4 total number of mode Chapter: 3/28 0:06:32 / 2:12:10 titles/chapters (Use v / V to select desired option) Menu Options Function Selection Method... -
Page 29: Video & +R/Rw
Initial Setup (Continued) OSD Menu Options by Media Type (Continued) Shows the elapsed playing time Video +R/RW and total time. Shows the title name, recording date, Title 1 Shows the current recording mode, etc. 0:06:32 / 2:12:10 01/02/03 mode. (Use v / V to select desired option) Menu Options Function Selection Method... -
Page 30: Dvd Playback
“Movie Rating” on page 22. T 1/8, T 1/4, T 1/2. – The DVD Recorder+VCR will not play discs with With a Video CD, the Slow speed changes to: T 1/8, Region codes different from the DVD Recorder+VCR. -
Page 31: Still Picture And Frame-By-Frame Playback
• Chapter: Repeats the current chapter. 1 Press PAUSE/STEP (X) during playback. • Title: Repeats the current title. The DVD Recorder+VCR will go into Pause mode. • All: Repeats all titles on the disc 2 You can back up or advance the picture frame-by- (VR mode DVD-RW disc only). -
Page 32: Time Search
DVD/VCD Playback (Continued) Playing a DVD/Video CD To Recall a Marked Scene 1 During disc playback, press SEARCH. The Marker Search menu will appear on the TV screen. (Continued) Marker Search Time Search Marker Search Video +R/RW - : -- : -- The Time Search function allows you to start playback from any chosen time on the disc. -
Page 33: Camera Angle
See page 16 for connection details. in memory even if you remove the disc from the DVD Recorder+VCR or switch off the DVD Recorder+VCR. If you load a disc that had its settings memorized, the lat- Changing the Audio Channel est Stop position is automatically recalled. -
Page 34: Audio Cd And Mp3/Wma Operation
1. To display menu options, select a track (or folder) on the menu then press ENTER. 2. Use v / V to select an option then press ENTER to The DVD Recorder+VCR can play audio CDs and confirm your selection. MP3/WMA files on CD-ROM, CD-R,CD-RW, DVD+R/RW or DVD-R/RW discs. -
Page 35: Pause
1 Press REW (m) or FF (M) during playback. This DVD Recorder+VCR requires discs/recordings to The DVD Recorder+VCR will go into SEARCH mode. meet certain technical standards in order to achieve 2 Press REW or FF to select the desired speed: m, optimal playback quality. -
Page 36: Program Playback With Audio Cd And Mp3/Wma
Program Playback with Audio CD and MP3/WMA Use v / V to select the track you want to start Program Playback enables you to make custom playlists of Audio CD or MP3/WMA tracks. Program can playing. contain 99 Audio CD tracks or 256 MP3/WMA tracks. Press PLAY (N) to start. -
Page 37: And Mp3/Wma
Program Playback with Audio CD and MP3/WMA (Continued) Repeat Programmed Tracks Press REPEAT to select the desired Repeat mode. • TRACK : Repeats the current track. • ALL : Repeats all the tracks in the program list • OFF: Cancels Repeat mode (no display). Erasing a Track from the Program List 1 Select the track that you wish to erase from the Program List then press ENTER. -
Page 38: Jpeg Disc Operation
Use v / V to select “Full Screen” then press Viewing a JPEG File JPEG ENTER. The DVD Recorder+VCR can play discs with JPEG files. Before playing JPEG recordings, read “Notes on JPEG Recordings” on page 39. Insert a disc and close the tray. -
Page 39: Still Picture
JPEG Disc Operation Still Picture Notes on JPEG Recordings Depending on the size and number of JPEG files, it Press PAUSE/STEP (X) during a Slide Show to pause playback. may take several minutes for the recorder to read the disc’s content. If you don’t see an on-screen display Skip Images after several minutes, some of the files are too big —... -
Page 40: Vcr Playback
3 or 4) or select the video input connected to the DVD Search mode will be activated. Recorder+VCR. If the DVD Recorder+VCR is left in Search mode for more than 3 minutes, the DVD Recorder+VCR will automatically Insert a prerecorded video cassette. -
Page 41: Recording
The remaining recording time is shown on the front during recording. For example, if the TV broadcast is in panel display. Stereo, then setting the DVD Recorder+VCR to Stereo will record the broadcast in Stereo, and the Monitor Audio will To Extend the Recording Time also be in Stereo. -
Page 42: One Touch Copy - Dvd To Vhs
Basic Recording One Touch Copy - DVD to VHS One Touch Copy - VHS to DVD You can copy the contents of a DVD to a VHS tape You can copy the contents of a VHS tape to a record- using the COPY button. -
Page 43: Timer Recording
• When the earlier program finishes, the later program • The DVD Recorder+VCR will record the audio according starts. to the current TV tuner setting (Stereo, Mono or SAP). -
Page 44: Recording From An External Input
Press REC (z) once to start recording. If your source is copy-protected, you will not be able to record • Recording is automatically stopped if the DVD it using the DVD Recorder+VCR. See “Copyright Notice” on Recorder+VCR detects no signal. page 8 for more details. -
Page 45: What Is Dv
The i.LINK interface is also known as IEEE 1394-1995. corder is switched off. “i.LINK” and the “i.LINK” logo are trademarks. • The DVD Recorder+VCR is only compatible with DV- Too many devices connected. format (DVC-SD) camcorders. Digital satellite tuners The DV jack on the DVD Recorder+VCR supports con- and Digital VHS video recorders are not compatible. -
Page 46: Title List And Chapter List Menu
Title List and Chapter List Menu Press RETURN (O) repeatedly to exit the Title Using the Title List-Original menu List-Original menu. The Title List-Original is where you build and edit your Playlist, and where you can delete titles and make other changes to the Original content of the disc. -
Page 47: Using The Title List-Playlist Menu (Vr)
Title List and Chapter List Menu (Continued) Using the Chapter List-Playlist Menu Using the Title List-Playlist Menu Press DISC MENU/LIST repeatedly to display the Title List-Playlist menu. • Use the v/V buttons to display the previous/next Press DISC MENU/LIST repeatedly to display the Title List-Playlist menu. -
Page 48: Using The Title List Menu (Video)
Title List and Chapter List Menu (Continued) Using the Title List menu Deleting a Title Video Video From the Title List display you can play, name and Before a disc is finalized, you can erase titles recorded erase titles. Once a Video mode disc is finalized, the on the disc. -
Page 49: Using The Title List Menu (+Rw)
Title List and Chapter List Menu (Continued) Using the Title List menu Press DISPLAY to display more detailed information for The DVD+RW Title List menu is where you view, edit, the selected title. protect, delete, and make other changes to the content of the disc. -
Page 50: Using The Title List Menu (+R)
Title List and Chapter List Menu (Continued) Using the Title List menu Using the Chapter List menu The DVD+R Title List menu is where you view, edit, pro- Press DISC MENU/LIST repeatedly to display tect, delete, and make other changes to the content of the Title List menu. -
Page 51: Title And Chapter Editing
Title and Chapter Editing About Original vs. Playlist Content Adding Chapter Markers Chapter Edits you make to the Original content of a DVD-RW You can put a chapter marker anywhere in a Playlist or disc in VR mode change the actual content of the disc. Original title during recording or playback. -
Page 52: Making A New Playlist (Vr)
Title and Chapter Editing (Continued) Adding Titles/Chapters to a Playlist Making a New Playlist Use this function to add an Original title or chapter to a You can add an Original title or chapter to a new or Playlist. When you do this, the whole title is put into the existing Playlist. -
Page 53: Deleting Titles/Chapters (Vr/+R/+Rw)
The Title Edit (Delete Part) menu appears on the Options appears on the left side of the screen. TV screen and the DVD Recorder+VCR goes into Pause mode. The Start Point option is highlighted. Select the ‘Delete’ option on the menu. -
Page 54: Renaming A Title (Vr/Video/+R/+Rw)
Title and Chapter Editing (Continued) Combining Two Chapters Renaming a Title Video Use this function to combine two adjacent Playlist or You can name Original and Playlist titles independently. Original chapters into one. On the Title List menu, use v V b B to choose On the Chapter List menu, select the second the title you want to name then press ENTER. -
Page 55: Moving A Playlist Chapter (Vr)
Title and Chapter Editing (Continued) Moving a Playlist Chapter Protecting a Title Use this function to re-arrange the playback order of Use this function to protect against accidental recording, Playlist chapters on the Title List-Playlist menu. editing or deleting of a title. Press DISC MENU/LIST repeatedly to display Press DISC MENU/LIST to display the Title List Title List-Playlist menu. -
Page 56: Hiding A Title/Chapter (+R/+Rw)
Title and Chapter Editing (Continued) Hiding a Title/Chapter Dividing a Title Use this function to hide titles or chapters on the Title Use this command to split a title into two new titles. List or Chapter List menu (e.g., to hide commercials). On the Title List menu, select the title you want On the Title List or Chapter List menu, to divide then press ENTER. -
Page 57: Overwriting A Disc (Video/Vr/+Rw)
You can see how your Title List menu will appear on be changed. another DVD player that is capable of playing DVD+RW Turn on the DVD Recorder+VCR and load a or DVD+R discs. recordable disc. Press and hold the REC (z) button for more Insert a DVD+R or DVD+RW disc with one or than 3 seconds. -
Page 58: Programming The Multibrand Remote To Control Your Tv
Programming the MultiBrand Remote to Control Your TV You can program the DVD Recorder+VCR MultiBrand TV CODES BY BRAND remote control to operate many TV brands and models. TV Brand Name Codes TV Brand Name Codes ADMIRAL 16,33,37,44,45 MONTGOMERY 01,06,08,09,... -
Page 59: Language Code List
Language Code List Use this list to enter the appropriate code number for your preferred Disc Menu, Disc Audio, and Disc Subtitle lan- guages; see page 20. Code Language Code Language Code Language Code Language 6566 Abkhazian 7074 Fiji 7678 Lingala 8373 Singhalese... -
Page 60: Country Code List
Country Code List Use this list to enter the appropriate code number for the “Country Code” setting; see page 23. Code Country Code Country Code Country Code Country Andorra Eritrea Saint Lucia Seychelles United Arab Emirates Spain Liechtenstein Sudan Afghanistan Ethiopia Sri Lanka Sweden... -
Page 61: Troubleshooting
The TV is not set to receive DVD Select the appropriate video input on the TV No picture. Recorder+VCR signal output. so the picture from the DVD Recorder+VCR appears on the TV screen. The video cable is not connected securely. Connect the video cable securely. - Page 62 Moisture Condensation Moisture condensation can occur: In locations where moisture condensation may occur: • When the DVD Recorder+VCR is moved from a cold • Keep the DVD Recorder+VCR plugged into an AC place to a warm place. power outlet with POWER On. This will help prevent condensation.
-
Page 63: Technical Specifications
Technical Specifications General Power requirements AC 120V, 60 Hz Power consumption Dimensions (approx.) 430 X 78.5 X 354 mm (16.9 x 3.1 x 13.9 inches) (w x h x d) Mass (approx.) 5.6 kg (12.3 lbs) Operating temperature 5˚C to 35˚C (41˚F to 95˚F) Operating humidity 5 % to 90 % Signal system... - Page 64 Technical Specifications (Continued) Outputs 1 Vp-p 75 Ω, sync negative, RCA jack x 1 VIDEO OUT (Y) 1.0 V (p-p), 75 Ω, negative sync, Mini DIN 4-pin x 1 S-VIDEO OUT (C) 0.286 V (p-p) 75 Ω (Y) 1.0 V (p-p), 75 Ω, negative sync, RCA jack x 1 COMPONENT VIDEO OUT (Pb)/(Pr) 0.7 V (p-p), 75 Ω, RCA jack x 2 (PROGRESSIVE SCAN)
-
Page 65: Limited Warranty
This warranty covers internal operating parts and service/labor to repair or replace covered parts in this GoVideo product for 90 days labor, 1 year parts, from the date of purchase, defined as follows: (1) Original Consumer Retail Purchase; (2) First Rental Purchase Agreement; or (3) First Lease Purchase Agreement (the “Warranty Period”). - Page 66 3834RV0002X Printed in Korea...
Need help?
Do you have a question about the DVD Recorder+VCR and is the answer not in the manual?
Questions and answers