Table of Contents
Advertisement
Advertisement
Table of Contents

Related Manuals for Toshiba SD-24VBSB


Summary of Contents for Toshiba SD-24VBSB
-
Page 1: Dvd Player
DVD PLAYER & VIDEO CASSETTE RECORDER SD-24VBSB OWNER’S MANUAL Before connecting, operating or adjusting this product, please read this instruction booklet carefully and completely. ©2004 Toshiba Corporation This device does not tape-record copy protected DVD Video Discs. -
Page 2: Safety Precautions
Safety Precautions This product incorporates copyright protection technology that CAUTION is protected by method claims of certain U.S. patents and other intellectual property rights owned by Macrovision Corporation RISK OF ELECTRIC SHOCK DO NOT OPEN and other rights owners. Use of this copyright protection tech- nology must be authorized by Macrovision Corporation, and is CAUTION: TO REDUCE THE RISK... - Page 3 Safety Precautions(Continued) SOME DOS AND DON'TS ON THE SAFE USE OF EQUIPMENT This equipment has been designed and manufactured to meet international safety standards but, like any electrical equipment, care must be taken if you are to obtain the best results and safety is to be assured.
-
Page 4: Table Of Contents
Table of Contents Screen Saver......27 Introduction Zoom......28 Safety Precautions . -
Page 5: Before Use
Before Use Playable Discs Track (Video CD and audio CD only) Sections of a picture or a musical piece on a video CD or an audio CD. Each track is assigned a track number, enabling you to locate the track you want. (8 cm / 12 cm disc) Scene Video CD (VCD) -
Page 6: Precautions
Before Use (Continued) Precautions Cleaning discs Fingerprints and dust on the disc can cause poor pic- Handling the unit ture quality and sound distortion. Before playing, clean the disc with a clean cloth. Wipe the disc from the cen- When shipping the unit ter out. -
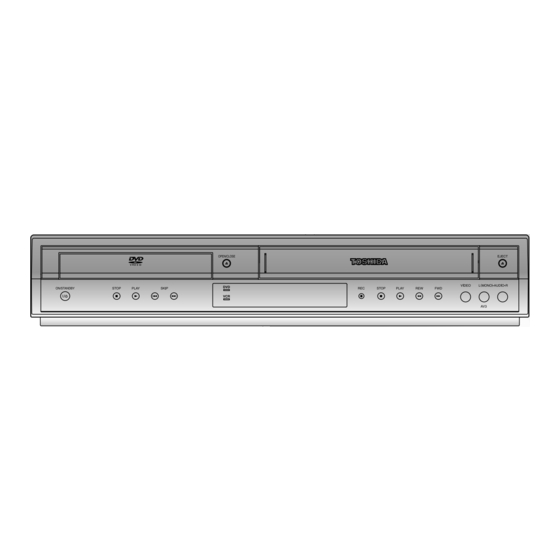
Page 7: Front Panel
Front Panel OPEN/CLOSE Display window Opens or closes the disc tray. Shows the current status of the DVD+VCR. Disc Tray (DVD deck) Cassette Compartment (VCR deck) Insert a disc here. Insert a video cassette here. Remote Sensor Point the DVD+VCR remote control here. ON/STANBY Switches the DVD+VCR EJECT... -
Page 8: Display Window
Display Window The DVD deck is selected. A disc is in the DVD deck. (Lights when a disc is in the DVD deck and Flashes when no disc.) Indicates when the Progressive scan is active. Indicates repeat mode. DVD+VCR is in timer recording or a timer recording is programmed.(VCR part only) A cassette is in the VCR deck. -
Page 9: Remote Control
Remote Control DVD/VCR select button + + / / 1 1 (POWER) Select the output source (DVD or VCR) Switches DVD+VCR ON and OFF. to view on the TV screen. EJECT, OPEN/CLOSE 0-9 numerical buttons - Opens and closes the disc tray. Selects numbered options in a menu. -
Page 10: Rear Panel
Rear Panel AERIAL Connect the aerial using this jack. DVD/VCR OUT (VIDEO/AUDIO (Left/Right)) Connect to a TV with video and audio inputs. COMPONENT/PROGRESSIVE SCAN VIDEO OUT (Y Pb Pr) (DVD EXCLUSIVE OUT) Connect to a TV With Y Pb Pr inputs. AUDIO OUT (Left/Right) (DVD EXCLUSIVE OUT) Connect to an amplifier, receiver or stereo system. -
Page 11: Connections
Connections Component (Color Stream ® ) / Progressive Scan Tips (ColorStream ® pro) Video connection Depending on your TV and other equipment you wish (DVD EXCLUSIVE OUT) to connect, there are various ways you could connect Connect the COMPONENT/PROGRESSIVE SCAN the unit. -
Page 12: Connecting To Optional Equipment
Connections (Continued) Connecting to Optional Equipment Notes If the audio format of the digital output does not match Connecting to an amplifier equipped with two the capabilities of your receiver, the receiver will channel analog stereo or Dolby Surround. produce a strong, distorted sound or no sound at all. Connect the Left and Right DVD/VCR AUDIO OUT or Six Channel Digital Surround Sound via digital AUDIO OUT (DVD EXCLUSIVE OUT) jacks on this unit... -
Page 13: Before Operation - Vcr Part
Before Operation - VCR part Tuning in a video channel on your TV Use REW m m or FWD M M to select another video channel. You may select any channel number between 22 and 68. Notes You can also set it to “OFF” if there is any The output frequency of this video recorder (VCR) is interference when your TV is connected to the VCR set at UHF channel 36. -
Page 14: Setting The Clock Manually
Before Operation - VCR part (Continued) Setting the clock Manually To set the colour system The clock in your DVD+VCR controls time and Press VCR MENU. date settings for your DVD+VCR. The clock is set automatically during ACMS The main menu will appear on the TV screen. (Automatic Channel Memory System) when your DVD+VCR detects a channel that broadcasts a Press 1 or 2 to select the SYSTEM and press... -
Page 15: How To Use The Main Menu
Before Operation - VCR part (Continued) How to use the main menu Tuning in TV Stations Automatically This DVD+VCR can easily be programmed by If the TV broadcast signal is weak your DVD+VCR using the menus displayed on screen. may not detect the necessary information and will The menus are controlled from the Remote not be able to store them correctly. -
Page 16: Tuning In Tv Stations Manually
Before Operation - VCR part (Continued) Searching will stop when it locates a stations. Tuning in TV Stations Manually Press 2 to select MFT. In certain areas of the country broadcast signals Control the fine tuning of the station by using 3 or 4. may be too weak for your VCR’s automatic tuning process to find or assign TV stations correctly. -
Page 17: Changing The Other Of Tv Stations
Before Operation - VCR part (Continued) Changing the order of TV Stations Deleting TV Stations After tuning TV stations into your VCR you may After tuning TV stations into your VCR you may wish to change the order in which they are stored wish to delete a station. -
Page 18: Before Operation - Dvd Part
Before Operation - DVD part Use b/B to change the setting of an item. Caution: The number buttons can also be used for setting numbers (e.g., title number). For some functions, Before using the remote control, press the DVD button press ENTER/OK to execute the setting. -
Page 19: Initial Settings
Before Operation - DVD part (Continued) Initial Settings Picture TV Aspect You can set your own Personal Preferences on the player. General Operation 4:3 Letterbox: Select when a standard 4:3 TV is connected. Displays theatrical images with masking Press SETUP. bars above and below the picture. -
Page 20: Sound
Before Operation - DVD part (Continued) Sound Dynamic Range Control (DRC) With the DVD format, you can hear a program’s sound- Digital Audio Output track in the most accurate and realistic presentation Each DVD disc has a variety of audio output options. possible, thanks to digital audio technology. -
Page 21: Parental Control
Before Operation - DVD part (Continued) Parental Control Area Code Enter the code of a country/area whose standards were Rating used to rate the DVD video disc, referring to the list Movies on DVDs may contain scenes not suitable for (See “Country/Area Code List”, page 39). -
Page 22: Operation With Tape
Operation with tape , Shuttle : Playing a tape Slow motion playback During playing back or still picture press You will only be able to load and eject video cassettes You can reach the following playback speeds. (-7xplay, -3xplay, -play, still, 1/19 slow, play, 2xplay, when your DVD+VCR is plugged into the mains. -
Page 23: One-Touch Timer Recording (Otr)
Operation with tape (Continued) One-touch Timer Recording (OTR) Press PAUSE/STILL X/C to avoid recording unwanted scenes. Press PAUSE/STILL X/C to continue recording. Your VCR allows you to make recordings using a variety of simple methods: Tapes can be paused for up to 5 minutes; RECP One-touch Timer Recording (OTR) start record- will be displayed when a tape is paused. -
Page 24: Timer Recording Using On Screen Display
Operation with tape (Continued) Press the numbered buttons to enter the date of Timer recording using the programme. On Screen Display If you press ENTER/OK before entering the date you may select one of the following automated You may set up to seven timer record events with- recording features. -
Page 25: Operation With Tape
Operation with tape (Continued) Timer recording using Programme Delivery Control (PDC) The Programme Delivery Control (PDC) system adjusts the start and end times of a timer record On Screen Display (Continued) event. This can be particularly useful with sports events which may run over into extra time. The PDC Press VCR MENU to set another timer record event signal is transmitted by the broadcaster and this con- and follow steps 3 to 7. -
Page 26: Operation With Dvd And Video Cd
Operation with DVD and Video CD Playing a DVD and Video CD General Features Playback Setup VCD2.0 VCD1.1 Note Unless stated otherwise, all operations described use Turn on the TV and select the video input source the remote control. Some features may also be connected to the DVD player. -
Page 27: Slow Motion
Operation with DVD and Video CD (Continued) General Features (continued) Repeat A-B VCD2.0 VCD1.1 Slow Motion VCD2.0 VCD1.1 1 Press SLOW T during playback or still mode. To repeat a sequence in a title: The player will enter SLOW mode. 1 Press A-B RPT at your chosen starting point. -
Page 28: Zoom
Operation with DVD and Video CD (Continued) General Features (continued) Special DVD Features Checking the contents of DVD Video Zoom VCD2.0 VCD1.1 discs: Menus The Zoom function allows you to enlarge the video image and to move through the enlarged image. DVDs may offer menus that allow you to access special features. -
Page 29: Operation With Audio Cd And Mp3 Disc
Operation with Audio CD and MP3 Disc (Continued) Playing an Audio CD and MP3 Disc otes on MP3 Recordings About MP3 An MP3 file is audio data compressed by using the The DVD+VCR can play MP3 formatted recordings on MPEG1 audio layer-3 file-coding scheme. We call CD-ROM, SVCD, CD-R or CD-RW discs. -
Page 30: Pause
Operation with Audio CD and MP3 Disc (Continued) Pause Repeat A-B 1 Press PAUSE/STEP X/C during playback. To repeat a sequence. 2 To return to playback, press PLAY N or press 1 During disc playback, press A-B RPT at your chosen PAUSE/STEP X/C again. -
Page 31: Operation With Jpeg Disc
Operation with JPEG Disc Moving to another File Viewing a JPEG disc JPEG Press SKIP . or > once during viewing a picture This DVD+VCR can play discs with JPEG files. Before to advance to the next file or to the previous file. playing JPEG recordings, read the notes on JPEG Still Picture Recordings on right. -
Page 32: Programmed Playback
Programmed Playback VCD2.0 VCD1.1 Programmed Playback with Audio CD Programmed Playback with Video CD and MP3 Disc Note On a Video CD with PBC, you must set PBC to Off on the The Program function enables you to store your favorite setup menu to use the Program function. -
Page 33: Additional Operation With Tape
Additional Operation with tape Hi-Fi Stereo Sound System (NIC) On Screen Display (F.OSD) Your VCR will record and playback Hi-Fi stereo sound. You may easily display the current time or tape counter, In addition it has a stereo NICAM digital stereo sound amount of tape left, day, month, year, day of week, decoder. -
Page 34: Video Doctor (Self-Diagnosis)
Additional Operation with tape (Continued) Video Doctor (Self-Diagnosis) Wide Screen Compatibility 16:9 This feature informs you that there is a problem with Your VCR can record and play back wide screen aspect your VCR. These error messages will appear on the TV ratio programmes (16:9). -
Page 35: Copying From Dvd To Vcr
Additional Operation with tape (Continued) Copying from DVD To VCR This unit allows you to copy the contents of a DVD to a VHS tape with a press of the REC/OTR button. Note If the DVD you are attempting to copy is copy protected, you may not be able to copy the disc. -
Page 36: Troubleshooting
Troubleshooting Check the following guide for the possible cause of a problem before contacting service. Symptom Cause Correction No power. The power cord is disconnected Plug the power cord into the wall outlet securely. The power is on, but DVD or VCR button is not switched Refer to page 6. - Page 37 Troubleshooting (Continued) Symptom Cause Correction The remote control There is an obstacle in the path of the Remove the obstacle. does not work properly. remote control and this unit. The batteries in the remote control are Replace the batteries with new ones. exhausted.
-
Page 38: Language Code List
Language Code List Enter the appropriate code number for the initial settings Disc Audio, Disc Subtitle and/or Disc Menu (See page 19). Code Language Code Language Code Language Code Language 6566 Abkhazian 7074 Fiji 7678 Lingala 8373 Singhalese 6565 Afar 7073 Finnish 7684... -
Page 39: Country/Area Code List
Country/Area Code List Enter the appropriate code number for the initial setting Area Code (See page 21). Code Country/Area Code Country/Area Code Country/Area Code Country/Area Andorra Eritrea Saint Lucia Seychelles United Arab Emirates Spain Liechtenstein Sudan Afghanistan Ethiopia Sri Lanka Sweden Antigua and Barbuda Finland... -
Page 40: Specification
Specification General Power requirements AC 200-240V, 50Hz Power consumption Dimensions (approx.) 430 X 78.5 X 275 mm (w/h/d) Mass (approx.) 4.0 kg Operating temperature 5˚C to 35˚C (41˚F to 95˚F) Operating humidity 5 % to 90 % Timer 24 hours display type RF Modulator UHF 22-68 (Adjustable) System... - Page 41 P/NO: 3834RV0004D Printed in Indonesia 1-46...
Need help?
Do you have a question about the SD-24VBSB and is the answer not in the manual?
Questions and answers