Table of Contents
Advertisement
Operating Instructions
IC Recorder
RR-XR800
Model No.
Dear customer
Thank you for purchasing this product.
For optimum performance and safety, please read these instructions carefully.
Before connecting, operating or adjusting this product, please read the
instructions completely. Please keep this manual for future reference.
VQT3C56
E
Advertisement
Table of Contents

Related Manuals for Panasonic RR-XR800


Summary of Contents for Panasonic RR-XR800
-
Page 1: Operating Instructions
Operating Instructions IC Recorder RR-XR800 Model No. Dear customer Thank you for purchasing this product. For optimum performance and safety, please read these instructions carefully. Before connecting, operating or adjusting this product, please read the instructions completely. Please keep this manual for future reference. -
Page 2: Supplied Accessories
1 USB cable [K2KZ4CB00012] • Most major credit and debit cards accepted. • All enquiries transactions and distribution facilities are provided directly by Panasonic UK Ltd. • It couldn’t be simpler! g For the United Kingdom and Republic of • Also available through our Internet is direct... -
Page 3: Table Of Contents
Table of contents Repeat play (REPEAT) ........... 24 Preparation Setting the skip interval (TIME SKIP) ......25 Supplied accessories ............2 Setting the playback EQ (SOUND EQ) ......26 Features ................4 Dividing fi les ..............27 Part names ............... 5 Recording by connecting an external microphone .. -
Page 4: Features
Features This unit offers various types of recording settings. Recording You can switch to your preferred setting according Musical instrument play Nature observation Lesson, lecture, etc. to the recording environment. The chart below This unit supports the Linear PCM (hereinafter referred shows the guideline of recording settings for each to as “PCM”) recording. -
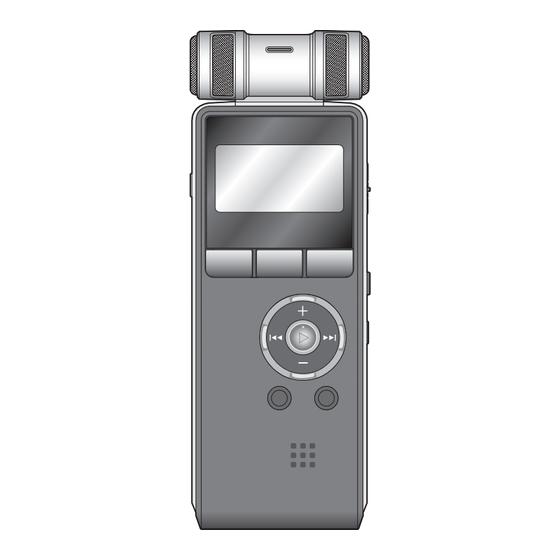
Page 5: Part Names
Part names Recording indicator (red) LCD display INDEX/DIVIDE STOP (PAUSE) + (Volume up) u (Fast backward) q (Play/Enter) – (Volume down) FOLDER/SLOW Built-in speaker OPR/HOLD MENU ERASE i (Fast forward) LIST/FAST USB jack Built-in microphone Headphone/earphone jack ( W ) External microphone jack (MIC) Battery cover Hand strap hole... -
Page 6: Screen Display
Screen display ∗ The following screen examples explain each item. Some items may not be displayed simultaneously. Screen display during recording: Synchro recording ( ➜ page 31) Input setting: MIC ( ➜ page 28)/ Low cut filter ( ➜ page 17) ”... -
Page 7: Inserting The Battery
Inserting the battery The remaining battery level is displayed as below while this unit is operating. Blinking If the battery runs out, “ ” blinks. Replace the battery as soon as possible. Please replace battery within approx. 3 minutes for preservation of the clock data. Depending on the battery status or the operation content to use, even if the power turns off due to the battery exhaustion, this unit may be used for a while if... -
Page 8: Turning The Power On/Off
Turning the Power ON/OFF OPERATION/HOLD Switch: Set the current date and time when turning this unit on for the first time. ( ➜ page 9) OFF OPR ON OFF OPR ON OPR: Operation HOLD HOLD Hold function Button operations are ignored when you set Hold Turning the power ON: Using the Hold function: Slide the OPERATION/HOLD switch to ON side to turn the... -
Page 9: Setting The Clock
Setting the clock The clock operation starts on this unit when the battery is inserted and the power is turned on for the first time. The date and time indication is not correct in this state because the clock has not been set yet. -
Page 10: Recording
Recording File • Turn the power on. ( ➜ page 8) • Press to stop the unit. Recorded audio data from the starting STOP point to the ending point is saved as a Press FOLDER file. STOP Press u, i to The saved data is called a file. - Page 11 Screen display during recording: Possible remaining recording time Displays the remaining recording time (possible recording time) in the selected recording mode. MP3 128k See page 6 for other screen displays. A001 –06 PEAK Note when recording 0:00:48 68:38:55 This unit is equipped with a large-diameter and high-sensitivity Microphone sensitivity ( ➜...
-
Page 12: Playing
Playing Select a folder • Press to stop the unit. STOP • Select a folder. ( ➜ right) to display “ SELECT FOLDER ”. FOLDER Press • Select a file. ( ➜ right) Press u, i to select the folder that STOP Press q (Playback starts). -
Page 13: Listening To The Audio Using Earphones
Press while the unit is stopped. LIST Recommended additional earphones: Files in the selected folder are displayed as Panasonic RP-HV154, RP-HJE120 a list. (The list screen) (the product number is correct as of Press +, – to select October 2010.) -
Page 14: Deleting Files
Deleting files When deleting by selecting a • Select a file to delete beforehand. ( ➜ page 12) file from the list INDEX • Press to stop the unit. STOP STOP • Press to stop the unit. Press STOP ERASE Press LIST Press +, –... -
Page 15: Index Function
Index function By adding Index (position information on the file) to the file, playback position jumps to the specified position by skip operation ( ➜ page 12) during playback. You cannot set index marks in files stored in “M” folder and “L” folder. Adding Index Deleting Index During recording or playback or while... -
Page 16: Selecting Recording Mode
Selecting recording mode You can change the sound quality for microphone recording or line-in recording. This allows you to provide the best sound quality for the particular purpose. Press +, –, u, i to select • Press to stop the unit. STOP STOP the setting (PCM, MP3, bit... -
Page 17: Switching Microphone Sensitivity
Switching microphone sensitivity Reducing noise (LOW CUT FILTER) Switch the microphone sensitivity according to Sound of low frequency range is reduced during the volume of the sound source. When the sound microphone recording. This is effective when source volume is loud, set the sensitivity to “LOW”. reducing noise of air conditioning equipment, etc. -
Page 18: Setting The Recording Level Manually
Setting the recording level manually The recording level can be adjusted automatically or manually on this unit. When the microphone ALC (Auto Level Control) setting is ON (factory setting), the sound distortion is reduced by adjusting the recording level automatically. Setting the microphone ALC setting to OFF enables manual adjustment of the recording level. - Page 19 Setting the recording peak limiter to ON Recording level Even if the microphone ALC setting is OFF, when MP3 128k A001 Level metre the excessive volume is input, the recording level is PEAK indication PEAK Level 10 68:34:56 automatically adjusted and the sound distortion is reduced.
-
Page 20: Setting The Recording Eq
Setting the recording EQ Using the recording EQ enables you to set bass, middle and treble range of recording level according to your preferred settings for recording. The recording EQ includes 7 types of fixed mode and the “USER” mode with which you can set the recording level according to each frequency band. -
Page 21: Self Timer
Self timer You can select your preferred time period from when is pressed until when the recording starts. This function is very useful where you need time for preparation before recording should start – for example in musical instrument practice. STOP When is pressed, countdown starts. -
Page 22: Preventing Unnecessary Recording (Vas)
Preventing unnecessary recording (VAS) When VAS (Voice Activated System) is set, if silence continues for approx. 2 seconds during microphone recording, the recording is paused automatically. If the unit detects sound, the recording resumes. “ ” is displayed. • Set the microphone ALC setting to ON beforehand. -
Page 23: Changing The Playback Speed
Changing the playback speed A-B Repeat play Playback speed can be adjusted at 21 different Playback repeats between the start point (A) and steps (50 % to 200 %). finish point (B) if those points are set. Press q while The playback speed for PCM files cannot be 128k FLAT A-B... -
Page 24: Playback From A Specifi Ed Position (Time Search)
Playback from a specified Repeat play (REPEAT) position (TIME SEARCH) • Press to stop the unit. STOP Press MENU Playback is possible from the time-specified position. Press +, – to select “PLAY MENU” • Press to stop the unit. and press q to enter. STOP Press Press +, –... -
Page 25: Setting The Skip Interval (Time Skip)
Setting the skip interval (TIME SKIP) Setting the skip time jumps with the interval set during skip operation. This allows you to quickly move to a position for playback, or repeat playback of the same portion in a file. If the beginning of a file or the index STOP •... -
Page 26: Setting The Playback Eq (Sound Eq)
Setting the playback EQ (SOUND EQ) Using the sound EQ enables you to set bass, middle and treble range of volume level according to your preferred settings for playback. The sound EQ includes 6 types of fixed mode and the “USER” mode with which you can set the volume level according to each frequency band. -
Page 27: Dividing Files
Dividing files You can divide 1 file into 2 files at a specified position. A necessary part can be extracted or an unnecessary part of a file can be cut. While playing, press Files in the “M” folder cannot be divided. STOP /DIVIDE A file length of approx. -
Page 28: Recording By Connecting An External Microphone
Recording by connecting an external microphone Use this setting when recording by connecting an external microphone to the external microphone jack of this unit. Press to start recording. • Press to stop the unit. STOP STOP See page 10 for recording operations. Press MENU Connecting the external... -
Page 29: Copying To Other Devices
Copying to other devices Connect as below. Read the operating instructions for the connected device. Use the connection cable that matches Mini microphone jack monaural/stereo of the connected device. Audio Cable with resistor (not supplied) Wrong connection may cause recording trouble Stereo Stereo (i.e. -
Page 30: Recording From Other Devices
Recording from other devices This is the method to record to the “L” folder by connecting an external device to the external microphone jack of this unit. • Press to stop the unit. STOP Audio Cable without resistor (not supplied) Press MENU Stereo... - Page 31 Press to start recording. Press +, – to select “SYNCHRO REC” and press Play the external device. q to enter. STOP Press u, i to select “ON” Disconnecting the audio cord (not supplied) and press q to enter. during recording will stop recording. When the device is MENU connected, either...
-
Page 32: Common Menu
Common menu Recording from other devices The following are the settings used for both recording and playback. Synchro recording: Common settings • Set the recording mode to MP3 beforehand. STOP operation ( ➜ page 16) • Make the synchro recording setting beforehand. •... -
Page 33: Auto Power Off
BEEP SOUND AUTO POWER OFF The button operation sound can be set. This function automatically turns the power off if there is no operation for a certain period of time BEEP SOUND such as when recording is paused or stopped. This function helps you save battery when you forget to turn off the power. - Page 34 Common menu FORMAT INIT MENU All files are deleted completely. Deleted files cannot If the settings of this unit are initialised, settings be recovered. except for the “DATE & TIME” setting are restored Select “YES”, press q to enter and the internal to the default state.
-
Page 35: System Requirements
✽ Depending on the computer environment, malfunctions may occur (e.g. Audio data recorded on this unit cannot be used. etc.). Panasonic and Panasonic dealers cannot be held liable for any lost audio data or other direct or indirect damage except in cases of intentional of gross negligence. -
Page 36: Connecting This Unit To A Computer
Connecting this unit to a computer You can copy files recorded on this unit to the The first time you connect the unit to ■ computer. your PC • Start the computer beforehand. Because multiple “Found New Hardware” messages • Turn the unit off beforehand. will appear, do not disconnect the unit from your PC until all messages disappear. - Page 37 g Removing the USB cable When the unit is connected to the computer, the Double-click the icon (Windows 2000/Windows computer may not start (restart). It is recommended XP: [ ], Windows Vista/Windows 7: [ ]) on the that the USB cable is removed from this unit when task tray at the bottom of the computer screen starting (restarting) the computer.
-
Page 38: Opening Folders Of This Unit
Opening folders of this unit When opening folders “A”, “B”, “C”, “D”, “L” and “M” of this unit, they are displayed as “MIC_A”, “MIC_B”, “MIC_C”, “MIC_D”, “LINE” and “MUSIC” respectively. The illustrations show Windows XP (OS). The display may differ depending on the OS. 2. -
Page 39: Importing Fi Les To A Computer/Organising Fi Les
Importing files to a computer/Organising files • Open the “IC RECORDER” (this unit) displayed Do not change the folder names on the computer screen and open the folders If you change the names of folders (“MIC_A”, (“MIC_A” to “MIC_D” and “LINE”) beforehand. “... -
Page 40: File Name
File name File naming rules when recording on this unit: example: Recording information: July 20, 2011, 17:20/folder A/MP3 File number (001 to 199) 001A_110720_1720.MP3 Folder name (A to D and L) Recording information (1-byte number, 6 characters) “_” (1-byte) Recording time (1-byte number, 4 characters) File extension (.MP3/.WAV) The above file name is displayed on the computer, however, “001A_”... - Page 41 Returning the files imported to the File name in the MUSIC folder and computer to this unit: order of playback: By returning the files imported to the computer to If numbers are added at the beginning of file names this unit, such files can be played back on this unit. in the MUSIC folder, playback is performed from (If file names are changed, those files cannot be the file with the smallest number in priority.
-
Page 42: Folder Structure On This Unit
Folder structure on this unit Folders “A”, “B”, “C”, “D”, “L” and “M” are displayed as “MIC_A”, “MIC_B”, “MIC_C”, “MIC_D”, “LINE” and “MUSIC” respectively on the computer or the list screen of this unit. The “DATA” folder is used to store data files. - Page 43 Folder and file selection method on the list screen (the folder hierarchy screen) of this unit: (The following is an example. The displayed content changes.) Press u on Press +, – to select Press +, – to select Pressing while LIST screen to move...
-
Page 44: Transferring Music Fi Les To This Unit
Transferring music files to this unit You can enjoy music by transferring MP3 music files stored in the computer to this unit. Transferring MP3 music files to Never remove the USB cable while transmitting data. File data or this unit may be destroyed. this unit from the computer You can create subfolders in the MUSIC folder to transfer and play back files. -
Page 45: Listening To Music On This Unit (Mp3 Music Fi Les)
Listening to music on this unit (MP3 music files) Selecting a file from folder “M”: In MUSIC folder, you can play a maximum of 199 files. Files over 199 cannot be See page 12 for selecting a folder and pages 13, played on this unit. -
Page 46: Creating Mp3 Music Fi Les
Creating MP3 music files This unit is not equipped with the function or computer software to create MP3 file from music CD. You can create MP3 music files using separately sold computer software, etc. Windows XP or Windows Vista users can create MP3 music files using Windows Media Player 11 (using Windows Media Player 12 for Windows 7 users). -
Page 47: Q & A (Frequently Asked Questions)
Can I play files recorded on other • You can play files recorded on IC recorders using MP3 or PCM Panasonic IC recorders? format by transferring them to MUSIC folder. ( ➜ page 44) But cannot play files with other formats (i.e. ADPCM and TRC formats) because the recording format is different. -
Page 48: Error Message
Error messages Error message Checkpoints LIMIT TO TOTAL PLAYBACK TIME • This is displayed when you set the time for Time Search exceeding the total playback time of the file. Make the setting within the total playback time. ( ➜ page 24) INDEX FULL •... -
Page 49: Troubleshooting Guide
Error message Checkpoints CAN’T FORMAT THE MEMORY • The internal memory may be damaged. Consult your dealer. MEMORY WRITE SPEED IS SLOW • This is displayed when wr iting speed is slow due to memor y fragmentation ∗ . Changing the recording mode to MP3 may remedy the problem. - Page 50 Troubleshooting guide Symptom Checkpoints Recording The memory is used completely • Remaining recording time largely differs depending on the recording mode. earlier than expected. ( ➜ page 55) Select a suitable recording mode according to the purpose for use. ( ➜ page 16) •...
- Page 51 Symptom Checkpoints Recording Recorded sounds contain noise that • Move a mobile telephone away from this unit when you use the two in the same area. makes it difficult to hear sounds. • Set the “LOW CUT FILTER” to “ON”. Noise is reduced and listening may become easier. ( ➜ page 17) Recorded sound differs from the •...
- Page 52 Troubleshooting guide Symptom Checkpoints Playing The selected file changes on its • If this unit is connected to the computer, the selected file on this unit is own. changed. For the MUSIC folder, the file immediately under the MUSIC folder “NO PLAYABLE FILES”...
- Page 53 -If you see this symbol- Information on Disposal for Users of Waste Electrical & Electronic Equipment (private households) This symbol on the products and/or accompanying documents means that used electrical and electronic products should not be mixed with general household waste. For proper treatment, recovery and recycling, please take these products to designated collection points, where they will be accepted on a free of charge basis.
-
Page 54: Specifi Cations
Specifications Power USB2.0 (Hi-Speed) DC 5 V / 150 mA Battery DC 1.5 V (1 AAA LR03 battery) Audio Earphone ø 3.5 mm, 16 Ω, Max. 10 mW Audio Output Speaker ø 15 mm, 8 Ω, 80 mW (RMS) Sampling Frequency 44.1 kHz [PCM, 44.1] Output... - Page 55 17 h. MP3, 32 (Monaural) approx. 273 h. 32 kbps Using Panasonic Alkaline (AAA LR3) battery. Specifications are subject to change without notice. ∗2 Without recording monitor, Recording indicator: OFF, Microphone ALC setting: ON ∗3 When audio is output from speaker (Volume: 13,...
-
Page 56: Care And Use
Care and use To reduce risk of radio interference caused by headphone-, earphone- or microphone cables, only use adequate accessories with a cable length of less than 3 m. g Unit • Avoid using or placing this unit near sources of heat. •... -
Page 57: Maintenance
g Precautions for listening with the Headphones or Earphones • Do not play your headphones or earphones at a high volume. Hearing experts advise against continuous extended play. • If you experience a ringing in your ears, reduce volume or discontinue use. •... - Page 60 Web Site: http://panasonic.net Pursuant to at the directive 2004/108/EC, article 9(2) Panasonic Testing Centre Panasonic Marketing Europe GmbH VQT3C56 Winsbergring 15, 22525 Hamburg, Germany H1010AF0 © Panasonic Corporation 2010...
Need help?
Do you have a question about the RR-XR800 and is the answer not in the manual?
Questions and answers