Table of Contents
Advertisement
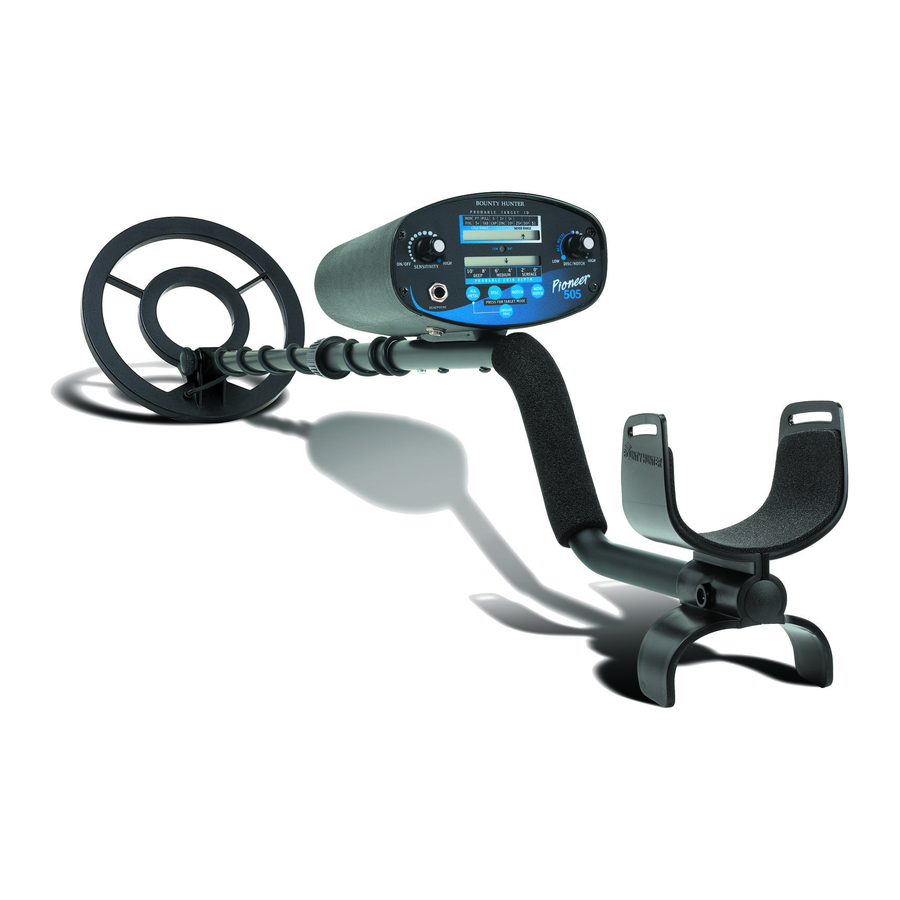
The Pioneer 505 is a professional metal detector. The concepts
and terminology can be quite unfamiliar if you are new to the
hobby. To understand it quickly and to get the most enjoyment
possible from your detector, we strongly recommend that you:
1) Watch the video. It is 21 minutes long.
2) Turn the Sensitivity knob to a low setting if you get false
signals. A little practice is required to understand when and how
you can use the sensitivity at or near 100%.
3) Do not use indoors. This detector is for outdoor use only. Many
household appliances emit electromagnetic energy, which can
interfere with the detector.
demonstration, turn the sensitivity down and keep the search
coil away from all floors, walls and metal objects.
4) Read this manual.
Most importantly, review the Summary of Operating Modes and
the Quick-Start Demo.
5) Use 9volt ALKALINE batteries only.
OWNER'S MANUAL
If conducting an indoor
Advertisement
Table of Contents

Related Manuals for Bounty Hunter Pioneer 505


Summary of Contents for Bounty Hunter Pioneer 505
- Page 1 OWNER’S MANUAL The Pioneer 505 is a professional metal detector. The concepts and terminology can be quite unfamiliar if you are new to the hobby. To understand it quickly and to get the most enjoyment possible from your detector, we strongly recommend that you: 1) Watch the video.
-
Page 2: Table Of Contents
TABLE OF CONTENTS TERMINOLOGY .......3 ASSEMBLY ........4 BATTERIES . -
Page 3: Terminology
TERMINOLOGY ELIMINATION Reference to a metal being "eliminated" means that the detector will not emit a tone, nor light up an LCD indicator, when a specified object passes through the coil’s detection field. DISCRIMINATION When the detector emits different tones for different types of metals, and when the detector "eliminates"... -
Page 4: Assembly
EASY ASSEMBLY Assembly is easy and requires no tools. Position detector upright. LOCKING COLLAR Rotate LOCKING INTERNAL COLLAR fully in a counter CAM LOCK clockwise direction. SILVER BUTTON Insert your finger inside the MIDDLE STEM tube and make sure the INTERNAL CAM LOCK is S-ROD flush with the inside of the... -
Page 5: Batteries
The Low Battery indicator light will come on and stay on whenever the batteries need replacing. It should flash momentarily when the Power Switch is turned on. IMPORTANT: Your Pioneer 505 metal detector requires two 9-Volt ALKALINE batteries. Follow these steps to install the batteries. Carefully remove the battery... -
Page 6: Quick-Start Demo
QUICK-START DEMO I. SUPPLIES NEEDED • Nickel • Quarter • A small piece of aluminum foil • Dime • A Nail • A large screwdriver or other large iron object • A Zinc Penny (dated after 1982) II. POSITION THE DETECTOR a. -
Page 7: Basic Operation
BASIC OPERATION TURN THE DETECTOR ON Click the left knob to the on position. Three tones will sound. The detector automatically enters the DISC Mode. NO-MOTION ALL METAL MODE To operate in this mode: • Hold the search coil over the ground surface, about 1/2 inch. •... -
Page 8: Basic Operation
BASIC OPERATION continued on the ground. Non-repeatable tones indicate the presence of trash objects or highly oxidized metals. You can increase the level of sensitivity, depending on the ground conditions. If the detector emits false signals, simply reduce the Sensitivity until the false signals cease. -
Page 9: Summary Of Operating Modes
SUMMARY OF OPERATING MODES I. NO-MOTION ALL METAL MODE • Deepest Seeking Mode • No motion is required • All metals will be detected • One tone only • Manual Ground Balance: User must tune and retune with the GroundTrac button. To Operate: 1) Press All Metal button. -
Page 10: Lcd Target Display
LCD scale. lower you will push your trash-to- Gold flakes will register under Iron/Foil treasure ratio. While the Pioneer 505 Small gold items will register under Pull will eliminate or indicate the presence Tab. -
Page 11: Depth & Battery Indicators
BATTERY/ DEPTH INDICATORS & SENSITIVITY ADJUSTMENT BATTERY INDICATOR: SENSITIVITY ADJUSTMENT: The LOW BATT indicator will flash as The principle use for the SENSITIVITY the unit is powered on. If the knob eliminate indicator comes on and stays on, ELECTROMAGNETIC INTERFERENCE replace the batteries. -
Page 12: Audio Target Identification
IN THE FIELD TECHNIQUES - No-motion modes In the No-Motion All Metal Mode, coil sweep technique is not important. Rather, user retuning is critical. The detector does not automatically adjust to changing ground and environmental conditions; the operator is required to make the adjustment. If the detector sounds a constant tone over all areas of the ground, retune the detector by pressing the GroundTrac button. -
Page 13: Motion Modes
AUDIO TARGET ID -Motion modes only In the DISC, NOTCH or AUTONOTCH PULL TABS: modes, the detector emits three Pull tabs are the most bothersome distinct tones, which classify metal trash items for detectorist. Most will objects into categories induce a medium tone. Most will be eliminated automatically in the AUTO IRON &... -
Page 14: Motion Modes
IN THE FIELD TECHNIQUES - Motion modes PINPOINTING COIL MOVEMENT Accurate pinpointing takes practice When swinging the coil, be and is best accomplished by careful to keep it level with the “X-ing” the target area. ground about one inch from the surface. - Page 15 Make sure you The Pioneer 505 is a very sensitive keep your searchcoil approximately 1 and deep-seeking detector. It will inch above the ground as you search.
-
Page 16: 4-Inch Gold Nugget Coil
4-INCH GOLD NUGGET COIL The standard 8-inch coil is great for most detecting applications. In special situations, a smaller coil is needed. Tight Spaces The 4-inch coil can fit into tight spaces. Black Sand “Sees through” black sand, or other highly mineralized soils, because the ratio of metal to detection area is higher. -
Page 17: Troubleshooting Guide
TROUBLESHOOTING TROUBLESHOOTING GUIDE SYMPTOM CAUSE SOLUTION Detector chatters • Using detector • Use detector or beeps erratically indoors outdoors only • Using detector near • Move away power lines from power lines • Using 2 detectors in • Keep 2 detectors close proximity at least 30’... - Page 18 NOTES...
-
Page 19: Warranty
Bounty Hunter® is a registered trademark of First Texas Products, L.L.C. The BOUNTY HUNTER PIONEER series of metal detectors is not associated or connected in any way with Pioneer Corporation or its PIONEER brand audio and video products or other products. -
Page 20: Accessories
Pouch & Digger Combo Pouch with 2 large pockets & 9” heavy duty digging tool. TP-KIT-W Bounty Hunter Stereo Headphones Use with Bounty Hunter metal detectors. Lightweight and adjustable with true stereo sound, adjustable volume, 1/8 jack with 1/4 adaptor, 4’ cable. HEAD-W Pin Pointer Pinpoints the exact location of buried metal objects.
Need help?
Do you have a question about the Pioneer 505 and is the answer not in the manual?
Questions and answers