Table of Contents
Advertisement
Quick Links
Advertisement
Table of Contents

Related Manuals for ORION TELESCOPES & BINOCULARS SKYVIEWPRO 6LT EQ 9872


Summary of Contents for ORION TELESCOPES & BINOCULARS SKYVIEWPRO 6LT EQ 9872
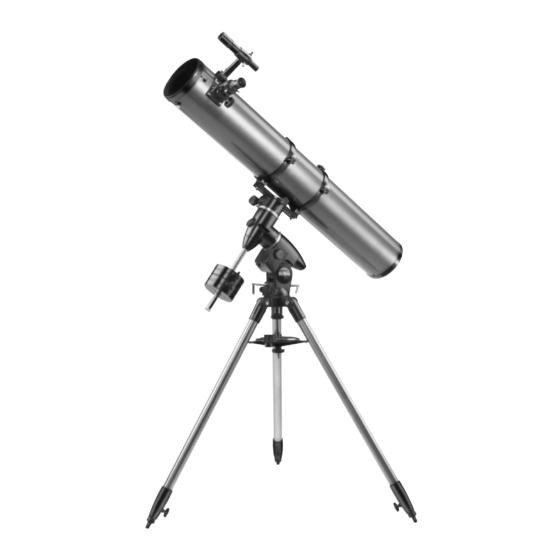
- Page 1 INSTRUCTION MANUAL Orion ® SkyView ™ Pro 6LT EQ #9872 Equatorial Reflecting Telescope Customer Support (800) 676-1343 E-mail: support@telescope.com Corporate Offices (831) 763-7000 P.O. Box 1815, Santa Cruz, CA 95061 Providing Exceptional Consumer Optical Products Since 1975 IN 212 Rev. A 11/02...
- Page 2 Finder scope Finder scope bracket Eyepiece Focus knob Optical tube Tube rings Declination lock lever (opposite side) Right ascension lock lever (opposite side) Declination slow-motion knob Safety thumbscrew Mounting plate securing knob Tube ring mounting plate Counterweight shaft Counterweight lock knobs Counterweights Mirror cell Right ascension...
-
Page 3: Table Of Contents
ongratulations on your purchase of an Orion telescope. Your new SkyView Pro 6LT EQ is designed for, high-resolution viewing, and astrophotography of astronomical objects. With its precision optics and stur- dy equatorial mount, you’ll be able to enjoy hundreds of fascinating celestial denizens. These instructions will help you set up, properly use, and care for your telescope. - Page 4 Finder scope bracket Nylon alignment thumbscrews Finder scope Azimuth adjustment knobs Post Tensioner Focus lock ring Figure 2. Orient the equatorial mount so that the post on the tripod head lines up with the azimuth adjustment knobs on the equatorial mount. 2.
-
Page 5: Balancing The Telescope
Figure 4. Proper operation of the equatorial mount requires that the telescope tube be balanced on both the R.A. and Dec. axes. (a) With the R.A. lock lever released, slide the counterweights along the counterweight shaft until it just counterbalances the tube. (b) When you let go with both hands, the tube should not drift up or down. - Page 6 at an object at least a 1/4 mile away—the top of a telephone pole, a chimney, etc. First, loosen the R.A. and Dec. lock levers and move it until the telescope is pointing towards the desired object. Then sight along the tube to aim the tele- scope.
-
Page 7: Setting Up And Using The Equatorial Mount
Dec. slow-motion control knob Dec. setting circle Front opening Dec. lock lever R.A. lock lever R.A. setting circle R.A. slow-motion control knob Polar axis finder scope Latitude scale Latitude adjustment L-bolts Figure 6. The SkyView Pro Equatorial Mount, shown from both sides. The maximum attainable magnification for a telescope is directly related to how much light it can gather. - Page 8 Eyepiece Alignment Focus Objective Azimuth focus ring setscrews (3) lock ring lens adjustment knobs Figure 8. For polar alignment, position the tripod so that the “N” Figure 9a. The optional polar axis finder scope. label at the base of the mount faces north. The azimuth fine adjustment knobs above it are used to make small adjustments to the mount’s azimuth position.
- Page 9 4. Shine a red flashlight down the front end of the polar find- er to illuminate the reticle within the field of view. Make sure the flashlight shines in at an angle, so as not to block the polar finder’s field of view. It may be helpful to have a friend hold the flashlight while you look through the polar finder.
- Page 10 about the mount’s right ascension and declination axes. Once Dec. setting circle the telescope is pointed close to the object to be viewed, retighten both lock levers. Dec. setting R.A. circle setting Note: If you have an optional motor drive attached, you thumbscrew circle will need to loosen the manual clutch on the R.A.
-
Page 11: Collimating (Aligning The Mirrors)
Figure 12. This illustration show the telescope pointed in the four cardinal directions (a) north, (b) south, (c) east, (d) west. Note that the tripod and mount have been moved; only the telescope tube has been moved on the R.A. and Dec. axes. 1. - Page 12 Figure 14. To center the secondary mirror under the focuser, hold the secondary mirror holder in place with one hand while adjusting the center bolt with a Phillips screwdriver. Do not touch the mirror’s surface. This adjustment will rarely need to be done. Figure 13.
- Page 13 Figure 16. Figure 17. The three small thumbscrews that lock the primary The tilt of the primary mirror is adjusted by turning mirror in place must first be loosened before any adjustments can be one or more of the three larger thumbscrews. made.
-
Page 14: Astronomical Observing
Out of collimation Collimated Figure 18. A star test will determine if a telescope’s optics are properly collimated. An unfocused view of a bright star through the eyepiece should appear as illustrated on the right if the optics are Figure 19. Megrez connects the Big Dipper’s handle to it's perfectly collimated. - Page 15 good idea to keep the scope covered until the Sun sets so the The best rule of thumb with eyepiece selection is to start with tube does not heat greatly above the temperature of the out- a low power, wide field, and then work your way up in magni- side air.
- Page 16 to charts published monthly in Astronomy, Sky & Telescope, or other astronomy magazines. Venus, Mars, Jupiter, and Saturn are the brightest objects in the sky after the Sun and the Moon. Your SkyView Pro 6LT EQ is capable of showing you these planets in some detail.
-
Page 17: Care And Maintenance
tions on sight, consult a planisphere. The planisphere gives may scratch the lens. On larger lenses, clean only a small an all-sky view and shows which constellations are visible on area at a time, using a fresh lens tissue on each area. Never a given night at a given time. -
Page 18: Specifications
10. Specifications Primary mirror diameter: 150mm (5.9") Primary mirror coating: Aluminized, SiO 2 overcoat Focal Length: 1200mm Focal Ratio: f/8.0 Secondary mirror: 34.5mm minor axis Secondary mirror holder: Four-vaned spider, .4mm thick vanes Eyepieces: 25mm and 10mm Sirius Plössls, fully coated, 1.25"... - Page 20 One-Year Limited Warranty This Orion SkyView Pro 6LT EQ is warranted against defects in materials or workmanship for a period of one year from the date of purchase. This warranty is for the benefit of the original retail purchaser only. During this warranty period Orion Telescopes & Binoculars will repair or replace, at Orion’s option, any warranted instrument that proves to be defective, provided it is returned postage paid to: Orion Warranty Repair, 89 Hangar Way, Watsonville, CA 95076.
Need help?
Do you have a question about the SKYVIEWPRO 6LT EQ 9872 and is the answer not in the manual?
Questions and answers