Ariston CP 059 MD X AUS S Operating Instructions Manual
Cooker and oven
Hide thumbs
Also See for CP 059 MD X AUS S:
- Instructions for use and installation (13 pages) ,
- Specifications (13 pages)
Advertisement
Table of Contents
- 1 Table of Contents
- 2 Warnings
- 3 Assistance
- 4 Description of the Appliance
- 5 Installation
- 6 Start-Up and Use
- 7 Using the Oven
- 8 Timer (Electric Oven),10
- 9 Troubleshooting
- 10 Precautions and Tips
- 11 Maintenance and Care
- 12 Replacing the Oven Light Bulb
- Download this manual
See also:
Use and Installation Instructions
CP 059 MD (X) AUS S
CP 859 MT (X) AUS S
English
Operating Instructions
COOKER AND OVEN
Contents
Operating Instructions,1
Warnings,2
Description of the appliance,3
Advertisement
Table of Contents

Related Manuals for Ariston CP 059 MD X AUS S


Summary of Contents for Ariston CP 059 MD X AUS S
-
Page 1: Table Of Contents
CP 059 MD (X) AUS S CP 859 MT (X) AUS S English Operating Instructions COOKER AND OVEN Contents Operating Instructions,1 Warnings,2 Assistance,2 Description of the appliance,3 Description of the appliance,3 Installation,4 Start-up and use,8 Timer (Electric oven),10 Troubleshooting,11 Precautions and tips,13 Maintenance and care,13... -
Page 2: Warnings
WARNING: Unattended cooking on a hob with fat or oil can be dangerous and may result in fire. ARISTON PRIORITY SERVICE NEVER try to extinguish a fire with water, If you are not completely satisfied with your appliance... -
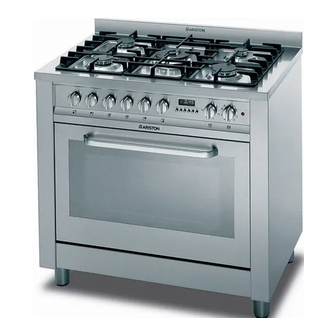
Page 3: Description Of The Appliance
Description of the appliance Description of the appliance Overall view Control panel 10 Control knobs for GAS BURNERS 1 AUXLIARY gas burner 11 TIMER 2 SEMI-RAPID gas burner 12 ELECTRIC OVEN THERMOSTAT KNOB 3 RAPID gas burner (temperature selection) 4 TRIPLE RING gas burner 13 ELECTRIC OVEN SELECTOR KNOB 5 DC-DR gas burner (cooking mode selection) -
Page 4: Installation
Installation ! The liquefied petroleum gases are heavier than air and collect by the floor, therefore all rooms containing LPG cylinders must have openings leading outside so that any ! Before placing your new appliance into operation please leaked gas can escape easily. read these operating instructions carefully. -
Page 5: Adapting To Different Types Of Gas
! Make sure that the gas supply pressure is consistent Connecting the supply cable to the mains electricity supply with the values indicated in the Table of burner and nozzle For models supplied without a plug, fit a standard plug, specifications (see below). - Page 6 Safety Chain 3. Replace all the components by following the above instructions in reverse. Replacing the nozzles on separate “double flame “ burners 1. remove the grids and slide the burners from their housings. The burner consists of 2 separate parts (see figure);...
-
Page 7: Table Of Burner And Nozzle Specifications
Table of burner and nozzle specifications NATURAL PROPANE Injector MJ/H Injector MJ/H Diameter Pressure Diameter Pressure l l a At 15°C and 1013 mbar - dry gas Propane G31 H.s. = 50.37 MJ/Kg Butane G30 H.s. = 49.47 MJ/Kg Methane G20 H.s. -
Page 8: Start-Up And Use
Start-up and use To turn on one of the rings, press the relative knob in all the way and turn it anti-clockwise to the high setting Using the hob The burner is fitted with an electronic igniter that automatically starts when the knob is pressed in. Since the burner is equipped with a safety device, after Lighting the burners lighting the burner keep the knob pressed in for about... -
Page 9: Using The Oven
Using the oven To provide heat only to the bottom or the top part of the dishes, turn the selector to the position (hot below), or WARNING ! The oven is (hot above). provided with a stop system to extract the racks and •... -
Page 10: Timer (Electric Oven),10
Timer (Electric oven) When “auto” is lighted, it indicates that the length and end cooking time have been preset to operate in automatic mode. At this point, the oven will turn on automatically The programmer makes it possible to preset the oven and at 12:30 in order to finish the cooking session within 30 the grill in terms of: minutes. -
Page 11: Troubleshooting
Troubleshooting The flame does not stay on Check to make sure that: • You press the knob all the way in; It may occur that the appliance does not function or does • You keep the knob pressed in long enough to activate not function properly. - Page 12 FAN ASSISTED cooking Guide rail no. Quantity Temperature Time Type of dish from bottom °C (minutes) Cakes * With beaten mix, in mould * With beaten mix, without mould 1-3-4 Short pastry, flan base 1-3-4 Short pastry with wet filling Short pastry with dry filling 1-3-4 * With natural leavened mix...
-
Page 13: Precautions And Tips
Precautions and tips • The appliance should not be operated by people (including children) with reduced physical, sensory or mental capacities, by inexperienced individuals or by anyone ! This appliance has been designed and manufactured who is not familiar with the product. These individuals in compliance with international safety standards. -
Page 14: Replacing The Oven Light Bulb
Inside the oven: * Greasing the taps • The inside of your oven is coated with a special self- As time passes, a tap may lock or become difficult to turn. cleaning microporous enamel glaze which, at a normal In this case it will be necessary to clean inside and replace cooking temperature of between 200 and 300°C, oxidises the grease. - Page 16 195104088.01 11/2012 - XEROX FABRIANO...
Need help?
Do you have a question about the CP 059 MD X AUS S and is the answer not in the manual?
Questions and answers