Epson MovieMate 62 User Manual
Portable, lightweight home cinema system
Hide thumbs
Also See for MovieMate 62:
- Quick setup manual (4 pages) ,
- Declaration of conformity (4 pages) ,
- Brochure & specs (4 pages)
Table of Contents
Advertisement
Advertisement
Table of Contents

Related Manuals for Epson MovieMate 62


Summary of Contents for Epson MovieMate 62
- Page 1 Epson MovieMate ® User’s Guide...
-
Page 2: Copyright Notice
Epson product. Epson is not responsible for any use of this information as applied to other products. Neither Seiko Epson Corporation nor its affiliates shall be liable to the purchaser of this product or third parties for damages, losses, costs, or expenses incurred by purchaser or third parties as a result of: accident, misuse, or abuse of this product or unauthorized modifications, repairs, or alterations to this product, or (excluding the U.S.) failure to... -
Page 3: Table Of Contents
Contents Welcome Registration and Warranty Optional Accessories About This Manual Epson MovieMate 62 Parts and Controls Important Safety Instructions Unpacking and Setting Up Unpacking Choosing a Location Setting Up Epson MovieMate Turning the Projector Off Playing Movies Wall and Projection Screen Recommendations... - Page 4 Adjusting the Color Mode Adjusting the Sound and Audio Modes Listening with Headphones Connecting a Microphone Using Epson MovieMate with Other Equipment Viewing Video from External Devices Connecting a USB Device Playing Projector Audio Through an External Audio System Connecting a Computer or Laptop...
- Page 5 Setting Video and Other Options Viewing Status Information and Resetting the Lamp Timer Caring for Your Epson MovieMate Protecting Epson MovieMate Cleaning the Lens Cleaning the Case Cleaning and Replacing the Air Filter Replacing the Lamp Resetting the Lamp Timer...
-
Page 6: Welcome
In just a few minutes, you can set up Epson MovieMate and watch a DVD, play a video game, or view your favorite photos. You can connect the Epson MovieMate to a wide range of computers and video sources. -
Page 7: Optional Accessories
(Canadian sales). About This Manual See the Quick Setup sheet to set up your Epson MovieMate and start using it. This book contains information on using all the features of Epson MovieMate, troubleshooting tips, and specifications. Please follow these guidelines as you read through the manual: Warnings: Must be followed carefully to avoid bodily injury. - Page 8 ® If you need more help, you can use the Epson PrivateLine Support service. Call (800) 637-7661 and enter the PIN on the PrivateLine support card that came with Epson MovieMate. Welcome...
-
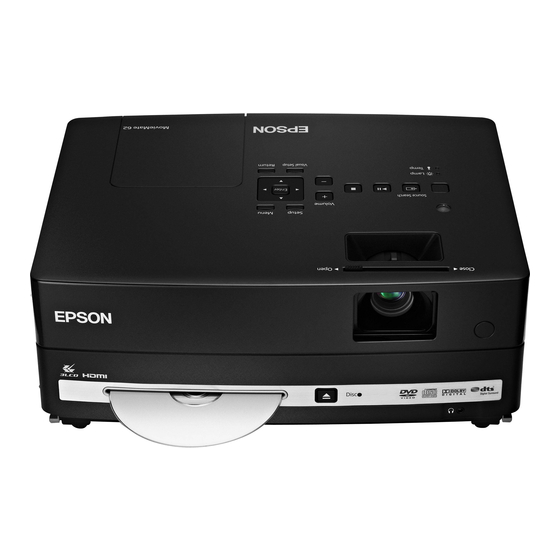
Page 9: Epson Moviemate 62 Parts And Controls
Epson MovieMate 62 Parts and Controls Front View Lens cover slide Remote control receiver Lens cover Air intake vent Foot adjustment lever Adjustable Security foot slot Disc slot Handle Eject button Foot adjustment Lens Disc lever indicator light Headphone Adjustable... -
Page 10: Top View
Focus image Control panel Ambient light Power sensor Access Setup menu Access DVD status light (DVD settings) menu (chapter Play/Pause selection, etc.) Turn Epson MovieMate on or off Select menu settings Lamp warning light Temperature warning light Return to Project from... -
Page 11: Remote Control
Function/numerics MovieMate Eject DVD toggle switch on or off Project from external equipment Pause movie and turn on light Adjust picture for different lighting Control playback Fix image shape (if Control volume Epson MovieMate is tilted) Access DVD features Welcome... -
Page 12: Important Safety Instructions
■ The lamp is fragile and can easily break. If the lamp breaks, handle the projector with extreme care to avoid injury from broken glass, and contact Epson to replace the lamp. ■ Do not use the lamp after the lamp replacement period has elapsed, because the possibility of lamp breakage increases. - Page 13 ■ The lamp(s) in this product contain mercury. Please consult your state and local regulations regarding disposal or recycling. Do not put in the trash. ■ The lamp in this projector is under high internal pressure and may make a loud noise if it breaks.
- Page 14 ■ Don’t overload wall outlets, extension cords, or integral convenience receptacles. This can cause fire or electric shock. ■ Unplug the projector from the wall outlet and refer servicing to qualified service personnel under the following conditions: when the power cord or plug is damaged or frayed;...
- Page 15 Avoid projecting a high-contrast still image for more than 15 minutes to prevent burn-in. If this happens, project a bright screen until the burn-in disappears (from 30 to 60 minutes). If you can’t eliminate the burn-in, contact Epson as described on page 69. ■...
- Page 16 Welcome...
-
Page 17: Unpacking And Setting Up
Follow these instructions to unpack your projector, choose a location, and set up your projector. Unpacking Make sure you have all the parts shown here: Remote control and 2 AA Batteries Epson MovieMate 62 CD with User’s Guide Padded bag Power cord Unpacking and Setting Up... -
Page 18: Choosing A Location
Choosing a Location You can use your Epson MovieMate just about anywhere—in the living room, bedroom, or even outside. You can use it with an optional floor-, wall-, or ceiling-mounted screen, or simply project on a flat white wall. The following pictures show three different setups:... - Page 19 Your projector should be directly in front of the screen or wall, facing straight ahead (at a 90-degree angle to the surface). If the image is too low, you can raise it by extending the feet and tilting the projector up. This causes the image to lose its rectangular shape, but the projector will correct it automatically.
- Page 20 Standard aspect ratio (4:3) Image size (diagonal) Projection distance 21 in. 2.5 to 3.4 ft. (0.8 to 1 meter) 30 in. 3.6 to 4.9 ft. (1.1 to 1.5 meters) 50 in. 6 to 8.2 ft. (1.8 to 2.5 meters) 60 in. 7 .2 to 9.8 ft.
-
Page 21: Setting Up Epson Moviemate
Setting Up Epson MovieMate 1. If you have a screen, set it up following the instructions included with the screen. Make sure you read all the instructions to avoid damaging the screen. 2. Put the batteries in the remote control. -
Page 22: Turning The Projector Off
■ If you would like to play a DVD, see “Playing Movies” on page 23. ■ If you would like to connect other equipment to the projector, see“Using Epson MovieMate with Other Equipment” on page 34. Turning the Projector Off 1. -
Page 23: Playing Movies
To optimize viewing of projector images, follow the recommendations in this section. Viewing on a Wall You can easily view Epson MovieMate’s high quality images on any flat white wall in your home. There is no cost or setup involved, and you can project and resize the image up to any size that fits on your wall. - Page 24 Standard screens have a 4:3 shape ratio, which is better suited for viewing computer presentations and standard TV broadcasts. Watching DVD movies or HDTV broadcasts on a 4:3 ratio screen limits the image width and leaves unused screen area above and below the image.
-
Page 25: Starting A Dvd
Screen surface quality can also affect the reflectivity of light in your projected image. Screen reflective properties are measured as “gain” rates, with 1.0 gain as the reflectivity of a white board. Highly reflective screen surfaces (above 1.0 gain) create a brighter image, but the brightness may not be uniform enough for a dedicated home theater environment and the colors may appear to shift from different viewing angles. -
Page 26: Adjusting The Picture
Adjusting the Picture After you set up and start the projector, you may need to make certain adjustments. ■ If the image is too low, you can extend the feet (by pressing the foot adjustment levers) and tilt the projector up. ■... -
Page 27: Adjusting The Sound
■ Use the Zoom setting in the Signal menu to adjust the image size. See page 52. ■ Rotate the focus ring to sharpen the picture. ■ To enlarge or reduce the aspect ratio of the picture, press the button on the remote control to select , or (if available for the video source you’re using). -
Page 28: Controlling Playback
To resume, press on the remote control or on the control panel. ■ To pause a movie and display the Epson logo, press on the remote control or control panel. To resume, press on the remote control or on the control panel. -
Page 29: Searching (Fast Forward Or Reverse)
Searching (Fast Forward or Reverse) ■ To move forward or backward through a video or music CD, press on the remote control. Each time you press the button, the search (or “shuttle”) speed increases. ■ To return to normal play, press Playing in Slow Motion You can play a video frame by frame or in slow motion (“jog control”). -
Page 30: Using Dvd Menus
Using DVD Menus Many DVDs display a top menu at startup and include submenus that let you select chapters. ■ To display a menu, press (press the button for about 3 seconds to display the top menu). ■ To select items in a menu, press , or . -
Page 31: Adjusting The Color Mode
Adjusting the Color Mode You can select a color mode to optimize picture quality based on the lighting conditions in the room. 1. Press . The currently selected color mode is displayed on the screen. 2. Press repeatedly until the desired color mode appears. After a few seconds, the color mode name disappears and the picture quality changes. -
Page 32: Listening With Headphones
Listening with Headphones Connect headphones as shown below: After you connect headphones, you no longer hear any sound from the built-in speakers. However, you can still adjust the volume to the headphones using the projector’s volume controls on the control panel or remote control. Warning: Make sure the volume is not set too high, especially when you first plug in the headphones. -
Page 33: Connecting A Microphone
Connecting a Microphone Connect a microphone as shown below: You can adjust the volume using the projector’s volume controls on the control panel or remote control. If the microphone level is too low, you can adjust it by pressing the button on the remote control or through the Option menu (see page 51). -
Page 34: Using Epson Moviemate With Other Equipment
Using Epson MovieMate with Other Equipment You can connect a variety of video, audio, and computer equipment to Epson MovieMate to further enhance your viewing and listening experience. ■ ™ Video equipment such as a Blu-ray Disc player, VCR, DVR, cable or satellite TV ®... - Page 35 Composite Video Connection White Yellow Video Audio For connecting a VCR, or DVD player, cable or satellite TV receiver or DVR, game console, camcorder, iPod, digital camera, or other device with a video output port. Using Epson MovieMate with Other Equipment...
- Page 36 After you start playing your video or game, you may find that you need to adjust the position or shape of the picture. Or you may need to focus or zoom the image. See “Adjusting the Picture” on page 26. Using Epson MovieMate with Other Equipment...
-
Page 37: Connecting A Usb Device
Connect the drive or other device to the USB port as shown below. When you’re finished, make sure you press before removing the device from the USB slot. For instructions on playing MP3, WMA, JPEG, or MPEG 1/2/4 files, see page 41. Using Epson MovieMate with Other Equipment... -
Page 38: Playing Projector Audio Through An External Audio System
DTS/Dolby Digital Decoder or PCM if you are Stream connecting to equipment that is only compliant with linear PCM. For more information, see page 51. You can use any of your projector’s audio controls, as described on pages 27 and 31. Using Epson MovieMate with Other Equipment... -
Page 39: Connecting A Computer Or Laptop
5. When you see the menu, use the down-arrow or up-arrow button to select PC (if necessary), then press the button on the projector or the button on the remote control. 6. Turn on the power to the connected computer or laptop. Using Epson MovieMate with Other Equipment... - Page 40 After your image appears, you may find that you need to adjust the position or shape of the picture. Or you may need to focus or zoom the image. See “Adjusting the Picture” on page 26. Using Epson MovieMate with Other Equipment...
-
Page 41: Doing More With Epson Moviemate
You can also select a specific track by using the numeric buttons, as described on page 30. To use the numeric buttons, you need to set the toggle switch on the remote control to the position. -Num ■ To turn off the lamp, close the lens cover. Doing More with Epson MovieMate... -
Page 42: Playing Mp3/Wma Music Or Videos
When you play MP3 or WMA files, scrolling through the list of songs will pause the music until you highlight the next file. Note: You can use the Setup menu to change the way files are displayed. See page 50 for instructions. Doing More with Epson MovieMate... -
Page 43: Viewing Jpeg Photos
1. To display the list of files, press 2. Select the music file you want and press to start playing it. 3. Select the JPEG file you want and press to start displaying the slideshow. Doing More with Epson MovieMate... -
Page 44: Using Advanced Playback Controls
For MP3, WMA, and JPEG files, you can repeat a file, all files in a folder, or select random play (Shuffle). 3. To cancel repeat play, press until is displayed on the screen. Repeat Off Doing More with Epson MovieMate... -
Page 45: Changing The Play Sequence (Program Play)
Start 5. Set the toggle switch on the remote control back to the position. Func- 6. To cancel the program, press 7. To resume normal playback, stop play and press Doing More with Epson MovieMate... -
Page 46: Selecting Language, Subtitles, And Camera Angles
30. To use the numeric buttons, you need to set the toggle switch on the remote control to the position. -123 After you press , playback starts from the title, chapter, track, or time you selected. Doing More with Epson MovieMate... -
Page 47: Customizing Epson Moviemate
Once a password is set, you need to enter it before you can view the locked CD or DVD. If you forget your password, enter in the column to reset the 000000 Old Password password. Doing More with Epson MovieMate... -
Page 48: Locking The Power Button On The Control Panel
You need to restart the projector for the setting to take effect. Note: When the Child Lock setting is turned on, the projector will not automatically power up when you insert a disc. Doing More with Epson MovieMate... -
Page 49: Saving Power
DVD you are playing. 3. Press to select the language you want, then press to save it. For a list of language codes, see page 80. 4. To exit the menu, press Doing More with Epson MovieMate... -
Page 50: Adjusting Picture Quality
You can choose from the following: ■ Screen Saver: By default, the screen saver starts when a still image is projected for more than 15 minutes. Select to turn off this setting. Doing More with Epson MovieMate... -
Page 51: Adjusting Dolby Audio Settings
Option Menu 1. Press on the remote control. You see the Visual Setup menu. 2. Press to highlight , then press to select it. Option 3. Press until you see the option you want to set. Doing More with Epson MovieMate... - Page 52 If no image appears or you see interference, select the appropriate signal. ■ Ceiling projection: Turn this setting on to invert the image for viewing on the ceiling. (Requires a special optional adapter.) 4. Press to adjust the setting. Doing More with Epson MovieMate...
-
Page 53: Viewing Status Information And Resetting The Lamp Timer
Info information. Note: If the lamp has been used less than 10 hours, 0H is displayed. 3. To reset the lamp timer after replacing the lamp, press 4. Press to exit the menu. Doing More with Epson MovieMate... -
Page 54: Caring For Your Epson Moviemate
The only parts you should replace are the lamp and air filter. If another part needs replacing, contact Epson or a qualified servicer (see page 69). Follow the instructions in this section to clean the lens and case, clean and replace the air filter, replace the lamp, and store or transport the projector. -
Page 55: Cleaning The Case
If you cannot clean the removable filter or it is broken, you need to replace it. You can purchase a new filter (part # V13H134A26) from an Epson authorized reseller. To find the nearest reseller, call 800-GO-EPSON (800-463-7766). Or you can purchase online at www.epsonstore.com... - Page 56 3. If you need to clean or replace the filter, lift up the handle, press up on the tab, and lift off the cover. 4. Remove the old filter and install the new filter. 5. Replace the cover. Caring for Your Epson MovieMate...
-
Page 57: Replacing The Lamp
Caution: If you continue to use the lamp after you see the replacement indicators, the lamp is more likely to break. You can purchase a new lamp (part # V13H010L56) from an Epson authorized reseller. To find the nearest reseller, call 800-GO-EPSON (800-463-7766). Or you can purchase online www.epsonstore.com... - Page 58 5. Grasp the lamp handle as shown and pull the lamp straight out. Note: The lamp(s) in this product contain mercury. Please consult your state and local regulations regarding disposal or recycling. Do not put in the trash. Caring for Your Epson MovieMate...
-
Page 59: Resetting The Lamp Timer
2. Press on the projector on the remote control. You see the Visual Setup menu. 3. Press to highlight , then press on the projector or on the remote Info control to select it. Caring for Your Epson MovieMate... -
Page 60: Storing Epson Moviemate
Remove the batteries from the remote control. ■ Place the projector in its padded bag. You can stand it on end for convenient storage. ■ Package the projector in its original packaging or equivalent (as described in the following section). Caring for Your Epson MovieMate... -
Page 61: Transporting Epson Moviemate
Transporting Epson MovieMate Note: Epson shall not be liable for any damages incurred during transportation. Your projector contains many glass and precision parts. If you need to transport it, follow these guidelines to prevent damage: ■ When shipping the projector for repairs, use the original packaging material if possible. If you do not have the original packaging, use equivalent materials, placing plenty of cushioning around the projector. -
Page 62: Problem Solving
Problem Solving This section explains how to interpret the projector’s status lights, solve problems, and contact technical support. What To Do When the Lights Flash The lights on top of the projector indicate its status and let you know when a problem occurs. If all lights are off, make sure the power cable is connected correctly. - Page 63 See page 59. If the lamp is broken, or the lights continue to flash after you turn the power back on, unplug the projector and contact Epson. See page 69. light is red and the warning light is flashing red.
-
Page 64: Solving Epson Moviemate Operation Problems
Make sure the power cord is securely attached at both ends. Try using a different power outlet. If the power cord has been damaged, turn off the projector, disconnect the power cord, and contact Epson. See page 69. ■ Make sure you pressed the... -
Page 65: Solving Picture And Sound Problems
■ Some discs don’t support all of the remote control’s functions. ■ If you’re using a “universal” remote control, it might not work with the projector. Epson does not support any third-party remote controls. Solving Picture and Sound Problems The picture is blurry or out of focus. - Page 66 The picture looks too light or too dark. ■ Press the button on the remote control to select the best setting for your viewing environment. See page 31. ■ Adjust the settings. See page 50. Brightness Contrast ■ If the picture looks darker than it used to, you may need to replace the lamp. See page 57. The colors on the screen don’t look right.
-
Page 67: Problems With External Video Equipment
There is a problem with the sound quality. ■ Try pressing the button on the remote control and adjusting the sound mode. (Make sure the toggle switch on the remote control is set to the position.) Func- ■ If you’re using external equipment, you may need to adjust the Audio settings in the setup menu (see page 51). - Page 68 ■ Press the button on the projector or the button on the remote control to select the external video source. Allow a few seconds for the projector to sync up. ■ If you’re using a PC notebook, hold down the Fn key on the keyboard and press the function key that lets you display on an external monitor.
-
Page 69: Where To Get Help
Epson with your questions. Speak to a Support Representative To use the Epson PrivateLine Support service, call (800) 637-7661 and enter the PIN on the included Epson PrivateLine Support card. This is the fastest way of speaking to a live representative, and it’s free. -
Page 70: Index
Audio system connection, 38 DVR, connecting, 34 to 36 Auto Iris, 50 AV amplifier, connecting, 38 Electrical specifications, 75 Environmental specifications, 76 Blurry picture, 65 Epson Brightness accessories, 7, 69 adjusting, 50 Home Service, 6 lamp, 57, 74 PrivateLine Support, 69... - Page 71 Location, projector, 18 to 20 Lock, security, 7 HDMI connection, 34 Locking Power button, 48 Headphones, 32 Looping, 44 Help, 8, 69 High altitude mode, 52, 63 Home Service, 6 Maintenance, 54 to 60 Menus, 30 Microphone, connecting, 33 Image Movies blurry, 65 pausing, 28...
- Page 72 Problems Screen projection, 23 to 25 audio, 66 to 67 Screen saver setting, 50 color, 66, 68 Searching, 29 lights indicating, 62 to 63 Shuttle control, 29 operation, 64 to 65 Signal not supported message, 68 overheating, 20, 55, 63 Size, image, 19, 74 picture, 64 to 66 Skipping chapters or tracks, 29...
- Page 73 Vents, 9 Video camera, connecting, 34 to 36 Video, compatible formats, 76 to 78 Volume, adjusting, 27 Wall projection, 23 to 25 Warranty, 6 to 7 WMA, 42, 50, 78 Zooming, 26, 29 Index...
-
Page 74: Specifications
Specifications General Type of display Poly-silicon TFT active matrix Size of LCD panels 0.54 inch (13.7 mm) wide Lens F=1.44, f=16.6 mm Resolution (native format) 960 × 540 pixels × 3, 540p Light Output (brightness) White Light Output 2000 lumens (ISO 21118 standard) Color Light Output 2000 lumens Contrast ratio Up to 300:1 (native), up to 3000:1 (Auto Iris on) -
Page 75: Projection Lamp
Remote Control Range Approx. 19 feet (6 m) AA u 2 (Alkaline or Manganese dry cell) Battery Operating angle Horizontal: +/– 30° Vertical: +/– 15° Projection Lamp Type 200 W UHE (Ultra High Efficiency) E-TORL Part number ELPLP56/ V13H010L56 Lamp life Approx. -
Page 76: Compatible Video Formats
Environmental Temperature Operating: 41 to 95 °F (5 to 35 °C) without condensation Storage: 14 to 140 °F (–10 to 60 °C) without condensation Humidity Operating: 20 to 80% RH, non-condensing Operating altitude Up to 7500 feet (2286 m) Safety and Approvals United States FCC Part 15B Class B UL60950-1 2nd Edition (cTUVus Mark) - Page 77 Component video Normal aspect Full aspect Zoom aspect Signal Resolution mode mode mode HDTV (720p) 16:9 1280 x 720 960 x 540 — — (16:9) HDTV (1080i) 16:9 1920 x 1080 960 x 540 — — (16:9) * Letterbox signal HDMI video Normal aspect Full aspect...
- Page 78 Computer image Normal aspect Full aspect Zoom aspect Signal Resolution mode mode mode VGA 60/72/75/85, iMac* 640 x 480 720 x 540 960 x 540 960 x 540 640 x 360** SVGA56/60/72/75/85, 800 x 600 720 x 540 960 x 540 960 x 540 iMac* 800 x 450**...
- Page 79 Sampling frequency MP3: 11 kHz, 16 kHz, 22.05 kHz, 32 kHz, 44.1 kHz, 48 kHz, WMA: 44.1 kHz, 48 kHz Total number of pixels JPG: Up to 3027 × 2048, MPEG-1/2/4 (Advanced Simple Profile): Up to 720 × 576 pixels Your projector can play multi-session recorded discs.
-
Page 80: Language Codes
Language Codes Abkhazian 6566 Gaelic; Scottish 7168 Magyar 7285 Sinhalese 8373 Gaelic Afar 6565 Gallegan 7176 Malayalam 7776 Slovensky 8373 Afrikaans 6570 Georgian 7565 Maltese 7784 Slovenian 8376 Amharic 6577 Gikuyu; Kikuyu 7573 Manx 7186 Somali 8379 Arabic 6582 Guarani 7178 Maori 7773... - Page 81 Epson MovieMate® 62 Other Connections Quick Setup Connect up to 3 video devices and use the remote control to switch between them. You can also connect a microphone or USB thumb drive. Before using the projector, make sure you read the safety instructions in the...
- Page 82 EXCEED YOUR VISION Epson is a registered trademark and Epson Exceed Your Vision is a registered logomark of Seiko Epson Corporation. Epson MovieMate and Private Line are registered trademarks of Epson America, Inc. General Notice: Other product names used herein are for identification purposes only and may be trademarks of their respective owners.
- Page 84 Need help with your product? This card enables you to quickly obtain technical assistance. Always keep it nearby. Call (800) 637-7661, then enter your Epson' Personal Identification Number (on the back of the PrivateLine' card). • Fast, person-la-person support from our prioritized support line.
- Page 85 .....
- Page 86 You could have a problem with your projector at a critical moment, and we know how important it is to be able to watch the big game or a special movie. Epson's Extra Care Home Service provides you with the support you need.
- Page 87 Days and hours of support are subject to change without notice. © 2009 Epson America, Inc. 8/09 Epson is a registered trademark and Epson Exceed Your Vision is a registered logomark of Seiko Epson Corporation. PrivateLine is a registered trademark and Extra Care is a service mark of Epson America, Inc.
- Page 88 If your product requires service during the limited warranty period, please call Epson at the number on the bottom of this statement and be prepared to provide the model, serial number, and date of original purchase. Epson will, at its option, repair or replace the defective unit, without charge for parts or labor.
- Page 89 Postage, insurance, or shipping costs incurred in presenting your Epson product for carry-in warranty service are your responsibility. Epson will pay for all freight charges if you choose to send your unit to Epson for repair. If a claimed defect cannot be identified or reproduced in service, you will be held responsible for costs incurred.
- Page 90 Ce que fera Epson pour remedier aux problemes : Si votre produit doit etre repare durant la periode OU il est couvert par la garantie limitee, veuillez appeler Epson au numero inscrit dans Ie bas de cette declaration et assurez-vous d'etre en mesure d'indiquer Ie modele, Ie numero de serie et la date d'achat d'origine.
- Page 91 La presente garantie n'est pas transferable. Epson ne sera pas tenue d'effectuer d'intervention au titre de la garantie lorsque l'etiquette ou Ie logo Epson, Ie numero de serie ou la plaque signaletique ont ete enleves de l'appareil, ou si Ie produit n'est pas correctement entretenu ou ne...
Need help?
Do you have a question about the MovieMate 62 and is the answer not in the manual?
Questions and answers