Table of Contents
Advertisement
Quick Links
Model #: 22-PS150
Important: Keep this owner's manual; do not discard in case you need to contact Pacific Cycle, Inc.
in the future. Should there be a change of ownership, please transfer this manual to the new owner to
ensure proper assembly and safety.
Pacific Cycle, Inc. warrants this product to be free of defective materials and workmanship for 90 days from
the date of original purchase.
THIS LIMITED WARRANTY IS THE ONLY WARRANTY APPLICABLE TO THIS PRODUCT,
AND IS EXPRESSLY IN LIEU OF ANY OTHER WARRANTY. ANY IMPLIED WARRANTIES,
INCLUDING ANY WARRANTY OF MERCHANTABILITY AND WARRANTY OF FITNESS
FOR A PARTICULAR PURPOSE, IS LIMITED IN DURATION TO THE DURATION OF THIS
EXPRESS WARRANTY. This limited warranty gives you specific legal rights and you may also have
other rights which may vary from state to state. This warranty is extended only to the original consumer
purchaser for non-commercial use.
PACIFIC CYCLE, INC. IS NOT RESPONSIBLE FOR INCIDENTAL OR CONSEQUENTIAL
DAMAGES. THIS LIMITED WARRANTY DOES NOT COVER ANY PERSONAL INJURIES,
DAMAGE TO, OR FAILURE OF THE PRODUCT OR ANY OTHER LOSSES DUE TO ACCIDENT,
ABUSE, MISUSE, ALTERATION, NEGLECT, NORMAL WEAR AND TEAR, RUST, IMPROPER
ASSEMBLY, IMPROPER FIT, IMPROPER MAINTENANCE OR USE OF UNAUTHORIZED
REPLACEMENT PARTS NOT DESIGNED FOR THE PRODUCT.
1
Owner's Manual and Assembly Instruction
90 DAY LIMITED WARRANTY
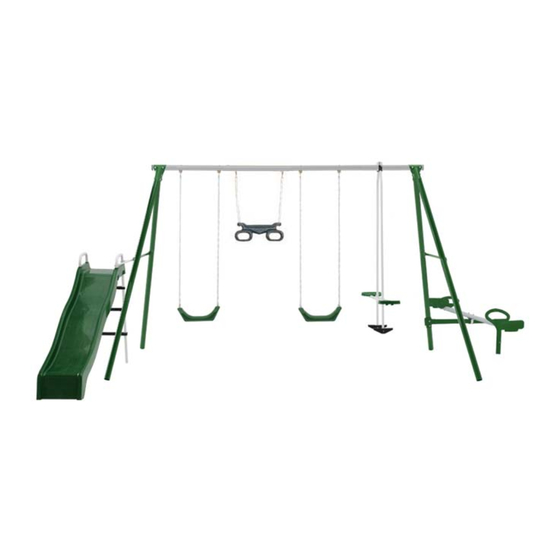
Model Name: Bristol Swing Set
Manual Date: September, 2008
2006 Pacific Cycle, Inc.
©
Advertisement
Table of Contents

Related Manuals for PlaySafe Bristol Swing Set

Summary of Contents for PlaySafe Bristol Swing Set
- Page 1 Owner’s Manual and Assembly Instruction Model #: 22-PS150 Model Name: Bristol Swing Set Manual Date: September, 2008 Important: Keep this owner’s manual; do not discard in case you need to contact Pacific Cycle, Inc. in the future. Should there be a change of ownership, please transfer this manual to the new owner to ensure proper assembly and safety.
- Page 2 1-800-242-6110 Monday – Friday 8am-5pm CST Please contact the Playsafe™ customer service team if you have any questions about our product, need assembly assistance or need replacement parts for the swing set. You may also contact us by mail: Playsafe™ Customer Service...
-
Page 3: Warnings And Safety Information
WARNINGS AND SAFETY INFORMATION BSERVE ALL WARNINGS AND STATEMENTS IN ORDER TO REDUCE THE RISK OF INJURY OR DEATH BEFORE YOU ASSEMBLE THE SWING SET FIND LEVEL GROUND NOT LESS THAN FEET FROM ANY STRUCTURE OR OBSTRUCTION TO THE SWING SET OUR SWING SET MUST HAVE CLEARANCE ON ALL SIDES O PREVENT SERIOUS INJURY... -
Page 4: Proper Use
ANCHORING ANCHORING is necessary to prevent tipping, lifting, and overturning. Playsafe™ recommends anchoring the swing set in concrete, especially in soft or sandy soil. When this is not possible, anchors can be purchased by calling 1-800-242-6110. To anchor the swing set in concrete, dig a hole at least 5” deep and 10” to 12” in diameter. Place the swing set leg in the hole, preferably on a brick or stone to keep if from sinking. -
Page 5: Care And Maintenance
checked periodically and replenished to maintain correct depth as determined necessary for your equipment. The choice of a material depends on the type and height of the playground equipment, the availability of material in your area and its cost. (The information above has been extracted from CPSC documents ‘Playground Surfacing – technical Information guide” and “Handbook for public Playground Safety.”... -
Page 6: Main Frame Assembly
PRE-ASSEMBLED HARDWARE For easier assembly, Playsafe™ has pre-assembled some of the parts for you. Most of the screws and bolts should already be in place. If removal of this hardware is required for certain assembly steps, it should be replaced in its original position. - Page 7 Remove the hardware from the middle Part Ref. #: PSHW12 section of a leg. Match up the holes of the mid-leg and support bar and re-insert the hardware through both. Repeat the process for the opposite side and center legs. It may be necessary to pull both legs towards each other in order for the holes to align properly.
- Page 8 Attach the two vertical poles to the glider Part Ref. #: PSHW21, PSHW36 attachment. Start by removing the hardware from the lower section of the glider attachment. Align the vertical bar with the glider attachment and re-insert the hardware. Repeat the process for the other side.
- Page 9 SWING AND TRAPEZE ASSEMBLY Pre-Assembled Parts • Swing seats should be attached to the chain. Step Illustration Instructions Hardware Reference Before attaching the swings, you will need to verify the hook positioning. Although the hooks will be pre-assembled in the top bar, their position may need to be adjusted.
- Page 10 SEE-SAW ASSEMBLY Required Parts: See-Saw Frame and Extension Frame Attachment Top Tube Attachment Seat x2 Step Illustration Instructions Hardware Reference Remove the hardware from the See-Saw Part Ref. #: PSHW10 Frame and connect the extension. Re- insert the hardware and tighten. NOTE: Be sure that the lower part of the see-saw extension is buried and anchored per the anchoring instructions on page 3.
-
Page 11: Slide Assembly
Once fully assembled, check that the see- Part Ref. #: PSHW10 saw hinges freely. If it does not, make sure that the bolts on the See-Saw Top Tube are not overly tightened. SLIDE ASSEMBLY Proper Placement: Slide Assembly Correct Location Incorrect Location Pre-Assembled Parts: •... - Page 12 Check all parts on all rides before allowing a child on the swing set. • Be sure to check and tighten the hardware on a regular basis to ensure the safety of the users. Your Playsafe™ Bristol Swing Set should now be fully assembled! 2006 Pacific Cycle, Inc. ©...
Need help?
Do you have a question about the Bristol Swing Set and is the answer not in the manual?
Questions and answers