Table of Contents
Advertisement
Available languages
Available languages
Quick Links
Advertisement
Table of Contents

Subscribe to Our Youtube Channel
Related Manuals for Numark MP302


Summary of Contents for Numark MP302
- Page 1 MP302 Dual CD / MP3 Player QUICKSTART GUIDE ENGLISH ( 3 – 7 ) GUÍA DE INICIO RÁPIDO ESPAÑOL ( 8 – 12 ) GUIDE D’UTILISATION RAPIDE FRANÇAIS ( 13 – 17 ) GUIDA RAPIDA ITALIANO ( 18 – 22 ) KURZANLEITUNG DEUTSCH ( 23 –...
-
Page 3: Box Contents
Safety & Warranty Information Booklet REGISTRATION Please go to http://www.numark.com to register your MP302. Registering your product ensures that we can keep you up-to- date with any last-minute product developments and provide you with world-class technical support, should you run into any problems. -
Page 4: Rear Panel Features
REAR PANEL FEATURES CONTROL CABLE CONNECTOR – Plug in the 8-pin cable included in here to connect the remote control and main CD unit together POWER PLUG CONNECTOR – Plug your supplied power cord in here. VOLTAGE SELECTOR – Set this switch to the voltage for your location. RCA AUDIO CONNECTORS –... -
Page 5: Lcd Features
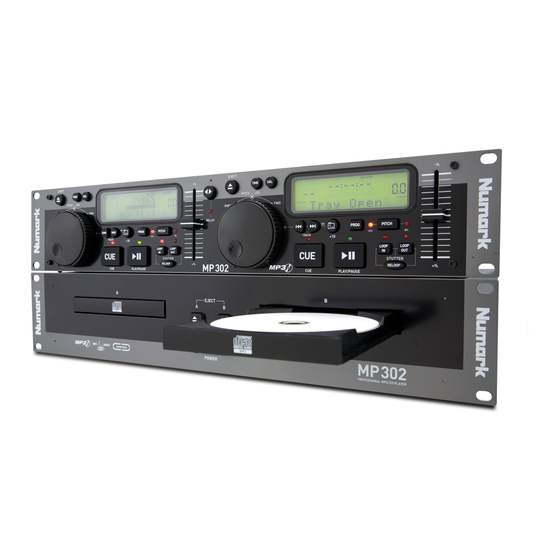
One way to organize the MP3 files on your CD’s is by using Folders. Folders make it easier to find the music you want quickly. The MP302 is set up to navigate folders, making it the ideal tool for the professional DJ. - Page 6 PLAY, PAUSE & CUE OPERATIONS PLAY & CUE Pressing “PLAY/PAUSE” Press "PLAY/PAUSE" Press "CUE" return to to start music last starting point button starts the disc. Pressing the “CUE” button will reset the Play Interval Position on Disc disc to the last place where the disc was started.
- Page 7 BEAT MATCHING USING PITCH BEND If you find the BPM’s (Beats Per Minute or Tempos) are the same, however, the drum beats are not matched you will need to temporarily change the pitch. The illustration below shows how to match the beat of PLAYER 2 to the beat of the music being played on PLAYER 1.
-
Page 8: Contenido De La Caja
Folleto de información sobre la seguridad y la garantía REGISTRO Visite http://www.numark.com y registre su MP302. El registro de su producto asegura que podamos mantenerle actualizado con los desarrollos de productos de último momento y brindarle apoyo técnico de categoría mundial en caso de que tenga algún problema. -
Page 9: Características Del Panel Trasero
CARACTERÍSTICAS DEL PANEL TRASERO CONECTOR DEL CABLE DE CONTROL – Enchufe el cable de 8-pines que se incluye aquí para conectar el control remoto a la unidad principal de CD. CONECTOR DEL CABLE DE ALIMENTACIÓN IEC – Enchufe su cable de alimentación aquí. SELECTOR DE VOLTAJE –... -
Page 10: Características De La Pantalla Lcd
Una manera de organizar los archivos MP3 de su CD es usando carpetas. Las carpetas permiten encontrar más rápida y fácilmente la música que desea. El MP302 está preparado para navegar por las carpetas, lo que lo convierte en la herramienta ideal para el DJ profesional. - Page 11 OPERACIONES DE PLAY, PAUSE Y CUE PLAY (REPRODUCCIÓN) Y CUE Pulsando botón “PLAY/PAUSE” se pondrá el disco funcionamiento. Pulsando el botón "CUE" se el disco comenzará de nuevo en la misma posición en la que comenzó anteriormente. Esto es lo que se llama punto cue. Pulsando los botones de “PLAY/PAUSE”...
- Page 12 IGUALACIÓN DEL BEAT HACIENDO USO DEL PITCH BEND Aunque observe que los BPM (Beats por minuto o tempos) son iguales, sin embargo, los beats de la batería no se corresponden y necesitará cambiar el pitch provisionalmente. La ilustración siguiente muestra cómo igualar el beat del reproductor 2 al beat de la música que está...
-
Page 13: Contenu De La Boîte
Le livret des consignes de sécurité et des informations concernant la garantie ENREGISTREMENT Veuillez visiter le site internet http://www.numark.com pour enregistrer votre nouveau MP302. L'enregistrement des produits vous permet d'être informé sur les toutes dernières nouveautés concernant les produits et de vous offrir un soutien technique de niveau international, si vous en aviez besoin. -
Page 14: Caractéristiques Du Panneau Arrière
CARACTÉRISTIQUES DU PANNEAU ARRIÈRE CONNECTEUR DU CÂBLE DE COMMANDE – Branchez le câble à 8 lames fourni dans cette prise pour brancher la commande à distance et le lecteur principal ensemble. CONNECTEUR CEI POUR CÂBLE D'ALIMENTATION – Brancher le câble d’alimentation fourni avec l’appareil dans cette prise. - Page 15 Créer des dossiers est une bonne façon d’organiser les fichiers MP3 sur vos disques. Les dossiers permettent de trouver rapidement la musique que vous désirez entendre. Le MP302 est conçu de façon à vous permettre de parcourir facilement les dossiers, faisant de lui l’outil indispensable pour tout DJ professionnel.
- Page 16 FONCTIONS DE LECTURE/PAUSE ET DE PRÉ-ÉCOUTE LECTURE ET PRÉ-ÉCOUTE Appuyez touche PLAY/PAUSE pour commencer la lecture du disque. Appuyer sur la touche renvoie lecture du disque au dernier point de départ. Ce point de départ s’appelle un point de référence. Appuyer sur la touche PLAY et ensuite sur la touche CUE permet de recommencer la lecture toujours au même endroit plusieurs fois.
- Page 17 LA SYNCHRONISATION DU TEMPO AVEC LA FONCTION PITCH BEND Si toutefois les BPM (Battements par minute ou tempo) sont identiques mais que les basses ne sont pas synchronisées, vous devrez modifier temporairement la tonalité. L’illustration suivante démontre comment synchroniser le rythme du lecteur 2 avec le rythme de la musique qui joue sur le lecteur 1.
-
Page 18: Contenuti Della Confezione
Libretto di istruzioni di sicurezza e garanzia REGISTRAZIONE Recarsi alla pagina http://www.numark.com per registrare il MP302. La registrazione del prodotto garantisce che possiamo tenervi aggiornati con tutti gli ultimissimi sviluppi del prodotto e offrirvi assistenza tecnica di livello mondiale, in caso di eventuali problemi. -
Page 19: Caratteristiche Pannello Posteriore
CARATTERISTICHE PANNELLO POSTERIORE CONETTORE DEL CAVO DI COMANDO – inserire il cavo a 8 poli in dotazione per collegare il telecomando e l’unità principale CD. PRESA CONENTTORE D'ALIMENTAZIONE IEC – inserire a questo livello il cavo di alimentazione in dotazione. SELETTORE VOLTAGGIO –... -
Page 20: Caratteristiche Lcd
Per organizzare i file MP3 sui propri CD un buon metodo è quello di utilizzare cartelle in quanto queste facilitano la ricerca rapida della musica desiderata. Il MP302 è impostato per navigare all´interno delle cartelle, risultando quindi lo strumento ideale per i DJ professionisti. - Page 21 OPERAZIONI PLAY / PAUSE E CUE PLAY E CUE Premendo tasto “PLAY/PAUSE” il disco viene avviato. La pressione del tasto “CUE” imposterà disco sull’ultima posizione in cui era stato avviato. Questo viene chiamato punto cue. Premendo tasti “PLAY/PAUSE” e “CUE” in maniera alternata, il disco può tornare ad essere avviato dal punto cue quante volte si vuole. Questa funzione prende il nome di back cue.
- Page 22 ACCORDARE IL BEAT UTILIZZANDO IL PITCH BEND Nel caso in cui il BPM (Battiti Al Minuto o Tempi) sia lo stesso, ma il ritmo delle percussioni non corrisponda, sarà necessario modificare temporaneamente il pitch. La figura sottostante illustra come abbinare il beat del PLAYER 2 a quello della musica riprodotta sul PLAYER 1.
-
Page 23: Inhalt Der Verpackung
Kurzanleitung Broschüre mit den Sicherheits- und Garantierichtlinien REGISTRIERUNG Registrieren Sie Ihren MP302 bitte auf http://www.numark.de. Dadurch geben Sie uns die Möglichkeit, Ihnen Informationen bei Produktaktualisierungen zukommen zu lassen und Ihnen bei möglichen Problemen den bestmöglichen technischen Support zu bieten. GRUNDREGELN Vorderseite der Anleitung abgebildeten Bestandteile im Karton befinden. -
Page 24: Übersicht Über Die Rückseite
ÜBERSICHT ÜBER DIE RÜCKSEITE ANSCHLUSS FÜR KONTROLLKABEL – Schliessen Sie das beigefügte 8-polige Kabel hier an, um die Fernbedienungseinheit und die CD-Haupteinheit miteinander zu verkabeln ANSCHLUSS FÜR IEC-GENORMTEN NETZSTECKER – Schliessen Sie hier das mitgelieferte Stromkabel an. SPANNUNGSUMSCHALETER – Stellen Sie diesen Schalter auf die für Ihren Aufenthaltsort richtige Stromspannung ein. RCA-TONANSCHLÜSSE –... - Page 25 Diese Funktion steht nur bei CDs ohne Ordnern zur Verfügung. Die MP302 Ordnersuche ist leicht zu bedienen. 1. Legen Sie eine MP3 CD, die Ordner enthält, in eine Seite des MP302 ein. 2. Wenn die CD fertig eingelesen wurde, ändert sich das LCD Displayanzeige von “READ” auf den Namen des Ordners.
- Page 26 PLAY / PAUSE & CUE FUNKTIONEN PLAY & CUE Drücken “PLAY/PAUSE”-Taste startet die Disc. Wird die “CUE”- Taste gedrückt, wird die Disc letzten Anfangspunkt zurückgesetzt. Dies ist der Cue-Punkt. Abwechselndes Drücken Tasten “PLAY/PAUSE” “CUE” führt zum beliebig oftmaligen Abspielen der CD, angefangen von derselben Position. Diese Funktion wird Rück-Cue genannt. PLAY, PAUSE &...
- Page 27 ANPASSUNG DES TAKTS DURCH DIE TONLAGENVERÄNDERUNG Falls Sie entdecken, daß die TPMs (Takte pro Minute oder das Tempo) zwar gleich sind, doch die Trommelschläge nicht übereinstimmen, müssen Sie vorübergehend die Tonlage verändern. Die folgende Abbildung zeigt Ihnen, wie man den Takt von SPIELER 2 mit dem Takt der Musik, welche auf SPIELER 1 abgespielt wird, in Einklang bringt.
-
Page 28: Specifications
SPECIFICATIONS DIMENSIONS: Main Unit: 482 x 88.8 x 262 (mm) (W x H x D) Control Unit: 482 x 88.8 x 97 (mm) WEIGHT: Main Unit: 4.9 Kg Control Unit: 1.5 Kg POWER SOURCE: AC 115/230 V, 50/60 Hz, 23 W AUDIO CHARACTERISTICS Typical Limit...
Need help?
Do you have a question about the MP302 and is the answer not in the manual?
Questions and answers