Table of Contents
Advertisement
Advertisement
Table of Contents

Related Manuals for Callaway Golf UPRO GO


Summary of Contents for Callaway Golf UPRO GO
- Page 1 CALLAWAY UPRO GO GOLF GPS USER GUIDE (V1.2) © 2010 CALLAWAY GOLF COMPANY...
-
Page 2: Table Of Contents
1 GETTING STARTED WITH THE CALLAWAY UPRO GO....................3 1.1 CALLAWAY UPRO GO OVERVIEW......................1.2 SYSTEM REQUIREMENTS..........................1.3 CHARGING THE CALLAWAY UPRO GO......................5 1.4 PRE LOADED COURSES ON YOUR CALLAWAY UPRO GO............... 1.5 CONNECTING YOUR CALLAWAY UPRO GO....................6 1.6 REGISTERING YOUR UPRO GO........................ 1.7 SEARCHING FOR COURSES........................ -
Page 3: Getting Started With The Callaway Upro Go
1 Getting Started with the Callaway uPro Go 1.1 Callaway uPro Go Overview This section provides a brief overview of the location and functionality of the inputs and outputs you will use to enable the full capability of your uPro Go. -
Page 4: Charging The Callaway Upro Go
1.4 Pre Loaded Courses on your Callaway uPro Go Your uPro Go is pre loaded with thousand of courses from our course database and is ready for you to go play! You don’t have to register your uPro Go to play your first round. But we do recommend that you register your uPro Go after you have played your first round to optimize your device. - Page 5 1.1.3 Other Inputs and Outputs LED - The uPro Go has one LED light. This LED light provides status indications. The blue LED flashes when the uPro Go is in normal operation. The red LED indicates that the device is charging. A flashing red LCD indicates that charging is complete.
-
Page 6: Connecting Your Callaway Upro Go
Step 1: Power on the uPro Go Press and hold the power button for 3 seconds to power on the uPro Go. The device is powered on when the boot up screen appears. After the device is done booting up, the Main Menu will be displayed. - Page 7 Once connected, the program launcher will automatically start. The uPro sync program should already be highlighted as shown in Figure 5. Clicking “OK” will start the sync program and the uPro Go website login or registration page will launch. Figure 5: Windows Program Launcher - Autorun Callaway uPro Go ©...
- Page 8 “Save” or “Run”. We recommend you save the uPro Finder to your desktop for future use. . Each time you want to connect your uPro Go to the website for updates, you will be able to double click the uPro icon on your desktop to launch the sync program.
- Page 9 Go the Windows Start Menu, click “My Computer”. Locate the uPro Go icon in your “My Computer” folder Right click on the uPro Go icon, a drop down menu should appear that will give you the option to “Sync uPro De- vice”...
- Page 10 Finder. Click “Download”. You will be given the option to either “Save” or “Run”. We recommend you save the uPro Finder to your desktop for future use. Each time you want to connect your uPro Go to the website for updates, you will be able to double click the uPro icon on your desktop to launch the sync program.
- Page 11 Windows 2000 If you are running Windows 2000, the sync program will not automatically run after the uPro Go is connected to the PC. You can launch the sync program directly from the device. Sync Launch From Device 1. From your desktop, double click the “My Computer” icon.
- Page 12 Mac 10.4 or above If you are using a Mac, once you have powered on your uPro Go and it has mounted to the computer, you should see a removable disk icon labeled uPro Go, Figure 10. You will need to start the sync program directly from the device.
-
Page 13: Registering Your Upro Go
Go Registration Once the uPro Go sync application has started it will launch the uPro Go website and take you to step 1 of 5 to complete registration. After the registration is complete you will be able to check for course updates and sync your uPro Go. - Page 14 Step 4: Download the uPro Go Finder If you have not already downloaded the uPro Go Finder we recommend that you do so now. The uPro Go Finder makes it easy to launch the sync program and website when you need to update your uPro Go. Simply double click the uPro icon on your desktop once you have connected your uPro Go to your computer.
-
Page 15: Searching For Courses
Your registration is now complete. You will need to sync your device to remove the registration warnings on your device. You can also search the course finder to see if the courses you play are already pre loaded on your uPro Go. Find cours- es is covered in the next section, section 1.7 Searching for Courses. - Page 16 Once you have located the course and/or courses in your search results, you will then be able to identify if the course is pre loaded and current on your uPro Go, if it’s pre loaded and has an update, is not on your uPro Go, or is not mapped.
-
Page 17: Syncing Your Callaway Upro Go
1.8 Syncing your Callaway uPro Go Once you are ready to sync, go to the My uPro Go page. You can access this page, by clicking My uPro Go in the left side navigation. Once you are on this page, you can manage which regions you would like to update on your uPro. - Page 18 Available Regions Figure 23 The available regions section gives you a list of all regions that are available for your uPro Go. You have the ability to pick and choose which regions you would like up to update. The United States has all 50 states plus the District of Columbia broken out into individual regions to make the sync time shorter for the states.
- Page 19 Go during sync. You can also update device preferences on your device. Once the sync has started your uPro Go page will reflect a syncing status, Figure 24. This will continue to update through the sync process and provide updates as it continues to sync.
- Page 20 At this time you can now disconnect your device from your computer. The screen on the uPro Go will prompt you to power your uPro Go off. After you power your uPro Go back on, you will be able to access the updated and new courses on your uPro Go.
-
Page 21: Watching The Introductory Video
Figure 27: Sync Complete Messages 1.9 Watching the Introductory Video The uPro Go contains an introductory video that demonstrates the basic functionality of the device in video form on the device. The video can be viewed by following the steps listed below. -
Page 22: Playing Golf With Your Callaway Upro Go
2 Playing Golf with Your Callaway uPro Go 2.1 Powering On/Off The uPro Go’s Power/Menu button is used to power the device on and off. Turn on the uPro Go by pressing and holding the power button for three seconds while the device is powered off. - Page 23 For instructions on changing holes, see section 2.7. While in the course list, the Left LCD select “View All” will allow you to view all the courses that are loaded on the uPro Go.
- Page 24 Courses that were not properly received on the device or contain invalid data will display an error message in the Course Select list. You will need to connect you uPro go and re-sync. For questions, regarding connecting and syncing your uPro Go see Section 1.5 and 1.8 Callaway uPro Go ©...
-
Page 25: Basicmode
2.4 Basic Mode The uPro Go contains a mode called Basic Mode. This is the mode that is pre loaded and free of charge on your uPro Go. BasicMode gives distances to the green center, front, and back as well as all hazards. BasicMode consists of two views, Green View and Hazard View. - Page 26 In BasicMode and GoMode, there are several indicators that provide status during play. These indicators provide the time, battery level, and satellite signal strength as shown in Figure 38. Figure 38: On Screen Indicators Callaway uPro Go © 2009 Callaway Golf Company Page 26 of 37 User Guide V 1.2...
-
Page 27: Gomode
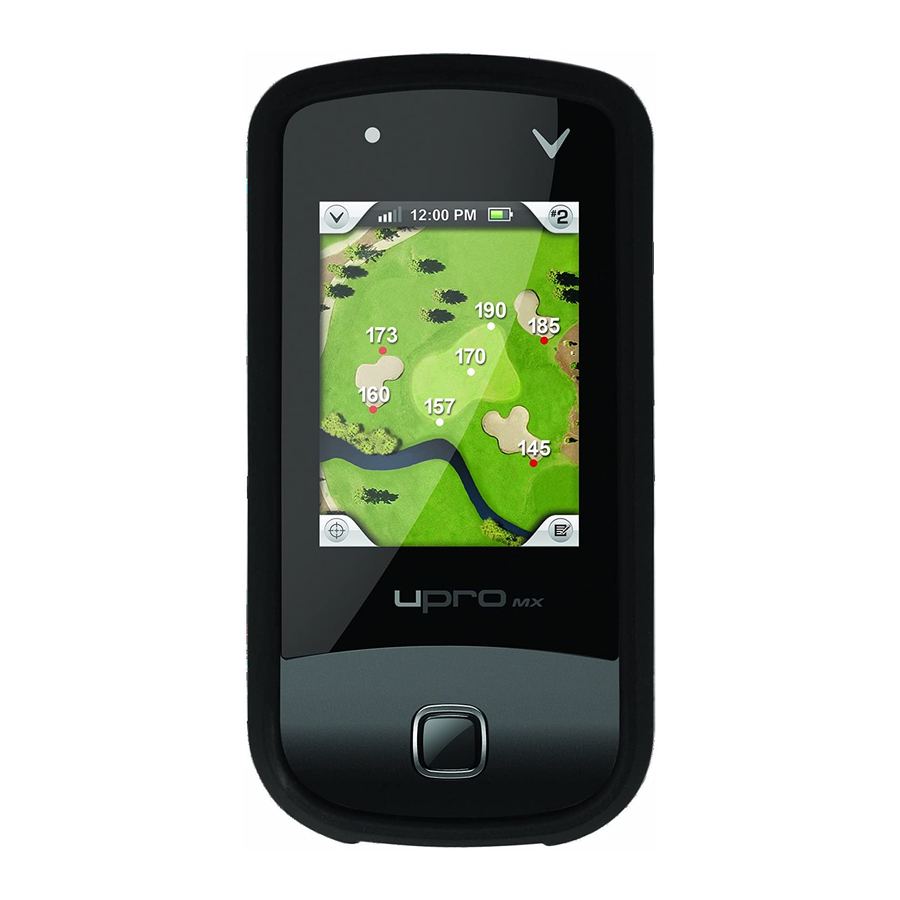
2.5.1 Virtual Green View Upon entering GoMode, the uPro Go dynamically generates a rendered view of the green with the distances super im- posed on the rendering. The surrounding area and bunkers are also included in the rendering. Virtual Green View gives you a detailed view of the green that maintains proportions, size, distance, and accuracy. - Page 28 Red Dots indicate that the corresponding distance being displayed is a reading from bunker or other feature on the golf course. White Dots indicates that the corresponding distance being displayed is a reading from the green, either center, front, or back. Callaway uPro Go © 2009 Callaway Golf Company Page 28 of 37 User Guide V 1.2...
-
Page 29: Changing Holes
2.6 Changing Holes The uPro Go automatically prompts you to go to the next hole at the appropriate times during the round by default. If you would like to disable this feature you can by modifying your Go Preferences from the Settings Menu. Access the hole advance settings by selecting Go Preferences and then Hole Advance from the Settings Menu. - Page 30 2.6.1 Changing to a Different Hole with the Auto Hole Prompt When the uPro Go determines that you are on a different hole than the one you were previously playing, by default you will receive a hole change prompt asking you wether you would like to play the next hole. The UP and DOWN arrows can be used from this prompt to select any hole that you would like as shown in the figure below.
-
Page 31: Callaway Upro Go Settings Menu
3 Callaway uPro Go Settings Menu The uPro Go has several settings that can be configured for your uPro Go uniquely. All of these options are enabled through the settings menu. The settings menu can be selected from the Main Menu. Using the joystick navigate to the right until you locate Settings, press enter. -
Page 32: Device Settings
3.1 Device Settings Selecting Device Settings from the Settings Menu gives you the ability to alter some of the functionality of the uPro Go and to enable additional functionality. 3.1.1 Backlight Selecting this option allows you to alter the nominal intensity of the backlight. The backlight is normally adjusted dynami- cally based on the amount of ambient light present to give you the best view ability possible. -
Page 33: Factory Defaults
This option allows to you to select what the device will do once it’s connected to a computer. If you enable this feature, when you connect your uPro Go to a computer it will give you an option to either connect to PC or Charge Only. Figure 45 Figure 45: USB Connect Option Screen This option is useful if you want to still use the device while it is charging. -
Page 34: Device Preferences
2.6 for the different hole advance options. Hole Entry Mode - Normally, the uPro Go takes you into BasicMode first at the start of each hole. This option allows you to alter this functionality to enter GoMode at the start of each hole. GoMode does need to be enabled for the GoMode to display. -
Page 35: Info Screen
4 Preview Mode The uPro Go contains a mode of operation that allows you to simulate playing any pre loaded course while away from the course. This mode enables all of the functionality within BasicMode and GoMode. GoMode does need to be enabled for all courses to view it for any course. -
Page 36: Compliance
5 Compliance 5.1 FCC Statement (USA) Callaway uPRO GO GOLF GPS - # 5909254 Callaway Golf Company Corporate Address: 2180 Rutherford Road, Carlsbad, CA 92008 Phone number: 1.888.358.5788 http://www.uprogps.com FCC Class B Part 15 This device complies with Part 15 of the FCC Rules. Operation is subject to the following two conditions: (1) this device may not cause harmful interference, and (2) this device must accept any interference received, including interference that may cause undesired operation. -
Page 37: Battery Information And Warning
Batteries should not be discarded in the normal waste stream, local/regional systems exist to dispose of the batteries. As an end user/consumer you contribute by ensuring that the battery is disposed of properly. Callaway uPro Go © 2009 Callaway Golf Company Page 37 of 37 User Guide V 1.2...
Need help?
Do you have a question about the UPRO GO and is the answer not in the manual?
Questions and answers