
Related Manuals for Callaway Golf UPRO MX


Summary of Contents for Callaway Golf UPRO MX
- Page 1 ® Callaway UPRO MX Golf GPS User Guide (v1.0) - abridged ©2011 Callaway Golf Company...
-
Page 2: Table Of Contents
Table of Contents GETTING STARTED WITH THE CALLAWAY UPRO MX................3 UPRO® MX O ......................3 ALLAWAY VERVIEW UPRO MX ......................6 HARGING THE ALLAWAY PLAYING GOLF WITH YOUR UPRO® MX ....................7 ............................ 7 OWERING ..............................7 UPRO® MX .................... 8 LAYING ............................. -
Page 3: Getting Started With The Callaway Upro Mx
1 Getting Started with the Callaway UPRO MX 1.1 Callaway UPRO® MX Overview This section provides a brief overview of the location and functionality of the inputs and outputs you will use to enable the full capability of your upro mx Device uPro User Guide (v1.5) ©2011 Callaway Golf Company ... -
Page 4: Touch Screen
Touch Screen – The upro mx has an extremely precise, simple-to-use capacitive touch screen to ensure quick and easy operation of your new device. You will use this powerful feature to perform nearly every function on your new device. See Section 2 – Playing Golf with your upro mx for more information Supported Gestures: ... -
Page 5: Charging The
Optical Finger Navigation (OFN) – The upro mx has a state-of-the-art Optical Finger Navigation button which offers the user a powerful, flexible, and extremely precise method of navigating through the upro mx user interface. You can use the OFN in the following scenarios: ... -
Page 6: Charging The Callaway Upro Mx
5) Connect the larger end of the USB cable to the included wall adapter. 6) Plug the wall adapter into an AC wall outlet. The upro mx’s red LED will be lit while charging. This LED will begin to flash when charging is completed. Charging the battery completely takes approximately 3 hours. -
Page 7: Playing Golf With Your Upro® Mx
2 Playing Golf with Your UPRO® MX 2.1 Powering On/Off The upro mx Power button is used to power the device on and off. Turn on the upro mx by pressing the power button for three seconds while the device is powered off. -
Page 8: Playing Golf With Your New Upro® Mx
2.3 Playing Golf With Your New UPRO® MX Your new upro mx device comes pre-loaded with over 25,000 courses, as well as the ability to download and use actual aerial imagery to play in ProMode®. This section will provide you all the information you need to enjoy the use of your upro mx. - Page 9 2.4.2 Navigating Through Lists Whenever you have a list of items on your upro mx, you can scroll through the list by swiping the list up or down. In Figure 5 below, if you wish to scroll down, you simply touch the screen near the bottom (do not touch the corners) and drag your finger upwards along the screen.
-
Page 10: Basicmode
If your upro mx has achieved satellite lock, you will automatically be provided with a list of nearby golf courses, with the distance to the course listed to the right. - Page 11 Figure 6a: BasicMode Figure 6b: Basic Mode Green View Hazard View 2.5.2 Hazard View The Hazard View (Figure 6b) displays distances to each hazard as well as the distance to clear each hazard or object on the course. There is no limit to the number of hazards that can be displayed in the Hazard View and the hazards are displayed in order of proximity to your current location.
-
Page 12: Signal Strength
Figure 7: Shot Tracking Options 2.5.4 On-Screen Indicators In BasicMode, there are several indicators that provide status during play. These indicators provide the time, battery level and satellite signal strength as shown below in Figure 8. Signal Strength Time Battery Level Figure 8: Basic Mode Indicators upro mx User Guide (v1.0) ... -
Page 13: Gomode
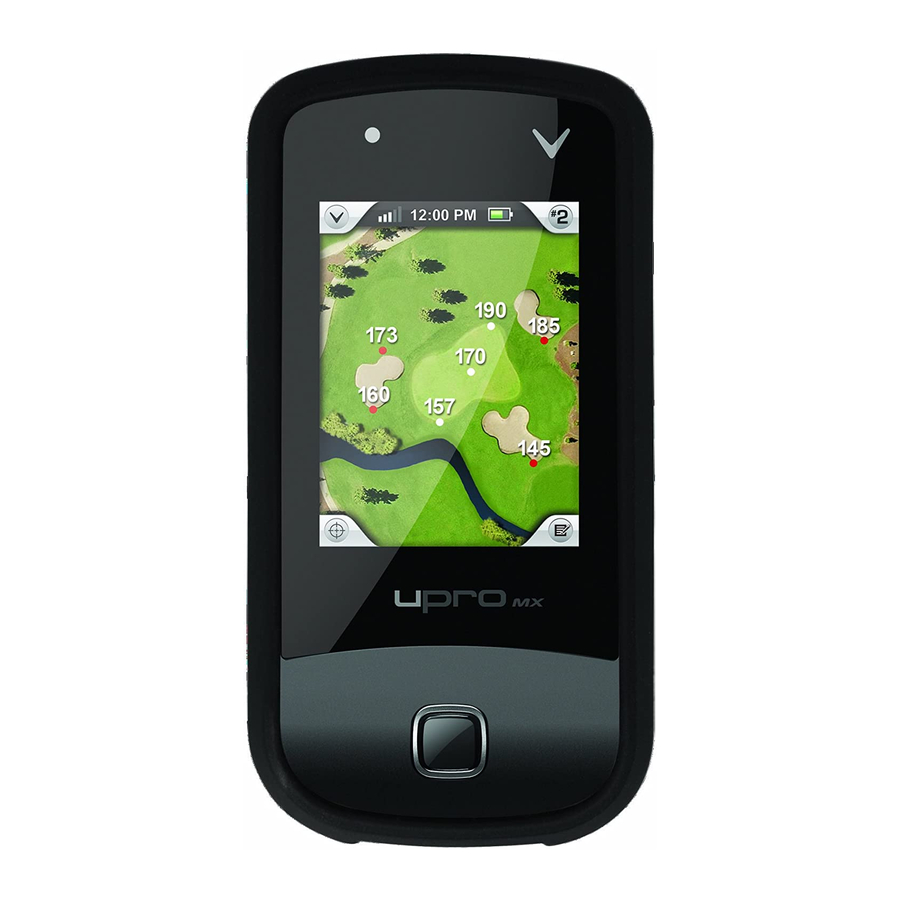
2.6 GoMode® In addition to BasicMode, your new upro mx comes with the ability to utilize our powerful GoMode® option to enhance your understanding of your approach shots. By clicking on the Mode button on the right hand side of the device while in BasicMode, you will toggle between these BasicMode and GoMode®. - Page 14 Figure 9a: Fairway SmartView Figure 9b: Green SmartView The distances are constantly updating while in ProMode as your position changes. Additionally, the uPro identifies your current position on the image of the course by displaying a red diamond character. As your position changes, the uPro will continually update your position on the image as well.
- Page 15 Indicates corresponding distance being displayed is a reading from the White green, either center, front or back. Indicates corresponding distance being displayed is a reading from a bunker or other feature on the golf course. Indicates that a distance would normally be displayed for this precise location but is currently hidden due to lack of space on the screen to Yellow display this distance.
-
Page 16: Shot Tracking
2.9 Score Keeping You can keep your score, and the score of up to 3 playing partners with your upro mx. After clicking Play Golf, and selecting the course you want to play, you will be prompted to select your stats settings. - Page 17 Figure 12: Scorecard From this screen, tap the cell you wish to edit to enter your score, fairways hit, greens in regulation, and putts. To exit the scorecard, click the red X, or turn the upro mx upright. uPro User Guide (v1.5) ©2011 Callaway Golf Company ...
-
Page 18: Round Reviews
2.10 Round Reviews This feature allows you to review the scorecard from a previous round. You can edit the scorecard if there are changes to make. Note: If you have already uploaded the scorecard to www.callawayuxplore.com, you will not be able to edit the scorecard on your device. -
Page 19: Settings Menu
3 Settings Menu The uPro has several settings that can be configured for your upro mx. From the Main Menu, tap the settings icon to reach the Settings Menu as pictured in Figure 14 below. Figure 14: Settings Menu 3.1 Device Settings Selecting Device Settings from the Settings Menu gives you the ability to alter some of the functionality of the uPro and to enable additional functionality. -
Page 20: General Settings
This is informational only, and provides the status of various sensors on your upro mx. 3.1.5 UTRACK Your upro mx comes equipped to support exciting new technologies that will be introduced in the future. 3.1.6 Statistics This menu allows you to set your preferences regarding the use of the scorecard. -
Page 21: Preview Mode
4 Preview Mode The uPro contains a patent-pending mode of operation that allows you to simulate playing any downloaded golf course while away from the course. This mode enables all of the functionality within BasicMode and ProMode®. 4.1 Enabling Preview Mode The uPro’s Preview Mode is enabled by selecting the Preview option from Main Menu. -
Page 22: Compliance
5 Compliance 5.1 FCC Statement (USA) Callaway uPRO MX GOLF GPS - # 5911016 Callaway Golf Company Corporate Address: 2180 Rutherford Road, Carlsbad, CA 92008 Phone number: 1.888.358.5788 http://www.uprogps.com FCC Class B Part 15 This device complies with Part 15 of the FCC Rules. Operation is subject to the following two conditions: (1) this device may not cause harmful interference, and (2) this device must accept any interference received, including interference that may cause undesired operation. -
Page 23: Industry Canada Standard (Canada 310)
5.2 Industry Canada Standard (Canada 310) This Category II radio communication device complies with Industry Canada Standard RSS-310. Operation is subject to the following two conditions: (1) this device may not cause interference, and (2) this device must accept any interference, including interference that may cause undesired operation of the device. Ce dispositif de radiocommunication de catégorie II respecte la norme CNR-310 d'Industrie Canada. - Page 24 An improperly disposed battery could be short-circuited by metal parts of other objects and result in a fire or explosion. Cover the exposed battery terminals with electrician’s tape prior to disposal. Do not use the battery if it appears to be damaged, deformed or discolored or if it leaks or emits unusual odors.
Need help?
Do you have a question about the UPRO MX and is the answer not in the manual?
Questions and answers