Table of Contents
Advertisement
Quick Links
Advertisement
Table of Contents

Related Manuals for Sirius Satellite Radio Starmate 7


Summary of Contents for Sirius Satellite Radio Starmate 7
- Page 1 User Guide Starmate 7 SIRIUS Radio...
- Page 3 ® Your new SIRIUS Starmate 7 Radio comes with everything you need to enjoy SIRIUS ® your car. And with available SIRIUS accessories you can use your Starmate 7 just about anywhere. Your new Starmate 7 gives you powerful features: >>...
-
Page 4: Table Of Contents
Table of Contents Table of Contents Warning & Safety Information Canadian Compliance General Precautions Warnings Copyrights & Trademarks Package Contents Vehicle Installation Installing the PowerConnect Vehicle Dock Installing the Magnetic Antenna Connecting the PowerConnect Power Adapter Connecting the Audio Subscribing to the SIRIUS Service Controls Remote Control Buttons PowerConnect Vehicle Dock Reference Guide... - Page 5 Channel Presets (B Button) ) and Song Seek (S-Seek) Functions Memory (M Jump Button FM Presets Button Menu Options Sirius ID FM Transmitter Settings Parental Control Time Based Features Signal Indicator Factory Default Troubleshooting Specifications SIRIUS ID Table of Contents...
-
Page 6: Warning & Safety Information
Warning & Safety Information Warning Changes or modifications not expressly approved by the manufacturer could void the user’s authority to operate the equipment. Canadian Compliance This Class B digital apparatus complies with Canadian ICES-003. IC STATEMENT Operation is subject to the following two conditions: (1) this device may not cause inter- ference, and (2) this device must accept any interference, including interference that may cause undesired operation of the device. -
Page 7: General Precautions
Be sure to observe the following warnings. Failure to follow these safety in- structions and warnings may result in a serious accident. • Do not operate your Starmate 7 in a way that might divert your attention from driving safely. As a driver, you alone are responsible for safely operating your vehicle in accordance with traffic safety laws at all times. - Page 8 • Do not drop the radio or subject it to strong shocks. • If your Starmate 7 doesn’t seem to be working properly, turn it off, wait 10 seconds and then turn it on again.
-
Page 9: Warnings
Warnings Operating Temperature The radio is designed to operate between -20° to +85° C (-4° to +185° F). Avoid leaving the radio in a vehicle or elsewhere where the temperature may fall outside this range. Extreme temperatures or extreme temperature fluctuations can degrade the performance of the LCD display screen, and possibly damage it. -
Page 10: Copyrights & Trademarks
Portions of the software on this radio are licensed under the eCos License. Distribution of eCos requires that the eCos source code be made available to SIRIUS Satellite Radio customers. The eCos License and eCos source code are available to the public at http://www.sirius.com/ecoslicense. -
Page 11: Package Contents
Package Contents The following items are included with your SIRIUS Starmate 7 radio: Remote Control Starmate 7 Radio PowerConnect Vehicle Dock Aux In Cable Package Contents... - Page 12 Suction Cup Mount Vent Mount & PowerConnect Power Extended Vent Hooks Adapter Antenna Mounting Screws Alcohol Swab Magnetic Antenna Cover/Tail Package Contents...
- Page 13 Unpack your Starmate 7 radio carefully and make sure that everything shown is pres- ent. If anything is missing or damaged, or if your Starmate 7 fails to operate, notify your dealer immediately. We recommended that you retain the original carton and packing materials in case you need to ship your radio in the future.
-
Page 14: Vehicle Installation
Vehicle Installation Installing the PowerConnect Vehicle Dock When installing the PowerConnect Vehicle Dock in your vehicle, choose a location in your vehicle where it will not block your vision, interfere with the vehicle controls, or obstruct the air bag. The location should be easily accessible and provide good visibility of the display, and should not be located where it will be in direct sunlight which will affect the visibility of the display screen. - Page 15 Figure 1 Depending upon the mounting location you select in your vehicle, the mount should be attached to the dock and installed as described in the following sections. Installation...
- Page 16 Suction Cup Mount Method (A) The suction cup mount may be attached to any smooth surface. Before attaching the suction cup mount to your windshield, you should check your state and local laws for regulations regarding mounting this device on your windshield. Attach Dock to Mount with Included Screws...
- Page 17 3. Be sure the cam lever is up (as shown in Figure 3 ) and position the suction cup mount on the windshield or other location you which have chosen. Press the cam lever all the way down towards the base of the mount until it locks to adhere the suction cup. (To unlock the suction cup, lift the lever up.) Press Lever Down To...
- Page 18 Vent Mount Method (B) To mount the dock using the vent mount method, install the vent mount as follows: 1. If the vent louvers in your vehicle are recessed, you may need to use the longer vent hooks with the vent mount. Refer to Figure 4 and install the longer vent hooks into the vent mount.
- Page 19 3. Refer to Figure 6 and attach the vent mount to a heating/air conditioning vent in your vehicle. Position the two tension springs against a vent louver B. Then push the vent mount into the vent, far enough so that the hooks drop down and hook the rear of the vent louver (see Figure 7 ).
- Page 20 4. You can change the angle of the dock by changing the position of foot on the vent mount to a different adjustment hole (see Figure 8 ). ADJUSTMENT HOLES Figure 8 Installation...
-
Page 21: Installing The Magnetic Antenna
Installing the Magnetic Antenna Caution Because adhesive is used in the installation of the Rubber Antenna Cover/Tail, we recommend that you install the antenna at or above room temperature (68° F). The adhesive on the Rubber Cover/Tail may not adhere properly to the vehicle roof at temperatures lower than this. -
Page 22: Antenna Mounting
Antenna Mounting The SIRIUS Magnetic Mount Vehicle Antenna has a strong magnetic mount designed to hold it in place during normal driving conditions (highway/city). This also makes the antenna easy to remove for transferring it to other vehicles. Figure 9 shows the optimal mounting location for the antenna on several types of vehicles. - Page 23 The SIRIUS antenna needs to have an unobstructed area of 3 inches by 3 inches around it. It is important to mount the antenna where no obstructions will block the antenna from receiving the SIRIUS signal. Objects which can obstruct the antenna could be a roof rack, a sunroof, a roof-mounted cargo container, another antenna, etc.
-
Page 24: Cable Routing
4. Peel the protective material from the adhesive strips (see Figure 10 , on page 23) and press the rubber Cover/Tail firmly into place on the vehicle. 5. Double check that the location of the antenna and rubber cover/tail are correct, and continue to press firmly down on the Rubber Cover/Tail for another 30 seconds. - Page 25 Sedan/Coupe Antenna Cable Routing Procedure Figure 11 shows how the antenna cable should be routed from the antenna to your Starmate 7 in a sedan/coupe. 1. Feed Cable Under 6. Bring Cable Out To Rubber Molding SIRIUS Receiver Around Window Location 2.
- Page 26 2. Route the antenna cable out of the window molding and into the rubber weather stripping around the trunk opening. Lift the weather stripping from the opening and tuck the cable inside it, then replace the weather stripping. To avoid sharp bends in the cable, run the cable inside of the weather stripping for a few inches, then remove the cable from the weather stripping inside of the trunk.
- Page 27 Pickup Truck Antenna Cable Routing Procedure Figure 12 shows how the antenna cable should be routed from the antenna to your Starmate 7 in a pickup truck. NTENNA 1. Route Cable Under Rubber Molding Around Windshield 2. Continue Tucking Cable...
- Page 28 Vehicle Dock. SUV/Mini-Van Antenna Cable Routing Procedure Figure 13 (oppposite) shows how the antenna cable should be routed from the antenna to your Starmate 7 in an SUV or a Mini-Van. Installation...
- Page 29 1. Feed Cable Under 4. Bring Cable Out To Rubber Seal Around SIRIUS Receiver Hatch Opening Location NTENNA 3. Route Cable Under Carpet to Dashboard 2. Route Cable Under Interior Trim, into Cabin and Towards Front of Vehicle Figure 13 Follow these detailed cable installation instructions: 1.
- Page 30 Vehicle Dock. Convertible Antenna Cable Routing Procedure Figure 14 shows how the antenna cable should be routed from the antenna to your Starmate 7 in a convertible. 6. Bring Cable Out To SIRIUS Receiver Location 1.
- Page 31 Follow these detailed cable installation instructions: 1. Bring the cable from the antenna into the trunk at the front edge of the trunk lid. Keep any bends in the cable loose. Tape or tie the cable along the inside of the trunk lid to the trunk lid hinge strut.
- Page 32 Antenna Installation Tips The following DO NOT antenna mounting tips illustrate how to install the antenna for optimal performance, and also illustrate where the antenna should not be installed. Mount the antenna on the roof, at least 3 inches from the edge.
- Page 33 3” Mount the antenna on the roof where it has at least 3 inches of clear space around it. Use the supplied Rubber Tail Cover to protect the antenna cable. Installation...
- Page 34 Don’t mount the antenna inside the vehicle, for example, on the dashboard. Don’t mount the antenna on any of the vehicle’s front, back or side pillars. Installation...
- Page 35 Don’t mount the antenna close to a roof rack. Adjust the rack so it’s further away from the antenna or move the antenna closer to the center of the roof. Don’t mount the antenna close to another antenna. Mount it at least 3 inches away.
- Page 36 Don’t mount the antenna closer than 3 inches from the edge of the roof. Use the supplied rubber tail/cover as a guide for judging proper length and correct positioning. After you’ve routed the cable to the PowerConnect Vehicle Dock, connect the antenna cable to the a connection on the left side of the PowerConnect Vehicle Dock.
-
Page 37: Connecting The Powerconnect Power Adapter
Power Outlet AUDIO Figure 16 Important: Do not power the PowerConnect Vehicle Dock directly from your vehicle’s 12VDC power system without using the PowerConnect Power Adapter. Doing so could damage the PowerConnect Vehicle Dock, your Starmate 7 or both. Installation... -
Page 38: Connecting The Audio
Cassette Adapters are sold separately and can be purchased from an electronics retailer, or go to shop. sirius.ca/accessories. • Option 3: Good: Use the PowerConnect feature in the Starmate 7. PowerConnect plays the audio through your vehicle’s FM radio. • Option 4: Best: Use the FM Direct Adapter. - Page 39 AUDIO Figure 17 3. Insert your Starmate 7 into the dock, aligning the radio against the rear of the dock so that the rails on the dock fit into the mounting slots in the back of the radio (see Figure 18 ).
- Page 40 8. You should hear SIRIUS channel 184 through your vehicle’s stereo system. You are now ready to activate your Starmate 7. 9. The audio level output of the Starmate 7 can be increased or decreased as neces- sary to match the audio levels of other sources in your vehicle. Refer to “Audio Level”...
- Page 41 AUDIO order to do so. 3. Insert your Starmate 7 into the dock, aligning the radio against the rear of the dock so that the rails on the dock Figure 21...
- Page 42 8. You should hear SIRIUS channel 184 through your vehicle’s stereo system. You are now ready to activate your Starmate 7. 9. The audio level output of the Starmate 7 can be increased or decreased as neces- sary to match the audio levels of other sources in your vehicle. Refer to “Audio Level”...
- Page 43 Option 3: PowerConnect Installation Instructions 1. Insert your Starmate 7 into the dock, aligning the radio against the rear of the dock so that the rails on the dock fit into the mounting slots in the back of the radio (see Figure 25 ).
- Page 44 FM channel that has only static or silence on it, until you reach 107.9. 5. Ensure that the Starmate 7 is tuned to channel 184. Upon power up, the Starmate 7 should tune to channel 184 by default, when it’s not yet activated. If it’s not on channel 184, refer to “Operation”...
- Page 45 The FM channel you selected will be con- firmed on the display screen (see Figure ). The Starmate 7 will tune to the FM Figure 31 channel. 8. You should hear SIRIUS channel 184 through your vehicle’s FM radio. If you are satisfied with the sound quality, you’re done! You are now ready to activate your...
- Page 46 (steps 6 & 7). Also ensure the chosen FM channel is a suitable one to use in your area (step 4). Verify that nothing is plugged into the AUDIO connector on the PowerConnect Vehicle Dock. Refer to “Troubleshooting” on page 91 for additional help. Installation...
-
Page 47: Subscribing To The Sirius Service
6. When you have successfully subscribed to the SIRIUS service an alert will be displayed (see Figure 35 ). To continue, press any button on the front panel. You are now ready to begin enjoying SIRIUS Satellite Radio’s digital entertainment, and can tune to other channels! -
Page 48: Controls
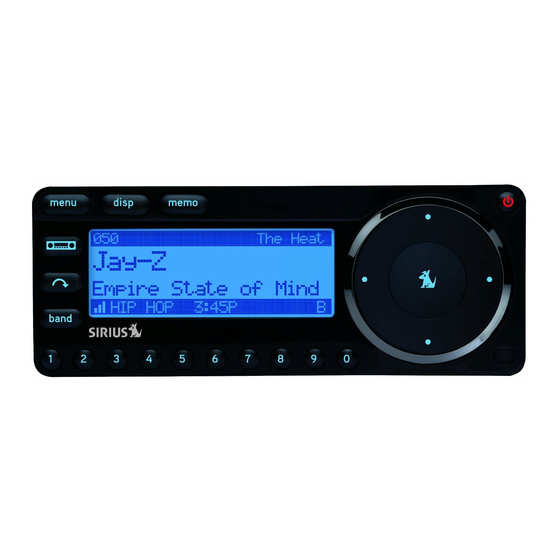
Controls Starmate 7 Front Panel Figure 36 and the section following identify and describe your Starmate 7’s buttons and controls. Figure 36 Menu Button: Accesses Menu options to make setup and feature changes. Display (D ) Button: Toggles the Default display screen between the normal display mode and large text display mode (see page 57). - Page 49 Quickly switches between the current channel and a favourite (or frequently-accessed) channel. FM Presets Button: Selects between different preset frequencies used by the built-in wireless FM transmitter. LCD Display Screen: Provides information about the Starmate 7’s operation, the program that is playing and other programming that is available. Controls...
-
Page 50: Remote Control Buttons
Figure 37 and the section following identify the remote control’s buttons. Figure 37 Power Button: Turns the Starmate 7 On and Off. Select Button: Selects items highlighted in a list; hold-down to jump to the previously- received channel. When not in a menu or list, pressing the Select button selects the channel entered using the number buttons. - Page 51 FM Presets Button: Selects between the different FM preset frequencies used by the Starmate 7’s built-in internal FM transmitter. Menu Button: Accesses the Menu Options to make setup and feature changes. Band Button: Pressing and releasing this button switches between the preset banks A, B, and C, which hold 10 presets each for a total of 30.
-
Page 52: Remote Control Battery Installation
Remote Control Battery Installation To install the remote control battery, turn the remote control over and locate the battery cover near the bottom edge. Open the battery compartment and place the battery in the compartment with the + side of the battery facing up. Replace the battery cover on the remote control. -
Page 53: Powerconnect Vehicle Dock Reference Guide
Audio output for directly connecting to your uDio vehicle’s audio system (see pages 39 & 41). Docking Rails: Fit-into slots in the back of the Starmate 7 to secure it while it is docked (see page 39). FM o Connector: FM output for use with the optional FM Direct Adapter (see page 43). -
Page 54: Operation
Operation Display Screen Information Your Starmate 7’s 5-line LCD display screen provides information about the operation of the radio, such as the currently-tuned channel, song or show being played, artist name, time and other information. This screen is referred to as the Default screen in this manual. -
Page 55: Changing Channels And Categories
Changing Channels and Categories Pressing the Channel UP or DOWN button will immediately tune to the next or previous subscribed channel. Pressing the Category LEFT or RIGHT button once will display a list of the subscribed channels in the current category, highlighting the currently-tuned channel (see Figure 41 ). - Page 56 • Channels that have been locked using the Parental Control feature (see page 80) will be displayed with a padlock icon next to the channel name. • If you try to tune to an unsubscribed channel the Starmate 7 will display a “Channel Unsubscribed” message.
-
Page 57: Display (D Isp ) Button
When the M screen is active, the Starmate 7 displays a listing of all your sub- hannels scribed channel numbers and names. Repeated momentary pressing and releasing of the Disp button will sequence the display between listings of artist names, song titles, and back to channel names (see Figure 44 ). -
Page 58: Selecting Channels Directly
Changing the Display Momentarily pressing the Disp button while the Default screen is displayed changes the artist name and song title to a scrolling, single-line, large-format display for easier viewing from a distance (see Figure 45 ). Figure 45 Selecting Channels Directly You can directly tune to any channel by entering the channel number using the 0 –... -
Page 59: Channel Presets (B And Button)
Channel Presets (B Button) You can store up to 30 of your favourite channels as presets for quick access with the press of a button. Storing Channel Presets Presets are stored in three banks (A, B and C), each containing ten channel presets: 1. -
Page 60: Recalling Channel Presets
The 10 presets in the active bank (A, B, or C) can be selected by pressing the 0 – 9 buttons. 1. Press the Band button to activate the preset bank you want. The selected bank is shown in the lower-right corner of the default display screen. The Starmate 7 will tune to the last-tuned preset in the selected bank. -
Page 61: Memory (M Emo ) And Song Seek (S-Seek) Functions
While the My Presets screen is active, pressing the Disp button will cycle the channel information on the screen between channel names, artist names, composer names (if available) and song title (see Figure 49 ). Figure 49 To exit the My presets screen and return to Default display screen, press and hold the Band button for 1½... - Page 62 7 on you will be alerted if your sports team/car are playing/racing in a game/race being broadcast. Also, you will be alerted should your team/car begin playing/racing while you’re listening to your Starmate 7. Storing Artist Names, Song Titles, and Sports Teams to Memory...
- Page 63 2. For Sports Teams: If the currently-tuned channel is a sports broadcast, momentarily press and release the Memo button. The Starmate 7 will display a menu to choose which sports team or NASCAR car should be saved to memory (see Figure 54 ).
- Page 64 Select button to save the current selection to memory. 3. To ensure that no duplicate entries are stored in memory, the Starmate 7 will check the stored memory list to ensure that the alert about to be stored is not already stored in memory.
- Page 65 Figure 58 Use the Channel UP/DOWN buttons to choose whether to replace an existing alert or cancel saving the alert to memory. If you cancel saving the alert, the radio will revert to the last active display mode. If you have chosen to replace an existing alert, a listing of all the alerts stored in memory will be displayed (see Figure 59 ).
-
Page 66: Viewing Stored Alerts Stored In Memory
Viewing Stored Alerts Stored in Memory To view all the alerts you have saved to memory, press and hold the Memo button for 1½ seconds to enter the S-Seek mode. The alerts stored in memory will be displayed one- at-a-time in page format (see Figure 61 ). Use the Channel UP/DOWN buttons to scroll through the listings. - Page 67 The screen will then revert to the last active display mode. Figure 63 When the S-Seek option is enabled, whenever the Starmate 7 is turned on, it automati- cally searches the incoming channels to determine if a match exists with the program information stored in the S-Seek memory.
- Page 68 The Starmate 7 then displays the sirius seek list screen, which displays a list of the current matches (see Figure 65 ). No alert is provided for the currently-tuned channel. Figure 65 Use the Channel UP/DOWN buttons to highlight the artist, song, or sports event that you wish to listen to, and then press the Select button to tune to it.
-
Page 69: Jump Button
Jump Button Your Starmate 7 has a special preset button called the Jump button that lets you quickly tune to a channel that you want to access frequently, such as a music channel or a sports channel. Pressing the Jump button ‘jumps’ to the specific channel you have pro- grammed into the Jump button;... -
Page 70: Fm Presets Button
FM Presets Button If you are using a wireless connection between your Starmate 7 and your vehicle’s audio system (see page 43), the FM Presets button makes it easy for you to select between the five different FM transmitter preset frequencies. It also makes it easy for you to select new FM transmitter preset frequencies without having to go through the Menu Options (see page 72). - Page 71 If you frequently travel to different areas, you can set the five FM presets to frequencies that are not being used by broadcasters in those areas. Note: You can display the FM Preset list at any time by pressing and holding the FM Presets button.
-
Page 72: Menu Options
Select button to select them. To exit a menu, press the Menu button. If you don’t make a selection within 10 seconds the Starmate 7 will exit the Menu options screen and revert to the last active display mode. You can exit any Menu Options screen by pressing the Menu button. -
Page 73: Fm Transmitter
FM Transmitter The fM transmitter menu option allows you to enable or disable the Starmate 7’s built-in FM transmitter, and select up to 5 different preset FM transmitter frequencies (see Figure 72 ). Figure 72 FM p resets You can set up to 5 preset FM transmitter frequencies: 1. -
Page 74: Settings
Menu button. FM o To turn the Starmate 7’s FM transmitter On or Off, highlight and select FM On/Off on the FM Transmitter screen (see Figure 72 , on page 73). The FM On/Off screen will appear (see Figure 74 ). -
Page 75: Display Options
Display Options You can adjust the brightness and contrast of the Starmate 7’s LCD display screen to improve its visibility in different lighting conditions (see Figure 76 ). Figure 76 Brightness adjusts the overall intensity of the LCD display to help with viewing in different lighting conditions. -
Page 76: Jump Settings
Jump Settings Jump Settings controls the actions of the Jump button (see Figure 78). You can also access the Jump Settings screen by pressing and holding the Jump button. Figure 78 Two Jump setting options are available, Traffic and Jump Set. The Jump icon indicates the currently-selected option. - Page 77 The selected channel is now assigned to the Jump button. Figure 80 Note: While listening to any channel, you can assign that channel to the Jump but- ton by simply pressing and holding the Jump button for 2 seconds. Menu Options...
-
Page 78: Memory Options
Memory Options Memory Options lets you turn the automatic S-Seek feature or OFF, and also pro- vides a way to clear (erase) all the stored S-Seek alerts from memory (see Figure 81 ). Figure 81 Auto Memory Search This lets you turn the S-Seek function or OFF. -
Page 79: Audio Level
Audio Level Use the Channel UP/DOWN buttons to adjust the Starmate 7’s audio output level (see Figure 84 ). The bar graph will indicate the change. Figure 84 Confirmation Tone The Starmate 7 will sound an audio alert tone when you power it or OFF, as well as when an S-Seek alert or other alert is activated. -
Page 80: Parental Control
Parental Control Your Starmate 7 has the ability to lock channels you do not want others (such as chil- dren) to access without your permission. Locked channels will not appear on the Chan- nel List screen, the Category List screen or when browsing channels with the Channel UP/DOWN buttons. - Page 81 Changing the Lock/Unlock Code The first time you access the lock/unlock menu, you must enter the default lock code. The default lock code is 0. You can keep this code or change it. To change the 0 0 0 lock code: 4.
-
Page 82: Time Based Features
(see Figure 89 ) allows you to setup the clock that appears on the lock Default screen, based on the format desired and the time zone in which you reside. The actual time is provided via the SIRIUS satellite signal, and will automatically update your Starmate 7. Figure 89 Menu Options... - Page 83 format: Displays time either 12-hour (default) 24-hour format (see Figure 90 ). Figure 90 time Zone: Since the clock adjusts the time automatically, it is important to specify your time zone. Select your time zone from the list of the available time zones (see Figure 91 ).
- Page 84 Alarm The alarm screen (see Figure 93 ) lets you to set your Starmate 7 to turn at a specific time. The last selected channel prior to shutdown will play when the Starmate 7 powers ON. Figure 93 set alarm: This turns the alarm and OFF.
-
Page 85: Program Alert
The radio must be powered on in order for this feature to function. Figure 95 program time/Day: Program the day and time you want the Starmate 7 to tune to the specific channel. 1. Highlight and select program time/Day. The program time/Day screen will appear (see Figure 96 ). - Page 86 3. On the program time/Day screen, highlight and select Day. The program Day screen will appear (see Figure 98 ). Figure 98 4. Using the channel up and down buttons, select the day of the week you wish to tune to the selected channel, i.e., Monday, Tuesday, etc., and press the Select button.
-
Page 87: Auto Shutdown
Pressing the Select button will reset the Auto Shutdown for another 1-hour period. Sleep Mode The sleep Mode screen (see Figure 101 ) lets you program the Starmate 7 to automati- cally shut after a selected period of time. -
Page 88: Signal Indicator
Signal Indicator When using your Starmate 7 indoors with the optional SIRIUS Home Docking Station or Boombox, it is important to aim the antenna for maximum signal reception. The signal indicator screen (see Figure 102) visually shows the strength of the satellite and terrestrial signals being received by the Starmate 7. -
Page 89: Factory Default
Factory Default The Factory Default option will restore almost every feature of the Starmate 7 to its original factory settings. The following is a list of all features affected by the Factory Default option: • All Presets are cleared • All S-Seek Memory entries are cleared •... - Page 90 UP/DOWN buttons to select Yes to restore all settings to the settings from the factory, or select No to leave them as-is and return to the Menu Options menu. Figure 104 4. If you select yes, the Starmate 7 will revert to the original factory settings (see Figure 1058 ). Figure 105 5.
-
Page 91: Troubleshooting
The audio cables are not connected, or the FM radio is set to the wrong frequency. Check the audio cables at the SIRIUS Vehicle Dock and the radio. Tune the FM radio to the same FM frequency the Starmate 7’s FM Transmitter is tuned. Troubleshooting... -
Page 92: Specifications
Operating Temperature: -4°F to +140°F (-20°C to +60°C) Audio Output: 1.0 V rms (max) Starmate 7 Radio Dimensions: 4.9 in (width) x 1.9 in (height) x 0.6 in (depth) 124 mm (width) x 49mm (height) x 16 mm (depth) Weight: 2.5 oz (71 g) - Page 93 Aux In Cable Connectors: 1/8 in (3.5 mm) stereo male to 1/8 in (3.5 mm) stereo male Cable Length: 4 ft (1.2 m) Specifications...
-
Page 94: Sirius Id
SIRIUS ID Write down your Starmate 7’s SIRIUS ID (SID) number in the space provided below. SID: ____________________________________ SIRIUS ID... - Page 95 SIRIUS Customer Service: 1-888-539-7474 customercare@sirius.ca SIRIUS Canada Inc. 135 Liberty Street, 4th Floor Toronto, Ontario M6K 1A7 1-888-539-7474 http:// sirius.ca...
- Page 96 //sirius.ca SIRIUS Canada Inc. 135 Liberty Street, 4th Floor Toronto, Ontario M6K 1A7 1-888-539-7474 Starmate 7 User Guide E (062410a)
Need help?
Do you have a question about the Starmate 7 and is the answer not in the manual?
Questions and answers