Table of Contents
Advertisement
Advertisement
Table of Contents

Related Manuals for HIKVISION DS-72xx Series


Summary of Contents for HIKVISION DS-72xx Series
- Page 1 DS-72xx Series Embedded Net DVR USER’S MANUAL...
- Page 2 Hikvision except where specifically permitted under Europe and international copyright law. The information in this document is subject to change without notice. Hikvision assumes no responsibility or liability for any errors or inaccuracies that may appear in this book.
-
Page 3: Table Of Contents
Customizing PTZ Presets, Patterns and Patrols ..............52 Configuring Alarms and Exceptions ................... 54 Setting Up Motion Detection ....................54 Configuring Alarm Inputs ....................55 Configuring Exceptions ....................... 56 Configuring E-mail Settings ....................56 Hikvision EURO, Inc. DS-72xx Series Embedded Net DVR User Manual... - Page 4 Managing System ......................... 69 Upgrading the System Firmware..................69 Restoring Default Settings ....................69 Exporting & Importing Configuration ................70 Viewing System Logs ......................72 Locking and Unlocking System Menus ................73 Hikvision EURO, Inc. DS-72xx Series Embedded Net DVR User Manual...
-
Page 5: Chapter1 Introduction
CHAPTER1 Introduction Hikvision EURO, Inc. DS-72xx Series Embedded Net DVR User Manual... -
Page 6: Preventive And Cautionary Tips
• Supports event alarm and exceptions upload to remote management host. • Support user management. Administrator can create and manage remote users and set their privilege. • Supports remote instantaneous JPEG capture. • Supports remote PTZ control. Hikvision EURO, Inc. DS-72xx Series Embedded Net DVR User Manual... - Page 7 • Includes built-in WEB Server. • Development: • SDK for Windows and Linux environment is available. • Demo software source codes are available. • Development support and training of application system are available. Hikvision EURO, Inc. DS-72xx Series Embedded Net DVR User Manual...
-
Page 8: Connecting Your Dvr
Connecting Your DVR You may follow the diagram below (Figure 2) in connecting your DVR to its peripherals. Fig 2: DVR Connection Diagram Hikvision EURO, Inc. DS-72xx Series Embedded Net DVR User Manual... -
Page 9: Operating Your Dvr
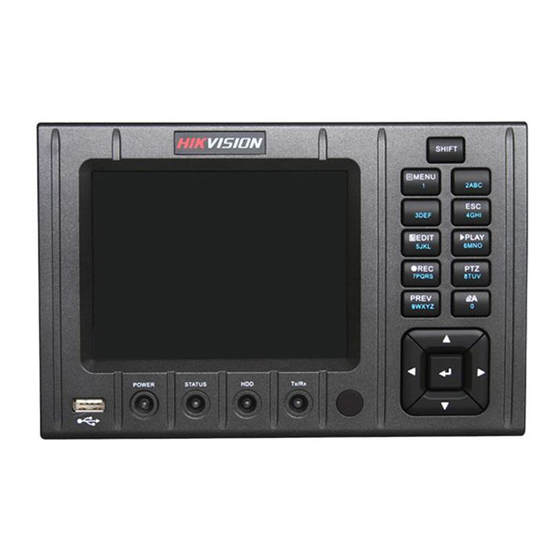
Using the Front Panel Controls Figure 3-1: DS-7204 series Figure 3-2: DS7204HVI-ST/L Figure 3-3: DS-7208 series Figure 3-4 DS-7216 series and DS-7208HFI-ST Notes: for DS-7204HVI-ST/M, DS-7204HVI-ST/E, there is not button in front panel. Hikvision EURO, Inc. DS-72xx Series Embedded Net DVR User Manual... - Page 10 It is important to note that you must click the EDIT button on either the remote or front panel on a text field before you’re able to edit its content. After you’re done entering text, you must hit the ENTER button to be able to move on to the next field. Hikvision EURO, Inc. DS-72xx Series Embedded Net DVR User Manual...
-
Page 11: Using The Ir Remote Control
12. DIRECTION/ENTER Buttons: Same as DIRECTION/ENTER buttons on front panel. 13. PTZ Button: Same as PTZ button on front panel. 14. ESC Button: Same as ESC button on front panel. 15. RESERVED: Reserved. Hikvision EURO, Inc. DS-72xx Series Embedded Net DVR User Manual... -
Page 12: Using A Usb Mouse
When a mouse is used to perform task on the DVR, clicking on a text input field will bring up the Soft Keyboard, shown in Figure 5. Figure 5. Soft Keyboard The buttons on the soft keyboard represents: Hikvision EURO, Inc. DS-72xx Series Embedded Net DVR User Manual... - Page 13 Switch to Uppercase: Switch to uppercase input Symbols: Switch to symbols input. Backspace: Delete the character in front of the cursor. Enter: Confirm selection. ESC: Exit out of Soft Keyboard. Hikvision EURO, Inc. DS-72xx Series Embedded Net DVR User Manual...
-
Page 14: Rear Panel Diagram
Connector for alarm input ALARM OUT Connector for alarm output RS-485 Interface Connector for RS-485 devices. T+, T- pin connects to PTZ POWER Switch for turn on/off the device 12VDC power supply Hikvision EURO, Inc. DS-72xx Series Embedded Net DVR User Manual... - Page 15 DS-7204HVI-ST/M and DS-7204HVI-ST/E have almost the same rear panel of DS-7204HVI-ST, except that: 1. DS-7204HVI-ST/M doesn’t have RS-232 port. 2. DS-7204HVI-ST/E doesn’t have RS-232 port, alarm input or output ports and RS-485 ports. Hikvision EURO, Inc. DS-72xx Series Embedded Net DVR User Manual...
- Page 16 RS-485 Interface Connector for RS-485 devices. T+, T- pin connects to PTZ 12VDC power supply POWER Switch for turn on/off the device Ground(needs to be connected when DVR starts up) Hikvision EURO, Inc. DS-72xx Series Embedded Net DVR User Manual...
- Page 17 Connector for alarm input ALARM OUT Connector for alarm output RS-485 Interface Connector for RS-485 devices. T+, T- pin connects to PTZ 12VDC power supply Ground(needs to be connected when DVR starts up) Hikvision EURO, Inc. DS-72xx Series Embedded Net DVR User Manual...
- Page 18 RS-485 Interface Connector for RS-485 devices. T+, T- pin connects to PTZ POWER Switch for turn on/off the device 12VDC power supply Ground(needs to be connected when DVR starts up) Hikvision EURO, Inc. DS-72xx Series Embedded Net DVR User Manual...
- Page 19 ALARM IN Connector for alarm input ALARM OUT Connector for alarm output 12VDC power supply POWER Switch for turn on/off the device Ground(needs to be connected when DVR starts up) Hikvision EURO, Inc. DS-72xx Series Embedded Net DVR User Manual...
- Page 20 RS-485 Interface Connector for RS-485 devices. T+, T- pin connects to PTZ POWER Switch for turn on/off the device 12VDC power supply Ground(needs to be connected when DVR starts up) Hikvision EURO, Inc. DS-72xx Series Embedded Net DVR User Manual...
-
Page 21: Chapter2 Getting Started
CHAPTER2 Getting Started Hikvision EURO, Inc. DS-72xx Series Embedded Net DVR User Manual... -
Page 22: Starting And Shutting Down Your Dvr
Option 1: Standard Shutdown Enter the Shutdown menu shown in Figure 8 by going to Main Menu > Maintenance > Shutdown. Figure 8. Shutdown Menu Select the Shutdown button. Click the Yes button. Hikvision EURO, Inc. DS-72xx Series Embedded Net DVR User Manual... -
Page 23: Rebooting And Locking Your Dvr
Enter the System Configuration menu by going to Main Menu > System Configuration, as shown in Figure 9. Figure 9. System Configuration Menu Click the Time/Date button to enter the Time/Date menu (Figure 10). Hikvision EURO, Inc. DS-72xx Series Embedded Net DVR User Manual... - Page 24 6. Click the Save button to save settings and click the Exit button to exit out of the menu. Clicking the Exit button without clicking the Save button will exit the menu without saving. Hikvision EURO, Inc. DS-72xx Series Embedded Net DVR User Manual...
-
Page 25: Checking The Status Of Your Dvr
• Alarm Status: The status of external alarm in/out on DVR • Network Status: Network status such as IP address, gateway, DNS server, client port, etc. • HD Status: Hard disk status on DVR. Hikvision EURO, Inc. DS-72xx Series Embedded Net DVR User Manual... -
Page 26: Chapter3 Live Feed
CHAPTER3 Live Feed Hikvision EURO, Inc. DS-72xx Series Embedded Net DVR User Manual... -
Page 27: Watching A Live Feed
Full Screen/Exit Full Screen Icon: Enter into/exit out of full screen mode for selected display. Audio On/Audio Off Icon: Enable/disable audio for selected display. Close Icon: Exit out of current setting and return to previous mode. Figure 13. Live Feed Icons Hikvision EURO, Inc. DS-72xx Series Embedded Net DVR User Manual... -
Page 28: Operating The Live Feed
PTZ camera: 1. Select display that corresponds to a PTZ camera. 2. Click the PTZ Control icon. This will bring up additional PTZ control buttons, as shown in Figure 16. Hikvision EURO, Inc. DS-72xx Series Embedded Net DVR User Manual... - Page 29 • Full Screen Mode: Enable full screen mode for selected display. To enable full screen mode: 1. Select display to enable full screen on. 2. Click the Full Screen icon. 3. Click the Exit Full Screen icon to return to normal display mode. Hikvision EURO, Inc. DS-72xx Series Embedded Net DVR User Manual...
-
Page 30: Using The Display Menu
Admin Password to exit out of the Live Feed. Start/Stop Auto-Switch: Click to start/stop auto-switch. Auto-switch will cycle through selected cameras. Switching of camera can be on an individual or multiple camera basis. Hikvision EURO, Inc. DS-72xx Series Embedded Net DVR User Manual... - Page 31 Live Feed into the Main Menu. To change this option and remove the lock to the Main Menu, visit the Lock Menus menu (See Locking and Unlocking System Menus on Page 68). Hikvision EURO, Inc. DS-72xx Series Embedded Net DVR User Manual...
-
Page 32: Configuring Live Feed Displays
• Device Name/No.: Designates the device name and number of the current unit. • VGA Resolution: Designates the resolution of main VGA display. • Mouse Pointer Speed: Pointer speed of the mouse, the higher the amount, the faster the mouse would move. Hikvision EURO, Inc. DS-72xx Series Embedded Net DVR User Manual... -
Page 33: Setting Camera Order
8. Click the Exit button to exit out of the menu. Note: You must click the Save button after adjusting the order of one video output before you are able to move on to adjust another one. Hikvision EURO, Inc. DS-72xx Series Embedded Net DVR User Manual... -
Page 34: Chapter4 Record Settings
CHAPTER4 Record Settings Hikvision EURO, Inc. DS-72xx Series Embedded Net DVR User Manual... -
Page 35: Configuring Settings For Recording
3. Select the Encoding Parameters mode to configure. Either Continuous or On Event can be selected. 4. Select the recording camera resolution in the Resolution drop down menu. The options for the camera recording resolution include 4CIF, and CIF Hikvision EURO, Inc. DS-72xx Series Embedded Net DVR User Manual... -
Page 36: Configuring A Quick Recording Schedule
Exit button without clicking Save will quit out of the menu without saving settings. Note: On Event recordings are recordings that are triggered from motion detection and/or from an external Hikvision EURO, Inc. DS-72xx Series Embedded Net DVR User Manual... -
Page 37: Configuring An Advanced Recording Schedule
(such as a microphone) is connected to the DVR. 9. Select the Add button to add time frame to schedule. The newly added time frame will appear in the Hikvision EURO, Inc. DS-72xx Series Embedded Net DVR User Manual... - Page 38 Creating a schedule in the Quick Schedule Configuration menu will also create a schedule in Advanced Schedule Configuration. The quick schedule will show up as a time period in the Advanced Schedule Configuration. Hikvision EURO, Inc. DS-72xx Series Embedded Net DVR User Manual...
-
Page 39: Chapter5 Playback
CHAPTER5 Playback Hikvision EURO, Inc. DS-72xx Series Embedded Net DVR User Manual... -
Page 40: Playing Back A Recording
Dates with recordings in the selected month and channel are displayed in light blue, while dates without recordings are dark gray. The active selected date is displayed in light gray, as shown in Figure 28. Hikvision EURO, Inc. DS-72xx Series Embedded Net DVR User Manual... -
Page 41: Playing Back Recorded Files
2. Click the Play button to begin playback of selected recording and the Pause button to pause playback. 3. You may slow down or speed up the playback speed by clicking the Decrease Speed/Increase Speed button. Hikvision EURO, Inc. DS-72xx Series Embedded Net DVR User Manual... - Page 42 The zoomed in region may be changed by moving the red rectangle in the regular recorded feed window. 8. Click the Exit button to return to the previous menu. Hikvision EURO, Inc. DS-72xx Series Embedded Net DVR User Manual...
-
Page 43: Chapter6 Backup
CHAPTER6 Backup Hikvision EURO, Inc. DS-72xx Series Embedded Net DVR User Manual... -
Page 44: Backing Up Video Clips
5. Select the ending position of the video clip. 6. Click the stop Clip button. 7. The selected video clip time range will be shown at the bottom of the Playback Interface, as seen in Figure Hikvision EURO, Inc. DS-72xx Series Embedded Net DVR User Manual... -
Page 45: Backing Up Video Clips
Formatting a storage device will permanently delete all the files on that device. There is also NO WARNING MESSAGE after clicking the Format button to format the storage device. Please proceed with caution Hikvision EURO, Inc. DS-72xx Series Embedded Net DVR User Manual... -
Page 46: Backing Up Recorded Files
6. When there is sufficient storage space for backup, click the Backup button. A backup progress bar will be shown. 7. Click the OK button once backup has completed. 8. Click the Exit button to return to the File Management menu. Hikvision EURO, Inc. DS-72xx Series Embedded Net DVR User Manual... -
Page 47: Chapter7 System Configuration
CHAPTER7 System Configuration Hikvision EURO, Inc. DS-72xx Series Embedded Net DVR User Manual... -
Page 48: Configuring Network Settings
A confirmation message, similar to the one shown in Figure 37 will pop up if the network is working properly. Figure 37. Test Connection Confirmation 10. Select the Save button to save the network settings and select Exit to return to the previous menu. Hikvision EURO, Inc. DS-72xx Series Embedded Net DVR User Manual... -
Page 49: Managing User Accounts
If you forget the password to your DVR, please contact your supplier. Note: The guest permissions can be set in the Lock Menus menu (See Locking and Unlocking System Menus on pages 68). Hikvision EURO, Inc. DS-72xx Series Embedded Net DVR User Manual... -
Page 50: Deleting A User
2. Select a user to edit in the Users List panel. 3. Edit user information in the Users and Remote Permissions panel. 4. Click the Done button to exit menu. Hikvision EURO, Inc. DS-72xx Series Embedded Net DVR User Manual... -
Page 51: Configuring Ptz Cameras
2. Select the On Camera Settings tab. This will open up the On Camera Settings menu, shown in Figure 40. Figure 40. PTZ Configuration Menu > On Camera Settings Menu 3. Select the camera to test in the camera drop down menu. Hikvision EURO, Inc. DS-72xx Series Embedded Net DVR User Manual... -
Page 52: Customizing Ptz Presets, Patterns And Patrols
6. Repeat steps 4-5 until you have included all the presets you would like to have on the patrol. 7. Click the Up and Down button at the bottom of the list to change the order of the presets in the patrol. Hikvision EURO, Inc. DS-72xx Series Embedded Net DVR User Manual... - Page 53 8. To test out your new preset, click the Play button. The PTZ should move through the list of added presets. 9. Click the Done button to exit out of the PTZ Configuration menu. Hikvision EURO, Inc. DS-72xx Series Embedded Net DVR User Manual...
-
Page 54: Configuring Alarms And Exceptions
8. Select the Save button to save the motion detection settings and select Exit to return to the previous menu. Selecting the Exit button without clicking Save will quit out of the menu without saving settings. Hikvision EURO, Inc. DS-72xx Series Embedded Net DVR User Manual... -
Page 55: Configuring Alarm Inputs
3. Select the alarm input to configure in the Alarm Input No. drop down menu on the upper left of the menu. If all alarm inputs are to be configured with the same settings, select All from the list. Hikvision EURO, Inc. DS-72xx Series Embedded Net DVR User Manual... -
Page 56: Configuring Exceptions
Selecting the Exit button without clicking Save will quit out of the menu without saving settings. Configuring E-mail Settings If you would like to have the DVR send out e-mails when certain events are detected or exceptions have been Hikvision EURO, Inc. DS-72xx Series Embedded Net DVR User Manual... - Page 57 5. Select the Save button to save the e-mail settings and select Exit to return to the previous menu. Selecting the Exit button without clicking Save will quit out of the menu without saving settings. Hikvision EURO, Inc. DS-72xx Series Embedded Net DVR User Manual...
-
Page 58: Chapter8 Camera Management
CHAPTER8 Camera Management Hikvision EURO, Inc. DS-72xx Series Embedded Net DVR User Manual... -
Page 59: Configuring Cameras
6. Select the Save button to save the privacy zones settings and select Exit to return to the previous menu. Selecting the Exit button without clicking Save will quit out of the menu without saving settings. Hikvision EURO, Inc. DS-72xx Series Embedded Net DVR User Manual... -
Page 60: Configuring Video Tampering Detection
7. Select the Save button to save the settings and select Exit to return to the previous menu. Selecting the Exit button without clicking Save will quit out of the menu without saving settings. Hikvision EURO, Inc. DS-72xx Series Embedded Net DVR User Manual... -
Page 61: Configuring Video Loss Detection
5. Select the Save button to save the privacy zones settings and select Exit to return to the previous menu. Selecting the Exit button without clicking Save will quit out of the menu without saving settings. Hikvision EURO, Inc. DS-72xx Series Embedded Net DVR User Manual... -
Page 62: Configuring Osd Settings
5. Select the Save button to save OSD settings and select Exit to return to the previous menu. Selecting the Exit button without clicking Save will quit out of the menu without saving settings. Hikvision EURO, Inc. DS-72xx Series Embedded Net DVR User Manual... -
Page 63: Chapter9 Disk Management
CHAPTER9 Disk Management Hikvision EURO, Inc. DS-72xx Series Embedded Net DVR User Manual... -
Page 64: Managing Disks
Figure 52. Disk Format Confirmation 5. A format progress bar (Figure 53) will be shown on the menu. After the disk has been formatted, the status of the disk will change to Active. Hikvision EURO, Inc. DS-72xx Series Embedded Net DVR User Manual... -
Page 65: Enabling Disk Overwrite
1. Enter the Disk Management menu, shown in Figure 54 by going to Main Menu > System Configuration > Disk Management. 2. Check the Overwrite checkbox. 3. Click the Save button. 4. Click the Done button to exit out of Disk Management. Hikvision EURO, Inc. DS-72xx Series Embedded Net DVR User Manual... -
Page 66: Managing Files
9. You may now play the selected file by clicking the Play button that is next to the file. 10. Click the Done button to exit out of the File Management menu. Locking and Unlocking Recorded Files Hikvision EURO, Inc. DS-72xx Series Embedded Net DVR User Manual... - Page 67 3. Click the Lock icon for the selected file. 4. Click the Done button to exit out of the File Management menu. Note: Locked files will never be overwritten until they are unlocked. Hikvision EURO, Inc. DS-72xx Series Embedded Net DVR User Manual...
-
Page 68: Chapter10 Dvr Management
CHAPTER10 DVR Management Hikvision EURO, Inc. DS-72xx Series Embedded Net DVR User Manual... -
Page 69: Managing System
Restoring Default Settings To restore factory default settings to your DVR: 1. Enter the Factory Default menu, shown in Figure 57 by going to Main Menu > Maintenance > Factory Default. Hikvision EURO, Inc. DS-72xx Series Embedded Net DVR User Manual... -
Page 70: Exporting & Importing Configuration
4. Click the New Folder button to create a new folder or the Delete button to delete a file/folder. 5. Select the location where you would like the configuration to be stored on the USB storage device. Hikvision EURO, Inc. DS-72xx Series Embedded Net DVR User Manual... - Page 71 3. Click the Refresh button. The contents of the USB storage device will be shown on the screen. 4. Select the configuration file. The configuration file is named devCfg.bin. 5. Click the Import button. 6. Click the Exit button to exit out of the Export/Import Configuration menu. Hikvision EURO, Inc. DS-72xx Series Embedded Net DVR User Manual...
-
Page 72: Viewing System Logs
7. Log files can also be exported onto a USB storage device. To export a log file, connect a USB storage device to the DVR, select the log files to export and click the Export button. Hikvision EURO, Inc. DS-72xx Series Embedded Net DVR User Manual... -
Page 73: Locking And Unlocking System Menus
(Unlock All Settings, Lock All Settings, Lock All Recording Settings). 6. Click the Done button to save setting and to return to the previous menu. Figure 62. Guest Lock Menu Hikvision EURO, Inc. DS-72xx Series Embedded Net DVR User Manual...
Need help?
Do you have a question about the DS-72xx Series and is the answer not in the manual?
Questions and answers