Table of Contents
Advertisement
Quick Links
Advertisement
Table of Contents

Subscribe to Our Youtube Channel
Related Manuals for Grizzly H8192


Summary of Contents for Grizzly H8192
- Page 1 1" BELT/8" DISC COMBINATION SANDER OWNER'S MANUAL COPYRIGHT © AUGUST, 2007 BY GRIZZLY INDUSTRIAL, INC. WARNING: NO PORTION OF THIS MANUAL MAY BE REPRODUCED IN ANY SHAPE OR FORM WITHOUT THE WRITTEN APPROVAL OF GRIZZLY INDUSTRIAL, INC. #TS9703 PRINTED IN CHINA...
- Page 2 ���� ������ �������� �������� ������ ������������ �� ��� ������ ������ ���������� ����������� ��� ������� �� ���� ������������������ ������� �� ����� ���������� ��� ������ ��� ������������ ����� �� ���� ������ ��� ������ �� ������� �������� ������� ��������� ����������� ������������� �� ������ ���...
-
Page 3: Table Of Contents
Inventory ... 10 Clean Up ... 12 Site Considerations ... 12 Assembly ... 13 Test Run ... 17 Mounting Sander ... 18 Dust Collection ... 18 SECTION 4: OPERATIONS ... 19 Operation Safety ... 19 Disc Sanding ... 19 Belt Sanding ... 20 SECTION 5: ACCESSORIES ... -
Page 4: Introduction
Foreword We are proud to offer the Model H8192 1" Belt/8" Disc Combination Sander. This machine is part of a growing Grizzly family of fine woodworking machinery. When used according to the guidelines set forth in this manual, you can expect years of trouble-free, enjoyable operation and proof of Grizzly’s commitment to customer... -
Page 5: Machine Data Sheet
�������������� � ������������������������������������������������������������������������������������������������������������������������������������������������� ��������� ��������������� � ��������������������������������������������������������������������������������� �������������������������������������������������� ���������������������������������������������������������������������������������������������������������������������������� ��������������������������������� ����������� ������������ ������������������� � ����������������������������������������������������������������������������������������������������������������������������������������� �������� ������������������� � ������������������������������������������������������������������������������������������������������������������������������������������������ ��������� �������������������������������������� ������������������ ����������������� ������������������������� Model H8192 1" Belt/8" Disc Combo Sander ������� ���� ����� ����� ����� � � � � � � �... -
Page 6: Identification
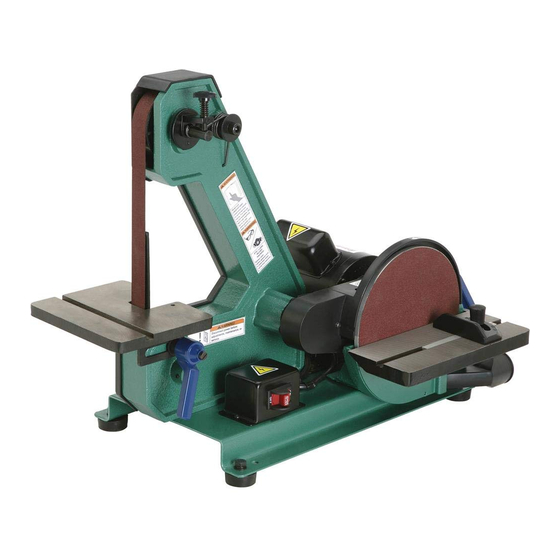
Motor Disc Table Angle Scale K. Disc Table Lock Handle Disc Dust Port M. ON/OFF Switch with Disabling Key N. Rubber Machine Feet O. Sanding Belt Table Lock Handle P. Sanding Belt Table Model H8192 1" Belt/8" Disc Combo Sander... -
Page 7: Section 1: Safety
�� ������ ���� � ����� �������� ���������� ���� ��������� ���� �������� ������ ����� ����� ���� ������ ������� ������������ ���������� Model H8192 1" Belt/8" Disc Combo Sander �� ������ ��� ������� ���������� ���� ���������� ������ ���� ������ ���������� �������������� �� ���� ������ ��������� ��� ����... - Page 8 ���������� ��� ������� ���� ��� �� ���������� ��� ���� ������������ �������� ��� ������� ���� ������������������������������������������� ���� ����� ��� ����� ���� ���� �������� ��� ���� �������������������������������������������� ������������������ Model H8192 1" Belt/8" Disc Combo Sander ��������� ���� ��� ��� ������� ����� ��������...
-
Page 9: Additional Safety Instructions For Belt And Disc Sanders
If normal safety precautions are overlooked or ignored, serious personal injury may occur. Model H8192 1" Belt/8" Disc Combo Sander UNATTENDED OPERATION. Never leave the machine running attended. DUST COLLECTION SYSTEM. Always operate the sander with an adequate dust collection system in place and running. -
Page 10: Section 2: Circuit Requirements
DO NOT connect the machine to the power source until instructed to do so. Amperage Draw The Model H8192 motor draws the following amps under maximum load: Motor Draw ... 4 Amps Circuit Recommendations... -
Page 11: Section 3: Setup
Wear safety during the entire setup process! Model H8192 1" Belt/8" Disc Combo Sander Items Needed for The following items are needed to complete the setup process, but are not included with your machine: users. -
Page 12: Inventory
Lock Washers 10mm ... 2 • Wing Nut M4-.7 ... 1 -10- Figure 3. Model H8192 inventory items A–G. Figure 4. Model H8192 inventory items H–N. If any nonproprietary parts are missing (e.g. a nut or a washer), we will gladly replace them; or for the sake of expediency, replacements can be obtained at your local hardware store. -
Page 13: Hardware Recognition Chart
Hardware Recognition Chart -11- Model H8192 1" Belt/8" Disc Combo Sander... -
Page 14: Clean Up
See Figure 5 for the minimum working clearances. inhaled. Figure 5. Model H8192 placement dimensions. Model H8192 1" Belt/8" Disc Combo Sander �� � � � � ��... -
Page 15: Assembly
M10-1.5 x 20 cap screws, lock washers, and flat washers (see Figures 7 & 8)—do not fully tighten the fasteners for now. Model H8192 1" Belt/8" Disc Combo Sander Figure 7. Cap screws securing the belt housing assembly (viewed from underneath the base). - Page 16 Figure 12, and secure it in place with the M4- .7 x 40 Phillips head screw and wingnut. ������ Figure 12. V-belt rear cover installed (inset shows front location of screw). Model H8192 1" Belt/8" Disc Combo Sander Wing Nut V-Belt Rear Cover...
- Page 17 Mounting Screws Figure 14. Disc dust cover installed. Model H8192 1" Belt/8" Disc Combo Sander 15. Lay the sander down on a flat surface, as shown in Figure 15, and place a thin piece of cardboard approximately ⁄...
- Page 18 21. Loosen the cap screw shown in Figure 20, adjust the belt support approximately away from the sanding belt, then re-tighten the cap screw. Belt Support Screw Figure 20. Sanding belt support. Model H8192 1" Belt/8" Disc Combo Sander ⁄ " clearance from ⁄ "...
-
Page 19: Test Run
Always disconnect the machine from power when investigating or correcting potential problems. Model H8192 1" Belt/8" Disc Combo Sander Turn the machine OFF. Remove the switch disabling key, as shown in Figure 21. -
Page 20: Mounting Sander
-18- Dust Collection DO NOT operate the Model H8192 without an adequate dust collection system. This sander creates substantial amounts of wood dust while operating. Failure to use a dust collection system can result in short and long-term respiratory illness. -
Page 21: Section 4: Operations
Grizzly Industrial will not be held liable for accidents caused by lack of training. Model H8192 1" Belt/8" Disc Combo Sander Disc Sanding Always keep the workpiece on the left side of the wheel that rotates down toward the table. -
Page 22: Belt Sanding
Note: Hold the workpiece firmly on the table, but keep your fingers away from the sanding surface, as shown in Figure 27. Figure 27. Example of belt sanding. Model H8192 1" Belt/8" Disc Combo Sander FROM... -
Page 23: Section 5: Accessories
" X 9" with Handle ...G2519 2" X 2" X 11" with Handle ...G2520 Figure 29 . PRO-STICK abrasive cleaners. ® Model H8192 1" Belt/8" Disc Combo Sander H2499—Small Half-Mask Respirator H3631—Medium Half-Mask Respirator H3632—Large Half-Mask Respirator H3635—Disposable Cartridge Filter Pair P100... -
Page 24: Section 6: Maintenance
Check and correct V-belt tension, damage, or wear. Cleaning Cleaning the Model H8192 is relatively easy. Vacuum excess sawdust, and wipe off the remaining dust with a dry cloth. Wiping the table clean after every use ensures moisture from wood dust does not remain on bare metal surfaces. -
Page 25: Changing The Sanding Belt
Sanding Belt Some sanding belts are designed to sand in only one direction and will have a direction indicated on the back of the belt. The Model H8192 is designed so that the sanding belt travels downward to the sanding table. -
Page 26: Section 7: Service
2. Reduce pressure on workpiece while sanding. 3. Do not keep workpiece in one place for too long. 1. Dry stock proper before sanding. 2. Use different stock; change/clean sanding material often. Model H8192 1" Belt/8" Disc Combo Sander Troubleshooting secure machine benchtop/stand... -
Page 27: Squaring The Sanding Disc Table
POWER! Remove the disc table, dust port, dust cover, and V-belt safety cover. Model H8192 1" Belt/8" Disc Combo Sander Lay the sander on its back, and loosen (but do not remove) the two cap screws securing the belt housing assembly. -
Page 28: Electrical Components & Wiring Diagram
Figure 36. Switch wiring. Figure 37. Motor wiring. -26- �� �� �� �� �� �� ������ �� �� �� �� Model H8192 1" Belt/8" Disc Combo Sander �� ������ �� ������� �� ��� ���� ���� ��� ��� ����� ����� �� ��������� ������... -
Page 29: Sanding Belt & Motor Breakdown
�� �� �� �� �� �� �� �� �� �� �� �� �� �� �� �� �� Model H8192 1" Belt/8" Disc Combo Sander �� �� � �� � �� �� �� �� �� �� �� �� �� ���� ����... -
Page 30: Sanding Disc Breakdown
��� ��� ��� ��� ��� ��� ��� �� ��� ��� ��� ��� ��� ��� ��� ��� ��� ��� �� ��� ��� ��� ��� ��� �� ��� ��� ��� ��� ��� �� �� -28- Model H8192 1" Belt/8" Disc Combo Sander... -
Page 31: Parts List
PH8192054 MOTOR PULLEY PK112M KEY 5 X 5 X 55 PH8192056 MOTOR 1/3HP,110V,1-PH 56-1 PH8192056-1 START CAPACITOR 240MF 125VAC Model H8192 1" Belt/8" Disc Combo Sander Parts List REF PART # DESCRIPTION 56-2 PH8192056-2 CAPACITOR COVER PN03M HEX NUT M8-1.25... -
Page 32: Label Placement
MUST maintain the original location and readability of the labels on the machine. If any label is removed or becomes unreadable, REPLACE that label before using the machine again. Contact Grizzly at (800) 523-4777 or www.grizzly.com to order new labels. -30-... - Page 33 ���������������������������������������������������������������������������������� � ������������������������������������������������������������������������������������ ����� ����������������������� ������ � ������������������������ ���� ��������������������� ���������������������������� ������ ������������������������ ���������� � ���������������� ���������������������������� ������������������������������� ��������������������������� ��� ��������� ����������� �� ����� �� � ��������� ������ �� ���� �� ���� ��� ��������� �������� �� ���� �� ������� ������ �������� ��� ��������� �� ������� ��� ����������� �� �������� ������������� ���...
- Page 34 ���������������������� ���������������������� ����������������������������������� ����������������������������������� ������������������������������������� �������������������������������������� ������� ����������� ���� ���� ��� ���� ����������� �� ���������� �������������������������������������� ����� ����� ����...
-
Page 35: Warranty And Returns
WARRANTY AND RETURNS Grizzly Industrial, Inc. warrants every product it sells for a period of 1 year to the original purchaser from the date of purchase. This warranty does not apply to defects due directly or indirectly to misuse, abuse, negligence, accidents, repairs or alterations or lack of maintenance. - Page 36 ��� ������ ��� ���� ���� ������� ����� ��� ������� ����� ��� �������� ��� ������� � � � ���� ����� ��� � � �������� ������ ��� � ����� ������ � �� ��� �������� ������� � ������ �������� ������ ������� ������ �� ����� ������...
Need help?
Do you have a question about the H8192 and is the answer not in the manual?
Questions and answers