Table of Contents
Advertisement
Quick Links
Advertisement
Table of Contents

Related Manuals for Axis PTZ


Summary of Contents for Axis PTZ
- Page 1 AXIS Panorama PTZ Network Camera User’s Manual...
-
Page 2: About This Document
Search by product, category, or phrases. should be used to ensure compliance with EMC standards. • Report problems to Axis support staff by logging in to your private support area. USA - This equipment has been tested and found to Visit the Axis Support Web at www.axis.com/techsup/... -
Page 3: Table Of Contents
Assembling the AXIS Panorama PTZ ........ -
Page 4: Overview
The AXIS Panorama PTZ minimizes the need for costly and complex coaxial cabling - to press your installation overheads and provide you with an advanced yet cost-effective network imaging solution. None of the hidden accessories normally associated with digital... -
Page 5: Features And Benefits
Note that recording/upload must be configured for each camera. Static Camera - The AXIS Panorama PTZ is defined as a static camera, that is, the camera combination does not physically move when the panorama is viewed (there are no moving parts at all). - Page 6 The fully configurable compression features afforded by High Compression and Sensitivity - the AXIS ARTPEC chip allow a normal quality image to be compressed to around 8 kbytes. Actual file sizes vary according to lighting conditions; although the product will work even in dark environments - right down to 1 lux.
-
Page 7: Physical Description
MAC/Ethernet address. Important! Although the AXIS Panorama PTZ can be used both indoors and outdoors, it is important to note that the charged coupled device (CCD) in the camera can become permanently damaged if exposed to too much direct sunlight or halogen light. -
Page 8: Rear Panel
AXIS 2110 User’s Manual. the AXIS 2191 Audio Mod- ule (these functions are not supported.) Note: The power adapter supplied with your AXIS Panorama PTZ is country-specific. Please check that the type you are using is correct. -
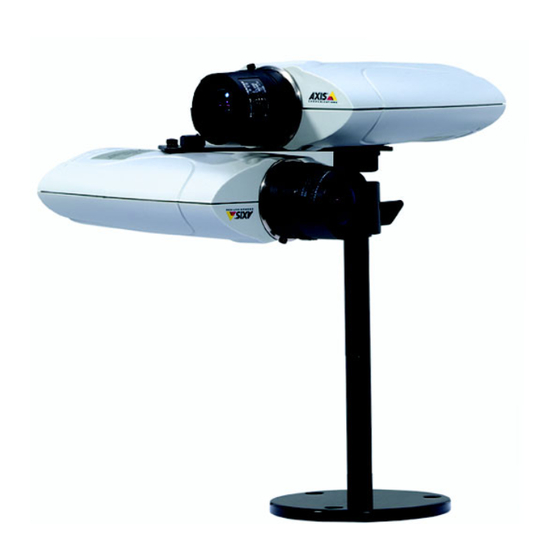
Page 9: Assembling The Axis Panorama Ptz
AXIS Panorama PTZ Installation Guide AXIS Warranty Note: The power supply for your AXIS Panorama PTZ is country-specific. Please check that the type you are using is correct. The Mounting Assembly The mounting assembly consists of a single bracket, used to join the 2 cameras together, and a single stand, on which the bracket and the 2 cameras are mounted. -
Page 10: Network Installation
AXIS Panorama PTZ User’s Manual Network Installation The AXIS Panorama PTZ Network Camera includes 2 cameras. The installation procedure described below should be followed for each camera. 2 IP addresses are required. Note the Serial number on the underside of the unit. You need to know this to set the IP address. - Page 11 Network Installation Verifying and Completing the Installation From Your Browser To access the AXIS Panorama PTZ, start your browser and enter the IP address of either camera in the location or address field, e.g. 171.21.1.200. This opens the Live View page, which is the default application page. The page provides a link to the product’s Administration Tools, providing access to all of the camera’s settings, including those...
-
Page 12: Configuration
• To access the Administration Tools, the product must first be installed on the network, as described in Network Installation, on page 10. • Javascript must be enabled in your Web browser for the AXIS Panorama PTZ Web-based interface to work. -
Page 13: Configuring The Panorama Application
AXIS Panorama PTZ User’s Manual Configuration Configuring the Panorama Application After completing the minimum configuration of the AXIS Panorama PTZ’s 2 cameras, click Panorama in the Administration Tools. Note that the Panorma settings only need to be made in one of the two cameras. -
Page 14: Setting Up Preset Postions
Up to 16 preset positions can be configured. Preset positions are configured in the Administration tools, by clicking Panorama>PTZ Presets. To set up a new preset, steer the view to the desired position, by clicking in the image or by using the Pan Tilt and Zoom bars. -
Page 15: The Administration Tools
• You should change the root password as soon as possible. Until this has been done, the security fea- tures in the product be will not be enabled. Furthermore, all Axis products are shipped with the same password by default. For further information, refer to System Security, on page 17. - Page 16 Set the Date and Time, create and delete Users and passwords, and change the Administrator’s password. External Set the COM-Port on the AXIS Panorama PTZ to use the AXIS 2191 Audio Module. For further information, please Devices refer to the AXIS 2110 User’s Manual.
-
Page 17: System Security
All Axis products are shipped with the same password as default. • By default, the AXIS Panorama PTZ is set for anonymous user access, which means that anybody on the network can view the video images from a browser. To restrict open access, simply register a sin- gle authorized user with viewing rights. -
Page 18: Reinstating The Factory Default Settings
3. Keep the Control Button pressed until the Status Indicator displays yellow (note that this may take up to 15 seconds), then release the button. When the Status Indicator displays green (which can take up to 1 minute) the AXIS Panorama PTZ will then have been reset to the original factory default settings. -
Page 19: Appendix A - Lenses And Focusing
Having positioned the camera, follow the instructions below to focus it. Important! Although the AXIS Panorama PTZ is intended for both outdoor and indoor use, it is important to note that the charged coupled device (CCD) in the camera can become permanently damaged if it is exposed to excessive direct sunlight or halogen light. -
Page 20: Focusing Using The Focus Assistant
Good Rotational Focus Control The lens provided with the AXIS Panorama PTZ has rotational focus control that allows the focal length of the lens to be adjusted manually. The lens is used to establish the basic level of focus when the image is stable, that is, when there is little or no movement. Rotate the lens clockwise for close focus, or anti-clockwise for distant focus. - Page 21 Replacing the Lens The lenses supplied with the AXIS Panorama PTZ are intended specifically for use with the Panorama application. Other compatible lenses may also be used with the cameras, but there is no guarantee that the Panorama application will function correctly.
-
Page 22: Appendix B - Troubleshooting
AXIS Panorama destination host unreachable, PTZ is not accessible on your subnet. You must obtain a new IP address and reinstall the unit. If this does not solve the problem, disconnect the AXIS Panorama PTZ from the network and run Ping again. -
Page 23: Problems, Possible Causes And Remedial Actions
Cable. If the above actions don’t solve the problem, the AXIS Panorama PTZ may be faulty. In this case, try to localize the problem by connecting the AXIS Panorama PTZ to the serial port of a local computer, using a Null Modem Cable; and report your findings to your local reseller. - Page 24 This can happen to the CCD sensor. Reposition your AXIS Panorama PTZ in a more e.g. with sunlight reflexes. shaded location immediately. Note: damage caused to the AXIS Panorama PTZ through overexposure to direct sunlight or halogen light is not covered under the product warranty.
-
Page 25: Appendix C - Other Ip Setup Methods
IP address changes. Notes: •Do not use the default or IP address featured in these examples when installing your AXIS Pan- orama PTZ. If in doubt, consult your network administrator to obtain an unused IP address. •Make sure the AXIS Panorama PTZ is powered up and attached to the network. -
Page 26: Using The Axis Ip Installer
1. Run the AXIS IP Installer from the Start menu. The following window will appear: 2. Restart your AXIS Panorama PTZ. 3. Select the serial number of your AXIS Panorama PTZ in the list. The serial number is identical to the unit’s MAC/Ethernet address. -
Page 27: Appendix D - Upgrading The Firmware
AXIS Panorama PTZ over the network. Obtaining Upgraded firmware The latest version of the AXIS Panorama PTZ firmware is available free of charge from the Axis Website at www.axis.com, or from your local distributor. Upgrading the firmware The AXIS Panorama PTZ firmware is upgraded over the network using FTP. -
Page 28: Appendix E - Technical Specifications
TCP/IP support on Windows 95, 98, NT, 2000 or XP. Microsoft System Requirements - Internet Explorer 4.x, or higher (to use the Axis ActiveX component AXIS Camera Control) RJ45 twisted pair cable, or remote connection using any standard Network Connection - serial modem. -
Page 29: Index
AXIS Panorama PTZ User’s Guide Index Index Linux 6 Live View page 11 Access rights 17 Administrator password 17 Manual focusing 19 Anonymous user access 17 ARP 23 ARTPEC-1 28 Network connector 8 AXIS IP Installer 25 Network indicator 8, 23... -
Page 30: Glossary Of Terms
Lux - A standard unit for light measurement. used to set the IP-address for your product. NWAY - A network protocol that automatically negotiates the ARTPEC - Axis Real Time Picture Encoder - used for image highest possible common transmission speed between two compression.
Need help?
Do you have a question about the PTZ and is the answer not in the manual?
Questions and answers