
Related Manuals for Vista Quantum PLUS H.264


Summary of Contents for Vista Quantum PLUS H.264
- Page 1 Quantum PLUS (H.264) Quick User guide Quick user guide for the Vista Quantum Plus range of H264 DVRs, including the models QP04-xxxhf QP08-xxxhf QP16-xxxhf Full manual found on the CD supplied with the DVR...
- Page 2 –...
- Page 3 Contents SCOPE OF USE ..............................3 FRONT PANEL DESCRIPTION ...........................4 REAR PANEL DESCRIPTION ..........................5 ON SCREEN DISPLAY (OSD) DESCRIPTION ....................7 DEFAULT PASSWORDS .............................7 SEARCHING AND PLAYING BACK VIDEO FOOTAGE ..................8 Playback ...............................8 Search options ............................10 ARCHIVING FOOTAGE TO CD/DVD OR USB ....................13 Quick Archive ..............................13 Direct Playback Archive..........................14 Standard Archiving process .........................15...
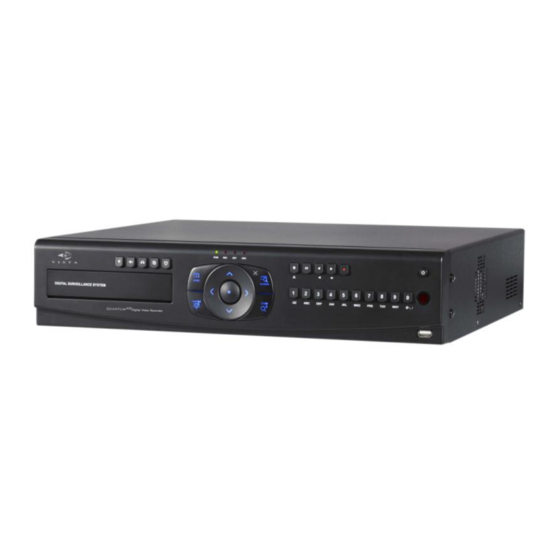
- Page 4 LEDs - REC: Recording status (When recording is on, the red light will flash) - POWER: System Power On/Off (When power is on, the green light will be illuminated) - NET: Network status (When network is connected, the light will lash) - HDD: HDD status (When the system is reading or writing to the HDD, the light will flash) USB 2.0 Port - USB2.0 connector, for downloading to USB pens / drives (plus upgrading firmware).
- Page 5 REC (●) - To manually start & stop recording, password protected. Volume Up & Down ( - Increase or decrease the volume. Arrow Buttons - Moves the cursor while in menu mode, and used for pan ant tilt control of PTZ enabled cameras. SELECT (Central circular button) - Enter button (SEL).
-
Page 6: Alarm / Sensor
USB ports Front : Port for both Thumbs drive and USB Mouse Rear : This is for the PS2 mouse and may not support some USB mouse. In this case, please insert the USB mouse into the front USB port Dome Used for RS485 Telemetry output to PTZ dome cameras Keyboard Controller... - Page 7 “ ” ’ “ ” ’ –...
- Page 8 ▶ “ ” “ ” –...
- Page 9 “ ” “ “ –...
-
Page 10: Date / Time Search
Within the search menu there are 4 ways of reviewing recorded footage: Date and Time Event Calendar Bookmark - Date / Time Search To playback from a specific Date and Times, Use the arrow keys and numeric keys to enter the Start date and Time. Next click on the Play button. -
Page 11: Calendar Search
- Calendar Search Choosing the calendar event option will display the adjacent box, select the year month required. days with recorded footage will be highlighted in white. Click on the required date. The box shown below will appear. This box displays the selected day in graphical format, form midnight “0”... -
Page 12: Bookmark Search
- Bookmark Search –... - Page 13 –...
- Page 14 –...
- Page 15 The Archiving of recorded information can be transferred onto various Archive media: Internal – CD/DVD drive External – USB memory sticks or drives 1) INTERNAL CD/DVD – Device Use the DVD/CD (ODD – Optical Disk Drive) Device Format Formatting is not required for CD or DVD-R. When a DVD-RW is used, formatting should be done first. Type - File Format Exclusive –...
- Page 16 Clicking on this button will show the file size of the selected segment. This checks that the selected time period will fit on the available archive media. Transfer Click on Transfer to start the download. Percentage completed during downloading will be shown Once downloading you can press the Search button, to exit the Archive screen and return to normal operation of the DVR while the archive is completed.
-
Page 17: Camera Selection
The telemetry function of the Quantum Plus can be controlled via 4 different interfaces: Remote keyboard Front panel buttons Remote control Software viewer Camera selection The PTZ cameras can be controlled in either full screen or split screen mode. If in full screen mode press the camera selection key , the camera icon will step from one camera to the next on the split screen. - Page 18 To store a preset position Move the camera to the required position then press the record key followed by the number key of the preset to be stored (1 – 9) To recall a Preset Press the search key followed by the number (1 -9). To run Tour 1, press the search key followed by the number 0 (Zero).
- Page 19 To select Zoom and Focus press the Zoom Key Zoom in = Zoom out = Focus Near = Focus Far = To store a preset position Move the camera to the required position then press the record key followed by the number key of the preset to be stored (1 –...
- Page 20 Network Connection & Minimum PC specification CPU: Core 2 Duo 1.8GHz, Graphic: 256MB 1) IP connection via Internet Explorer – Open up Internet Explorer and type in the IP address of the DVR (assuming it is a fixed IP address). If a fixed IP address is not available a DDNS server such as www.ddns-dvr.com can be used, refer to main manual on the supplied CD, Appendix 3 page 114.
- Page 21 –...
- Page 22 –...
Need help?
Do you have a question about the Quantum PLUS H.264 and is the answer not in the manual?
Questions and answers