Table of Contents
Advertisement
Model:
ECO-ADV-WS22
Wood Burning Stove
•
Important operating
a n d m a i n t e n a n c e
instructions included.
If the information in these instruc-
tions is not followed exactly, a
fire may result causing property
damage, personal injury, or death.
• Do not store or use gasoline or other flam-
mable vapors and liquids in the vicinity of
this or any other appliance.
• Do not overfire - If heater or chimney con-
nector glows, you are overfiring. Overfiring
will void your warranty.
• Comply with all minimum clearances to
combustibles as specified. Failure to
comply may cause house fire.
WARNING
Fire Risk.
For use with solid wood fuel only.
Other fuels may overfire and generate
poisonous gases (i.e. carbon monoxide).
www.heatilator.com
WS22
NOTICE
DO NOT DISCARD THIS MANUAL
• Read, understand and
follow these instructions
for safe installation and
operation.
WARNING
Heatilator • ECO-ADV-WS22• 7057-128C • August 13, 2010
Owner's Manual
Installation and Operation
• Leave this manual with
party responsible for
use and operation.
WARNING
Hot glass will cause burns.
• Do not touch glass until it is cooled
• NEVER allow children to touch glass
• Keep children away
• CAREFULLY SUPERVISE children in same room as
fireplace.
• Alert children and adults to hazards of high
temperatures.
High temperatures may ignite clothing or other
flammable materials.
• Keep clothing, furniture, draperies and other flammable
materials away.
Installation and service of this appliance should
be performed by qualified personnel. Hearth &
Home Technologies recommends NFI certified
professionals, or technicians supervised by an
NFI certified professional.
HOT SURFACES!
Glass and other surfaces are
hot during operation AND
cool down.
1
Advertisement
Table of Contents

Related Manuals for Heatilator ECO-ADV-WS22


Summary of Contents for Heatilator ECO-ADV-WS22
- Page 1 Owner’s Manual Installation and Operation Model: ECO-ADV-WS22 Wood Burning Stove WS22 NOTICE DO NOT DISCARD THIS MANUAL • • Read, understand and • Leave this manual with Important operating follow these instructions party responsible for a n d m a i n t e n a n c e for safe installation and use and operation.
-
Page 2: Congratulations
U.S. ENVIRONMENTAL PROTECTION AGENCY - Certified to Manufactured by: comply with July 1990 particulate emission standards. Fabriqué par: 1445 N. Highway, Colville, WA 99114 DO NOT REMOVE THIS LABEL / NE PAS ENLEVER L'ÉTIQUETTE Made in U.S.A./Fait Aux États-Unis 7057-125 www.heatilator.com Manufacturer Date Heatilator • ECO-ADV-WS22 • 7057-128C • August 13, 2010... -
Page 3: Table Of Contents
Section 4: Troubleshooting Guide .....20 A. Exploded Drawings ...........42 B. Service Parts & Accessories ......43-44 Section 5: Service Parts Replacement C. Service & Maintenance Log ......45-46 A. Glass Replacement ...........21 D. Homeowner’s Notes ..........47 B. Snap Disc Replacement........21 E. Contact Information ...........48 C. Baffle Removal ..........22 D. Door Handle Assembly ........23 E. Tube Channel Assembly Replacement .....24 Heatilator • ECO-ADV-WS22 • 7057-128C • August 13, 2010... -
Page 4: Warranty Policy
Warranty Policy Hearth & Home Technologies Inc. HEATILATOR ECO-CHOICE WARRANTY Hearth & Home Technologies Inc., on behalf of its hearth brands (“HHT”), extends the following warranty for ECO- CHOICE by heatilator wood and pellet hearth appliances that are purchased from an HHT authorized dealer. WARRANTY COVERAGE: HHT warrantes to the original owner of the HHT appliance at the site of installation, and to any transferree taking own- ership of the appliance at the site of installation within two years following the date of original purchase, that the HHT appliance will be free from defects in materials and workmanship at the time of manufacture. After installation, if cov- ered components manufactured by HHT are found to be defective in materials or workmanship during the applicable warranty period, HHT will, at its option, repair or replace the covered components. HHT, at its own discretion, may fully discharge all of its obligations under such warranties by replacing the product itself or refunding the verified purchase price of the product itself. The maximum amount recoverable under this warranty is limited to the purchaser price of the product. This warranty is subject to conditions, exclusions and limitations as described below. WARRANTY PERIOD: Warranty coverage begins on the date of installation. In the case of new home construction, warranty coverage begins on the date of first occupancy of the dwelling or six months after the sale of the product by an independent, authorized HHT dealer/distributor, whichever occurs earlier. The warranty shall commence no later than 24 months following the date of product shipment from HHT, regardless of the installation or occupancy date. The warranty period for parts and labor for covered components is produced in the following table. Warranty Period Heatilator ECO-CHOICE Components Covered Appliances Parts Labor Pellet EPA Wood... - Page 5 (8) modification of the appliance not expressly authorized and approved by HHT in writing; and/or (9) interruptions or fluctuations of electrical power supply to the appliance. • Non-HHT venting components, hearth components or other accessories used in conjunction with the appliance. • Any part of a pre-existing fireplace system in which an insert or a decorative gas appliance is installed. • HHT’s obligation under this warranty does not extend to the appliances’ capability to heat the desired space. Informa- tion is provided to assist the consumer and the dealer in selecting the proper appliance for the application. Consider- ation must be given to appliance location and configuration, environmental conditions, insulation and air tightness of the structure. This warranty is void if: • The appliance has been over-fired or operated in atmospheres contaminated by chlorine, fluorine, or other damaging chemicals. Overfiring can be identified by, but not limited to, warped plates or tubes, rust colored cast iron, bubbling, cracking and discoloration of steel or enamel finishes. • The appliance is subjected to prolonged periods of dampness or condensation. • There is any damage to the appliance or other components due to water or weather damage which is the result of, but not limited to improper chimney or venting installation. WARRANTY EXCLUSIONS: • The owner’s exclusive remedy and HHT’s sole obligation under this warranty, under any other warranty, express or implied, or in contract, tort or otherwise, shall be limited to replacement, repair, or refund, as specified above. In no event will HHT be liable for any incidiental or consequential damages caused by defects in the appliance. Some states do not allow exclusions or limitation of incidental or consequential damages, so these limitations may not apply to you. This warranty gives you specifice rights; you may also have other rights, which vary from state to state. EXCEPT TO THE EXTENT PROVIDED BY LAW, HHT MAKES NO EXPRESS WARRANTIES OTHER THAN THE WARRANTY SPECIFIED HEREIN. THE DURATION OF ANY IMPLIED WARRANTY IS LIMITED TO DURATION OF THE EX- PRESSED WARRANTY SPECIFIED ABOVE. 7014-212 2-10-10 Heatilator • ECO-ADV-WS22 • 7057-128C • August 13, 2010...
-
Page 6: Section 1: Listing And Code Approvals
Listing and Code Approvals D. BTU & Efficiency Specifications A. Appliance Certification EPA Certified: 2.7 grams per hour Model: ECO-ADV-WS22 Wood Stove Efficiency: 82.3% Laboratory: Intertek BTU Output: 11,700 to 27,000 per hour Report Number: 3198460 Heating Capacity: 1,580 to 2,780 sq. feet Type: Listed Room Heater, Solid Fuel Type depending on climate zone Standard: UL1482 and ULC S627-00 and Vent Size: 6 inches (UM) 84-HUD, Mobile Home Firebox Size: 2.75 cubic feet... -
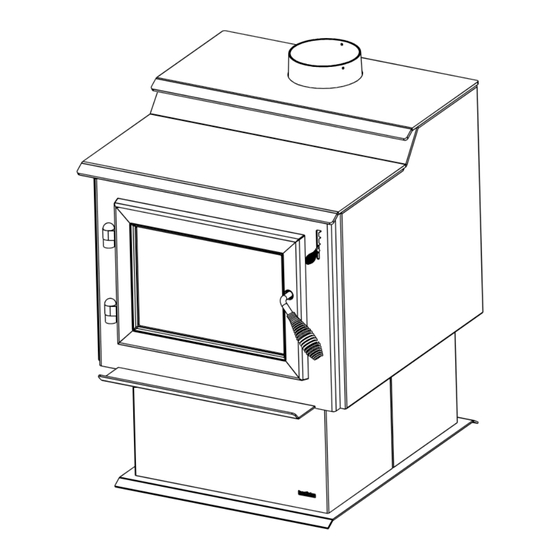
Page 7: Section 2: Operating Instructions
A. Your Wood Appliance - General Operating Parts WARNING! DO NOT operate appliance before reading and understanding operating instructions. Failure to operate appliance according to operating instructions could cause fire or injury. Firebrick Burn Rate Door Handle & Control Spring Handle Door Frame & Glass Hearth Pad Figure 7.1 General Operating Parts Heatilator • ECO-ADV-WS22 • 7057-128C • August 13, 2010... -
Page 8: Fire Safety
• Contact your local chimney professional and have your stove and stove pipe inspected for any damage. WARNING! Risk of Fire! A chimney fire can permanently • Do not use your stove until the chimney professional damage your chimney system and nearby structures. informs you it is safe to do so. In the event of a chimney fire, Hearth & Home Technolo- Hearth & Home Technologies WILL NOT warranty stoves gies Inc. recommends that exhibit evidence of over-firing. Evidence of over-firing includes, but is not limited to: • Replacement of the chimney, and • Inspection of the adjacent structure to the provisions of • Warped air tube NFPA Level III inspection criteria • Deteriorated refractory brick retainers • Deteriorated baffle and other interior components Heatilator • ECO-ADV-WS22 • 7057-128C • August 13, 2010... -
Page 9: Burning Process
• Fuel Air quality is important to all of us, and if we choose to use • Air wood to heat our homes we should do so responsibly. • Heat We need to learn to burn in the cleanest way possible al- If heat is robbed from the appliance during the drying stage, lowing us to continue using our wood appliances for many the new load of wood has reduced the chances for a good years to come. clean burn. It is always best to burn dry, seasoned firewood. When the wood isn’t dry, you must open the air controls and burn at a high burn setting for a longer time to start it burning. The heat generated from the fire should be warming your home and establishing the flue draft, not evaporating the moisture out of wet, unseasoned wood, resulting in wasted heat. Heatilator • ECO-ADV-WS22 • 7057-128C • August 13, 2010... -
Page 10: Burn Rate Air Control
5. Low Burn Rate* - Below 10,000 BTU/hr • Leave the Burn Rate Air Control at the bottom marker. Leave the blower off until the burn is well established, i.e., 30 minutes. *NOTE: These are approximate settings, and will vary with type of wood or chimney draft. Due to altitude and other environmental circumstances, this operational information is a guideline only. Figure 10.1 - Burn Rate Air Control Heatilator • ECO-ADV-WS22 • 7057-128C • August 13, 2010... -
Page 11: Correct Baffle & Blanket Placement
Back of Firebox Ceramic Blanket is NOT in contact with the Ceramic Blanket back of the firebox and NOT even with the Baf- fle Board in the front. Back of Firebox Ceramic Blanket Baffle Board Ceramic Blanket and Baffle Board MUST be in contact with the back of the firebox and even with Baffle Board each other in the front. Ceramic Blanket is bunched up at the back of the firebox and NOT even with the Baffle Figure 11.1 Board in the front. Figure 11.2 Heatilator • ECO-ADV-WS22 • 7057-128C • August 13, 2010... -
Page 12: Building A Fire
Ceramic Blanket on Top other hot, but far enough away from each other to allow 2 pc air flow between them. Baffle Board 7. Once there is an established bed of coals, set the Burn Rate Air Control to the desired setting following the instructions found in the Section: Burn Rates and Operating Efficiency. 8. If you have installed the optional blower, please note that the blower tends to cool the appliance. Leave the blower off until the burn is well established, i.e., 30 minutes. CAUTION Tube Channels Baffle Protection The baffle boards are FRAGILE. Use extreme caution Channel when loading firewood to prevent: • Cracking, breaking or damaging the baffle boards Figure 12.1 DO NOT operate the stove without baffle boards Heatilator • ECO-ADV-WS22 • 7057-128C • August 13, 2010... -
Page 13: Wood Fuel
• Store wood under cover to prevent water absorption from rain or snow. Avoid covering the sides and ends Processed Solid Fuel Fire Logs completely. • NOT permitted for use in this appliance WARNING! Risk of Fire! DO NOT store wood: • In front of the appliance. • In space required for loading or ash removal. Heatilator • ECO-ADV-WS22 • 7057-128C • August 13, 2010... -
Page 14: Blower Operating Instructions
When reloading the appliance, raise the Burn Rate Air Control all the wall to the High setting for 5 to 15 minutes before setting to the desired burn rate. 6. The blower is equipped with a rheostat (speed control). The highest blower speed is obtained by turning the rheostat on, then adjusting back towards “OFF” as far as possible without turning the blower off. For a low blower speed, turn the control knob clockwise as far as possible Figure 14.3 Heatilator • ECO-ADV-WS22 • 7057-128C • August 13, 2010... -
Page 15: Opacity (Smoke)
Open windows for air circulation. Opacity is measured in percent: • 100% opacity is when an object is totally obscured by the smoke column from a chimney, and • 0% opacity means that no smoke column can be seen. As you become familiar with your appliance, you should periodically check the opacity. This will allow you to know how to burn as nearly smoke-free as possible (goal of 0% opacity). P. Frequently Asked Questions ISSUES SOLUTIONS Odor from appliance When first operated, this appliance may release an odor for the first several hours. This is caused by the curing of the paint and the burning off of any oils remaining from manufacturing. Metallic noise Noise is caused by metal expanding and contracting as it heats up and cools down, similar to the sound produced by a furnace or heating duct. This noise does not affect the operation or longevity of the appliance. Whirring sound If the optional blower has been installed, the blower produces a whirring sound which increases in volume as the speed is increased. Heatilator • ECO-ADV-WS22 • 7057-128C • August 13, 2010... -
Page 16: Quick Start Guide
ADD KINDLING WARNING! Risk of Fire Close and securely latch the door after the fire has started, and after refueling, to prevent: • Spillage of smoke, flame and carbon monoxide • Spillage of sparks, coals and logs • Over-firing DO NOT leave the stove unattended with the door open. Starting a fire may not require an open door for draft. The air control should LIGHT THE PAPER supply adequate draft. ADD MORE WOOD REDUCE AIR CONTROL Set to desired heat output The stove is ready for normal operation. HIGH Heatilator • ECO-ADV-WS22 • 7057-128C • August 13, 2010... -
Page 17: Section 3: Maintenance And Service
22). • Close the door tightly. • The creosote or soot should be removed with a brush specifically designed for the type of chimney in use. • Clean out fallen ashes from the firebox. • It is also recommended that before each heating season the entire system be professionally inspected, cleaned and repaired if necessary. WARNING! Risk of Fire! Do not use chimney cleaners or flame colorants in your appliance. It will corrode your pipe. Heatilator • ECO-ADV-WS22 • 7057-128C • August 13, 2010... -
Page 18: Glass Cleaning
• Operating the appliance with the Burn Rate Air Control Provide brick dimension or copy this page, mark in the High setting for 15-20 minutes should remove the the desired brick and take it to your authorized built up coating. dealer. CAUTION! Handle glass assembly with care. Glass is breakable • Avoid striking, scratching or slamming glass • Avoid abrasive cleaners • Do not clean glass while it is hot Figure 18.1 Brick Size 9 x 4-1/2 x 1-1/4 9 x 2-1/4 x 1-1/4 Heatilator • ECO-ADV-WS22 • 7057-128C • August 13, 2010... -
Page 19: Quick Reference Maintenance Guide
Always burn dry wood to help prevent cap blockage and creosote build-up. Firebrick & Ash Removal Ashes must be cool and then you can dispose WEEKLY of the ashes in a non-combustible container. Firebrick is designed to protect your firebox. After Every After ashes are removed, inspect the firebrick 25 Loads of and replace firebricks that are crumbling, Wood cracked or broken. Keep door and glass gasket in good shape to Door & Glass Assemblies WEEKLY maintain good burn times on a low burn setting. To test: place a dollar bill between the stove and door and then shut the door. If you can pull the After Every dollar out, remove one washer from door handle 25 Loads of behind latch cam and try again. If you can still Wood pull it out, replace the door gasket. Check the glass frame for loose screws to pre- vent air leakage. Check glass for cracks. Door Handle Check the door latch for proper adjustment. WEEKLY This is very important especially after the door Latch Cam rope has formed to the stove face. After Every 25 Loads of Wood Check door handle for smooth cam operation. Spacing Washers Heatilator • ECO-ADV-WS22 • 7057-128C • August 13, 2010... -
Page 20: Section 4: Troubleshooting Guide
Check for restricted termination cap Check for blockage of outside air kit (if installed). Check for flue blockage. Pre-warm flue before starting fire (refer to Building a Fire Section). Not enough air for fire to ignite Check for adequate vent height (refer to Chimney Height Section). Open window below the appliance towards the wind. Wood condition is too wet, too Use dry, seasoned wood (refer to Seasoned Wood large Section). Bed of coals not established Start with paper & kindling to establish bed of before adding wood coals (refer to Building a Fire Section). Flue blockage such as birds’ Have chimney inspected for creosote and cleaned nests or leaves in termination by a certified chimney sweep. Down draft or negative pressure Do not use exhaust fans during start-up (refer to Competition with exhaust Negative Pressure Section). devices Open window below the appliance towards the wind. Fire burns too fast Mix in hardwood. Mix in less seasoned wood after fire is established Extremely dry or soft wood (refer to Wood Fuel Section). Check for correct vent height; too much vertical height creates overdrafting. Overdrafting Check location of vent termination (refer to Chimney Termination Requirement Section). Heatilator • ECO-ADV-WS22 • 7057-128C • August 13, 2010... -
Page 21: Section 5: Service Parts Replacement
Continue to tighten each retainer alternately, a few turns at a time, until the glass is secure. DO NOT OVERTIGHTEN - can cause glass to break. 9. Replace the door on the appliance. Snap Disc Location WARNING! Risk of Fire or Injury! Use only glass that is specified in the manual, DO NOT replace with any other material. Glass breakage will occur. Figure 21.1 CAUTION! Handle glass with care. • Inspect the gasket to ensure it is undamaged. • Do NOT strike, slam or scratch glass. Snap Disc • Do NOT operate appliance with glass & door assembly removed. • Do NOT operate with glass cracked, broken or scratched. This appliance is equipped with ceramic super heat-resistant Magnet glass, which can only be broken by impact or misuse. Spade Connectors Figure 21.2 Heatilator • ECO-ADV-WS22 • 7057-128C • August 13, 2010... -
Page 22: Baffle Removal
Rate Air 4. Remove the ceramic blanket. Control 5. Re-install the ceramic blanket and smooth out the blan- ket. 6. Slide the baffle pieces one piece at a time underneath the blanket. Be sure the baffle boards are even with the front manifold tube and is resting on all tubes. Figure 22.1 and 22.2. Ceramic Blanket on Top 7. Re-install the baffle protection channel by rotating it up and 2 pc around the front tube so the bottom flange of the channel Baffle Board rests behind the manifold tube. The baffle boards and blanket are tucked inside the rear of the baffle protection channel. Tube Channels Baffle Protection Channel Figure 22.2 Figure 22.1 - Baffle Heatilator • ECO-ADV-WS22 • 7057-128C • August 13, 2010... -
Page 23: Door Handle Assembly
D. Door Handle Assembly 1. Install washer on door handle shaft. 2. Slide door handle through door. 3. Install second washer(s) as shown in Figure 23.1. 4. Install key in groove. 5. Align groove in latch cam with key; slide latch cam over shaft 6. Install locknut but do not overtighten, the handle needs to move smoothly. 7. Install spring handle turning in a counter-clockwise mo- tion to desired location on door handle rod. CAUTION! Do not overtighten lock nut. The door handle needs to move smoothly. Door Cross Section (example) Latch Cam Locknut Spring Handle Door Handle Spacing Washers Square Key Figure 23.1 Heatilator • ECO-ADV-WS22 • 7057-128C • August 13, 2010... -
Page 24: Tube Channel Assembly Replacement
2. Make sure tube channel assembly is flush against the side of the stove and secure with channel nuts. 3. R e-install channel cover and side shield. 4. Re-install ceramic blanket, baffle pieces and baffle pro- tection channel. See instructions of page 22. Tube Channel Rack Channel Access Channel Cover Cover Screws (4) Remove 3 Screws Tube Channel Channel Bolts (2) Assembly Side Panel Figure 24.1 Heatilator • ECO-ADV-WS22 • 7057-128C • August 13, 2010... -
Page 25: Installer's Guide
• During a low burn, the chimney draft (static pressure) should located in the immediate vicinity of the fireplace be approximately -.04 inch water column (W.C.) • Avoid installing the fireplace near doors, walkways or small • During a high burn the chimney draft should be approximately isolated spaces -.10 inch (W.C.) • Recessed lighting should be a “sealed can” design • Measure the W.C at 6 inches (152mm) above the top of the • Attic hatches weather stripped or sealed appliance after one hour of operation at each burn setting. • Attic mounted duct work and air handler joints and seams taped or sealed NOTICE: Hearth & Home Technologies assumes no • Basement installations should be avoided responsibility for the improper performance of the appliance system caused by: • Inadequate draft due to environmental conditions • Downdrafts • Tight sealing construction of the structure • Mechanical exhausting devices Heatilator • ECO-ADV-WS22 • 7057-128C • August 13, 2010... -
Page 26: Locating Your Appliance And Chimney
• Must have an approved and Listed cap • Central heat outlets or returns • Must not be located where it will become plugged by snow or other material • Must terminate at least 3 feet (91cm) above the NOTICE: roof and at least 2 feet (61cm) above any portion • Chimney performance may vary. of the roof within 10 feet (305cm). • Trees, buildings, roof lines and wind conditions affect • Must be located away from trees or other struc- performance. tures • Chimney height may need adjustment if smoking or overdraft occurs. Heatilator • ECO-ADV-WS22 • 7057-128C • August 13, 2010... -
Page 27: 2-10-3 Rule
10 ft. (305cm) To Nearest Roofline 3 ft. (91cm) Minimum Pitched Roof Figure 27.1 10 ft. (305cm) or more Less than 10 ft. (305cm) Wall or Parapet 2 ft. (61cm) Minimum 3 ft. (91cm) Minimum 3 ft. (91cm) Minimum Flat Roof Figure 27.2 Heatilator • ECO-ADV-WS22 • 7057-128C • August 13, 2010... -
Page 28: Tools And Supplies Needed
• Doors are shipped in separate packages. • Report to your dealer any parts damaged in shipment. • Read all the instructions before starting the installation. Follow these instructions carefully during the installation to ensure maximum safety and benefit. WARNING! Risk of Fire! Inspect appliance and components for damage. Damaged parts may impair safe operation. • Do NOT install damaged components. • Do NOT install incomplete components. • Do NOT install substitute components. Report damaged parts to dealer. Heatilator • ECO-ADV-WS22 • 7057-128C • August 13, 2010... -
Page 29: Section 7: Dimensions And Clearances
21-11/16 in. (551mm) Figure 29.1 - Front View Figure 29.2 -Top View 30-3/4 in. (781mm) 28-3/8 in. (720mm) 15-1/8 in. (384mm) 6-5/8 in. (168mm) 27-1/2 in. (699mm) 11-5/8 in. (295mm) 23-1/4 in. (591mm) 27 in. (686mm) Figure 29.3 - Side View Heatilator • ECO-ADV-WS22 • 7057-128C • August 13, 2010... -
Page 30: Clearances To Combustibles (Ul And Ulc)
**In Canada must comply with Standard CAN/ULC-S629-M87 for the 650 C Factory-built chimney. * SEE PIPE MANUFACTURERS CLEARANCES - NOT TESTED NOTE: Service Space WARNING! Risk of Fire! In order to replace the tube channel assembly a clearance • Comply with all minimum clearanes to combustibles of 19 inches (483mm) is required on the right side of stove as specified. in order to remove the tubes with the stove in place. • Failure to comply may cause house fire. If space is not available, the stove will have to be discon- nected from the chimney to proceed with the tube replace- ment. Heatilator • ECO-ADV-WS22 • 7057-128C • August 13, 2010... -
Page 31: Hearth Protection Requirements
(8 in.) 1359mm (53-1/2 in.) minimum 457mm (18 in.) Must extend 2 in. (51mm) beyond each side of pipe (shaded area) 1066mm (42 in.) CANADA minimum Figure 31.3 Figure 31.4 NOTICE: • Illustrations and photos reflect typical installations and are FOR DESIGN PURPOSES ONLY. • Illustrations/diagrams are not drawn to scale. • Actual installation may vary due to individual design preference • Hearth & Home Technologies reserves the right to alter its products. Heatilator • ECO-ADV-WS22 • 7057-128C • August 13, 2010... -
Page 32: Alternate Floor Protection
Thermal Resistance: R value The R value is a measure of a material’s resisteance to heat transfer. R value is convenient when more than one material is used since you can add the R values together, whereas you can not do this for k value. The HIGHER the R factor means less heat is being conducted through the non-combustible material to the combustible material beneath it. The R value of a material must be equal or larger then the required R value to be accept- able. Converting k to R: Divide 1 by k and multiply the results times th thickness in inches of the material. R = 1/k x inches of thickness Converting R to k: Divide the inches of thickness by R. k = inches of thickness/R Calculatons: Example: Floor protection requires k value of .84, 3/4 inch thick. Alternative material has a k value of .6 and is 3/4 inch thick. Divide .6 by .75 = k value of .80. This k value is smaller than .84 and therefore is acceptable. Heatilator • ECO-ADV-WS22 • 7057-128C • August 13, 2010... -
Page 33: Section 8: Venting And Chimney Systems
• Within the room, between appliance and ceiling or wall. increased build-up of creosote. Connector shall NOT pass through: • Attic or roof space • Closet or similar concealed space • Floor or ceiling NOTICE: Check with your local building authorities and/or consult the National Fire Protection Association Maintain minimum clearances to combustibles (NFPA 211). NOTICE: Where passage through the wall, or partition of combustible construction is desired in Canada, the installation shall conform to CAN/CSA-B365. Heatilator • ECO-ADV-WS22 • 7057-128C • August 13, 2010... -
Page 34: Chimney Height/Rise And Run
S629M, STANDARD FOR 650 C FACTORY-BUILT Listed Chimney CHIMNEYS. WARNING! Risk of Fire! Inspection of Chimney: Ceiling Support • Chimney must be in good condition and meets the Chimney minimum standard of NFPA 211. Connector • Factory-built chimney must be 6 inches (152mm) UL103 HT. WARNING! Risk of Asphyxiation! • DO NOT CONNECT THIS APPLIANCE TO A CHIMNEY FLUE SERVICING ANOTHER Floor APPLIANCE OR TO ANY AIR DISTRIBUTION Protector DUCT OR SYSTEM. This may allow flue gases to enter the house. Figure 34.2 - Factory-Built Interior Chimney Heatilator • ECO-ADV-WS22 • 7057-128C • August 13, 2010... -
Page 35: Masonry Chimney
12 in. (305mm) Of Brick Sheathing Outside Air Rear Vent Outside Air Floor Termination Cap Protector Airtight Cleanout Door Figure 35.1 Masonry Chimney WARNING! Risk of Fire! WARNING! Risk of Asphyxiation! Inspection of Chimney: • DO NOT CONNECT THIS APPLIANCE TO A CHIMNEY FLUE SERVICING ANOTHER APPLIANCE • Chimney must be in good condition and meets the OR TO ANY AIR DISTRIBUTION DUCT OR SYSTEM. minimum standard of NFPA 211. This may allow flue gases to enter the house. Heatilator • ECO-ADV-WS22 • 7057-128C • August 13, 2010... -
Page 36: Masonry Chimney Liner
National Fire Protection Association (NFPA) Standard 211. • A chimney support package must be used when a connection is made through the ceiling to a factory built chimney. • An approved thimble and chimney support package are absolutely necessary to provide safe clearances to combustible wall and ceiling material. NOTICE: In Canada, the installation shall conform to CAN/CSA-B365. NOTICE: Check with your local building authorities and/or consult the National Fire Protection Association (NFPA 211). Heatilator • ECO-ADV-WS22 • 7057-128C • August 13, 2010... -
Page 37: Air Clearances
Secure Chimney Clearance to Section 6. Insert the section of the solid insulated chimney into the Combustibles outer wall of the masonry chimney. Chimney 7. Tightly secure the length of the solid insulated chimney Wood Studs Used Connector for Framing - Spaced with the wall band to the masonry chimney. 2 inch (51mm) 8. Insert a section of chimney connector into the chimney. clearance from Masonry Chimney Make sure it does not protrude past the edge of the clay chimney liner inside the chimney. 9. Seal the end of the chimney connector to the clay liner Figure 37.2 with refractory mortar. 10. Install trim collar around the sold pack chimney section. Heatilator • ECO-ADV-WS22 • 7057-128C • August 13, 2010... - Page 38 Chimney Flue Space to Chimney Liner Section Fireclay Chimney Liner or Connector Equivalent Chimney Section Trim Collar Wall Band Wall Spacer Masonry Chimney Constructed to NFPA 211 Figure 38.1 WARNING! Risk of Fire! Do NOT pack insulation or other combustibles between spacers. • ALWAYS maintain specified clearanes around venting and spacers and install spacers as specified. Failure to keep insulation or other material away from vent pipe may cause a fire. Heatilator • ECO-ADV-WS22 • 7057-128C • August 13, 2010...
-
Page 39: Section 9: Appliance Set-Up
Flex Adapter Wire Tie Outside air inlet must be located to prevent blockage Wire Tie from leaves, snow, ice or other debrs. Blockage may cause combustion air starvation. Smoke spillage may set off alarms or irritate sensitive individuals. Termination The length of the outside air supply duct shall NOT exeed the length of the vertical height of the exhaust For Floor Installa- flue. tions Remove Circular “Knock-Out” • The fire will not burn properly and their will be in Base of Pedestal. smoke spillage when the door is opened due to air Flex Line Wire Tie starvation. Figure 39.1 - Floor & Rear Installation Heatilator • ECO-ADV-WS22 • 7057-128C • August 13, 2010... -
Page 40: Mobile Home Installation
Outside Air Floor Vent per Section 905(a) of the Uniform Mechanical Code (UMC). Figure 40.1 • Offsets greater than 45° are considered horizontal and are also allowed, providing the horizontal run does not exceed 75% of the vertical height of the vent. CAUTION! • Construction, clearance and termination must be in com- pliance with the UMC Table 9C. This installation must also • THE STRUCTURAL INTEGRITY OF THE MOBILE HOME comply with NFPA 211. FLOOR, WALL AND CEILING/ROOF MUST BE MAINTAINED NOTE: Top sections of chimney must be removable to allow Do NOT cut through: maximum clearance of 13.5 feet (411cm) from ground level • Floor joist, wall, studs or ceiling trusses or any support- for transportation purposes. ing material that would affect the structural integrity. WARNING! Risk of Asphyxiation! NEVER INSTALL IN A SLEEPING ROOM AS IT WILL CONSUME THE OXYGEN IN THE ROOM. Heatilator • ECO-ADV-WS22 • 7057-128C • August 13, 2010... -
Page 41: Blower Installation (Optional)
CAUTION! Risk of Shock! • Do NOT remove grounding prong from plug. • Plug directly into properly grounded 3 prong receptacle. • Route cord away from appliance. • Do NOT route cord under or in front of appliance. Blower Snap Disc Snap Disc Bracket with Magnet MANUAL: Over-rides the Snap Disc AUTO: Fan will turn ON/OFF Automatically by the Snap Disc Controls the Fan Speed Figure 41.1 Heatilator • ECO-ADV-WS22 • 7057-128C • August 13, 2010... -
Page 42: Section 10: Reference Materials
ECO-ADV-WS22 Service Parts Free Standing Wood Stove Beginning Mfg Date: April, 2010 Beginning Manufacturing Date: Apr 2010 Reference Materials Ending Manufacturing Date: Active Ending Mfg Date: A. Exploded View 13 See Burn Rate Kit Detail Below 13 Inlet Assembly 14 Door Assembly Part number list on following page. -
Page 43: Service Parts & Accessories
HOW TO ORDER B. Service Parts & Accessories To order the entire assembly, order the top line part number only. ECO-ADV-WS22 Service Parts To order an individual part from an assembly, order the part(s) listed in the indented portion. Free Standing Wood Stove Beginning Manufacturing Date: Apr 2010 Ending Manufacturing Date: Active IMPORTANT: THIS IS DATED INFORMATION. When requesting service or replacement Stocked parts for your appliance please provide model number and serial number. All parts listed in this manual may be ordered from an authorized dealer. -
Page 44: B. Service Parts & Accessories
HOW TO ORDER ECO-ADV-WS22 B. Service Parts & Accessories (Cont’d) To order the entire assembly, order the top line part number only. Service Parts To order an individual part from an assembly, order the part(s) listed in the indented portion. Free Standing Wood Stove Beginning Manufacturing Date: Apr 2010 Ending Manufacturing Date: Active IMPORTANT: THIS IS DATED INFORMATION. When requesting service or replacement Stocked parts for your appliance please provide model number and serial number. All parts listed in this manual may be ordered from an authorized dealer. -
Page 45: Service & Maintenance Log
C. Service And Maintenance Log Date of Service Performed By Description of Service Heatilator • ECO-ADV-WS22 • 7057-128C • August 13, 2010... -
Page 46: C. Service & Maintenance Log
C. Service And Maintenance Log (Cont’d) Date of Service Performed By Description of Service Heatilator • ECO-ADV-WS22 • 7057-128C • August 13, 2010... -
Page 47: Homeowner's Notes
D. Homeowner’s Notes Heatilator • ECO-ADV-WS22 • 7057-128C • August 13, 2010... -
Page 48: Contact Information
E. Contact Information CONTACT INFORMATION: Hearth & Home Technologies 1445 North Highway Colville, WA 99114 Division of HNI INDUSTRIES Please contact your Heatilator dealer with any questions or concerns. For the number of your nearest Heatilator dealer, please visit www.heatilatorecochoice.com. NOTICE DO NOT DISCARD THIS MANUAL • • Read, understand and • Leave this manual with...
Need help?
Do you have a question about the ECO-ADV-WS22 and is the answer not in the manual?
Questions and answers