Xantrex XPower 400 Owner's Manual
Hide thumbs
Also See for XPower 400:
- Owner's manual (76 pages) ,
- Owner's manual (76 pages) ,
- Owner's manual (60 pages)
Table of Contents
Advertisement
Quick Links
Advertisement
Table of Contents
Troubleshooting

Related Manuals for Xantrex XPower 400


Summary of Contents for Xantrex XPower 400
- Page 1 XPower Inverter 400 t 1-800-670-0707 (toll free in North America) 1-360-925-5097 (direct) f 1-800-994-7828 (toll free in North America) 1-360-925-5143 (direct) e CustomerService@xantrex.com www.xantrex.com Owner’s Guide 975-0164-01-01 REV A Printed in China...
- Page 2 XPower Inverter 400 Owner’s Guide...
-
Page 3: Contact Information
Trademarks XPower Inverter 400 is a trademark of Xantrex International. Xantrex is a registered trademark of Xantrex International. Other trademarks, registered trademarks, and product names are the property of their respective owners and are used herein for identification purposes only. -
Page 4: Table Of Contents
Contents 1. Introduction ......... . 1 About the Inverter . - Page 5 5. Operating the Inverter ....... . .16 Operating conditions and guidelines ..... 16 Shutting the inverter off .
-
Page 6: Introduction
1 Introduction About the Inverter Connected to the 12 V outlet in your car, truck, boat, RV, or directly from a dedicated 12 V battery, the XPower Inverter 400 efficiently and reliably powers a wide variety of household AC products, such as portable stereos, laptop computers, TVs, VCRs, and other similar products. -
Page 7: About This Guide
About this Guide To get the best performance from your inverter, we recommend that you read this guide before connecting and using the inverter, and then save it for future reference. This guide contains: • Important safety information (page 3) •... -
Page 8: Important Safety Information
2 Important Safety Information Misusing or incorrectly connecting the XPower Inverter 400 may damage the equipment or create hazardous conditions for users. Read the following safety instructions and pay special attention to all Caution and Warning statements in the guide. Warnings identify conditions that may result in personal injury or loss of life. - Page 9 WARNING: Explosion hazard Do not use the inverter in the presence of flammable fumes or gases, such as in the bilge of a gasoline-powered boat, or near propane tanks. Do not use the inverter in an enclosure containing automotive-type, lead-acid batteries. These batteries, unlike sealed batteries, vent explosive hydrogen gas, which can be ignited by sparks from electrical connections.
-
Page 10: Additional Safety Guidelines
CAUTION Do not connect live AC power to the inverter’s AC outlets. The inverter will be damaged even if it is turned off. Do not connect any AC load that has its neutral conductor connected to ground to the inverter. Additional safety guidelines •... -
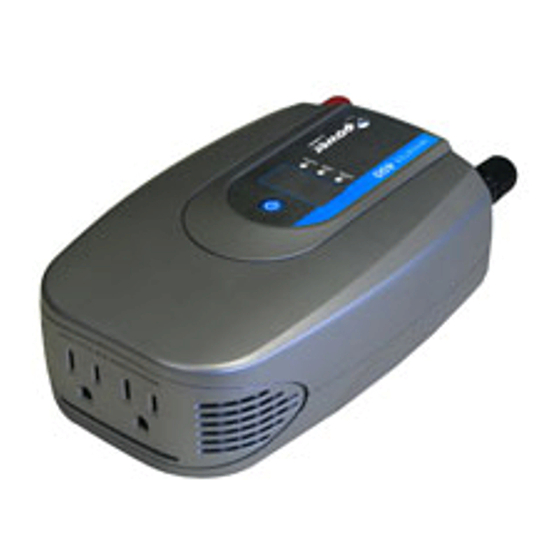
Page 11: Inverter Features
3 Inverter Features This section describes the main features of the XPower Inverter 400. CAUTION To prevent overheating, ensure that all the ventilation openings on the unit are kept clear. AC (front) panel Figure 1 shows the AC panel of the inverter. Figure 1 AC Panel Two AC receptacles are located on one end of the inverter. -
Page 12: Dc (Back) Panel
DC (back) panel Figure 2 shows the DC panel of the inverter. Use Table 1 to identify the function of each item. Figure 2 DC Panel Table 1 DC Panel Functions Item Function Fan and Ventilation Openings The cooling fan on the unit is designed to operate only when output power is greater than approximately 80 W. -
Page 13: Digital Display (Top) Panel
Digital display (top) panel Figure 3 shows the digital display panel. Use Table 2 to identify the function of items. Figure 3 Digital Display Panel... - Page 14 Table 2 Digital Display Panel Functions Item Function Press and hold to turn the unit on and off. When the unit is on, press to toggle the display function to show input voltage, output power or output voltage. Normal Operation Digital display shows input voltage, output power or output voltage.
-
Page 15: Types Of Connections
Types of connections The inverter comes with accessories for making two types of connections: • For AC loads of 150 W or less: Lighter plug cable to connect the inverter to a 12 V outlet in your vehicle. See Figure 4. •... -
Page 16: Connecting The Inverter
4 Connecting the Inverter CAUTION The inverter must only be connected to a battery that has a nominal output of 12 V. It will not operate if connected to a 6 V battery and may be damaged if connected to a battery with 16 V or more. Choosing a location For best performance, place the inverter on a flat surface in a location that is:... -
Page 17: Connecting For Loads Under 150 W
Connecting for loads under 150 W For loads under 150 W, you can use the lighter plug cable. Follow these steps to connect the unit with the lighter plug cable: Place the inverter on a flat surface such as the floor of your vehicle. Make sure that the unit is off by verifying the digital display is off. -
Page 18: Connecting For Loads Over 150 W
Tighten the nut on each cabling terminal until it is snug. Do not over-tighten. Place the inverter’s lighter plug in the vehicle’s lighter socket or a 12 V outlet. Turn on the unit by holding the switch located on top of the unit until 888 is shown on the display. - Page 19 Follow these steps to make a direct battery connection: Place the inverter on a flat surface. Make sure that the unit is off by verifying the digital display is off. CAUTION: Reverse polarity Power connections of the 12 V DC battery to the inverter must be positive to positive and negative to negative.
- Page 20 Fasten the positive (red) clamp to the positive battery post, and then fasten the negative (black) clamp to the negative battery post. Turn on the unit by holding the switch located on top of the unit until 888 is shown on the display. The digital display will show the battery voltage, indicating that the inverter is operating normally and AC power is available at the outlet.
-
Page 21: Operating The Inverter
5 Operating the Inverter This section explains how to operate the inverter most efficiently. Operating conditions and guidelines This section describes normal operation as well as conditions that trigger an alarm or automatically shut down the inverter. Normal Operation When you connect the inverter to the vehicle’s lighter socket or directly to a 12 V battery and turn on the unit, the digital display will show input voltage, the input voltage illuminates and AC power is available at the outlets. -
Page 22: Shutting The Inverter Off
Overload Shutdown If you connect an AC load that is rated too high (see Table 3) or a load that draws excessive surge power, the inverter shuts down. The overload error code ‘E03’ will show on the digital display. Overheating Shutdown The inverter shuts down automatically if it exceeds its safe operating temperature. -
Page 23: Operating Loads With High Surge Requirements
The inverter’s AC (“modified-sine wave”) output waveform is designed to function similarly to the sine wave shape of utility power. Most AC products correctly rated for the power rating maximums listed in Table 3 or less will operate normally with the inverter. Operating loads with high surge requirements The power, or wattage rating, of AC loads is the average amount of power they use. - Page 24 Table 4 Wattage of Common AC Products Will operate with Product Watts inverter? Cell phone/camcorder charger Video game console Portable work light Stereo system Laptop computer 13" TV 27" TV 20" TV/VCR combo Small appliances 400+ Power tools 400+ a.Power requirements for product examples are estimates only. To calculate the watt- age of a product, use the following equation: amperage x 115.
-
Page 25: Maintaining Battery Condition
6 Maintaining Battery Condition The battery operating time of the inverter depends on the charge level of the battery, battery capacity, and the amount of power drawn by the AC loads you are operating. With a typical vehicle battery, you can expect the following: Table 5 Battery Operating Times Load... - Page 26 Here are some guidelines that will help to preserve your battery: • Vehicle batteries are not designed for repeated deep-discharge cycles, and constantly recharging a vehicle’s battery will shorten its life. Therefore, when you are using a vehicle battery as a power source, start the vehicle every hour or two to recharge the battery.
-
Page 27: Troubleshooting
7 Troubleshooting This section will help you identify the source of most problems that can occur with the XPower Inverter 400. If you have a problem with the inverter, please review this section before contacting Customer Service. If you are unable to solve a problem and need to contact service, please prepare for the call by writing down the following details: •... -
Page 28: Common Problems
Common problems WARNING: Electrical shock and burn hazard Do not disassemble the inverter. It does not contain any user- serviceable parts. Attempting to service the inverter yourself could result in an electrical shock or burn. Buzz in audio systems Some inexpensive stereo systems have inadequate internal power supply filtering and buzz slightly when powered by the inverter. -
Page 29: Troubleshooting Reference
Troubleshooting reference This section describes problems, their symptoms, possible causes, and solutions. Problem: The AC load will not operate. Digital display is off. Possible Cause Solution Battery is defective. Check battery and replace if required. The inverter has been connected Check connection to battery. - Page 30 Problem: Measured inverter output is too low. Possible Cause Solution A standard “average-reading” For accurate measurement, the inverter AC voltmeter has been used to modified sine wave output requires a “true measure output voltage, RMS” voltmeter for accurate measurements. resulting in an apparent reading 5–15 V too low.
- Page 31 Problem: Inverter will not deliver 400 watts. Possible Cause Solution The inverter is connected to a Connect the inverter directly to the battery lighter socket with the lighter using the DC cable with clips. plug cable, which is fuse limited to 180 watts.
- Page 32 Problem: The AC load will not operate, error code shows on digital display and alarm is sounding. Error Possible Cause Solution Low voltage shutdown because Recharge battery. battery is discharged. Shorten cables or use heavier cables. Over-voltage shutdown because Verify the charging system is of high input voltage.
-
Page 33: Specifications
8 Specifications Specifications are subject to change without notice. Table 6 Specifications AC output voltage (nominal) 120 V AC DC input voltage range 10.5–15.5 V DC Maximum AC output power 400 W Maximum AC output surge power 700 W AC output frequency 60 ±... -
Page 34: Warranty And Return
You require proof of purchase to make warranty claims. What will Xantrex do? Xantrex will, at its option, repair or replace the defective product free of charge, provided that you notify Xantrex of the product... - Page 35 Authorization Policy described in your product manual. For some products, Xantrex maintains a network of regional Authorized Service Centers. Call Xantrex or check our website to see if your product can be repaired at one of these facilities. What proof of purchase is required? In any warranty claim, dated proof of purchase must accompany the product and the product must not have been disassembled or modified without prior written authorization by Xantrex.
- Page 36 Xantrex or its authorized service centers (hereafter "ASCs"); the product if it is used as a component part of a product expressly war- ranted by another manufacturer;...
- Page 37 UNDER APPLICABLE LAW TO APPLY TO THE PRODUCT SHALL BE LIMITED IN DURATION TO THE PERIOD STIPULATED UNDER THIS LIMITED WARRANTY. IN NO EVENT WILL XANTREX BE LIABLE FOR ANY SPECIAL, DIRECT, INDIRECT, INCIDENTAL OR CONSEQUENTIAL DAMAGES, LOSSES, COSTS OR EXPENSES HOWEVER ARISING WHETHER IN CONTRACT OR TORT...
- Page 38 IN CONNECTION WITH LIFE SUPPORT SYSTEMS OR OTHER MEDICAL EQUIPMENT OR DEVICES. Please note that the XPower Inverter 400 is not intended for use as an uninterruptible power supply and Xantrex makes no warranty or representation in connection with any use of the product for such purposes.
-
Page 39: Return Procedure
Direct to Xantrex In the event that you no longer have access to the retail outlet that you purchased your XPower Inverter 400 from, you may return the product to Xantrex. Package the unit safely, preferably using the original box and packing materials. -
Page 40: Return Material Authorization Policy
Ship the unit prepaid to the address provided by your Xantrex customer service representative. Return Material Authorization Policy Before returning a product directly to Xantrex you must obtain a Return Material Authorization (RMA) number and the correct factory "Ship To"... -
Page 41: Out Of Warranty Service
To return your XPower Inverter 400 for out of warranty service, contact Xantrex Customer Service for a Return Material Authorization (RMA) number and follow the other steps outlined in “Return Procedure”...
Need help?
Do you have a question about the XPower 400 and is the answer not in the manual?
Questions and answers