Advent In - Dash Navigation Radio Owner's Manual
Hide thumbs
Also See for In - Dash Navigation Radio:
- Quick start manual (12 pages) ,
- Addendum to owner's manual (9 pages)
Table of Contents
Advertisement
Quick Links
Advertisement
Table of Contents

Related Manuals for Advent In - Dash Navigation Radio


Summary of Contents for Advent In - Dash Navigation Radio
- Page 1 Owner’s Manual In - Dash Navigation Radio...
-
Page 2: Warnings
Introduction Congratulations on your purchase of the In-Dash Navigation Radio. Please read the instruction manual for this product before using. The documentation provided will allow you to fully enjoy all the features this unit has to off er. Please save this manual for future reference. -
Page 3: Table Of Contents
Contents WARNINGS ..............2 FEATURES . - Page 4 AM/FM RADIO OPERATION ..........27 AM/FM Radio Screen .
- Page 5 Contents BLUETOOTH OPERATION ........... . 45 Bluetooth Screen .
- Page 6 This page is intentionally left blank.
-
Page 7: Features
Features General • Built-in navigation • Composite video outputs for additional screens • Audio /Video auxiliary input • Rotary encoder audio control • Nine-Band EQ with three preset and three user-defi ned EQ curves • Subwoofer control • Rear camera input •... - Page 8 iPod/iPhone • Access iPod/iPhone playlists, artists, albums, songs, and video (requires video iPod), and shows album art • Power management charges iPod/iPhone while connected Media • USB - Supports most hard drives and fl ash memory drives • 3.5 mm audio/video input Navigation •...
-
Page 9: Controls And Indicators
Controls and Indicators NOTE: The above image shows a generic radio. Your radio may or may not have the following features. CONTROLS AND INDICATORS 1. Power, Volume, and Mute Control Knob Press the knob to turn the unit on. Press and hold the knob for 2 seconds to turn the unit off . - Page 10 7. MAP Cover Covers the Micro SD card slot. The Micro SD card slot is used for the Navigation Map only, not for music or other fi les. This may be used for fi rmware updates if required. 8. Tune/Audio Control Knob When the unit is set to Radio mode, rotate this knob to acquire the next or previous available frequency.
-
Page 11: Media Link
NOTE: If your vehicle is equipped with steering wheel controls for the audio system, the controls may function diff erently than described in the vehicle owners manual. The Advent In-Dash Navigation Radio system may function diff erently than the OEM radio due to added features and functions that the OEM radio did not support. -
Page 12: Dvd/Cd Basics
DVD/CD BASICS To get the optimum use out of your CD/DVD player, please read this section. Types of Discs Your System Will Play Your system will play the following types of discs: • DVD disc - DVD discs that contain audio and/or video. •... -
Page 13: Quick Start Guide
Quick Start Guide Turning the Unit ON or OFF: Press the front panel Power/Volume/Mute control knob to turn the unit on. To turn the unit off , press and hold the front panel Power/Volume/Mute control knob for 2 seconds. Playing a DVD/CD/MP3 Disc: 1. -
Page 14: Adjusting The Volume
Adjusting the Volume: To increase or decrease the volume level, rotate the front panel Power/Volume/ Mute control knob. The unit’s front panel screen will display the volume level for 3 seconds. The volume level ranges from 0 to 60. Navigation, Bluetooth, and OnStar/Bluelink (if equipped) volume can be adjusted independently of the radio volume by rotating the Power/Volume/Mute control knob. -
Page 15: Adjusting Fade And Balance
Quick Start Guide Adjusting Fade and Balance: 1. Press the front panel Tune/Audio control knob or the touch screen Audio icon to view the Audio Control Screen. 2. Press the left ( L ) or right ( R ) icons to adjust the left/right balance, or press the front ( F ) or rear ( R ) icons to adjust the front/rear fade. -
Page 16: Setting System Time
Setting System Time: 1. Press the front panel SETUP button or front panel Settings icon. A Settings Screen appears. 2. Press the Next icon. A second Settings Screen appears. 3. Press the Up () or Down () icon to select your time zone. 4. -
Page 17: Main Menu
Main Menu MAIN MENU SCREEN The Main Menu Screen allows you iPod Icon: to select an audio/video source for Press this icon to access the iPod/iPhone your vehicle’s front and rear zone. Screen. This icon is gray (not functional) In addition, you may access the if an iPod/iPhone is not connected to Navigation or System Setup functions. - Page 18 Orange/Blue Icon: Press this icon to switch between an orange or blue menu display. NOTE: Video will turn off and audio will mute for approximately ten seconds as the unit switches between the orange and blue menus. Night/Day Icon: Press this icon to dim or brighten the display.
-
Page 19: Cd/Mp3 Audio Disc Operation
CD/MP3 Audio Disc Operation Information Display CD CONTROLS SCREEN Upon inserting a compact disc, CD Previous Icon: mode is entered and disc playback Press this icon to play the previous begins. track. MENU Icon: Fast Reverse Icon: Press this icon to return to the Main Press this icon to fast reverse playback. -
Page 20: Tracklist Direct Entry Screen
Tracklist Icon: TRACKLIST DIRECT ENTRY SCREEN Press this icon to access the Tracklist Direct Entry Screen. Repeat Icon: Press this icon during playback to repeat playback of the current track. The icon will light and the track will repeat. Press this icon a second time cancel repeat. -
Page 21: Mp3 Controls Screen
CD/MP3 Audio Disc Operation Information Display MP3 CONTROLS SCREEN MP3 is a format for storing digital audio. Audio Icon: An audio CD-quality song can be Press this icon to access the audio compressed into the MP3 format with controls. very little loss of quality, while taking up Previous Icon: much less space. -
Page 22: Folder Direct Entry Screen
Tracklist Icon: FOLDER DIRECT ENTRY SCREEN When a MP3 disc is playing, this icon is gray, indicating that it can not be selected. Repeat Icon: Press this icon during playback to repeat playback of the current track. The icon will light and the track will repeat. -
Page 23: Dvd Operation
DVD Operation Information Display DVD CONTROLS SCREEN Upon inserting a DVD disc, DVD mode Audio Icon: is entered and disc playback begins. Press this icon to access the audio NOTE: When properly installed, DVD controls. video can not be displayed on Previous Icon: the front LCD screen unless the Press this icon to play the previous... - Page 24 4:3 Icon: Press this icon to view a standard display image. The standard display image has a 4 to 3 ratio of horizontal to vertical, leaving a blank area on the right and left sides of the display. 16:9 Icon: Press this icon to view a wide screen display image.
-
Page 25: On Screen Controls
DVD Operation ON-SCREEN CONTROLS Fast Reverse Icon: Press this icon to fast reverse video playback. Fast Forward Icon: Press this icon to fast forward video playback. Setup Icon: Press this icon to access the Picture Adjustment Screen. Previous Icon: To access the on-screen controls, touch Press this icon to play the previous the screen while a DVD is playing. -
Page 26: Picture Adjustment Screen
PICTURE ADJUSTMENT SCREEN When watching a video, the color, tint, contrast or brightness levels can be adjusted to suit your preferences. NOTE: The Picture Adjustment Screen will turn off automatically if no adjustment is made within four seconds or if any other button is pressed. -
Page 27: Am/Fm Radio Operation
AM/FM Radio Operation Preset Icons Banner Display AM/FM RADIO SCREEN MENU Icon: Preset Icons Press this icon to return to the Main Presets consist of stations that were Menu Screen. stored into memory. The radio can store 12 FM (6 FM1 and 6 FM2) and 6 AM Mute Indicator: stations. - Page 28 Mute Icon: Press this icon to mute the audio output of the unit. The mute indicator will appear. Press this icon again to un- mute the volume. The mute indicator disappears. FM1 Icon: Press this icon to select the FM1 band and to view FM1 station presets.
-
Page 29: Xm Satellite Radio Operation
XM Satellite Radio Operation Preset Icons Status Indicator XM SATELLITE RADIO SCREEN (if Equipped) Channel Icon: NOTE: Please use Jensen XMDirect2 Connection Cable Model Press the Previous ( ) icon to tune to CNPJEN1 and Jensen the previous channel. Press the XMDirect2 Vehicle Tuner Model Next ( ) icon to tune to the next... -
Page 30: Xm Radio Direct Entry Screen
Status Indicator: Direct Entry Icon: Displays XM Satellite Radio status Press this icon to access the XM Radio information. Direct Entry Screen. Mute Icon: Press this icon to mute the audio output of the unit. The mute indicator will appear. Press this icon again to un- mute the volume. -
Page 31: Channel Guide Screen
XM Satellite Radio Operation Channel Guide Icon: XM RADIO ID Press this icon to access the Channel The XM Radio ID consists of eight Guide Screen. alphanumeric characters. To view the XM Radio ID: 1. Enter the XM Radio Direct Entry Screen. - Page 32 This page is intentionally left blank.
-
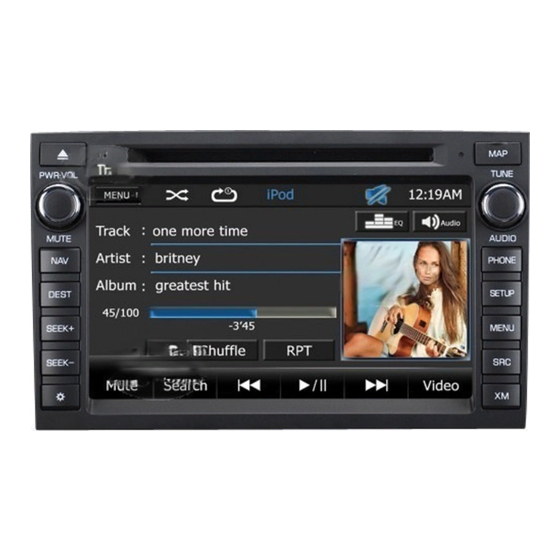
Page 33: Ipod/Iphone Operation
iPod/iPhone Operation iPOD/iPHONE SCREEN EQ - Equalizer Icon: You can control your iPod/iPhone via the touch screen to access playlists, Press this icon to access the equalizer artists, albums, songs, videos, etc. controls. NOTE: For basic connectivity, your iPod/ Audio Icon: iPhone must be connected to Press this icon to access the audio the Media Link using the iPod/... -
Page 34: Search Screen
Previous Icon: Search Icon: Press this icon to play the previous track Press this icon to view the Search in the directory. Screen. Play/Pause Icon: SEARCH SCREEN Press this icon to begin playback. Press this icon again to pause playback. Next Icon: Press this icon to play the next track in the directory. -
Page 35: Setup Screen
iPod/iPhone Operation SETUP SCREEN PICTURE ADJUSTMENT SCREEN When full screen video is displayed, When watching a video, the color, tint, touch the LCD screen to view the Setup contrast or brightness levels can be Screen. adjusted to suit your preferences. NOTE: The Setup Screen will turn off NOTE: The Picture Adjustment Screen automatically if no selection is... - Page 36 This page is intentionally left blank.
-
Page 37: Rear Lcd Operation
Rear LCD Operation REAR LCD SCREEN The unit allows two sources to be MENU Icon: played simultaneously. For example, Press this icon to return to the Main the unit’s screen can be set to the radio Menu Screen. function while the rear passengers can Mute Indicator: watch a DVD video using an optional This indicator is displayed when the... - Page 38 This page is intentionally left blank.
-
Page 39: Navigation Quick Start
Navigation Quick Start NAVIGATION SCREEN The Navigation mode can be selected Step 3 - Access the Main Menu: in a number of ways. Navigation can be accessed from the Main Menu. Press access the Navigation can also be selected by Navigation Menu: pressing the front panel NAV or DEST buttons. -
Page 40: Adjusting The Navigation Voice Volume
Step 4 - Select a Destination: Step 5 - Map/Guide Along Route You have many ways to select a Proceed to the highlighted route and destination. Select by touching screen: drive while the iGo primo software provides guidance to your destination. •... -
Page 41: Av In Operation
AV IN Operation AV IN SCREEN SETUP SCREEN You can play back audio/video from an external device connected to the unit. NOTE: Your audio/video device must be connected to the Media Link using an audio/video adapter cable that is available separately. NOTE: The unit can not directly control external devices connected to the Media Link. -
Page 42: Picture Adjustment Screen
PICTURE ADJUSTMENT SCREEN When watching a video, the color, tint, contrast or brightness levels can be adjusted to suit your preferences. NOTE: The Picture Adjustment Screen will turn off automatically if no adjustment is made within four seconds or if any other button is pressed. -
Page 43: Usb Operation
USB Operation Information Display USB SCREEN Audio Icon: You can control a USB device via the Press this icon to access the audio touch screen to access audio fi les stored controls. on that device. Playlist Icon: NOTE: Your USB device must be Press this icon to access the Playlist connected to the Media Link. -
Page 44: Playlist Screen
PLAYLIST SCREEN The Playlist Screen allows you to search for music or video fi les stored in your USB device. Press a list box item to display contents of a directory or begin playback of that item, as applicable. Press the Scroll Down () icon to view the next page in the menu list or the Scroll Up () icon to view the previous page. -
Page 45: Bluetooth Operation
Bluetooth System, we of your wireless phone’s address book. recommend you turn off the Bluetooth Mute Indicator: in the Advent In-Dash Navigation Radio system’s Bluetooth menu so it does This indicator is displayed when the not confl ict with your factory installed volume is muted. -
Page 46: To Adjust Your Call's Volume
Device Icon: Dial Icon: Press this icon to access the Device Press this icon to dial to phone number Screen. that you entered. Transfer Icon: Hang Up Icon: Press this icon while talking to transfer Press this icon to end a call or reject an audio from the unit back to the wireless incoming call. -
Page 47: Pairing Your Wireless Phone
Bluetooth Operation PAIRING YOUR WIRELESS PHONE To Pair a Wireless Phone to the Unit: Before using Bluetooth functions, you 1. Press the front panel PHONE button must pair your wireless phone and the or press the Main Menu Bluetooth unit. Pairing is a special process used icon to access the Bluetooth Screen. -
Page 48: To Pair The Unit To A Wireless Phone
To Pair the Unit to a Wireless Phone: 6. Press the Search icon. The following screen appears: 1. Access the wireless phone Bluetooth function and set the Bluetooth function to on. (Please refer to the wireless phone’s instruction manual to enter Bluetooth setup, turn Bluetooth on/off , and perform pairing). -
Page 49: To Delete Paired Wireless Phones
Bluetooth Operation To Delete Paired Wireless Phone(s): MAKING OUTGOING CALLS 1. Press the front panel PHONE button Outgoing calls can be performed in or press the Main Menu Bluetooth two manners. The outgoing call can icon to access the Bluetooth Screen. be direct dialed using the front panel keypad or the by pressing the Contacts 2. -
Page 50: To Make An Outgoing Call Using Your Contact List
To Make an Outgoing Call Using Your MANAGING INCOMING CALLS Contact List: When connected to a Bluetooth 1. Press the front panel PHONE button phone, the unit will mute audio output, or press the Main Menu Bluetooth pause DVD/CD play, and change to icon to access the Bluetooth Screen. -
Page 51: Call Waiting
Bluetooth Operation CALL WAITING DEVICE SCREEN Call Waiting lets you know when another caller is trying to reach you while you are already on a call. You may put one call on hold while you answer the second one, then alternate between the two calls. -
Page 52: Bluetooth Settings Screen
BLUETOOTH SETTINGS SCREEN CONTACTS LIST SCREEN The Bluetooth Settings screen allows The Contacts List Screen is a copy you to confi gure Bluetooth settings. of the contact list on your wireless phone which contains a listing of Back Icon: your important names and phone Press this icon to return to the previous numbers. -
Page 53: Call Log Screen
Bluetooth Operation CALL LOG SCREEN Missed Calls Icon Press the this icon to view the Missed Calls List. The Missed Calls List retrieves the list of missed numbers from your wireless phone. The last missed number is the fi rst number on the list. The Call Log Screen consists of received calls, dialed calls or missed calls. -
Page 54: Bluetooth Music Function
BLUETOOTH MUSIC FUNCTION NOTE: Song information (e.g. elapsed playing time, song title, song index, etc.) cannot be displayed on this unit. Since there are a number of Bluetooth audio players available on the market, operations with your Bluetooth audio player using this unit vary greatly. -
Page 55: System Settings
System Settings FIRST SETTINGS SCREEN GPS Voice Setting: When using the in-dash navigation Press the ON icon to hear turn-by- radio the fi rst time, it is recommended turn navigation instructions. This will that you customize the system settings override the settings in the Map setup. to suit your preferences. -
Page 56: Touch Screen Calibration
TOUCH SCREEN CALIBRATION INFORMATION SCREEN The Touch Screen Calibration adjustment is used to set the parameters of the touch screen to ensure that when the screen is pressed, it corresponds to the feature that you are selecting. NOTE: Never use a pen or sharp object to calibrate the touch screen as this will damage the panel. -
Page 57: Second Settings Screen
The System Update function is used Time Display: to update the unit’s software. Please contact Advent Technical Support for This indicator displays the time as further information on how to update entered by the user in the Settings software. -
Page 58: System Time Set Screen
SYSTEM TIME SET SCREEN Press the Increase () icon or Decrease () icon to set the desired year, month, day, hour, minute or seconds value. Back Icon: Press this icon to return to the Second Settings Screen. -
Page 59: Audio/Equalizer Controls
Audio/Equalizer Controls AUDIO CONTROLS SCREEN The audio control screen allows you Sub Control: to easily adjust your audio system to Press the ON icon to turn the vehicle’s meet the acoustical characteristics subwoofer on (if equipped). Press the of your vehicle. The acoustical OFF icon to turn the vehicle’s subwoofer characteristics vary depending on the off . -
Page 60: Equalizer Screen
EQUALIZER SCREEN Classical, Pop, and Flat Icons: The Equalizer Screen features a 9-band graphic equalizer that allows you to Press the Classical, Pop or Flat icons to easily adjust your audio system to meet apply a preset equalization level to the the acoustical characteristics of your unit’s audio output signal. -
Page 61: Rearview Camera
Rearview Camera REARVIEW CAMERA (if Equipped) The unit is “camera ready. ” Before accessing any camera features, you must install a rear video camera. To view the rearview camera: 1. Turn on the rearview camera in the System Settings. 2. Place the vehicle’s gear selector to reverse. - Page 62 NOTES...
- Page 63 Notes NOTES...
- Page 64 If technical support is required, please contact Advent Technical Support at 1-800-323-4815. 128-8919c © 2011 Audiovox Electronics Corp., Hauppauge, NY 11788...
Need help?
Do you have a question about the In - Dash Navigation Radio and is the answer not in the manual?
Questions and answers