Table of Contents
Advertisement
T
ABLE OF
Warning Labels .............................................3
Water Connection .........................................4
Installation Instructions ..................................4
Coffee Preparation Procedures .......................5
Brew Volume Adjustment ..............................5
Brew Basket Rail Adjustment ..........................5
Spare Parts List .............................................. 6
Water Tank Assembly Drawing .......................7
AT-2W/AT-2WE Drawing ................................8
AT-AP/AT-APE Drawing...................................9
AT-3WR/AT-3WRE Drawing ..........................10
AT-TC/AT-TCE Drawing .................................11
Troubleshooting Guide ................................12
Component Replacement Instructions ..........13
Prior authorization must be obtained from
Grindmaster Corporation™ for all warranty claims.
© Grindmaster Corporation, 2007
PRINTED IN THAILAND
AUTO-SERIES BREWERS
Installation, Operation, and Service Manual
C
ONTENTS
Model AT-2W/AT-2WE
Model AT-3WR/AT-3WRE
Grindmaster Corporation™
4003 Collins Lane
Louisville, Kentucky 40245 USA
(502) 425-4776
(800) 695-4500 (USA and Canada only)
(800) 568-5715 (Technical Service only)
FAX: (502) 425-4664
www.grindmaster.com
Model AT-AP/AT-APE
Model AT-TC/AT-TCE
0307 Form # BW-340-01
Part # 73254
Advertisement
Table of Contents

Related Manuals for Grindmaster AT-2W/AT-2WE


Summary of Contents for Grindmaster AT-2W/AT-2WE
-
Page 1: Table Of Contents
AT-AP/AT-APE Drawing...9 AT-3WR/AT-3WRE Drawing ...10 AT-TC/AT-TCE Drawing ...11 Troubleshooting Guide ...12 Component Replacement Instructions ...13 Prior authorization must be obtained from Grindmaster Corporation™ for all warranty claims. © Grindmaster Corporation, 2007 PRINTED IN THAILAND AUTO-SERIES BREWERS Model AT-2W/AT-2WE Model AT-3WR/AT-3WRE... -
Page 3: Warning Labels
WARNING LABELS The following warning labels were on your dispenser when it was shipped from the factory. They should remain on your dispenser in good, readable condition at all times. If one of your labels is missing or damaged, order a replacement label immediately. -
Page 4: Water Connection
WARNING - Read and follow installation instructions before plugging or wiring in machine to electrical circuit. Warranty will be void if unit is connected to any voltage other than that listed on the name plate. FILL BREWER TANK WITH WATER BEFORE CONNECTION TO POWER SUPPLY WATER CONNECTION The following is required for water hook-up: 1) A quick disconnect water connection or enough coiled tubing so the machine can be moved for cleaning... -
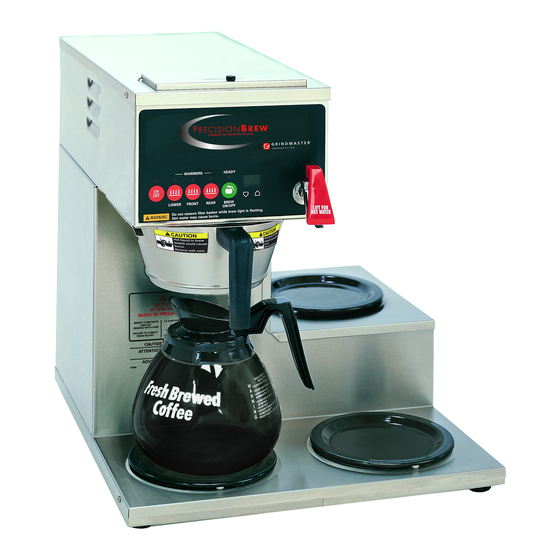
Page 5: Coffee Preparation Procedures
COFFEE PREPARATION PROCEDURES (Pour-Over Mode) 1) Place filter into brew basket. 2) Put the proper amount of coffee into the filter. 3) Slide the brew basket into holder. 4) Place empty decanter on warmer located directly under the brew basket and turn corresponding warmer switch ON. NOTE: For airpots, open airpot lid, remove pump stem from airpot and place airpot opening directly under center hole in brew basket. -
Page 6: Spare Parts List
SPARE PARTS LIST Item No. Part No. Description 73035 Water Tank 73252 Clamp Hose, Nylon 1/2" ID 07327 Clamp, Black 5/8" 71155 Tubing, 5/16"ID x 1/2"OD Silicone 73173 Heat Exchanger Inside Tank 70818 Element, Heating 1400W 120V 70820 Element, Heating 2500W 240V 73222 Element, Heating 1780W 120V 73037-1... -
Page 7: Water Tank Assembly Drawing
WATER TANK ASSEMBLY Auto Series Brewer Manual Page 7... -
Page 8: At-2W/At-2We Drawing
AT-2W/AT-2WE PART LIST Page 8 Auto Series Brewer Manual... -
Page 9: At-Ap/At-Ape Drawing
AT-AP/AT-APE PART LIST Auto Series Brewer Manual Page 9... -
Page 10: At-3Wr/At-3Wre Drawing
AT-3WR/AT-3WRE PART LIST Page 10 Auto Series Brewer Manual... -
Page 11: At-Tc/At-Tce Drawing
AT-TC/AT-TCE PART LIST Auto Series Brewer Manual Page 11... -
Page 12: Troubleshooting Guide
2. Clogged inlet valve If you still need help, call an authorized dealer in your area or Grindmaster Corporation’s Technical Service Department. You can reach Technical Service at (502) 425-4776 or (800) 695-4500 (USA and Canada only) Monday - Friday, 8:00 AM - 8:00 PM EST. -
Page 13: Component Replacement Instructions
COMPONENT REPLACEMENT INSTRUCTIONS WARNING - Disconnect power before servicing. Risk of electric shock. These steps apply to replacement of TANK, TANK HEATER, and HI-LIMIT or MAIN THERMOSTAT 1. Remove brewer lid. Disconnect electrical connectors from upper warmer plate if applicable. 2. -
Page 16: Form # Bw-340-01 Part
Grindmaster® Coffee Grinders and Brewers • PrecisionBrew™ Brewing Systems • Espressimo® Espresso Machines Crathco® Hot Beverage Dispensers • Crathco® Cold and Frozen Beverage Dispensers • AMW Coffee and Tea Systems Tel (502) 425-4776 • Fax (502) 425-4664 • 1-800-695-4500 (USA & Canada only) P.O.
Need help?
Do you have a question about the AT-2W/AT-2WE and is the answer not in the manual?
Questions and answers