Table of Contents
Advertisement
Quick Links
Copyright © 2009
All Right Reserved - Printed in China
Myou S1024 Computer User's Manual
Original Issue: 2009/05
This manual guides you in setting up and using your new Myou S1024 Small Notebook PC. Information in the manual
has been carefully checked for accuracy and is subject to change without notice.
No part of this manual may be reproduced, stored in a retrieval system, or transmitted, in any form or by any means,
electronic, mechanical, photocopy, recording, or otherwise, without prior written consent.
Trademarks
Product names used herein are for identification purposes only and may be the trademarks of their respective
companies.
®
®
®
Microsoft
, MS-DOS, Windows
, and Windows
Sound System are trademarks of Microsoft Corporation.
®
Intel
, Atom™ is registered trademarks of Intel Corporation.
Sound Blaster, Sound Blaster Pro are trademarks of Creative Technology.
All other brands or product names mentioned in this manual are trademarks or registered trademarks of their
respective companies.
Once you have checked and confirmed that your Myou S1024 Computer system is complete, read through the
following pages to learn about all of your Myou S1024 Computer components.
Advertisement
Table of Contents

Related Manuals for Gigabyte Myou S1024


Summary of Contents for Gigabyte Myou S1024
- Page 1 Myou S1024 Computer User’s Manual Original Issue: 2009/05 This manual guides you in setting up and using your new Myou S1024 Small Notebook PC. Information in the manual has been carefully checked for accuracy and is subject to change without notice.
-
Page 3: Safety Instructions
Do not cover the AC adapter with papers or other items that may prevent ventilation. Also, do not use the AC adapter while it is inside a carrying case. Do not insert objects into the air vent of your Myou S1024 Computer. Doing so can cause short- ... - Page 4 Please discard used batteries according to the manufacturer’s instructions. Before you connect your Myou S1024 Computer to a power source, ensure that the voltage rating of the AC adapter matches that of the available power source. 115 V/60 Hz in most of North and South America and some Far Eastern countries such as South Korea.
- Page 5 Also, before you connect the power cord, make sure that both connectors are correctly oriented and aligned. Before you clean your Myou S1024 Computer, turn it off first, unplug it from its power source, and ...
- Page 6 Regulatory Notices Federal Communications Commission Notice This equipment has been tested and found to comply with the limits for a Class B digital service, pursuant to Part 15 of the FCC rules. These limits are designed to provide reasonable protection against harmful interference in a residential installation.
- Page 7 CE Notice (European Union) This symbol indicates this Myou S1024 Computer complies with the EMC Directive and the European Union’s Low Voltage Directive. This symbol also indicates that S1024 meets the following technical standards: EN 55022 — “Limitations and Methods of Measurement for the Radio Interferences of Information ...
- Page 8 Even if the computer continues to work with a damaged battery in place, it may cause circuit damage, which may possibly result in fire. Recharge the batteries using the Myou S1024 Computer’s system. Incorrect recharging may make ...
- Page 9 Designed for a wide range of general, business, and personal productivity applications, this Myou S1024 Computer is an ideal choice for use in the office, at home, and on the road.
-
Page 10: Table Of Contents
CONTENTS TAKING CARE OF YOUR Myou S1024 Small Notebook PC ........2 BEFORE YOU START ....................4 Make sure you have everything ................4 Familiarize with the computer...................5 OPENING THE DISPLAY PANEL ................5 FRONT OVERVIEW .....................6 LEFT SIDE OVERVIEW ..................10 RIGHT SIDE OVERVIEW ...................11 REAR SIDE OVERVIEW ..................11... - Page 11 Power Management ....................19 Starting Your Myou S1024 Computer ..............24 POWER ON .......................24 Status Indicators ....................26 Using Function Keys ..................29 Using the TouchPad ...................30 BIOS SETTING ......................34 The Main Menu ......................37 Advance Menu ......................39 Security Menu......................40 Boot Menu .........................41 Exit Menu ........................42 Cleaning &...
-
Page 12: Taking Care Of Your Myou S1024 Small Notebook Pc
TAKING CARE OF YOUR Myou S1024 Small Notebook PC DO NOT press or touch the display panel. To prevent possible overheating of the computer’ s processor, make sure you don’t block the openings provided for ventilation. DO NOT place on uneven or unstable work DO NOT use your Myou S1024 Computer under surfaces. - Page 13 DO NOT expose to dust and/or corrosive DO NOT slam your Myou S1024 Computer shut chemicals. and never pick up or hold your Myou S1024 Computer by the display. DO NOT spray water or any other cleaning fluids If you are traveling with your computer, remember to directly on the display.
-
Page 14: Before You Start
BEFORE YOU START Make sure you have everything When you receive your Myou S1024 Small Notebook PC, unpack it carefully, and check to make sure you have all the items listed below. For a pre-configured model you should have the follow-... -
Page 15: Familiarize With The Computer
BEFORE YOU START Familiarize with the computer OPENING THE DISPLAY PANEL To open, simply lift the lid up. When closing it, be sure not to slam it shut. -
Page 16: Front Overview
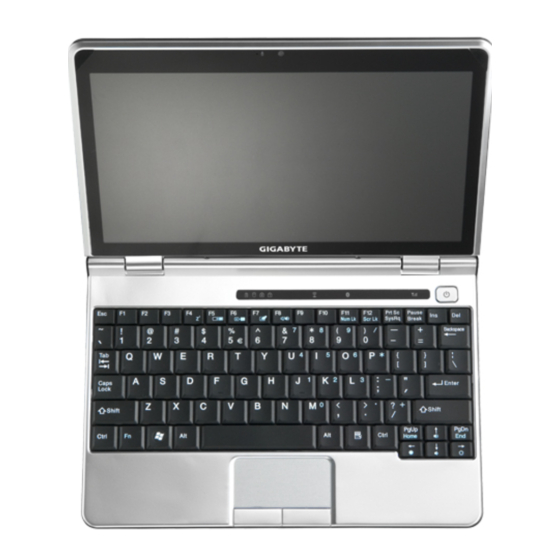
FRONT OVERVIEW The following is an overview of the front of the Myou S1024 Computer. Camera Camera Active Indicator (for 1.3Mpixel Camera) Microphone Display Panel Buttons/Status Indicators Keyboard TouchPad/Buttons Stereo Speakers Camera The 1.3M-pixel built-in camera allows you to have more visual features such as video recording, visual conferencing and so on. -
Page 17: Display Panel
BEFORE YOU START Display Panel The display panel is a color LCD panel with LED back lighting for the display of text and graphics. Keyboard The built-in Qwerty keyboard with dedicated Windows and function keys. ® Stereo Speakers The built-in dual speakers allow for stereo sound. TouchPad/Buttons Press the left and right buttons located on the edge of the touch pad to do selection and execution functions. - Page 18 Suspend/Resume/Power On Button Suspend/Resume/Power On Button This button turns your Myou S1024 Computer on and off as well as puts it into Sleep or Suspend mode.Or, you can press it to resume the system from Sleep or Suspend mode. The embedded...
-
Page 19: Status Indicators
BEFORE YOU START WiFi The WiFi button enables and disables Wireless LAN activity. The embedded indicator will On when WiFi is working. Bluetooth The Bluetooth button enables and disables Bluetooth function. The embedded indicator will On when Bluetooth is working. 3.5G or WiMax The button function is depending on your system configuration. -
Page 20: Left Side Overview
LEFT SIDE OVERVIEW The following is a brief description of the left side of the Myou S1024 Computer. Memory Card Microphone Jack Reader Headphone Jack Microphone Jack The microphone jack allows you to connect an external mono microphone. Headphone Jack The headphone jack allows you to connect headphone, external speakers or amplifier. -
Page 21: Right Side Overview
BEFORE YOU START RIGHT SIDE OVERVIEW The following is a brief description of the right side of the Myou S1024 Computer. There is no any I/O port at this side. REAR SIDE OVERVIEW The following is an overview of the rear side of the Myou S1024 Computer. - Page 22 FRONT SIDE OVERVIEW The following is a brief description of the front side of the Expansion Port. There is a 26-pin con- nector at this side. Ports at this side are to connect with Myou S1024 Computer. Expansion Port VGA/LAN Port OVERVIEW The following is an overview of Expansion Port.
- Page 23 BEFORE YOU START LAN (RJ-45) Port at side direction The LAN port is designed to support a 10/100 Base-TX standard RJ-45 plug. External Monitor Port at rear side The external monitor port allows you to connect an external monitor.
- Page 24 Install & Remove the Expansion Port When install or remove the Expansion Port to or from the Myou S1024 Computer, please hold the left & right side of the Expansion Port first. For installing, please make sure these two ports on Expansion Port rear side are right toward to Myou S1024 Computer ports then push Expansion Port forward to make sure the well connection.
-
Page 25: Bottom Overview
BEFORE YOU START BOTTOM OVERVIEW The following is an overview of the bottom of the Myou S1024 Computer. SIM Card Slot Battery Bay Battery Lock Battery Release Knob Ventilation Hole Ventilation Hole Rating Label Ventilation Hole These are open ports for the fan to dissipate heat from the computer’s internal components. -
Page 26: Battery Bay
2. To insert of a mobile SIM card for 3.5G function (Optional) Rating Label The label shows the model number and other information about your Myou S1024 Computer. Battery Bay The battery bay contains the internal Lithium-Ion battery. It can be opened for the removal of the battery when stored over a long period of time or for swapping a discharged battery with a charged Lithium-Ion battery. -
Page 27: Getting Started
Connecting the AC Adapter 1. Plug the DC output cable into the DC power jack of your Myou S1024 Small Notebook PC. 2. Plug the AC adapter into an AC electrical outlet. Switching from AC Adapter Power to Battery Power 1. -
Page 28: Recharging The Battery
When this happens, your Myou S1024 Small Notebook PC goes into Suspend mode. There is no guarantee your data will be saved once the Myou S1024 Computer reaches this point. -
Page 29: Power Management
Power Management Suspend/Resume/Power On Button The suspend/resume/power on switch is used to turn on your Myou S1024 Computer from its off state. Once you have connected your AC adapter or charged the internal Lithium-Ion battery, you can power on your Myou S1024 Computer by pressing the suspend/resume/on button located above the... -
Page 30: Monitoring Battery Power
Action button to choose whether the alarm sounds, displays a message, or both. Warning: When battery power is low, the Myou S1024 Computer will display a warning on the screen. Take immediate action, such as saving files or connecting to the AC adapter, or data may be lost. -
Page 31: Battery Charging
Battery Charging When you use the AC adapter to connect your Myou S1024 Computer to a power outlet, the internal battery will automatically begin to recharge. While the battery is charging, the Battery Charge icon on the Indicator panel will be active. -
Page 32: Power Button Settings
Initiating Suspend Mode There are several ways to initiate suspend mode. The settings can be adjusted in the Power Management dialog box: The computer will automatically enter suspend mode when not used for a set period of time. Selecting the Stand by button in the Shut Down Windows dialog box. Closing the screen cover (assuming no external monitor has been connected). -
Page 33: When To Replace The Battery
Monitoring Battery Power When to Replace the Battery Over time, the battery’s capacity gradually decreases. We recommend that you replace your battery when you notice that it begins to store significantly less charge. Changing the Battery Change the main battery pack as follows: 1. -
Page 34: Starting Your Myou S1024 Computer
POWER ON Suspend/Resume/Power On Button The suspend/resume/power on switch is used to turn on your Myou S1024 Computer from its off state. Once you have connected your AC adapter or charged the internal Lithium-Ion battery, you can power on your Myou S1024 Computer by pressing the suspend/resume/on button located above the keyboard. - Page 35 GETTING STARTED When you power on your Myou S1024 Computer, it will perform a Power On Self Test (POST) to check the internal parts and configuration for correct functionality. If a fault is found, your computer emits an audio warning and/or displays an error message.
-
Page 36: Status Indicators
Status Indicators The Status indicator lights correspond to specific operating modes. These modes are: AC Adapter Status, Battery status; Hard Disk Drive Activity; Memory Card Reader Activity; and Wireless LAN/ Bluetooth Activity. Furthermore, at the top of the keyboard there are three additional status indica- tor lights: Caps Lock, Scroll Lock, and Num Lock. -
Page 37: Caps Lock Indicator
GETTING STARTED Caps Lock Indicator This indicator tells you that the keyboard is set to type in all capital letters. Num Lock Indicator This indicator states that the internal keyboard is set in ten-key numeric keypad mode. Power On Indicator This light on the power button illuminates when the computer is powered on. -
Page 38: Battery Indicator
Battery Indicator The dual color battery indicator tells you the battery is charging or already fully charged. If charging the battery, the indicator is remains Green even if your Myou S1024 Computer is off. If the battery fully charged, the indicator is remains Orange no matter the system is On or Off. -
Page 39: Using Function Keys
You should refer to your software documentation to find out how these keys are used. The [FN] key provides extended functions for the Myou S1024 Computer and is always used in conjunction with another key. [FN+F4]: Places the Thin Note in Sleep mode. Pressing the Power button returns it to active ... -
Page 40: Using The Touchpad
Using the TouchPad A TouchPad pointing device comes built into your computer. It is used to control the movement of the pointer to select items on your display panel. The TouchPad consists of a cursor control, a left and right button, and two scroll buttons. The cursor control works the same way a mouse does, and moves the cursor around the display. - Page 41 GETTING STARTED Clicking Clicking means pushing and releasing a button. To left-click, move the cursor to the item you wish to select, press the left button once, and then immediately release it. To right click, move the mouse cursor to the item you wish to select, press the right button once, and then immediately release it.
-
Page 42: Identifying The Problem
4. Make sure that any devices connected to the external connectors are plugged in properly. You can also disconnect such devices, thus eliminating them as possible causes of failure. 5. Turn on your Myou S1024 Computer. Make sure it has been off at least 10 seconds before you turn it on. - Page 43 Conditions under which the problem occurred Any error messages that have occurred Hardware configuration Type of device connected, if any See the Configuration Label on the bottom of your Myou S1024 Computer for configuration and serial numbers.
-
Page 44: Bios Setting
Using the BIOS Setup Utility Your Myou S1024 Computer has a BIOS setup utility which allows you to configure important system settings, including settings for various optional functions of the computer. This chapter explains how to use the BIOS setup utility. -
Page 45: Starting The Bios Setup Utility
BIOS SETTING Starting the BIOS Setup Utility You can only enter the BIOS setup utility as the computer is booting, that is between the time you turn on the computer and before the Windows interface appears. If your computer is already on, shut down your computer completely (power off) and restart it and then press the F2 key to enter the setup utility. - Page 46 There may be difference of BIOS setting between different versions of BIOS of different batch of Myou S1024 Computer produced. Notice: The BIOS of your Myou S1024 Computer has been initialized to best settings. It’s ad- vised you not to change it if not so necessary.
-
Page 47: The Main Menu
There may be difference of BIOS setting between different versions of BIOS of different batch of Myou S1024 Computer produced. Notice: The BIOS of your Myou S1024 Computer has been initialized to best settings. It’s ad- vised you not to change it if not so necessary. - Page 48 System Time Allows you to change the system time using the hour:minute:second format of your Myou S1024 Computer. Enter the current time for reach field and use the -, + key to move from one field or back to another.
-
Page 49: Advance Menu
BIOS SETTING Advance Menu... -
Page 50: Security Menu
Security Menu Set Supervisor Password A supervisor password must be set before a lower-level user password can be set. After selecting Change Supervisor Password, press Enter. You will be prompted for the new password, and then again to verify it. Type in 6 or fewer keystrokes. If you make an error, press Esc to start over. Set User Password With a User password, you can enter the Setup Utility and change or remove the User password, but you cannot enter the Setup Utility and change or remove the Supervisor password, nor enable diskette... -
Page 51: Boot Menu
BIOS SETTING Boot Menu Set Supervisor Password A supervisor password must be set before a lower-level user password can be set. After selecting Change Supervisor Password, press Enter. You will be prompted for the new password, and then again to verify it. Type in 6 or fewer keystrokes. If you make an error, press Esc to start over. Set User Password With a User password, you can enter the Setup Utility and change or remove the User password, but you cannot enter the Setup Utility and change or remove the Supervisor password, nor enable diskette... -
Page 52: Exit Menu
Exit Menu... -
Page 53: Cleaning & Maintenance
Never place your Myou S1024 Computer on uneven surfaces. Use only a power adapter approved for use with your Myou S1024 Computer. If your Myou S1024 Computer is not in use for a long time, disconnect it from mains to avoid possible damage by transient over-voltage. -
Page 54: Taking Care Of Your Ac Adapter
Make sure the voltage of the power source when connect your Myou S1024 Computer to the power outlet. If your are unsure of your local power specifications, consult your dealer or local power com- pany. -
Page 55: Maintaining The Lcd Quality
Cleaning & Maintenance Do not leave your battery in your Myou S1024 Computer for longer than 1 month without plugging in the power adapter. Do not leave battery in storage for more than 2 months without recharging it to prevent over discharge. -
Page 56: Maintaining Your Hard Disk
Maintaining Your Hard Disk Losing your data has the same consequences as a system break down. Users must make it a habit of doing hard disk maintenance every week or so. Here is some maintenance you could do: Always backup your data files from your hard disk. Install the virus detecting program to monitor virus that could tamper your files. -
Page 57: When You Travel
Check the voltage rating and the outlet type of your destination. If the power cord of the adapter is dif- ferent, then you need to purchase a suitable one. Consult your dealer. Carry your Myou S1024 Computer in its carrying case or in a briefcase. Never check-in the computer as a luggage. -
Page 58: Appendix I Specification
Appendix I Specification Processor Intel Atom 1.6GHz N270 ® Microsoft Windows XP compliance Core Logic Intel 945GSE ® Memory DDRII-533 1GB on board Memory Video Interface Intel 945GSE ® Display 10.1”LCD panel/WSVGA 1024x600, w/ LED Backlight Technology Hard Disk Drive 1.8”... - Page 59 Appendix Optical Drive External ODD by USB connection Input Device Keyboard / Touch Pad I/O Port USB X 2, Mic in/Earphone out/DC-in Media Card Reader / Expansion port connector VGA, LAN support by expansion port. Audio Speaker 1 watt x 2, build-in Internal MIC Bluetooth BlueTooth 2.1 built-in Web Camera...
- Page 60 ~900g (Including 6 cell battery) Service 1 year global warranty 1 year battery warranty More service information, please refer to http://www.gigabyte.com.tw .................................. The above specification is for users’ reference. The final configuration depends on the Myou S1024 Computer users bought.
-
Page 61: Appendix Ii Recovery Update Notices
Appendix Appendix II Recovery Update Notices How to restore your Myou S1024 Computer to factory defaults Time to restore: When your computer is infected by virus or there is any other reason that you want to restore your operation system to the factory defaults. - Page 62 Then the prompt “Restore Image?” will appear on the menu. We recommend you to select “YES” to restore an image file.* “Image file” is a compressed file that compresses all the Windows operation system data. Recovery an image file allows you to restore your operation system to factory defaults.
-
Page 63: Appendix Iii Service Centers And Policy
Appendix Appendix III Service Centers and Policy This appendix will list our global service centers for your Myou S1024 Computer. Taiwan GIGABYTE Service Center 6F, No.136, Jien-Yi Rd., Chung-Ho, Taipei Hsien, Taiwan. TEL: +886-2-8227-6136 FAX: +886-2-8227-6163 WEB Address (English): http://www.GIGABYTE.com.tw/ WEB Address (Chinese): http://www.GIGABYTE.tw/... - Page 64 China G.B.T. TECH. TRADING CO., LTD. WEB Address: http://www.GIGABYTE.com.cn/ Shenzhen TEL: +86-755-8240-8099 FAX: +86-755-8240-8066 Ninbo TEL: +86-574-86869292 Fax: + 86-574-86860781 Beijing TEL: +86-10-6297-8099 FAX: +86-10-6298-0499 Guangzhou TEL: +86-20-3849-1240 FAX: +86-20-3849-1140 Shanhai TEL: +86-21-5763-8748 FAX: +86-21-5763-8320...
- Page 65 Appendix Xian TEL: +86-29-85531943 FAX: +86-29-85519336 Germany TEL: +49-40-2533-0433 Address: BULLENKOPPEL 16 22047 HAMBURG...
- Page 66 4. This warranty does not cover the pre-installed software products, operating system, consumables and other accessories (e.g. gifts/rucksack/disk/mouse/packaging material, etc). 5. In the absence of the sales invoice of the special dealer of GIGABYTE, the warranty period will be determined based on the GIGABYTE label and serial number on the product.
- Page 67 GIGABYTE will not provide warranty services. 10. In case that a product sent for repair during the warranty period cannot be repaired, GIGABYTE will replace the product with a comparable new product or an equivalent one.
Need help?
Do you have a question about the Myou S1024 and is the answer not in the manual?
Questions and answers