
Related Manuals for Go-Video GV8050


Summary of Contents for Go-Video GV8050
- Page 1 P C C O M PAT I B L E D U A L D E C K G V 8 0 5 0 / G E T T I N G S T A R T E D...
- Page 2 EDITING: The Go-Video Dual-Deck Director editing process is very simple, and easy to learn and use. You just point and click on VCR style controls right on your computer screen. • First, go through your raw 8mm camcorder footage marking segments you want to use.
-
Page 3: Table Of Contents
Contents Introduction ... 2 Connecting Your Dual-Deck VCR to Your TV or Monitor ... 4 Setting the Date and Time ... 6 Setting the Antenna and Channel Memory ... 7 Playing a Tape ... 8 Copying a Tape ... 9 Recording a TV Program ... - Page 4 Congratulations on your purchase of Go-Video’s 8mm/VHS Dual-Deck VCR. Because a Dual-Deck VCR has two videocassette decks, operation is a little different than for the single deck VCR’s that you’re probably used to. Two Decks, One Set of Controls The key difference in operating a Dual-Deck VCR is that you...
- Page 5 Dual-Deck VCR. The Owner’s Guides To get the most out of your new Dual-Deck VCR, take a few minutes to familiarize yourself with this User’s Guide and with the Reference Guide. Be sure to read all Safety Instructions, on pages 6-9 of the Reference Guide.
-
Page 6: Connecting Your
VCR. 3. Which channel your TV is tuned to. 4. Which channel, 3 or 4, is set on the back of your VCR. 5. If you have a cable converter box leading into your VCR, you will need to note which channel (2, 3, or 4) your VCR is tuned to. - Page 7 Connect the round end of this cable to the OUT TO TV connection on the back of your 8mm/VHS Dual-Deck VCR. Connect the other end of the cable to the VHF IN or CABLE IN connection on the back of your TV.
-
Page 8: Setting The Date And Time
SETTING THE DATE AND TIME If you plan on using the Timer Record and the Date and Time Stamp features of your 8mm/VHS Dual-Deck VCR, you’ll need to set the correct date and time. To set the current date and time: 1. -
Page 9: Setting The Antenna And Channel Memory
MENU KEY FOR PREV MENU SELECT KEY TO CHOOSE ARROW KEYS TO CHANGE Once you have your 8mm/VHS Dual-Deck VCR hooked up to your antenna or cable system, you’ll need to set the antenna and the channel memory: 1. Press... -
Page 10: Playing A Tape
See the discussion of Video Sequencing the Special Playback Functions section of the Reference Guide if you want to set the VCR to automatically play both decks in sequence or in a loop. If you want, you can play tapes in both the 8mm deck and... -
Page 11: Copying A Tape
VHS MENU (LP is twice as long as SP; SLP is three times as long as SP.) 2. Insert your 8mm tape into the 8mm deck on the left side of the 8mm/VHS Dual-Deck VCR, and the VHS tape into the VHS deck on the right side. 3. Press... -
Page 12: Recording A Tv Program
VHS MENU (LP doubles the recording time relative to SP; SLP triples the recording time relative to SP). 2. On the Dual-Deck VCR (or cable converter box if you have one), select the channel that you want to record. 3. Press the... -
Page 13: Setting The Timer To Record Later
TV shows at a later time. You can program up to eight Timer Recording ‘events’ (shows), for weeks, months, or years in advance. Note: You must have the VCR’s clock set to the correct date and time for Timer Recording to work. - Page 14 Note: If you have a cable converter box, set the CH in this menu to the channel of your cable box output (call your cable company for this information). Then, use the cable converter box to set the channel of your TV program.
-
Page 15: Recording A Date And Time Stamp
Recording a Date and Time Stamp SAT JAN 1, 1994 12:00 AM CH 10 0 HR 30 MIN You can record the Date and Time of a regular or Timer Recording from the TV at the beginning of your VHS record- ing. -
Page 16: Automatic Assembly Editing
“parentheses” around the scene. Use the Tape Counter with Frame accuracy to fine-tune your begin and end marks. Then, press a button and let the Dual-Deck VCR do all the work of assembling the scenes and copying them to your VHS tape. -
Page 17: Correcting Mistakes
8mm deck. STOP 9. Press COPY TAPE Sit back and watch the 8mm/VHS Dual-Deck VCR assemble and copy your scenes! You’ll see a message telling you which scene number is currently being assembled and copied (that number will flash). -
Page 18: Manual Editing
Or, you might want to mix together scenes from different 8mm tapes onto a VHS tape. The 8mm/VHS Dual-Deck VCR’s SYNC EDIT key synchro- nizes the 8mm and VHS decks during manual editing, giving you smooth transitions and more precise timing. -
Page 19: Adding New Audio
You can use your 8mm/VHS Dual-Deck VCR to add new audio to your VHS tapes. Use Audio Insert while copying to get the audio signal from someplace other than the 8mm deck (for example, from your stereo system). -
Page 20: Audio Dub
1. Connect the source of your new audio (a tape player, for example) to the Line 1 (front panel) audio input jacks on the 8mm/VHS Dual-Deck VCR. See the Audio Connec- tions section of the Reference Guide for hookup instruc- tions. -
Page 21: Custom Titling
Custom Titling ABCDEFG abcdefg 012345 HIJKLMN hijklmn 6789?= OPQRSTU opqrstu ':() VWXYZ., vwxyz., - /* WHEN OK PRESS MENU Note: Press if you need RESET to backspace. Tip: Press while the title is QUIT recording if you want it to appear for less than ten seconds. - Page 22 Computer Control Port Cable Converter Box Hookup Cable Hookup, Basic 54-55, 4-5U Camcorder Hookup Captions (Titler) 36-37, 19U Care of Dual-Deck VCR CATV Indicator CH Indicator CHANNEL Keys Counter Channel Memory U = in User's Guide (this Guide) All other page numbers refer to Reference Guide...
- Page 23 Front Panel Jacks FWD Key Glitches Help Hi-8 Playback (quasi) Hi-Fi Audio Hi-Fi Indicator Holding Event Hookup Hookup, Audio Equipment Hookup, Audio Mixers Hookup, Basic Antenna Hookup, Basic Cable Hookup, Cable Hookup, Cable Converter Box Hookup, Monitor-Style TV Hookup, Other Video Equipment Hookup, VHF &...
-
Page 24: Volume Key
TRK/MENU Keys 28-29 Troubleshooting Tuner/Channel Menu 74-76 TUNER Indicator 34, 6U TUNER Key (TV View) 37, 19U TV/VCR Key TV View Controls TV View Indicator 25, 27 VCR Indicator 25, 27 VHS Format VHS Index Search System VHS Indicator 20, 35... - Page 26 7835 East McClain Drive Scottsdale, Arizona, USA 85260 Printed in Korea © 1994, Go-Video, Inc.
- Page 27 P C C O M PAT I B L E D U A L D E C K G V 8 0 5 0...
- Page 28 Department store l Discount store l Gift l Other: ________________________ How important were each of the following reasons in your decision to purchase a Dual-Deck VCR? Please indicate whether each reason was very important, somewhat important, or not important. Very Somewhat...
-
Page 29: Introduction
VideoTape Editing ... 41 8mm and VHS Formats ... 48 Tape Counter & Memory Stop ... 51 VHS Index Search System... 52 Connecting Your 8mm/VHS Dual-Deck VCR ... 53 Audio Connections ... 61 Adding New Audio ... 63 Monitor Connections ... 66 Connecting Other Video Equipment ... -
Page 30: 8Mm/Vhs Dual-Deck
Congratulations on your purchase of a Go-Video 8mm/VHS Dual-Deck VCR. Record the model and serial numbers from the back of your VCR here. You will find the serial number on a white barcode sticker. Attach your sales receipt and/or a copy of your charge slip, for reference. - Page 31 This symbol is intended to alert the user to the presence of important operating and maintenance instructions in the literature accompanying this product. 8mm/VHS DUAL-DECK VCR...
- Page 32 Congratulations on your purchase of Go-Video’s 8mm/VHS Dual-Deck VCR. Because a Dual-Deck VCR has two videocassette decks, operation is a little different than for the single deck VCR’s that you’re probably used to. Two Decks, One Set of Controls The key difference in operating a Dual-Deck VCR is that you...
- Page 33 Dual-Deck VCR. The Owner’s Guides To get the most out of your new Dual-Deck VCR, take a few minutes to familiarize yourself with the User’s Guide and with this Reference Guide. Be sure to read all safety instructions beginning on the next page.
-
Page 34: Safety Instructions
Safety Instructions PORTABLE CART WARNING (Symbol provided by RETAC) GO VIDEO REFERENCE GUIDE 1. READ INSTRUCTIONS - All the safety and operating instructions should be read before the unit is operated. 2. RETAIN INSTRUCTIONS - The safety and operating instructions should be retained for future reference. 3. -
Page 35: Power Sources
These openings must not be blocked or covered. Never place your VCR on a bed, sofa, rug or other similar surface, on or near a radiator or heat register. This... -
Page 36: Outdoor Antenna Grounding
GROUND CLAMP ELECTRIC SERVICE EQUIPMENT GROUND GROUNDING CONDUCTORS CLAMPS (NEC SECTION 810-21) POWER SERVICE GROUNDING ELECTRODE SYSTEM NEC - NATIONAL ELECTRICAL CODE (NEC ART 250, PART H) GO VIDEO REFERENCE GUIDE 13. OUTDOOR ANTENNA GROUNDING - antenna or cable system is connected to the video unit, be sure the antenna or cable system is grounded to ANTENNA LEAD-IN... -
Page 37: Damage Requiring Service
18. SERVICING - Do not attempt to service this video unit yourself as opening or removing covers may expose you to a dangerous voltage or other hazards. Refer all servicing to qualified service personnel. 19. DAMAGE REQUIRING SERVICE - unit from the wall outlet and refer servicing to qualified service personnel under the following conditions: a. -
Page 38: Features
Your 8mm/VHS Dual-Deck VCR does the rest! (p. 41.) The Sync Edit feature synchronizes the 8mm and VHS tape decks, allowing clean manual edits (p. - Page 39 Keep Track of Your Recordings with Date and Time Stamp You can set the Dual-Deck VCR to record a date, time, and record source message on the VHS tape at the start of a timed recording event or a manual recording (p. 36; User's Guide p.
- Page 40 Eliminate Programming Errors with Tone Feedback System If you set the Tone Feedback System to “on”, the 8mm/VHS VCR will beep once if a a keypress is correct, or twice if it’s incorrect (p. 34). Control Volume and Mute with VCR Remote Control The Dual-Deck VCR’s remote control features a Mute...
-
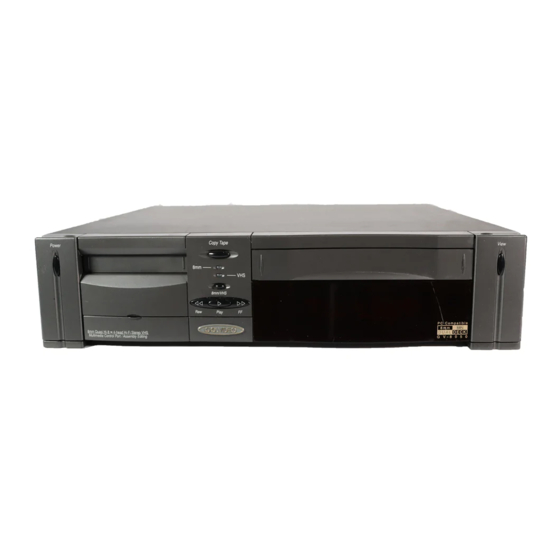
Page 41: Front Panel Buttons And Indicators
Press to turn your 8mm/VHS Dual-Deck VCR POWER on and off. If you press Rewind, Timer Record, Copy Tape, or One-Touch Record, the VCR will automatically shut off after the function is finished. Press to start and stop copying from the 8mm deck COPY TAPE to the VHS deck. - Page 42 Works while 8mm deck is in Play, Still (Pause), or Search modes. Channel Buttons: buttons serve as channel BEGIN up and down buttons when the VCR is not in Automatic Editing Mode. PLAY...
- Page 43 Press while in Copy Tape to Pause operation of SYNC EDIT both decks. Press while 8mm deck is in Play Still and VHS deck is in record pause, and VCR will start both decks at the same time, for a smooth edit.
-
Page 44: Front Panel Display
The Front Panel Display tells you what is happening as you use your 8mm/VHS Dual-Deck VCR. Each indicator on the Front Panel Display shows the status of one of the VCR’s functions. The Front Panel Display is divided into three sections, separated by columns of dots. -
Page 45: Center Section
Record), the Timer indicator will be ON, telling you that the VCR will begin recording at the time you have set. The Timer indicator will also be ON if the VCR is currently recording a TV show that you programmed in Timer Record. The Timer indicator will BLINK if there is an error in your Timer Record program. - Page 46 The CATV indicator will be ON if you have selected STD CATV, HRC CATV, or IRC CATV as your ANTENNA IN in the TUNER/CHANNEL MENU. The VCR indicator will be ON when the VCR is in VCR mode, and off when the VCR is in TV mode.
- Page 47 The VU, or Volume Unit Meter, gives you a visual indication, in decibels, of the relative volume level. In the 8mm/VHS Dual-Deck VCR Model GV8020, the relative audio volume is automatically adjusted. The VU Meter indicates the output volume, not the recording volume.
-
Page 48: On Screen Display
On Screen Display TV VIEW STOP TUNER PLAY CH 02 2:18 0:00 SP M M SP SAT JAN 1, 1994 12:00AM On Screen Display with Date and Time Note: The Source for the 8mm deck will always be the channel number that is tuned in. - Page 49 VHS and no tape is playing in that deck, you will instead see that deck’s Record Source. The channel indicator displays the channel that the Dual-Deck VCR is tuned to. It will also display SC if you choose SIMUL1 or SIMUL2 as your TUNER AUDIO in the TUNER/CHANNEL menu.
-
Page 50: Remote Control
TV/VCR Deck Controls between your 8mm/VHS Dual-Deck VCR and your TV. When in VCR mode, VCR will appear on the Front Panel Display. TV mode is the same as if your VCR were turned off. Press to switch control between the 8mm 8mm / VHS and VHS decks. - Page 51 Note: key is the same as key on the Dual-Deck VCR's front panel. Note: If you’re not playing or recording on a deck, the TV VIEW for that deck will be the Record Source for that deck. For example, if the VHS deck’s Record Source is...
-
Page 52: Numerical Keys
There is also an AUTO TRACK key behind the right hand hidden button panel on the front of the VCR. The TRK UP and DOWN keys are provided for users who prefer to adjust tracking manually. GO VIDEO REFERENCE GUIDE Numerical Keys Enter channel number to select a 2-digit channel. - Page 53 Automatic Editing Controls You must have an 8mm tape inserted to use the Automatic Editing keys. Press to enter the 8-scene Automatic Assembly SCENE Editing screen. Press again to enter the Scene List. While in the Scene List, press to cycle through the list.
- Page 54 GO VIDEO REFERENCE GUIDE Special Keys Press to start recording onto a VHS tape. Press RECORD while tape is paused to resume recording. Press while recording to activate One Touch Recording. Press while in Play Still to move to Record Pause. Press to start and stop AmeriChrome copy from COPY TAPE 8mm to VHS decks.
-
Page 55: Special Playback Functions
The On Screen Display is not available during Special Playback Modes. With your 8mm/VHS Dual-Deck VCR, the playback function is not limited to simply playing tapes. You can pause the tape for a stop action picture (Play Still). You can play tapes at Double-Speed or in Slow Motion (VHS only). - Page 56 Tracking (VHS Deck only) Occasionally, when you play a tape in the VHS deck that was recorded on a different VCR or on a VHS Camcorder, visual noise (white streaks) may appear if the recorded tracks on it do not align precisely with the playback heads on your deck.
- Page 57 AUTO FEATURES MENU when you have finished Sequential or Loop Play. With Loop Play, your 8mm/VHS Dual-Deck VCR will play an 8mm tape, then automatically activate the VHS deck to begin playing. The 8mm tape will rewind while the VHS tape is playing.
-
Page 58: On Screen Menu System
Try it! We’ve designed the menu system for the 8mm/VHS Dual- Deck VCR to do your thinking for you. When you press the menu that appears will depend on what your current TV View is. If your current TV View is the VHS deck, pressing will summon the VHS menu. - Page 59 To CHOOSE the setting you want for a SELECT particular item. Press SELECT repeatedly to cycle through the choices for that item. Press to CHOOSE an item if it’s a submenu (to enter that submenu). In the SET CLOCK and SET TIMER RECORD submenus, pressing this key moves you to the next field.
-
Page 60: Setup Menu
(a channel that you receive), it programs that channel into CHANNEL MEMORY. Once you have run AUTO PROGRAM, the channel selector (arrow keys) on your 8mm/VHS Dual- Deck VCR will stop only at the channels which you receive. SELECT... -
Page 61: Secondary Audio Programming (Sap)
IN connections on the front panel of your 8mm/VHS Dual-Deck VCR. SIMUL2 receives audio input from the LINE 2 AUDIO IN connections on the rear panel of your VCR. See the Audio Connections section of this manual for more information on Simulcast Stereo. - Page 62 KEY TONES to ON if you want feedback on your keypresses, or OFF if you do not. When set to ON, the VCR will beep once if your keypress is correct, and twice if it is in error.
-
Page 63: Vhs Menu
AMERICHROME COPY MENU, or to exit the QUIT menu system. The Dual-Deck VCR will remember your new settings. Use the VHS Menu to change settings related to your VHS tape: Record Speed, Record Source, Hi-Fi or Linear Audio, and Tape Length. -
Page 64: Display Menu
MENU the TIMER RECORD menu, or to exit the menu system. QUIT The Dual-Deck VCR will remember your new settings. GO VIDEO REFERENCE GUIDE Use the AMERICHROME COPY MENU to set Audio Insert, the Date/Time Stamp, and Custom Titling. - Page 65 ABCDEFG abcdefg 012345 HIJKLMN hijklmn 6789?= OPQRSTU opqrstu ':() VWXYZ., vwxyz., - /*# WHEN OK PUSH MENU TITLER SETUP SCREEN The TITLER SETUP SCREEN consists of two parts: a blank section where your title will appear and a section consisting of alphanumeric characters.
-
Page 66: Timer Record Menu
For example, enter 1994 as You can use the arrow keys to cycle through choices in the AM/PM, Type, Source, and Tape Speed fields (press tell the VCR to go to the next field). Or, you can use the numerical keys. Press for AM or for PM. -
Page 67: Record Menu
If you have a cable converter box, you’ll have to set this channel on the converter box. Set CH in the SET TIMER RECORD menu to whichever channel that you must keep your VCR tuned to (call your cable company for this infor- mation). Set the tape speed to SP (press (press ). - Page 68 Dual-Deck VCR will record Event 2. Fail-Safe Timer Recording The 8mm/VHS Dual-Deck VCR will alert you if there are any Timer Record errors. First, the TIMER indicator on the Front Panel Display will blink. You will also see a message on the Screen Display telling you what the error is.
-
Page 69: Videotape Editing
All you do is mark the beginning and end of each scene on your source tape, press the Copy Tape key, and your Dual-Deck VCR does the rest! Preparing an Automatic Assembly Edit List The key to making clean edits easily is planning. - Page 70 GO VIDEO REFERENCE GUIDE As you mentally break your 8mm tape up into segments, write down the Tape Counter positions for the beginning and end of each segment, and what is happening in the segment. Here is an example of notes for an assembly edit: 00:01:08 to 00:03:34 00:03:34 to 00:04:00 00:04:00 to 00:06:23...
- Page 71 Manual Assembly Editing You can also do assembly editing manually on the 8mm/VHS Dual-Deck VCR. Let’s say that you have a scene of all the kids leaving the birthday party, but this scene is on a different 8mm tape. Here’s how you would add that scene to the end of the VHS tape you just made: 1.
-
Page 72: Insert Editing
“Glitches” may occur during a manual assembly edit, usually at the end of a scene that is being recorded over old material. This is because the VCR’s full erase head (which erases the video, audio, and control tracks) is always a few seconds after the recording heads. - Page 73 Insert Editing allows you to copy over old material smoothly, without glitches. The 8mm/VHS Dual-Deck VCR Model GV8020 does not allow you to perform insert editing of video frames. How- ever, you can perform insert editing of the linear audio track of your VHS tapes.
- Page 74 Method #1 Connect the VIDEO and AUDIO OUTs on the Dual-Deck VCR to the video and audio inputs on the video enhancer. Then, connect the video and audio outputs on the video enhancer to the VIDEO and AUDIO IN (LINE 1 on the front or LINE 2 on the rear) connections on the Dual-Deck VCR.
- Page 75 Dual-Deck VCR to inputs of the video distribution amplifier. Connect one set of amplifier outputs to the AUDIO/VIDEO INPUTS of your VCR. Then, connect the other set of amplifier outputs to your monitor TV. With this connection, you will see the signal from your enhancer on your monitor, and the effect you see will be recorded onto your VHS tape.
-
Page 76: 8Mm And Vhs Formats
In LP and SLP, the individual video frames are recorded closer together. If your material was recorded on a 4-head VCR, the picture quality will be good, but you will lose some clarity compared to SP. Linear audio quality also... - Page 77 VCR uses to keep the tape playing smoothly, similar to the sprocket holes along the edge of movie film. These markers are also what the VCR uses to keep track of the hours, minutes, seconds, video frames, and VISS index marks that you see in the Tape Counter.
- Page 78 VHS Tape Cassette Record Safety Tab GO VIDEO REFERENCE GUIDE Record Safety Tab Both VHS and 8mm tapes have record safety tabs, to protect you from accidentally recording over your tapes. On a VHS tape, you break the record safety tab off to prohibit record- ing.
-
Page 79: Tape Counter & Memory Stop
Memory Stop If you wish, you can set the active deck of your 8mm/VHS Dual-Deck VCR so that the tape will stop at the zero point when rewinding or fast-forwarding. To do this, press the key on your remote control. You will see an M below MEMORY the Tape Counter setting on the On Screen Display. -
Page 80: Vhs Index Search System
You can locate Index Marks in two ways: First, use Index Scan if you want the 8mm/VHS Dual-Deck VCR to stop at each Index Mark, play for a few seconds, and then go on to the next Index Mark. 1. Press on the remote control. -
Page 81: Connecting Your 8Mm/Vhs Dual-Deck Vcr
For example, your VCR uses either channel 3 or 4, whichever you set on the back of the VCR. If your VCR is set to broadcast on channel 3, you must set your TV to channel 3 to receive that signal. -
Page 82: Basic Hookup
4. Call your cable company to find out which of these three channels they use. If your cable converter box leads to your VCR, you will need to tune your VCR to channel 2, 3, or 4. If your cable converter box leads directly to your TV, you will tune your TV to channel 2, 3, or 4. -
Page 83: Basic Cable Hookup
AUDIO VIDEO CONTROL IN FROM ANTENNA: POR T IN (LINE 2) OUT TO TV : DUAL-DECK VCR BACK PANEL Dual-Deck VCR Cable (supplied) VHF/UHF TV BACK PANEL Dual-Deck VCR Cable (supplied) VHF/UHF TV BACK PANEL HOOKING UP YOUR DUAL-DECK VCR... -
Page 84: Separate Vhf And Uhf Antennas
If you have separate VHF and UHF antennas, you’ll need to purchase a device called a combiner. This attaches to both antenna cables on one side and to a cable which goes to the VCR’s IN FROM ANTENNA connection on the other. MUL TIMEDIA AUDIO... -
Page 85: Cable Converter Box Hookup
Connect the round end of this cable to the OUT TO TV connection on the back of your 8mm/VHS Dual-Deck VCR. Connect the other end of the cable to the VHF IN or CABLE IN connection on the back of your TV. - Page 86 GO VIDEO REFERENCE GUIDE 8. Set the channel on the front display panel of your 8mm/ VHS Dual-Deck VCR to 2, 3, or 4. Call your cable company to find out which of these channels to use. 9. Use your cable converter box to select any channel.
- Page 87 OUT TO TV connection on the back of your 8mm/VHS Dual-Deck VCR. Connect the other end of the cable to the input connection on the back of your cable converter box.
- Page 88 TV, you should see the channel that the cable converter box is tuned to. To view any basic or premium channel, set your Dual- Deck VCR’s TV/VCR selector to TV (or turn off your Dual- Deck VCR). Select the desired channel on the cable con- verter box.
-
Page 89: Audio Connections
Or, if you have a stereo TV with separate audio input jacks, you can connect the Dual- Deck VCR audio output to your stereo TV and enjoy stereo sound. 1. Connect the AUDIO OUT connections on your 8mm/... -
Page 90: Channel Setup Menu
You can listen to this stereo audio and record it from the radio onto your VHS tape by connecting your 8mm/ VHS Dual-Deck VCR AUDIO IN to the audio output of your stereo system. 1. Connect your stereo amplifier tape or record output connections to the LINE 2 AUDIO IN connections on the back of your 8mm/VHS Dual-Deck VCR. -
Page 91: Adding New Audio
Line 1 or 2 input. When you set AUDIO INSERT in the AMERICHROME COPY menu to LINE 1 or LINE 2, the 8mm/VHS Dual-Deck VCR will copy the audio from the Line 1 (or 2) input, and the video from the 8mm deck. -
Page 92: Audio Insert
1. Connect the source of your new audio (a tape player, for example) to the Line 1 (front panel) or Line 2 (rear panel) audio input jacks on the 8mm/VHS Dual-Deck VCR. See the Audio Connections section of the Reference Guide for hookup instructions. -
Page 93: Audio Mixing
Connect the AUDIO OUT from the back of the 8mm/VHS Dual-Deck VCR to the INPUT on the audio mixer. Connect your other audio sources into the mixer. Then, connect the OUTPUT of the mixer to the LINE 1 AUDIO IN on the front of the Dual-Deck VCR. -
Page 94: Monitor Connections
VCR indirectly, through what is called an RF modulator. This is a miniature broadcasting station in your VCR that sends the signal to your TV. The OUT TO TV connection on the back of your Dual-Deck VCR trans- mits the signal from the RF modulator. -
Page 95: Connecting Other Video Equipment
VHS Dual- Deck VCR by using the Video and Audio input jacks. One set of input jacks (Line 1) is located on the front of your VCR, below the 8mm deck. A second set of jacks (Line 2) is located on the back of your VCR. -
Page 96: Care Of Your Dual-Deck Vcr
Specifications section of this Guide for specifications. • Do not place your Dual-Deck VCR near appliances with electric motors. • Do not put anything on top of your Dual-Deck VCR. Keep liquids and food away from your Dual-Deck VCR. Cleaning the Dual-Deck VCR Cabinet Dust the surface using a soft cloth. -
Page 97: Humidity Requirements
Humidity Requirements If your Dual-Deck VCR is suddenly moved from a cold to a warm place, moisture may form inside the unit. Before operating, allow at least 2 hours after plugging in the power cord for your Dual-Deck VCR to dry completely. Failure to do so may cause damage to your Dual-Deck VCR and the tape. -
Page 98: Technical Specifications
Technical Specifications VIDEO RECORD SYSTEM (VHS) VIDEO PLAYBACK SYSTEM (8mm) Rotary two-head helical scanning FM TELEVISION SYSTEM AUDIO TRACK (VHS) AUDIO TRACK (8mm) TAPE WIDTH (VHS) TAPE WIDTH (8mm) TAPE SPEED (VHS) TAPE SPEED (8mm) PLAY/RECORD TIME (VHS) PLAY TIME (8mm) FF/REW TIME HEADS (VHS) HEADS (8mm) - Page 99 VIDEO INPUT: OUTPUT: HORIZ RES: S/N RATIO: AUDIO INPUT: OUTPUT: S/N RATIO: WOW & FLUTTER: COMPUTER PORT: FREQUENCY RESPONSE TV TUNER RF MODULATION POWER REQUIREMENT CLOCK BACKUP TIME ENVIRONMENT WEIGHT/DIMENSIONS Video In connection (RCA). 1.0 V p-p, 75 ohms unbalanced. Video Out connection (RCA).
-
Page 100: Help
“I can’t timer record.” GO VIDEO REFERENCE GUIDE First, make sure that the TV/VCR key is set to VCR and that your TV is set to channel 3 or 4, whichever channel is set on the back of your VCR. You can use the TV/VCR key on the remote control. - Page 101 Check the AMERICHROME COPY menu. The AUDIO IN- SERT option should be set to OFF. If it is set to ON, the VCR is expecting sound to come from a source other than the 8mm tape, so it turns the sound OFF that tape.
- Page 102 VCR doesn’t work.” If your 8mm/VHS Dual-Deck VCR needs service, or if you’re having problems that you can’t solve by consulting the Owner’s Guides, contact a Go-Video Consumer Relations representative at (602) 922-0896. You will get the best service from our representatives if you place your call while in front of your 8mm/VHS Dual-Deck VCR.
-
Page 103: Limited Warranty
Limited Warranty The product you have purchased has been carefully engineered and manufactured under Go-Video’s rigid quality standards and should give you satisfactory and dependable operation. However, like all consumer electronic products, it may occasionally require adjustment, replacement parts, maintenance or service. Therefore, Go-Video provides a limited warranty for its products. -
Page 104: Additional Limitations On Warranty
To obtain warranty service, you will need to call Go-Video at the telephone number shown below and provide the following information to Go-Video or its service center: 1. Model, serial number and all of the other data shown on the model plate (on the back of the product). - Page 105 41-43, 14U Automatic Editing Keys BEGIN Key Cable Converter Box Hookup Cable Hookup, Basic 54-55, 4-5U Camcorder Hookup Captions (Titler) 36-37, 19U Care of Dual-Deck VCR CATV Indicator CH Indicator CHANNEL Keys Counter Channel Memory CLK/CTR Key Clock Clock, setting...
-
Page 106: Memory Key
FWD Key Glitches Help Hi-8 Playback (Quasi Hi-8) Hi-Fi Audio Hi-Fi Indicator Holding Event Hookup Hookup, Audio Equipment Hookup, Audio Mixers Hookup, Basic Antenna Hookup, Basic Cable Hookup, Cable Hookup, Cable Converter Box Hookup, Monitor-Style TV Hookup, Other Video Equipment Hookup, VHF &... - Page 107 TRK/MENU Keys 28-29 Troubleshooting Tuner/Channel Menu 74-76 TUNER Indicator 34, 6U TUNER Key (TV View) 37, 19U TV/VCR Key TV View Controls TV View Indicator 25, 27 VCR Indicator 25, 27 VHS Format VHS Index Search System VHS Indicator 20, 35...
-
Page 108: Vcr
EDITING: The Go-Video Dual-Deck Director editing process is very simple, and easy to learn and use. You just point and click on VCR style controls right on your computer screen. • First, go through your raw 8mm camcorder footage marking segments you want to use. - Page 109 The company plans to continue expanding its product base by developing, marketing, and licensing its consumer electronics technology, as well as developing enhancements to and new models of its Dual-Deck VCR. Look for more great products from Go-Video!
- Page 110 Your new 8mm/VHS Dual-Deck ™ VCR features: One Touch Copy Tape™ AmeriChrome™ Circuitry PC Compatible Multimedia Format Automatic Assembly Editing Audio Dub and Audio Insert Remote Volume Control Remote Load and Eject 4-Head VHS Deck Quasi Hi-8 Playback Real Time Tape Counter...
Need help?
Do you have a question about the GV8050 and is the answer not in the manual?
Questions and answers