
Related Manuals for Go-Video 4-Head Hi-Fi


Summary of Contents for Go-Video 4-Head Hi-Fi
- Page 1 Vi d e o Cassette Recorder U S E R U S E R ’ ’ S S G U I D E G U I D E Featuring Space-Saving ™ Stacked Deck Design Recorder VHS-VHS 4-Head Hi-Fi to 4-Head Hi-Fi...
-
Page 3: Safety Instructions
These openings must not be blocked or covered. Never place your VCR on a bed, sofa, rug or other similar surface, on or near a radiator or heat register. This... - Page 4 13. OUTDOOR ANTENNA GROUNDING - If an outside antenna or cable system is connected to the video unit, be sure the antenna or cable system is grounded to provide some protection against voltage surges and built-up static charges. Section 810 of the National Electrical Code, ANSI/NFPA No.
-
Page 5: Table Of Contents
Dual-Deck Go Video is a registered trademark of Go-Video, Inc. Copy Tape, AmeriChrome, Video Sequencing, and Dual-Deck VCR are trademarks of Go-Video, Inc. All other trademarks remain the property of their respective companies. ™ Introducing the Dual-Deck VCR Discover the Dual-Deck Difference ... 1 Features of Your Dual-Deck VCR ... - Page 6 Para reducir el riesgo de descarga eléctrica, no remueva la cubierta o la parte posterior del VCR. Dentro del VCR no hay partes que requieren servicio. Dirijase solamente a personal calificado cuando requiera servicio.
-
Page 7: Discover The Dual-Deck Difference
Tape at the Touch of a Button Go-Video’s Dual-Deck ™ VCRs do things that even two VCRs wired together can’t do. The secret behind this marvel of American electronics is Go-Video’s patented AmeriChrome ™ circuitry. Enhanced AmeriChrome circuitry incorporates an advanced microcontroller that synchronizes deck speeds for optimum duplication results. - Page 8 Syncro Start and Copy Audio Insert ... 26, 33 Use Skip Edit to quickly by-pass commercials with the Touch of a Button ... 27 Easy-to-Operate, Full Function VCR Remote ... 11 Sequential and Loop Record and Playback ... 20, 34-35 VHS Index Search System (VISS)/Automatic Show Finder (ASF) ...
-
Page 9: Features Of Your Dual-Deck Vcr
Watch a Video Tape While You Record a TV Show Why miss your favorite TV sit-com because the family wants to watch a rented video? With your Go-Video Dual-Deck VCR’s special recording and playback functions you can record that TV show WHILE you watch a video tape. - Page 10 Keep Track of Your Recordings with Date and Time Stamp You can set the Dual-Deck VCR to record a date, time and record source message on the tape at the start of a timed or manual recording event.
- Page 11 Dual, independently controlled, audio and video outputs allow you to connect two monitors to your Dual-Deck VCR. This feature allows you to watch a show on one monitor and a video tape on another or set up a home ‘editing suite’ to monitor both Deck One and Deck Two simultaneously.
-
Page 12: Automatic Features
The TV/VCR indicator switches to VCR. Auto Stop • Your Dual-Deck VCR will stop if a deck is left in Record Pause for more than 5 minutes, and will begin playing again if left in Play Still for more than 5 minutes. -
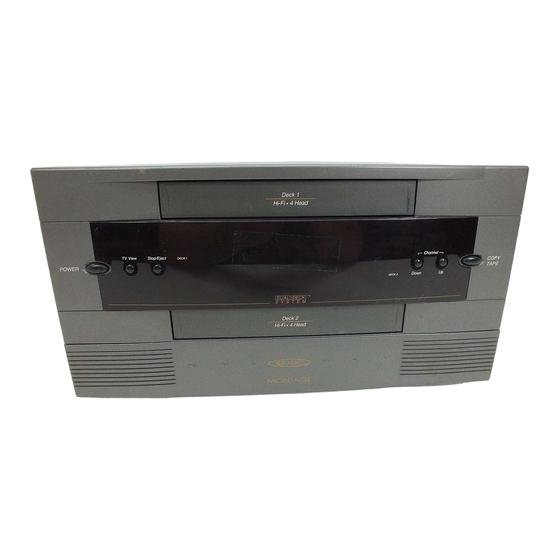
Page 13: The Dual-Deck System
Pause Record The Dual-Deck VCR has 18 keys on the front panel. They are: Press to turn your VCR on and off or to set the POWER Auto Power OFF mode. Press to switch control of the picture between TV/VCR the TV and the VCR. - Page 14 TV VIEW - Press to select which source you will view on your TV - Deck One, Deck Two, Tuner (TV channel), or Aux input. The TV/ VCR button must be set to VCR for you to see these sources. CLEAR - Press to clear programming entries such as in Timer Recording menu.
-
Page 15: Front Panel Display
‘Last Channel Viewed’. Front Panel Display The Front Panel Display tells you what is happening as you use your Dual- Deck VCR. This Front Panel Display will show the following: STOP, PLAY, EJECT, REC, REW, FF, REVEW, CUE, ON, OFF, LOOP, SLOW, PAUSE, STILL, END, PIC, 1-2. - Page 16 AM/PM • This indicator tells whether the time is AM or PM. SEP • This indicator shows the tape speed for each deck. If you are playing a tape, the tape speed is the speed at which the tape was recorded. Tapes can be played in three speeds, SP, EP and LP.
-
Page 17: Remote Control
Press FF or REW without entering digits to initiate a scan. In scan, the VCR stops at each index mark, plays 5 seconds, and moves on. Press while recording to place an Index Mark on the tape. - Page 18 ZERO RETURN tically stop at the zero point on the Tape Counter. To do this, press Zero Return during stop and the VCR will automatically Fast Forward or Rewind to counter position 0:00:00. This is also the Skip button. Press to manually summon the On-Screen Display.
- Page 19 TV - Deck One, Deck Two, Tuner (TV channel), or Line input. The TV/VCR button must be set to VCR for this button to work. Press two digits to enter a desired channel. Press ‘0’ first for channels 1-9. Also used for menu system programming.
-
Page 20: On-Screen Display
OTR and the duration will be displayed if One-Touch Recording is in progress. The channel indicator displays the channel that the Dual-Deck VCR is tuned to. In addition, the tuned channel’s audio mode (Mono, Stereo, SAP or TV/SAP) is displayed below the CH indicator. -
Page 21: Operating Your Dual-Deck Vcr
Setting the Date and Time If you plan to use the Timer Record or Date and Time Stamp features of your Dual-Deck VCR, you’ll need to set the correct date and time first. To set the current date & time: 1. - Page 22 DISCOVER THE DUAL-DECK DIFFERENCE Date • Enter the day of the month. For example, if today is the fourth, enter 0 4. Year • Enter only the last two digits. For exam- ple, 9 6 for 1996. 6. If you need to go back and change anything, press (Mute button) repeatedly until you SELECT...
-
Page 23: Setting Antenna & Channel Memory
If you are using a cable converter box, you will need to set your VCR’s tuner channel to receive only the cable converter box output channel. Your Dual-Deck VCR comes with a 181 channel MTS tuner capable of receiving both over-the-air and cable broadcasts in stereo. -
Page 24: Playing A Tape
Playing a Tape Playing a tape on your Dual-Deck VCR is simple: 1. Insert a tape into either deck of your VCR. If the tape is a play- only tape (it has no record safety tab) and AUTO PLAY/REWIND in the SETUP menu is set to PLAY or BOTH, it will automati- cally begin to play when inserted. - Page 25 (REVIEW 2). The tape will run in reverse at extra high speed and you will be able to see the picture. REVIEW will blink on the Front Panel Display. Press to resume playback. PLAY CHAPTER 2 - OPERATING YOUR DUAL-DECK VCR STOP again to advance play slows SLOW- SLOW+...
- Page 26 Deck Two to begin playing when the tape in Deck One is through. 1-2 will appear on the Front Panel Display. With loop play, your Dual-Deck VCR will play a tape in Deck One, then automatically activate Deck Two to begin playing.
-
Page 27: Copying A Tape
3. Press on your remote control or on the front COPY panel of your VCR. Your Dual-Deck VCR will now make a copy of your tape. If you wish to pause in the copying process, press again. To resume copying, press... -
Page 28: Recording A Tv Program
30 minutes to the record time. For example, if you press times, the VCR will record for 60 minutes. The Front Panel Display will show the length of recording time programmed. After the elapsed time, the deck will stop. -
Page 29: Setting Timer To Record Later
Timer Recording. Setting Timer to Record Later You can program your Dual-Deck VCR to record TV shows at a later time. You can program up to eight Timer Recording events (shows): 4 on Deck One and 4 on Deck Two. - Page 30 DISCOVER THE DUAL-DECK DIFFERENCE Date - If you selected Once, you will be asked to enter the day (01-31) when you which timer recording to start. 2: Daily - records one event at the same time every weekday. 3: Weekly - records one event at the same time every week.
- Page 31 SP gives you the best quality and this speed is automatically selected initially. If the VCR determines there is not enough time on the tape to record the entire selection, it will automatically change the speed to EP. You will notice some difference in quality if this happens.
-
Page 32: Date/Time Stamp
Date and Time Stamp does not record when you are doing a Copy Tape. Video Tape Editing With your Dual-Deck VCR you can edit tapes quickly and easily. Your editing may be as simple as removing unwanted scenes from your camcorder recordings. Or... -
Page 33: Tape Counter
When the tape is positioned at the beginning of the edit scene, press Pause. 4. Press the Copy Tape button and the VCR will automatically perform the synchronized edit. 5. To add the next scene, start over with Step 3. -
Page 34: Index Search
This feature combines the date/time stamp plus the VHS Index Search System (VISS). VISS is the VHS standard, so you can use the Dual-Deck VCR index system with tapes made on other VCRs and VHS camcorders that also use the VISS system. -
Page 35: Programming Your Dual-Deck Vcr
Many of the menu items come pre-programmed to the most common setting. Some settings you may never need to change. However, as you learn more about your Dual-Deck VCR, you may decide to change some of the settings. To use the On-Screen menu System: •... -
Page 36: Setup Menu
NOTE: If you press and do not get the MENU Features menu, continue pressing MENU until you see the Features menu. DISCOVER THE DUAL-DECK DIFFERENCE Menus Press to get the Features menu. The Setup menu MENU will be indicated. Press to select this menu. - Page 37 2. When the desired setting is shown on the screen, either press to exit this menu or move to MENU another item. Use the rear panel output jacks to hook up the second monitor, see page 00. CHAPTER 3 - PROGRAMMING YOUR DUAL-DECK VCR key is VIEW...
-
Page 38: Aux Input
NOTE: If you press and do not get the MENU Features menu, continue pressing MENU until you see the Features menu. DISCOVER THE DUAL-DECK DIFFERENCE AUX Input [Menu, 1, 7] This option allows you to select the incoming signal if you have already selected AUX for your record source or TV view. - Page 39 Features menu Copy Mode [Menu, 2] HQ Copy uses Go-Video’s patented AmeriChrome Cir- cuitry for optimum duplicating results. You can choose HQ1 or HQ2 depending on your particular needs. Optimum results will be obtained when using HQ1 if the source tape is in SP or any tape with Copy Guard.
-
Page 40: Playback Mode
Record Mode [Menu, 7] Loop Record • Your Dual-Deck VCR will record on a tape in Deck One, then automatically activate Deck Two to begin recording. The tape in Deck One will rewind while the tape in Deck Two is recording. When... - Page 41 Deck One is finished. When finished each tape will automatically rewind and stop. 1-2 will appear on the Front Panel Display. Normal Record • Your Dual-Deck VCR will begin recording a tape in whichever Deck you activate by pressing the REC button.
-
Page 42: Set Time And Date
Set Clock/Language Menu The Set Clock/Language menu allows you to set the date and time and determine in which language you want your Dual-Deck VCR menu system. Set Time and Date [Menu, 1,1,1] While in the Set Clock/Language menu, press the numeric keys and follow the prompt to determine what date you want to enter. -
Page 43: Auto Program
Any time it finds a channel with a signal (a channel that you receive), it programs that channel into channel memory. Once you have run Auto Pro- gram, the channel selector on your Dual-Deck VCR or remote control will stop only at the channels which you receive. - Page 44 Program, usually another language, along with the regular audio. All Second Audio Program broadcasts are monaural. When you tune your Dual-Deck VCR to a channel with a Secondary Audio Program, SAP will appear on the Front Panel Display (whether or not you have SAP selected).
- Page 45 SELECT this item and (LCV button) to change CHANGE this feature. 2. When the desired setting is shown on the screen, either press to exit this menu or move to MENU another item. CHAPTER 3 - PROGRAMMING YOUR DUAL-DECK VCR...
-
Page 46: Timer Recording
Timer Recording [Menu, 3] Use the Timer Recording menu when you want to set the Dual-Deck VCR to record at a later time. You can program up to four events (shows) in advance on Deck One and four on Deck Two. - Page 47 If Deck One is selected, you will record the tape playing in Deck One or Tuner if Deck One is stopped. TUNER records the channel you select on your VCR. When AUX is selected, the incoming signal is from the...
- Page 48 DISCOVER THE DUAL-DECK DIFFERENCE...
-
Page 49: Connecting Your Dual-Deck Vcr
For example, your VCR uses either channel 3 or 4. If your VCR is set to broadcast on channel 3, you must set your TV to channel 3 to receive this signal. -
Page 50: Basic Connections
VCR. 3. Which channel your TV is tuned to (to watch the VCR). 4. Which channel (3 or 4) is set on the back of your VCR. 5. If you have a cable converter box leading into your VCR, you will need to note which channel (2, 3 or 4) your VCR is tuned to. -
Page 51: Separate Vhf And Uhf Antennas
43. If you antenna cable is twin-lead, you will need to purchase an adapter, available at your local electronics store. 4. Make sure the switch on the back of the VCR is set to 3. 5. Turn on the power for your VCR and your TV. -
Page 52: Basic Cable Connections
To record one channel and view another: 1. Begin recording the channel you are viewing. 2. Press the TV/VCR button to switch to TV viewing. 3. Select the channel you want to watch with your TV channel selector. -
Page 53: Cable Converter Box Connections
Turn on the power for your VCR, TV and converter. Use the numeric keys or the channel up/down buttons to set your VCR to 2, 3 or 4. Call your cable company if you do not know which of these channels to use. - Page 54 You should get a picture. You are now ready to use your cable box with your VCR and TV. You may want to check the TUNER SETUP menu. The Antenna Source should be set to TV and the Channel Memory should be set for the cable box channel 2, 3 or 4 only.
-
Page 55: Alternative Cable Converter Box Hookup
(you can still watch those channels). 1. Place your Dual-Deck VCR next to your TV and plug the VCR power cord into a wall outlet. Discon- nect all antenna and cable connections. - Page 56 7. Use the menu System to set the antenna and channel memory, see pages 17 and 35. With TV/VCR on VCR and the cable box set on 3 or 4, you should see the channel that the VCR is tuned to.
-
Page 57: Monitor Connections
If practical, use the VIDEO and AUDIO OUT connec- tions on the back of your VCR instead of the TV OUT connection. To view the VCR output on the monitor, you have to switch the monitor to ‘VIDEO,’... -
Page 58: Connecting Other Video Equipment
DUAL-DECK VCR FRONT PANEL You can connect other video equipment to your Dual- Deck VCR by using the Video and Audio Input jacks. These jacks are located on the front of the VCR. Connect another VCR, a laser disc player, a video... -
Page 59: Audio Connections
MTS Stereo Sound through your stereo speakers. Or, if you have a stereo TV with separate audio input jacks, you can connect the Dual- Deck VCR audio output to your TV and enjoy stereo sound. 1. Connect AUDIO OUT connections on your Dual- Deck VCR back panel to an audio input connection (VCR, auxiliary, tape) on your stereo receiver. - Page 60 Dual-Deck from your IBM or compatible PC (personal computer). This requires an optional hardware interface and software package which is available directly from Go-Video. Complete connection and operating instructions are included in that package. For additional information, please contact our customer service staff at 602-922-0896 (Mon.
-
Page 61: Care Of Your Dual-Deck Vcr
Cleaning the Video Heads Your new Go-Video Dual-Deck VCR features a built-in video head cleaner, and was designed and engineered to give you many years of trouble-free operation. -
Page 62: Humidity Requirements
DISCOVER THE DUAL-DECK DIFFERENCE Cleaner will catch normal residue, but with heavy VCR use, or the playing of old, well-used or damaged video tapes, the accumulation of dirt over time will cause blurs or streaks in the video and video copy image. -
Page 63: Service And Warranty
Do not try to disassemble your Dual-Deck VCR - there are no user-serviceable parts inside. Servicing of your Dual-Deck VCR should be done by an authorized service center. For service information, see the Customer Service and Warranty section of this guide, on page 71. - Page 64 DISCOVER THE DUAL-DECK DIFFERENCE...
-
Page 65: B - Glossary
ACTIVE DECK The deck you have control of. To see which deck that is, look at the LEDs on the front panel of the VCR. Use the Deck Select key to control which deck is active. Green = Deck One and Red = Deck Two. - Page 66 DAILY A Timer Recording Event which starts every weekday (Monday - Friday). EVENT A particular television program which is programmed to be recorded in the Timer Recording menu. Button on the remote control and on the front panel which will fast forward your tape. Press while the active deck is stopped to fast forward the tape.
- Page 67 Press on either the remote control or the front panel of the VCR to turn your Dual-Deck VCR on and off. The indicator light is on when the VCR is on and off when the VCR is off. If the POWER key is pressed while timer recording, copying a tape or rewinding, the power light will blink.
- Page 68 TV/VCR Press to switch control of the picture between the TV and the VCR. This is the antenna switch. When set to TV, the antenna signal goes directly to the TV bypass- ing the VCR; when set to VCR, the antenna signal goes through the VCR.
-
Page 69: C - Help/Commonly Asked Questions
TV is set to channel 3 or 4 (see above), try adjusting the fine tuning on your TV. Or try changing the output channel of the VCR (if set to 3 change to 4, and if set to 4 change to 3). Then make sure your TV is set to the same channel. - Page 70 DISCOVER THE DUAL-DECK DIFFERENCE When the VCR is in VCR mode and your TV is set to channel 3 or 4, you should be able to view the desired channel on your TV. If you have a cable converter box, make sure the VCR is tuned to the cable converter box output channel.
- Page 71 This means the VCR has had difficulty with the tape mechanism. To reset, turn the power off and then on again. If this does not clear the error, unplug the VCR from the wall outlet and inspect both tape slots for foreign objects, or jammed or crooked tapes.
- Page 72 Double check your antenna connections. Your Dual-Deck VCR is in Auto Power Off mode. If you press the power button while rewinding a tape, timer recording, One-Touch recording, copying a tape, or using EZ-Copy, your VCR will automatically turn off when that function is completed.
-
Page 73: Troubleshooting
Thank You Contact your for using authorized Go-Video Go-Video’s Service Center Dual-Deck or Go-Video Direct at (602) 922-0896. VCR! APPENDIX C - HELP-COMMONLY ASKED QUESTIONS Verify that the VCR and cabling are connected to the TV, repeat the steps. Is... -
Page 74: Poor Video Quality
VCR output channel. Using the VCR remote, depress the display (DSP) key. Is the authorized Go-Video OSD present? or Go-Video Direct at (602) 922-0896. Play a tape in Deck One. Is the head cleaner, clean video OK? picture quality good? Play a tape in Deck Two. -
Page 75: Connecting Your Vcr To Your Tv
TROUBLESHOOTING Connecting Your VCR to Your TV, Monitor or Stereo System Does your TV have an Audio/Video Input jack? Do you want to listen in Stereo or do you want the best quality video transfer between your VCR and TV? - Page 76 DISCOVER THE DUAL-DECK DIFFERENCE...
-
Page 77: D - Customer Service Information
For your convenience, Go-Video has developed an extensive network of Dual-Deck VCR Service Centers across North America. For a list of the Authorized Go-Video Service Centers in your local area, call Go-Video Customer Service at (602) 922-0896. APPENDIX D - CUSTOMER SERVICE INFORMATION... -
Page 78: C - Warranty Statement
This warranty covers internal operating parts and service/labor to repair or replace covered parts in this Go-Video product for 90 days labor, 1 year parts, from the date of purchase, defined as follows: (1) Original Consumer Retail Purchase; (2) First Rental Purchase Agreement;... -
Page 79: E - Technical Specifications
Technical Specifications VIDEO SYSTEM: TELEVISION SYSTEM: AUDIO TRACK: TAPE WIDTH: TAPE SPEED: PLAY/RECORD TIME: FF/REW TIME: HEADS: Video: Audio: Control: Erase: VIDEO: Input: Output: Horiz Res: S/N Ratio: AUDIO: Input: Output: TV Tuner: 1/2" VHS system, rotary head helical scanning; chrominance: converted sub-carrier phase shift recording;... - Page 80 WOW & FLUTTER: Less than .005% (weighted R/P [SP]) ANTENNA OUTPUT: 75 ohm, unbalanced F-type RF MODULATION: Channel 3 or 4 FREQUENCY RESPONSE: 20-20,000 Hz (Hi-Fi) POWER REQUIREMENT: 120V AC, 60 Hz, 29 watts CLOCK BACKUP TIME: 30 seconds ENVIRONMENT: 35% - 80% relative humidity WEIGHT/DIMENSIONS: 8 kg (17.6 lbs)
-
Page 81: Dual-Deck Index
Auto Program Automatic Features Automatic Show Finder AUX Input Cable Converter Box Hookup Cable Hookup, Basic Camcorder, Connecting Care of Dual-Deck VCR Cleaning Your VCR Clock, Setting Clock Menu Connecting the Dual-Deck VCR Connecting Video Equipment Copy Audio Insert Copying a Tape... - Page 82 DISCOVER THE DUAL-DECK DIFFERENCE Hookup, Cable Hookup, Basic Antenna Hookup, Basic Cable HQ Copy Index Marks Index Search Index Scan Jet Search Language Menu Laser Disc Player Loop Play Loop Record Menu System On-Screen Display On-Screen Menu System One Touch Recording (OTR) Playback Mode Playing a Tape Record Mode...
- Page 84 7835 East McClain Drive Scottsdale, Arizona 85260-1732 (602) 998-3400 E-Mail: custsvc@govideo.com F# 1128 PRINTED 6/96...
Need help?
Do you have a question about the 4-Head Hi-Fi and is the answer not in the manual?
Questions and answers