AEG Electrolux 79301 KF-N Installation And Operating Instructions Manual
Ceramic glass hob
Hide thumbs
Also See for 79301 KF-N:
- Installation and operating instructions manual (40 pages) ,
- Installation and operating instructions manual (32 pages)
Chapters
Table of Contents

Related Manuals for AEG Electrolux 79301 KF-N


Summary of Contents for AEG Electrolux 79301 KF-N
- Page 1 79301 KF-N Glaskeramik-Kochfeld Ceramic glass hob Table de cuisson vitrocéramique Montage- und Gebrauchsanweisung Installation and Operating Instructions Instructions de montage et mode d’emploi...
- Page 2 Sehr geehrte Kundin, sehr geehrter Kunde, lesen Sie bitte diese Gebrauchsanweisung sorgfältig durch und bewah- ren Sie sie zum späteren Nachschlagen auf. Geben Sie diese Gebrauchsanweisung an eventuelle Nachbesitzer des Gerätes weiter. Folgende Symbole werden im Text verwendet: Sicherheitshinweise Warnung! Hinweise, die Ihrer persönlichen Sicherheit dienen. Achtung! Hinweise, die zur Vermeidung von Schäden am Gerät dienen.
-
Page 3: Table Of Contents
Inhalt Gebrauchsanweisung ........Sicherheitshinweise . -
Page 4: Gebrauchsanweisung
Gebrauchsanweisung 1 Sicherheitshinweise Beachten Sie bitte diese Hinweise, da sonst bei auftretenden Schäden der Garantieanspruch entfällt. Dieses Gerät entspricht den folgenden EG-Richtlinien: – 73/23/EWG vom 19.02.1973 Niederspannungs-Richtlinie – 89/336/EWG vom 03.05.1989 EMV-Richtlinie einschließlich Änderungs-Richtlinie 92/31/EWG – 93/68/EWG vom 22.07.1993 CE-Kennzeichnungs-Richtlinie Bestimmungsgemäße Verwendung •... - Page 5 Sicherheit während der Benutzung • Aufkleber und Folien von der Glaskeramik entfernen. • Am Gerät besteht beim unachtsamen Arbeiten Verbrennungsgefahr. • Kabel von Elektrogeräten dürfen nicht an die heiße Geräteoberfläche bzw. heißes Kochgeschirr gelangen. • Überhitzte Fette und Öle entzünden sich schnell. Kochvorgänge mit Fett oder Öl (z.B.
-
Page 6: Gerätebeschreibung
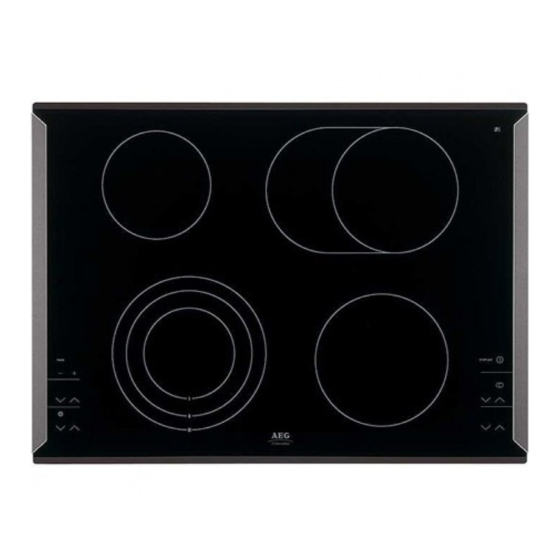
Gerätebeschreibung Ausstattung Koch- und Bedienfeld Einkreis-Kochzone Bräterzone 1200W 2200W Bedienfeld Bedienfeld Dreikreis-Kochzone Einkreis-Kochzone 2300W 1800W Sensorfeld „Stop+Go“ Sensorfeld „Timer“ mit „Ein/Aus“ Kontrollanzeigen Sensorfeld Bräterzone Kontrolllampe Kontrolllampen Bräterzone Dreikreis Anzeige für Kochstufe Sensorfeld /Restwärme Dreikreis Kochstufenwahl... -
Page 7: Digitale Anzeigen
Digitale Anzeigen Die vier Anzeigefelder, die den vier Kochzonen zugeordnet sind, zeigen: – ¾ nach dem Einschalten, – u bei Anwahl der Warmhaltestufe, – ¿ bis Ç, je nach gewählter Kochstufe, – 2 bis 6 (mit Dezimalpunkt) für Zwischen-Kochstufen – a bei Ankochautomatik, –... -
Page 8: Bedienung Des Kochfeldes
Bedienung des Kochfeldes Touch Control-Sensorfelder Zur Bedienung der Touch Control-Sensorfelder legen Sie Ihren Finger von oben und flach auf das gewünschte Feld, bis entsprechende Anzei- gen aufleuchten oder erlöschen, bzw. die gewünschte Funktion ausge- führt wird. Gerät einschalten Das komplette Gerät wird mit dem Sensorfeld „Ein/Aus“ I einge- schaltet. -
Page 9: Gerät Ausschalten
Gerät ausschalten Zum kompletten Ausschalten des Gerätes Sensorfeld „Ein/Aus“ I be- tätigen. Das Sensorfeld „Ein/Aus“ ca. eine Sekunde lang berühren. Nach dem Abschalten einer einzelnen Kochzone oder des gesamten Kochfeldes wird vorhandene Restwärme mit h (wie „Heiß“) in den digi- talen Anzeigen der entsprechenden Kochzonen angezeigt. -
Page 10: Dreikreis-Kochzone Ein- Und Ausschalten
Dreikreis-Kochzone ein- und ausschalten Je nach Topf- oder Pfannengröße kann bei der Dreikreis-Kochzone mit dem Sensorfeld „Dreikreiszone“ zu der kleineren Kochzone der jeweils größere Heizkreis zugeschaltet werden. Diese können nur zugeschaltet werden, wenn für den kleineren Heiz- kreis schon eine Kochstufe eingestellt ist. 1. -
Page 11: Bräterzone Ein- Und Ausschalten
3. Bei erneutem Berühren des Sensorfelds „Dreikreis“ wird der äußere Heizkreis aktiviert. Die obere Kontrolllampe leuchtet. 4. Zum Ausschalten der äußeren Heizkreise Sensorfeld „Dreikreis“ berüh- ren, der jeweils äußere Heizkreis wird abgeschaltet. Bräterzone ein- und ausschalten 1. Die gewünschte Kochstufe einstellen. 2. -
Page 12: Stop+Go-Funktion
Stop+Go-Funktion Bei Betätigung des Sensorfeldes „Stop+Go“ werden alle eingeschalteten Kochzonen gleichzeitig auf die Warmhaltestufe zurückgeschaltet. Die Kontrolllampe des Sensorfeldes „Stop+Go“ leuchtet. Die Warmhaltestu- fe wird im Display mit u angezeigt.. Bei erneuter Betätigung des Sensorfeldes „Stop+Go“ werden die vorher gewählten Kochstufen wieder eingestellt, die Kontrolllampe erlischt. Der Timer wird durch die Stop+Go-Funktion nicht angehalten. -
Page 13: Restwärmeanzeige
Restwärmeanzeige Nach dem Abschalten einer einzelnen Kochzone oder des gesamten Kochfeldes wird vorhandene Restwärme mit h (wie „Heiß“) in den digitalen Anzeigen der ent- sprechenden Kochzonen angezeigt. Auch nach dem Ausschalten der Kochzone erlischt die Restwärmeanzeige erst, wenn die Kochzone abgekühlt ist. Sie können die Restwärme zum Schmelzen und Warmhalten von Spei- sen benutzen. -
Page 14: Kochen Mit Der Ankochautomatik
Kochen mit der Ankochautomatik Alle vier Kochzonen des Kochfeldes sind in neun Stufen regelbar und sind mit einer Ankochautomatik ausgestattet: – ¿, kleinste Kochstufe – Ç, höchste Kochstufe – a, Ankochfunktion. Wenn Sie die von Ihnen gewünschte Kochstufe mit dem Sensorfeld Kochstufenwahl wählen, arbeitet die Kochzone für eine bestimmte Zeit mit der vollen Leistung und schaltet automatisch auf die einge-... -
Page 15: Kochen Ohne Ankochautomatik
Kochen ohne Ankochautomatik Wenn Sie die Kochzone ohne Ankochautomatik nutzen wollen, dann wählen Sie die gewünschte Kochstufe mit dem Sensorfeld Kochstufen- wahl 1. Sensorfeld Kochstufenwahl berühren, um die gewünschte Kochstufe Ç bis ¿ einzustellen. Mit den Sensorfeldern Kochstufenwahl können Sie die Stufe jederzeit verstellen. -
Page 16: Kindersicherung
Kindersicherung Mit der Kindersicherung kann das Kochfeld gegen unerwünschter Be- nutzung gesichert werden. Kindersicherung einschalten Zum Einschalten der Kindersicherung muss das Gerät eingeschaltet sein, es darf aber keine Kochzone eingeschaltet sein. 1. Das Sensorfeld ca. drei Sekunden lang berühren.. Zur Bestätigung ertönt ein Signalton. 2. - Page 17 Kindersicherung überwinden Die Kindersicherung kann für die einmalige Benutzung des Gerätes (bis zum nächsten Ausschalten des Gerätes) überwunden werden. Beim nächsten Einschalten ist die Kindersicherung automatisch wieder aktiv. 1. Das Gerät einschalten. Bei aktiver Kindersicherung wird l angezeigt. 2. Gleichzeitig zwei beliebige Sensorfelder Kochstufenwahl rühren.
- Page 18 Kindersicherung ausschalten 1. Das Gerät einschalten. Bei aktiver Kindersicherung wird l angezeigt. 2. Das Sensorfeld ca. drei Sekunden lang berühren.. Zur Bestätigung ertönt ein Signalton. 3. Ein beliebiges Sensorfeld Kochstufenwahl berühren. Die Anzeigen werden dunkel, die Kindersicherung ist ausgeschaltet. Das Gerät schaltet nach einigen Sekunden automatisch ab.
-
Page 19: Timer
Timer Sie können den Timer auf zwei Arten benutzen: – als Abschaltautomatik. Sie stellen für eine Kochzone eine Gardauer ein, nach deren Ablauf schaltet sich die Kochzone automatisch ab. Diese Funktion kann für mehrere Kochzonen gleichzeitig genutzt werden. – als Kurzzeitmesser ohne Schaltfunktion („Eieruhr“), nach Ablauf der eingestellten Zeitdauer ertönt ein akustisches Signal. - Page 20 2. Während die Kontrolllampe schnell blinkt, mit den Sensorfeldern Timer- einstellung + oder - für diese Kochzone die gewünschte Zeitdauer bis zum automatischen Abschalten einstellen (z.B. 15 Minuten). Nach wenigen Sekunden wird die Abschaltautomatik aktiviert Die Kontrolllampe blinkt jetzt langsamer und die Restgardauer wird während des Ablaufs im Display angezeigt.
- Page 21 Abschaltautomatik vorzeitig beenden Sie haben zwei Möglichkeiten die Abschaltautomatik vorzeitig abzu- schalten: Kochzone und Timer gleichzeitig abschalten 1. Mit dem Sensorfeld Kochstufenwahl die gewünschte Kochzone auf Null zurückstellen: Kochzone und Timer schalten ab. Timer ausschalten - Kochzone bleibt aktiv 1. Mit dem Sensorfeld Timer die gewünschte Kochzone auswählen. Die entsprechende Kontrolllampe blinkt dann schneller.
-
Page 22: Anwendung, Tabellen, Tipps
Anwendung, Tabellen, Tipps Kochgeschirr • Gutes Kochgeschirr erkennen Sie am Topfboden. Der Boden sollte so dick und plan wie möglich sein. • Achten Sie beim Neukauf von Töpfen und Pfannen auf den Boden- Durchmesser. Hersteller geben oft den oberen Durchmesser des Ge- schirrrandes an. -
Page 23: Tipps Zum Kochen Mit Und Ohne Ankochautomatik
Tipps zum Kochen mit und ohne Ankochautomatik Die automatische Ankochfunktion eignet sich für: • Gerichte, die kalt aufgesetzt werden, bei hoher Leistung erhitzt wer- den und auf der Fortgarstufe nicht ständig beobachtet werden müs- sen, • Gerichte, die in die heiße Pfanne gegeben werden. Die automatische Ankochfunktion eignet sich nicht für: •... -
Page 24: Anhaltswerte Zum Kochen
Anhaltswerte zum Kochen Die Angaben in der folgenden Tabelle sind Richtgrößen. Welche Schal- terstellung für Kochvorgänge erforderlich ist, hängt von der Qualität der Töpfe und von der Art und Menge der Lebensmittel ab. Ankochzeit der Schalter- Automatik Garvorgang Beispiele für die Anwendung stellung (Min.) Ankochen großer Flüssigkeitsmengen,... -
Page 25: Reinigung Und Pflege
Reinigung und Pflege Vorsicht! Verbrennungsgefahr durch Restwärme. Gerät abkühlen lassen. Achtung! Scharfe und scheuernde Reinigungsmittel beschädigen das Gerät. Mit Wasser und Spülmittel reinigen. Achtung! Rückstände von Reinigungsmitteln beschädigen das Gerät. Rückstände mit Wasser und Spülmittel entfernen. Gerät nach jedem Gebrauch reinigen 1. -
Page 26: Metall-Dekorstreifen
Metall-Dekorstreifen Achtung! Keinen Essig, Zitrone oder kalklösende Mittel auf die Metall- Dekorstreifen des Kochfelds bringen, es entstehen sonst matte Stellen. Beim Reinigen nicht mit flachen Gegenständen (z.B. Messern) unter die Dekorstreifen fahren, da sich diese sonst eventuell ablösen können. 1. Metall-Dekorstreifen mit einem feuchten Tuch und ein wenig Hand- spülmittel abwischen. -
Page 27: Was Tun, Wenn
Was tun, wenn … Abhilfe bei Störungen Möglicherweise handelt es sich bei einer Störung nur um einen kleinen Fehler, den Sie anhand nachfolgender Hinweise selbst beheben können. Führen Sie keine weiteren Arbeiten selbst aus, wenn nachstehende In- formationen im konkreten Fall nicht weiterhelfen. Warnung! Reparaturen am Gerät dürfen nur von Fachkräften durchge- führt werden. -
Page 28: Entsorgung
… nach dem Ausschalten der Kochzonen kein h für Restwärme in der Anzeige erscheint? Überprüfen Sie, ob – die Kochzone nur kurz in Betrieb gewesen und daher noch nicht heiß genug ist. Sollte die Kochzone heiß sein, rufen Sie bitte den Kundendienst. …... -
Page 29: Montageanweisung
Montageanweisung Sicherheitshinweise Die im Einsatzland geltenden Gesetze, Verordnungen, Richtlinien und Normen sind einzuhalten (Sicherheitsbestimmungen, sach- und ord- nungsgemäßes Recycling etc.). Die Montage darf nur von einer Fachkraft ausgeführt werden. Die Mindestabstände zu anderen Geräten sind einzuhalten. Schubladen dürfen nur mit Schutzboden direkt unter dem Gerät montiert sein. -
Page 30: Montage Aufliegend
Montage aufliegend • Die Arbeitsplatte im Ausschnittbereich reinigen. • Das mitgelieferte, einseitig selbstklebende Dichtungsband umlaufend auf der Unterseite des Kochfeldes entlang des äußeren Randes der Glaskeramikscheibe aufkleben. Dabei nicht dehnen. Die Schnittstelle soll in der Mitte einer Seite liegen. Nach dem Ablängen (einige mm zugeben) die beiden Enden stumpf gegeneinander drücken. -
Page 31: Service
Service Bei technischen Störungen prüfen Sie bitte zunächst, ob Sie mit Hilfe der Gebrauchsanweisung (Kapitel „Was tun, wenn...“) das Problem selbst beheben können. Wenn Sie das Problem nicht beheben konnten, wenden Sie sich bitte an den Kundendienst oder einen unserer Service-Partner. Um Ihnen schnell helfen zu können, benötigen wir folgende Angaben: –... -
Page 32: Dear Customer
Dear Customer, Please read these user instructions carefully and keep them to refer to later. Please pass the user instructions on to any future owner of the appli- ance. The following symbols are used in the text: Safety instructions Warning! Information that affects your personal safety. Important! Information that prevents damage to the appliance. - Page 33 Contents Operating Instructions ........34 Safety instructions.
-
Page 34: Operating Instructions
Operating Instructions 1 Safety instructions Please comply with these instructions. If you do not, any damage re- sulting is not covered by the warranty. This appliance conforms with the following EU Directives: – 73/23/EEC dated 19.02.1973 Low Voltage Directive – 89/336/EEC dated 03.05.1989 EMC Directive inclusive of Amending Directive 92/31/EEC –... -
Page 35: Safety During Use
Safety during use • Remove stickers and film from the glass ceramic. • There is the risk of burns from the appliance if used carelessly. • Cables from electrical appliances must not touch the hot surface of the appliance or hot cookware. •... -
Page 36: Description Of The Appliance
Description of the Appliance Cooking zones and control panel Single ring cooking zone Casserole zone 1200W 2200W Control Panel Control Panel Triple ring cooking zone Single ring cooking zone 2300W 1800W Sensor panel ”Stop+Go” Sensor field “Timer” with ”On/Off” Pilot indicators Browning zone sensor panel Browning zone... -
Page 37: Digital Displays
Digital displays The four display panels that belong to the four cooking zones indicate: – ¾ after having been switched on, – u when a keep warm setting has been selected, – ¿ to Ç, depending on the cooking setting selected, –... -
Page 38: Operating The Hob
Operating the hob Touch Control Sensor Field To operate the Touch Control sensor field place your finger from above flat onto the required field until the appropriate displays come on or go out or the required function is carried out. Switching on the appliance The entire appliance is switched on using the ”On/Off”... -
Page 39: Switching Off The Appliance
Switching off the appliance To completely switch off the appliance, actuate the “On/Off” sensor panel I. Touch the “On/Off” sensor panel for approx. one second. After switching off a single cooking zone or the entire cooking surface, the existing residual warmth will be displayed in the digital displays of the corresponding cooking zones in the form of h (for “hot”). -
Page 40: Switching The Triple Ring Zone On And Off
Switching the triple ring zone on and off According to the size of the saucepan or frying pan, when using the tri- ple ring cooking zone you can switch from a smaller cooking zone to a larger cooking zone using the “triple ring zone” sensor panel. You can only switch to the next size if a heat setting has already been set for the smaller heating ring. -
Page 41: Switching The Casserole Zone On And Off
3. Touch the “triple ring” sensor panel to activate the outer heating ring. The upper control lamp will illuminate. 4. To switch off the outer heating ring, touch the “triple ring” sensor pan- el, and the heating ring that is outermost at the time will switch off. Switching the casserole zone on and off 1. -
Page 42: Stop+Go Function
STOP+GO function When the “Stop+Go” sensor panel is actuated all cooking zones that are switched on are simultaneously switched to the keep warm setting. The control light for the “Stop+Go” sensor panel will illuminate. The keep warm setting will be indicated in the display with u. When the “Stop+Go”... -
Page 43: Residual Heat Indicator
Residual Heat Indicator When an individual cooking zone or the entire hob is switched off, any residual heat is shown with an h (for “Hot”) in the digital display for the appropriate cooking zones. Even after the cooking zone has been switched off, the residual heat indicator only goes out when the cooking zone is cold. -
Page 44: Cooking Without The Automatic Warm Up Function
1. Touch the heat setting selector sensor panel to set the desired heat setting from ¿ to Æ. The heat setting that has been set will then be displayed. After a period of 5 seconds, the a (=automatic warm up function) will appear in the display in place of the heat setting. -
Page 45: Child Safety Lock
Child safety lock You can use the child safety lock to safeguard against unwanted use of the cooking surface. Switching on the child safety lock To be able to switch on the child safety lock the appliance must be switched on, but all the cooking zones must be switched off. 1. - Page 46 Overriding the child safety lock The child safety lock can be overridden in order to use the appliance (until the appliance is switched off again). When the appliance is switched on again the child safety device is activated once again. 1.
- Page 47 Switching off the child safety lock 1. Switch on the appliance. When the child safety device has been activated, l will be displayed. 2. Touch the sensor field for approx. three seconds. An acoustic signal will sound as confirmation. 3. Touch any heat setting sensor field The displays will become dark, and the child safety device is switched off.
-
Page 48: Timer
Timer There are two ways to use the timer: – as a safety cut-out function. Set a cooking period for a cooking zone, and after this time has elapsed the cooking zone will automati- cally switch itself off. This function can be used for more than one cooking zone simultaneously. - Page 49 2. While the control lamp is flashing rapidly, use the + or - timersetting sensor panels to set the desired period of time for this cooking zone up until the point where it automatically switches itself off (e.g. 15 minutes). The safety cut-out function will be activated after several minutes The control lamp will now flash more slowly and the remaining cooking time will be shown in the display as it elapses.
-
Page 50: Countdown Timer
Switching off the safety cut-out function before it has come to an end There are two ways to switch off the safety cut-out function before it has come to an end. Switch off the cooking zone and timer simultaneously 1. Using the heat setting selector sensor panel, reset the desired cook- ing zone to zero: the cooking zone and timer will switch themselves off. -
Page 51: Uses, Tables And Tips
Uses, Tables and Tips Pans • You can recognise good pans by their bases. The base should be as thick and flat as possible. • Pay particular attention when buying new pans to the diameter of the base. Manufacturers often give only the diameter of the upper rim. -
Page 52: Advice On Cooking With And Without Automatic Warm Up
Advice on Cooking with and without Automatic Warm up The automatic warm up function is suitable for: • dishes that start off cold, are heated up at high power and do not need to be continually watched when cooking on the selected heat setting, •... -
Page 53: Settings For Cooking On The Zones
Settings for Cooking on the Zones The figures in the following table are benchmark figures. The switch setting required for a certain cooking method depends on the quality of the pans and the type and amount of food. Automatic Switch warm up func- Cooking Examples for use... -
Page 54: Cleaning And Care
Cleaning and Care Take care! Risk of burns from residual heat. Let the appliance cool down. Warning! Sharp objects and abrasive cleaning materials will damage the appliance. Clean with water and washing up liquid. Warning! Residues from cleaning agents will damage the appliance. Remove residues with water and washing up liquid. -
Page 55: Metal Décor Strips
Metal décor strips Warning! Do not use vinegar, lemon juice or lime slaking agents on the cooking surface's décor strips, otherwise dull spots will result. When cleaning do not introduce flat objects (e.g. knives) under the dé- cor strips, as otherwise these can possibly become detached. 1. -
Page 56: What To Do If
What to do if … Rectifying faults It is possible that faults have been caused by a minor error, which you can correct yourself with the help of the following instructions. Do not attempt any further repairs if the following instructions do not help in each specific case. -
Page 57: Disposal
… after having switched off the cooking zones, no h for residual warmth is indicated in the display. Check whether – the cooking zone was only briefly used and therefore did not become hot enough. If the cooking zone is hot, please call customer service. …... -
Page 58: Installation Instructions
Installation Instructions Safety instructions The laws, ordinances, directives and standards in force in the country of use are to be followed (safety regulations, proper recycling in accord- ance with the regulations, etc.) Installation may only be carried out by a qualified electrician. The minimum distances to other appliances are to be observed. - Page 59 A device must be provided in the electrical installation which allows the appliance to be disconnected from the mains at all poles with a contact opening width of at least 3 mm. Suitable isolation devices include line protecting cut-outs, fuses (screw type fuses are to be removed from the holder), earth leakage trips and contactors.
-
Page 60: Installation Proud Of The Work Surface
Installation proud of the work surface • Clean the worktop around the cut-out area. • Stick the single-sided adhesive sealing tape provided on the under- side of the hob around the outside edge ensuring that it is not stretched. The two ends of the tape should join in the middle of one side. -
Page 61: Service
Service In the event of technical faults, please first check whether you can remedy the problem yourself with the help of the operating instruc- tions (section “What to do if…”). If you were not able to remedy the problem yourself, please contact the Customer Care Department or one of our service partners. - Page 62 Chère cliente, cher client, Veuillez lire attentivement la notice d’utilisation dans son intégralité et la conserver pour pouvoir la consulter ultérieurement. Veuillez la transmettre à l’éventuel propriétaire ultérieur de l’appareil. Les symboles suivants sont utilisés dans ce document : Consignes de sécurité Avertissement : conseils pour votre sécurité...
- Page 63 Sommaire Notice d'utilisation ......... 64 Sécurité...
-
Page 64: Notice D'utilisation
Notice d'utilisation 1 Sécurité Pour ne pas perdre le bénéfice de la garantie en cas de panne, veuillez observer ces recommandations. Cet appareil est conforme aux directives CE suivantes : – directive 73/23/CEE du 19.02.1973 basse tension – directive 89/336/CEE du 03.05.1989 relative à la compatibilité élec- tromagnétique (CEM) y compris la directive de révision 92/31/CEE –... - Page 65 Précautions d’utilisation. • Retirer les étiquettes et les films protecteurs de la vitrocéramique. • Attention aux risques de brûlures lors de l’utilisation de l’appareil. • S’assurer que les câbles d’appareils électriques n’entrent pas en con- tact avec les surfaces brûlantes de l’appareil ou les récipients brû- lants.
-
Page 66: Description De L'appareil
Description de l'appareil Equipement de la table de cuisson et de commande Zone de cuisson Zone extensible 1200W 2200W Bandeau de Bandeau de commande commande Foyer à triple zone Zone de cuisson 2300W 1800W Touche « Stop+Go » Touche « Marche/Arrêt » «... -
Page 67: Affichages Numériques
Affichages numériques Les quatre affichages numériques dont sont pourvus les zones de cuis- son indiquent : – ¾ Après la mise en marche, – u Lors de la sélection de la fonction de maintien au chaud, – ¿ à Ç, Selon le niveau de cuisson sélectionné, –... -
Page 68: Utilisation De La Table De Cuisson
Utilisation de la table de cuisson Touches sensitives Touch Control Pour commander les touches sensitives Touch Control, faites glisser vo- tre doigt de haut en bas à plat sur la touche désirée jusqu'à ce que les indicateurs correspondants s'allument ou s'éteignent ou que la fonc- tion désirée soit exécutée. -
Page 69: Mettre L'appareil À L'arrêt
Mettre l'appareil à l'arrêt Pour mettre l'ensemble de l'appareil hors service, appuyez sur la touche « Marche/Arrêt » I. Appuyez sur la touche « Marche/Arrêt » pendant environ une seconde. Lorsqu'une seule zone ou l'intégralité de la table de cuisson est mis hors service, la présence de chaleur résiduelle est signalée par l'indicateur h dans les écrans d'affichage des zones de cuisson correspondantes. -
Page 70: Mettre En Fonctionnement Et À L'arrêt Le Foyer À Triple Zone
Mettre en fonctionnement et à l'arrêt le foyer à triple zone Il est possible, selon la taille du récipient, de sélectionner une zone dif- férente sur ce foyer. Les zones intermédiaire et extérieure ne peuvent être activées que si un niveau de cuisson a préalablement été... -
Page 71: Mettre En Fonctionnement Et À L'arrêt La Zone De Cuisson Extensible
3. Appuyez de nouveau sur la touche « foyer à triple zone » pour activer la zone extérieure. Le voyant de contrôle supérieur s'allume. 4. Pour éteindre la zone extérieure, appuyez sur la touche « foyer à triple zone » " et la zone extérieure correspondante s'éteint. Mettre en fonctionnement et à... -
Page 72: Fonction Stop+Go
Fonction Stop+Go Lorsque l’on actionne la touche « Stop+Go », ", toutes les zones de cuis- son actives basculent simultanément sur la position de maintien au chaud. Le voyant de contrôle de la touche « Stop+Go » s'allume. La po- sition de maintien au chaud s'affiche sur le bandeau de commande u. -
Page 73: Indicateur De Chaleur Restante
Indicateur de chaleur restante Après avoir mis à l'arrêt une zone de cuisson ou l'ensem- ble de la table de cuisson, la présence de chaleur rési- duelle est signalée par un h dans l'écran d'affichage lorsque la surface de la zone de cuisson respective est assez chaude pour constituer un danger de brûlure.. -
Page 74: Cuisson Avec La Fonction De Saisie Automatique
Cuisson avec la fonction de saisie automatique Les zones de cuisson de la table sont réglables sur neuf niveaux de cuis- son et sont équipées d'une fonction de saisie automatique. : – ¿, niveau de cuisson minimum – Ç, niveau de cuisson maximum –... -
Page 75: Cuisson Sans La Fonction De Saisie Automatique
Cuisson sans la fonction de saisie automatique Pour utiliser une zone de cuisson sans la fonction de saisie automati- que, sélectionnez le niveau de cuisson désiré à l'aide de la touche de sé- lection 1. Après avoir mis l'appareil en fonctionnement et sélectionné la zone de cuisson souhaitée avec les touches de sélection des zones de cuisson, appuyez sur la touche de sélection pour sélectionner un niveau de... -
Page 76: Sécurité Enfants
Sécurité enfants La sécurité enfants permet d'éviter l'utilisation non autorisée de la ta- ble de cuisson. Activation de la sécurité enfants L'activation de la sécurité enfants suppose que l'appareil soit en fonc- tionnement. En revanche aucune zone de cuisson ne doit fonctionner. 1. - Page 77 Brider la sécurité enfants Pour une unique utilisation de l’appareil (jusqu’à la désactivation), il est possible de brider la sécurité enfants. Lors de la prochaine mise en mar- che de l’appareil, la sécurité enfants est de nouveau automatiquement activée. 1. Mettre l’appareil en marche. Le symbole l s’affiche si la sécurité...
- Page 78 Désactiver la sécurité enfants 1. Mettez l'appareil en fonctionnement. Le symbole l s’affiche si la sécurité enfants est active. 2. Appuyez sur la touche pendant environ trois secondes. Un signal sonore confirme la manipulation. 3. Appuyez sur la touche d'une zone de cuisson.. Les voyants s’éteignent, la sécurité...
-
Page 79: Minuteur
Minuteur Le minuteur est doté de deux fonctions : : – une fonction de déconnexion automatique Lorsque la durée de cuisson sélectionnée pour une zone de cuisson est écoulée, celle-ci s’éteint automatiquement. Cette fonction peut s’appliquer simultané- ment à plusieurs zones de cuisson. –... - Page 80 2. Tandis que le voyant de contrôle clignote rapidement, appuyez sur les touches de réglage Minuteur + et - pour sélectionner la durée après laquelle cette zone de cuisson se déconnectera automatiquement (par exemple 15 minutes).. Au bout de quelques secondes, la déconnexion automatique est activée Le voyant de contrôle clignote maintenant plus lentement et le temps de cuisson restant s'affiche sur le bandeau de commande.
- Page 81 Anticiper la désactivation de la déconnexion auto- matique Il existe deux manières d’anticiper la déconnexion automatique : En déconnectant simultanément la zone de cuisson et le minuteur 1. A l'aide des touches de réglage du niveau de cuisson , affichez 0 pour la zone de cuisson souhaitée: la zone de cuisson et le minuteur se déconnectent.
-
Page 82: Application, Tableaux, Conseils
Application, tableaux, conseils Récipients de cuisson • Vous reconnaissez les bonnes batteries de cuisine au fond des casse- roles. Le fond doit être aussi épais et aussi plan que possible. • Faites attention au diamètre du fond du récipient lors de l'achat de nouvelles casseroles et poêles. -
Page 83: Cuisson Pour Cuire Avec Et Sans La Fonction De Saisie Automatique
Cuisson pour cuire avec et sans la fonction de saisie automatique La fonction de saisie automatique de la cuisson convient pour: • les aliments froids qui sont chauffés à forte puissance et qui n'ont pas besoin d'être surveillés pendant qu'ils mijotent, •... -
Page 84: Valeurs Indicatives De Cuisson
Valeurs indicatives de cuisson Les valeurs indiquées dans le tableau suivant sont indicatives. Les puis- sances recommandées dans ce tableau pour la cuisson dépendent de la nature du récipient et, du type et du volume des aliments à cuire Durée de cuisson en Type de cuis- Puissance... -
Page 85: Nettoyage Et Entretien
Nettoyage et entretien Attention ! Risque de brûlure dû à la chaleur résiduelle. Laissez refroidir l’appareil. Attention ! Les produits de nettoyage agressifs ou abrasifs endomma- gent l’appareil. Nettoyez l’appareil avec de l’eau et de la lessive. Attention ! Les restes de produits de nettoyage endommagent l’appa- reil. -
Page 86: Bandes Décoratives En Métal
Même s’il n’est plus possible de faire disparaître les égratignures ou les taches sombres sur la vitrocéramique, cela n’a aucune influence sur le fonctionnement de l’appareil. Bandes décoratives en métal Attention ! Ne pas utiliser du vinaigre, du citron ou de produit antical- caire sur les bandes décoratives en métal au risque de provoquer des ta- ches mates. - Page 87 – la zone de cuisson adéquate est activée, – les zones de cuisson sont réglées au niveau de cuisson souhaité, – la déconnexion de sécurité des zones de cuisson est désactivée (voir chapitre « sécurité »)..il est impossible de mettre en fonctionnement les zones de cuis- son ? Vérifier si –...
-
Page 88: Protection De L'environnement
... l'appareil ne réagit pas à la mise en fonctionnement d'une zone de commande ? L’appareil ne réagit pas à l’activation d’une zone de commande si vous avez simultanément touché une autre zone de commande non prévue pour une combinaison. En cas de dérangement Faites appel au service après vente de votre magasin vendeur. -
Page 89: Instructions D'installation
Instructions d'installation Sécurité L’utilisateur est tenu de respecter la législation, la réglementation, les lignes directrices et les normes en vigueur dans son pays de résidence (dispositions relatives à la sécurité, recylage conforme et réglementaire, etc.). Le montage relève de la compétence exclusive de spécialistes. Respectez l’espacement minimal requis par rapport aux autres appa- reils. -
Page 90: Montage Par Applique
Au niveau de l'installation électrique, prévoir un dispositif qui permette de couper cet appareil du secteur sur tous les pôles avec une ouverture des contacts d'au moins 3 mm. Des dispositifs de protection appropriés sont par exemple les disjonc- teurs, les fusibles (les fusibles vissés doivent être retirés de leur socle), les disjoncteurs différentiels et les contacteurs. -
Page 91: Service Après-Vente
Service après-vente En cas de problèmes techniques, vérifiez d’abord s’il ne vous est pas possible de réparer vous-même le dysfonctionnement à l’aide de la no- tice d’utilisation (chapitre „Que faire, si...“). Si vous ne parvenez pas à réparer le dysfonctionnement, veuillez con- tacter notre Consumer Services. -
Page 92: Montage
Assembly / Montage... - Page 95 Typenschild / Rating Plate / Plaque signalétique...
- Page 96 USD 14 billion in more than 150 countries around the world. AEG Hausgeräte GmbH Postfach 1036 D-90327 Nürnberg http://www.aeg.hausgeraete.de © Copyright by AEG Änderungen vorbehalten Subject to change without notice 822 925 124-A-041104-01 Sous réserve de modifications...