AEG ARCTIS Operating Instructions Manual
Electronic freezer
Hide thumbs
Also See for ARCTIS:
- Operating instructions manual (36 pages) ,
- Operating instructions & installation manual (28 pages) ,
- User manual (24 pages)

Subscribe to Our Youtube Channel
Related Manuals for AEG ARCTIS


Summary of Contents for AEG ARCTIS
- Page 1 ARCTIS Electronic Freezer Electronische diepvrieskasten Congeladores electrónicos Operating Instructions Gebruiksaanwijzing Instrucciones para el uso...
- Page 2 Dear customer, Before placing your new refrigerator into operation please read these operating instructions carefully. They contain important information for safe use, for installation and for care of the appliance. Please keep these operating instructions for future reference. Pass them on to possible new owners of the appliance.
-
Page 3: Table Of Contents
Contents Safety ............Disposal . - Page 4 Contents Control and Information System ....... . 23 “Open door” warning ..........23 Temperature Warning .
-
Page 5: Safety
Safety The safety of our freezers is in accordance with recognised technolo- gical standards and appliance safety legislation. We nevertheless feel that it is important to acquaint you with the following safety guidelines: Use for Intended Purpose • The freezer is intended for household use. It is suited for the freezing and frozen storage of foods as well as the preparation of ice. - Page 6 Safety • Children often do not recognise the dangers involved with household appliances. Please provide for the necessary supervision and do not allow children to play with the appliance! Daily Operation • Containers with flammable gases or fluids can develop leaks through contact with the cold.
-
Page 7: Disposal
tions in this section are not sufficient, do not undertake any further work on your own. • Feezers may only be repaired by trained personnel. Repairs carried out by untrained personnel can lead to substantial danger. Please contact your dealer or our customer service department for repairs. Disposal Appliance Packaging Information All materials are environmentally sound! They can be dumped or bur-... -
Page 8: Appliance Transport
Appliance Transport Two persons are required for transport of the appliance. There are two recessed handles at the front of the base and at the back of the appliance at the top for improved gripping. 1. Pull the plinth cover forwards to remove (see P. 14, „Reversing the door“, Item 1). -
Page 9: Remove Transport Safeguard
Remove transport safeguard The appliance as well as interior accessory parts are safeguarded for transport. 1. Remove tape from left and right of the outside of the door. Tape remnants can be removed with benzene. Wipe off benzene. 2. Remove all tape and pads from the interior of the appliance. 3. -
Page 10: Installation
Installation Installation Location The appliance should be set up in a well ventilated, dry room. The base- ment is an ideal set-up location for freezers. Energy use and efficient performance of the appliance is affected by the ambient temperature. The appliance should therefore –... -
Page 11: The Freezer Needs Ventilation
Installation The freezer needs ventilation Air is fed under the door through the vent slots in the base and is exhausted upwards along the back wall. To ensure proper air cir- culation never cover or alter the vent ope- nings. Attention! If the appliance is installed under, for example, a hanging cabinet, a clearance of at least 10 cm between the top of the... - Page 12 Installation Electrical Connection (valid for United Kingdom only) Any electrical work required to install this appliance should be carried out by a qualified electrician or competent person. WARNING – THIS APPLIANCE MUST BE EARTHED The manufacturer declines any liability should these safety measures not be observed.
-
Page 13: Opening The Door
Opening the door If the door is closed when the appliance is in operation, it cannot be immediately opened again, because a vacuum occurs which holds the door closed until pressure has been equalised. The door can be opened again after several minutes. If your appliance is equipped with a QUICK door opener - an opening mechanism integra-... -
Page 14: Reversing The Door
Reversing the Door The side at which the door opens can be changed from the right side (factory adjustment) to the left side, if the installation site requires. Warning! When changing the side at which the door opens, the appliance may not be connected to the mains. Remove plug from the mains beforehand. -
Page 15: Door Alignment
7. Place washer (B) between door and door pivot at bottom left, and turn pivot pin (A) into lower door pivot at the left. 8. Reposition door handle and hole plug-pins as shown in the dia- gram. 9. Replace base cover. Door Alignment If necessary, the appliance door can be aligned. -
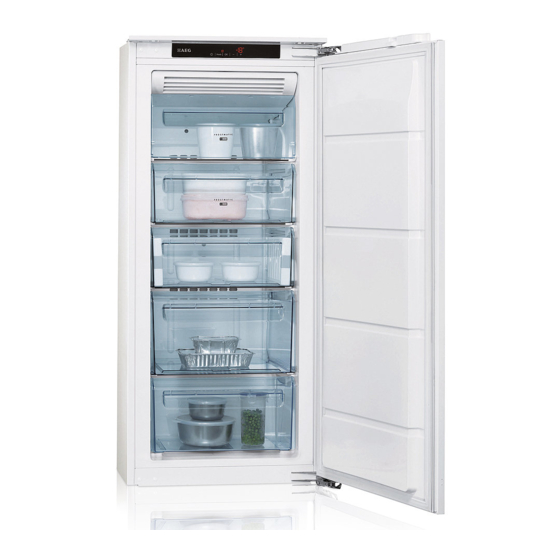
Page 16: Appliance Description
Appliance Description View of Appliance (various models) Control panel Freezer tray Freezer compartment with lid (for storage and freezing) Freezer drawers (for storage and freezing) ã Drawer (for storage only) When defrosting, the bottom drawer serves as a water collecting vessel. -
Page 17: Interior Illumination
Appliance Description Interior Illumination The illumination switches on automatically when the appliance door is opened. By closing the appliance door it is automatically switched off. If the appliance door remains open for more than 10 minutes, the interior illumination switches off automatically in order to save energy. If directly after opening the door the interior illumination is not glowing although the appliance is in operation (recognisable through the green mains control indicator), the lamp is defective. -
Page 18: Control Panel
Appliance Description Control Panel 1 Stand-by display (green) 2 ON/OFF button 3 Buttons for adjusting the temperature (for warmer temperatures) 4 Temperature Display 5 Buttons for adjusting the temperature (for colder temperatures) 6 Stand-by display for FROSTMATIC function (yellow) 7 FROSTMATIC button for fast freezing 8 Warning Display (red) 9 WARNING OFF button (see section: "Control and Information Systems") -
Page 19: Temperature Display
Appliance Description DESIRED temperature means: The temperature that is required in the freezer compartment, this can be adjusted to the temperatures shown in the display. The DESIRED temperature is indicated by flashing numbers. ACTUAL temperature means: The temperature display indicates the temperature that is currently present in the freezer compartment. -
Page 20: Prior To Initial Start-Up
Prior to Initial Start-Up 1. Please clean the appliance interior and all accessories prior to initial start-up (see section: "Cleaning and Maintenance"). 2. Remove both ice packs from the freezer tray, if they are included with your model. 3. Place the ice packs into a compartment or drawer only after the opti- mal storage temperature of -18°C has been reached, and allow to freeze. -
Page 21: Temperature Adjustment
Temperature Adjustment 1. Press either the „+“ (WARMER) or „-“ (COLDER) button. The temperature display switches over and the DESIRED temperature currently set flashes on the temperature display. 2. To adjust to a warmer temperature, press the „+“ (WARMER) button. To adjust to a colder temperature, press the „-“... -
Page 22: Switching The Appliance Off
Switching the Appliance Off In order to protect frozen goods, the appliance is guarded against accidental switching off (child-proof). 1. To switch off, hold down the ON/OFF button for approx. 5 seconds. This will result in a countdown from "3" to "1" taking place in the tempera- ture display. -
Page 23: Control And Information System
Control and Information System The control and information system comprises a temperature display, an optical warning light and an acoustic warning device. The system warns: – open appliance door; – if the temperature in the freezer compartment is too warm; –... -
Page 24: Partial/Complete Thaw Warning
Control and Information System Partial/complete thaw warning If frozen food has been partially or completely thawed (e.g., during a temporary power failure) the red warning indicator will flash. In addition, if the WARNING OFF button is activated the temperature display will show the warmest temperature the frozen food has reached once the power supply has been reinstated. -
Page 25: Freezing
Freezing Except for the bottom drawer, which serves for storage purposes, all compartments and drawers are suited for freezing. Attention! • Before foods are frozen, the actual temperature in the freezer com- partment must be -18°C or colder. • Please observe indicated freezing capacity on the rating plate. The freezing capacity represents the maximum amount of fresh goods that can be frozen within 24 hours. -
Page 26: Frozen Storage
• Press air out of bags and wraps before sealing, because air encoura- ges drying of frozen goods. • Make flat packages, because these freeze more quickly. • Do not fill cans for frozen goods to the brim with liquid or paste-like goods, because liquids expand during freezing. -
Page 27: Storage Goods Symbols/Freezing Calendar
Storage Goods Symbols/Freezing Calendar (not included with all models) • The symbols on the compart- ment flaps and drawers show different types of frozen goods. • The numbers indicate storage times in months for the appropriate types of frozen goods. Whether the upper or lower value of the indi- cated storage time is valid depends on the quality of the foods and pre-treating before freezing. -
Page 28: Defrosting
Defrosting Moisture is precipitated in the form of white frost during operation and when the door is open, especially on the evaporators. Remove this white frost from time to time with a soft plastic scraper, e.g. a dough scraper. Do not under any circumstances use hard or pointed objects for this purpose. -
Page 29: Cleaning And Maintenance
Cleaning and Maintenance For hygienic reasons the appliance interior, including interior accesso- ries, should be cleaned regularly. Warning! • The appliance may not be connected to the mains during cleaning. Danger of electrical shock! Before cleaning switch the appliance off and remove the plug from the mains, or switch off or turn out the circuit breaker or fuse. -
Page 30: Energy Saving Tips
Energy Saving Tips • Do not install the appliance near cookers, radiators or other sources of warmth. High ambient temperatures cause longer, more frequent operation of the compressor. • Ensure sufficient air circulation and exhaust at the appliance base and at the back wall of the appliance. Never cover air vent openings. •... -
Page 31: What To Do If
What to do if ... Correcting Malfunctions Perhaps a malfunction has been caused by a minor error, which you can correct yourself with the help of the following instructions. Do not attempt any further repairs if the following instructions do not help in each specific case. - Page 32 What to do if ... Symptom Possible cause Solution Interior illumination does Please refer in this chapter Light bulb is defective. not function. under "Replace light bulb" . Temperature is not properly Please refer to the section adjusted. "Temperature Adjustment". Door was open for a long Only leave the door open time.
-
Page 33: Replace Light Bulb
Replace light bulb Warning! Danger of electrical shock! Before replacing the light bulb switch appliance off and remove the mains plug, or switch off or turn out the circuit breaker or fuse. Light bulb specifications: 220-240 V, max. 15 W, socket: E 14 1. -
Page 34: Regulations, Standards, Guidelines
Regulations, Standards, Guidelines This appliance was designed for household use and was manufactured in accordance with the appropriate standards. The necessary measures in accordance with appliance safety legislation regulations (GSG), acci- dent prevention regulations for refrigeration appliances (VBG 20) and the regulations of the German Society of Electrical Engineers (VDE) were observed in the manufacture of this appliance. -
Page 35: Customer Service
Customer Service If you cannot find the remedy for a malfunction in these operating instructions, please contact your dealer or our customer service depart- ment. Addresses and telephone numbers are listed in the accompanying booklet "Guarantee Conditions/Customer Service Locations". Selective ordering of replacement parts can save unnecessary travel and costs. - Page 36 AEG Hausgeräte GmbH Postfach 1036 D-90327 Nürnberg http://www.aeg.hausgeraete.de © Copyright by AEG 822 941 144 –01- 0401...
Need help?
Do you have a question about the ARCTIS and is the answer not in the manual?
Questions and answers