Table of Contents
Advertisement
Advertisement
Table of Contents

Related Manuals for Pfaff powerquilter 16.0


Summary of Contents for Pfaff powerquilter 16.0
- Page 1 Owner’s manual...
- Page 2 With that in mind, we invite you to visit our website at www.pfaff.com to learn more about the art of quilting through classes and events held around the world. Plus, you will find tips, tricks and inspiration on a variety of quilting topics including the basics of setting up your machine and loading a quilt.
- Page 3 IMPORTANT INFORMATION: REGULATIONS Federal Communications Commissions (FCC) Declaration of Conformity (For USA Only) Responsible Party: SVP Worldwide 1224 Heil Quaker Blvd LaVergne, TN 37086 USA declares that the product powerquilter ™ Product Name: 16.0 complies with Part 15 of the FCC Rules. Operation is subject to the following two conditions: (1) this device may not cause harmful interference, and (2) this device must accept any interference received, including interference that may cause undesired operation.
-
Page 4: Important Safety Instructions
Important Safety Instructions Read all instructions before using When using this machine, basic safety precautions should always be taken, including the following: DANGER - To reduce the risk of electric shock: • A quilting machine should never be left unattended when plugged in. Always unplug the machine from the electrical outlet immediately after using and before cleaning. - Page 5 If the machine breaks down or needs adjustment, first check the troubleshooting chart in the appendix to inspect and adjust the machine yourself. For more product information and updates, visit our website at www.pfaff.com. We reserve the right to change the machine equipment and the assortment of accessories without prior notice, or make modifications to the performance or design.
- Page 6 For Users in the UK, Eire, Malta and Cyprus Only If this machine is fitted with a three-pin non-rewireable BS plug then please read the following. IMPORTANT If the available socket outlet is not suitable for the plug supplied with this equipment, it should be cut off and an appropriate three pin plug fitted.
- Page 7 Grounding GROUNDED OUTLET BOXES TAB FOR METAL GROUNDING SCREW SCREW GROUNDING PIN ADAPTER Figure 1 This product is for use on a nominal 120 V or nominal 220 V circuit, and has a grounding plug that looks like the plug illustrated in sketch A in Figure 1. A temporary adapter, which looks like the adapter illustrated in sketches B and C, may be used to connect this plug to a 2-pole receptacle as shown in sketch B if a properly grounded outlet is not available.
-
Page 8: Table Of Contents
Table of Contents Safety Section Quick Facts Components (Front Side View) Components (Back Side View) Components (Rear and Front Views) Included Accessories Setting Up the Table Placing Machine in Table Installing Power Cord Installing Foot Pedal Installing Thread Stand Installing Color Touch-Screen Inserting Needle Needle/Thread Selection Guide Adjusting Hopping Foot... -
Page 9: Safety Section
Safety Section Quick Facts This device complies with Part 15 of the FCC Rules. powerquilter ™ quilting machine utilizes high- 16.0 Operation is subject to the following two conditions: tech electronics and an innovative touch-pad user (1) This device may not cause harmful interference, interface to offer greater functionality and ease of and (2) this device must accept any interference operation to home quilters than ever before conceived... -
Page 10: Components (Rear And Front Views)
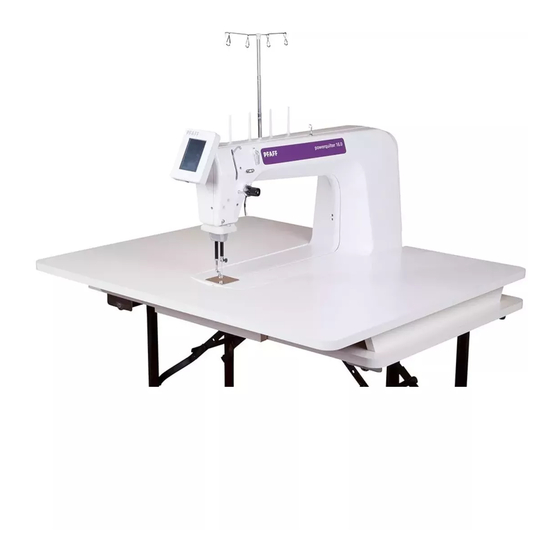
powerquilter ™ 16.0 Quilting Machine Components Front Side View Figure 1 Thread Stand Thread Guide A Three-Hole Thread Guide B Thread Guide C Top Thread Tension Assembly Stirrup Thread Guide E Take-Up Lever Thread Guide F Front Casing/Frame 10. Hand Wheel Page 10... -
Page 11: Back Side View
Back Side View 18. Back Casing/Frame 11. Needle Bar 19. Color Touch-Screen Display Connector 12. Needle Bar Thread Guide 20. Threaded Horizontal Spool Pin Mounting Hole 13. Needle 14. Hopping Foot 15. Needle Plate 16. Needle Clamp Screw 17. Front Display DETAIL H DETAIL H SCALE 1 : 2... -
Page 12: Rear And Front Views
Rear and Front Views Included Accessories 21. On/Off Switch 4 M-Class Bobbins 22. Power Cord Connector INSPIRA® Needles Size 16 23. Foot Pedal Connector Bobbin Case Screwdriver 24. Spool Pins Lint Brush 25. Thread Stand Pen Oiler 26. Bobbin Assembly Power Cord 27. -
Page 13: Setting Up The Table
Setting Up the Table (and Taking it Installing the Power Cord Down for Storage) quilting machine table has powerquilter ™ 16.0 been designed to accommodate the powerquilter ™ 16.0 machine. It has folding legs that are height-adjustable and is heavy enough to provide stabilization for quilting at high speeds. -
Page 14: Installing The Thread Stand
Installing the Color Touch-Screen Installing the Thread Stand Figure 6 The color touch-screen comes pre-installed on its mounting bracket and should have one end of the D cable attached to the back of the touch-screen (see Figure 6). Note: Confirm that the power is turned off before installing the Color Touch-Screen. -
Page 15: Needle/Thread Selection Guide
Inserting (or changing) the Needle Note: Changing the needle is recommended for each new quilt loaded on the machine or any time the needle becomes bent, dull or burred. Needles are inexpensive and are important to the success of your project. Plan to change needles every 5-7 hours of quilting or more often if working with a lot of fusibles or heavy materials. -
Page 16: Threading The Machine
Threading the Machine Figure 8 1. Place a cone or spool of thread on the spool pin. If using a spool, make sure that the slits on the spool DETAIL D are against the base of the spool pin holder. Pass the SCALE 1 : 2 thread through the thread-stand eyelet from back to front, continuing to thread guide A. - Page 17 3. Thread continues through thread guide C, and then down to the tension assembly (see Figure 10). Note: It is important that the thread is “flossed” up between the two tension discs. If the thread is not firmly in place between the two tension discs, the thread rests on the outside of the tension discs (without tension) and looping on fabric or thread nests may occur.
-
Page 18: Bobbin And Thread Tension Adjustments
Bobbin and Thread Tension Adjustments Inserting the Bobbin Note: Turn off the power switch while inserting the bobbin case or anytime your hands are near the needle area. TENSION SPRING Figure 13 Figure 11 1. Place the bobbin in the bobbin case so that the thread pulls off clockwise when viewing the open side (Figure 11). -
Page 19: Top Thread Tension Adjustment
Drawing the Bobbin Thread to the Top of the Quilt 1. After threading the machine, plug it in and turn on the power. Place quilt sandwich under hopping foot. 2. While firmly holding the tail of the needle thread with the left hand, choose one of the following methods to cycle the needle through one full rotation to bring the bobbin thread to the top of the quilt. -
Page 20: Maintenance
Loosen Top Thread Tension To loosen the tension, turn the top thread tension knob (page 10, Figure 1, #5) counter-clockwise. NOTE: Before adjusting the top tension, remember to floss or pull the top thread up into the tension discs or it will float outside the discs providing little or no top tension. -
Page 21: Using The Touch-Screen Displays
Using the Touch Screen Displays Display Menus quilting machine has a color powerquilter ™ 16.0 Pedal touch-screen display on the front of the machine. Set- tings are changed using this display. 25 % Main Screen Button Functions (Figure 18) Pedal Status The status of the foot pedal connection is displayed in the top left corner of the Main screen (Figure 18). - Page 22 87 % The second feature of the Limit box are three buttons called Presets that can be customized to your favorite 54 % 87 % speed settings (Figure 21). Pressing a Preset button will change the “My Speed” setting to the speed shown on that button.
-
Page 23: System Information
More Menu (Figure 25) More The More screen allows access to other functions available on the quilting machine. powerquilter ™ 16.0 Presets (Figure 25) Presets Options Press the “Presets” button to adjust the three available speed presets. Diagnostics Options Pressing the “Options” button will open a screen that allows adjustment of the sound volume and the LED System Information Light Ring brightness. - Page 24 “beep” or no “beep” at all, this indicates at all as you rotate the a failed test and the machine should be inspected by a hand wheel. quali fied PFAFF® repair technician. Back Main Press the “Main” button to return to the “Main” menu Figure 28 screen or the “Back”...
- Page 25 Failing Test failed test and the machine should be inspected by a No beep or solid beep as qualified PFAFF® repair technician. you rotate the hand wheel one full revolution. Press the “Main” button to return to the “Main” menu screen or the “Back”...
- Page 26 PFAFF® Representative. (Figure 32) Press the “Main” button to return to the “Main” menu screen or the “Back” button to return to the “More”...
- Page 27 Presets Screen Presets Pressing the Presets button will take you to a screen that allows you to customize the preset button speed settings (Figure 34). There is a “+” and “-” button for each of the three presets and a blue box that displays 87 % the current setting.
-
Page 28: Getting Started Quilting
Getting Started Quilting Thread Requirements When quilting, relax your hands and maintain a light touch on the fabric. Gripping the fabric too tightly may cause body tension resulting in poor quilting quality Threads have a tendency to dry rot over a period of and discomfort. -
Page 29: Correcting Common Issues
Correcting Common Issues Skipped Stitches Corrective Measure • The needle is damaged, dull, • Replace the needle often, normally once or twice per day for continuous bent, or installed improperly quilting or at least once per quilt. Use quilting machine powerquilter ™... - Page 30 Correcting Common Issues Stitch Quality is Poor Corrective Measure • Tension is not balanced • Adjust the tension of the needle thread after ensuring the bobbin tension is adjusted correctly (see pages 19-20). • Bobbin case is damaged, • Since thread slides over the surface of the bobbin case at a high speed, corroded, dirty, et cetera make sure the case is free of any lint or foreign matter that could impede thread passage through the machine.
- Page 31 • Wrong type of needle • Use needles recommended by PFAFF®. Using the wrong needle with a smaller shank diameter causes many problems. For example a system 1738 or 287WH needle with a shank diameter of 1.64mm will fit loosely into the clamp at an angle.
-
Page 32: Optional Accessories
Adding two extensions fed from a vertical spool. will expand the original table to a full six feet in width (one extension shown above). TruStitch™ Stitch Regulator for PFAFF® INSPIRA Table Overlay ® Figure 36... -
Page 33: Register Your Powerquilter ™ 16.0 Quilting Machine
They can take this product for environmental safe recycling. CE - Authorised Representative VSM Group AB, SVP Worldwide Drottninggatan 2, SE-56184, Huskvarna, SWEDEN PFAFF, POWERQUILTER INSPIRA and PERFECTION STARTS HERE are trademarks of KSIN Luxembourg II, S.ar.l. ©2013 KSIN Luxembourg II, S.ar.l. All rights reserved. Page 33... - Page 34 ©2013 KSIN Luxembourg II, S.ar.l. All rights reserved.